22
Repeat for 1 more Assembly
Hardware:
G1
‐
5/16
x
1½
Hex
Bolt
Inner
Beam
‐
Y50000
‐
488
Hardware:
LS8
‐
5/16
x
3"
Lag
Screw
S4
‐
#8
x
3"
Wood
Screw
Front
Beam
‐
Y50000
‐
489
52"
From
Splice
to
End
of
Beam
PG 11
Repeat for 1 more Assembly
Hardware:
G1
‐
5/16
x
1½
Hex
Bolt
Inner
Beam
‐
Y50000
‐
488
Hardware:
LS8
‐
5/16
x
3"
Lag
Screw
S4
‐
#8
x
3"
Wood
Screw
Front
Beam
‐
Y50000
‐
489
52"
From
Splice
to
End
of
Beam
PG 11
Repeat for 1 more Assembly
Hardware:
G1
‐
5/16
x
1½
Hex
Bolt
Inner
Beam
‐
Y50000
‐
488
Hardware:
LS8
‐
5/16
x
3"
Lag
Screw
S4
‐
#8
x
3"
Wood
Screw
Front
Beam
‐
Y50000
‐
489
52"
From
Splice
to
End
of
Beam
PG 11
Hardware
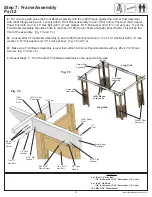
Step 8: Beam Assembly - Inner Beam
A:
Interlock the cut-outs on two (488) Inner Beams then attach with four 5/16 x 1-1/2” Hex Bolts (with 5/16” lock
washer,
5/16” flat washer and 5/16” t-nut). (fig. 8.1 and 8.2)
B:
Place one (026) Splice on top of (488) Inner Beams with long side facing down, 52” from the end of one beam
then using a 1/8” drill bit pre-drill a hole using the countersunk holes as a guide and attach with two 5/16 x 3” Lag
Screws (with
5/16” flat washer
) and four #8 x 3” Wood Screws. Turn (488) Inner Beams over and repeat for other
side. (fig. 8.1 and 8.3
)
C:
Repeat Steps A and B to create a second Inner Beam Assembly.
(fig. 8.1, 8.2 and 8.3)
(026) Splice
(488)
Inner
Beam
#8 x 3” Wood Screw
x 4 per (026) Splice
1/4 - 5/16”
Large Washer
(488) Inner
Beam
5/16 x 3” Lag Screw
x 2 per (026) Splice
Fig. 8.3
8 x 5/16 x 3” Lag Screw (
5/16” flat washer
)
8 x 5/16 x 1-1/2” Hex Bolt
(5/16” lock washer,
5/16” flat washer
, 5/16” t-nut)
16 x #8 x 3” Wood Screws
4 x (488) Inner Beam
4 x (026) Splice
Wood Parts
5/16 x1-1/2”
Hex Bolt x 4
5/16” Flat
Washer
5/16” T-nut
5/16” Lock
Washer
(026) Splice
52”
(488) Inner Beam
(488) Inner Beam
Fig. 8.1
Fig. 8.2
Содержание MADISON YM11783X
Страница 44: ...44 support yardistrystructures com NOTES...
Страница 45: ...45 support yardistrystructures com NOTES...


