background image

11

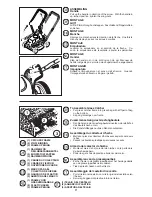
ASSEMBLING

Handle

Pull up the handle in direction of the arrow.  With the handle in 

up-turned position, tighten the wing-nuts.

MONTAGE

Griff

Griff in Pfeilrichtung hochklappen.  Anschließend Flügelmuttern 

anziehen.

MONTAGE

Manche

Déployez le manche dans la direction de la flèche.  Une fois le 

manche déployé, serrez les écrous à oreilles.

MONTAJE

Empuñadura

Levantar le empuãdura en el sentido de la flecha.  Cu-

ando la empuãdura esté levantada, apretar las palomillas.

MONTAGE

Hendel

Klap de hendel om, in de richting van de pijl. Wanneer de 

hendel omgeklapt is, worden de veugelmoeren aangedraaid.

MONTAGGIO

Impugnatura

Sollevare l'impugnatura nel senso dell afreccia.  Quando 

l'impugnatura è sollevato, stringere i galletti.

2

1

3

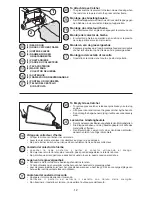
(1) CATCHER FRAME  

(2)  VINYL  BINDING                                                  

(3) FRAME OPENING
(1) RAHMEN FÜR

      DEN.GRASFANGBEUTEL 

(2)  KUNSTSTOFFKAPPEN                                              

(3) RAHMENÖFFNUNG
(1)  CADRE  DU  COLLECTEUR                                          

(2) CRANS DE FIXATION 

(3) OUVERTURE DU CADRE
(1) MARCO PARA EL

      COLECTOR DE HIERBA 

(2) GANCHOS DE PLASTICO   

(3) ABERTURA DEL MARCO
(1) FRAME VOOR

      GRASVERGAARBAK                       

(2)  PLASTIC  HAKEN                                               

(3) FRAME-OPENING

To Assemble Grass Catcher

•  Put grass catcher frame into grass bag with stiff part of bag 

on the bottom.

•  Slip vinyl bindings over frame.  

Zusammensetzung des Grasfangbeutels

•  Den Rahmen in den Grasfangbeutel einsetzen; der steife Teil 

des Beutels nach unten.

•  Die Kunststoffkappen auf den Rahmen aufsetzen.

Assemblage du collecteur d'herbe

•  Mettez en place le collecteur d'herbe avec sa partie dure vers 

le bas.

•  Passez les fixations plastiques par dessus le cadre.

Armado del colector de hierba

•  Montar el marco en el colector de hierba con la parte dura 

de éste hacia abajo.

•  Poner los ganchos de plástico alrededor del marco. 

Assembleren van de grasvergaarbak

•  Zet het frame in de grasvergaarbak met het harde gedeelte 

van de grasvergaarbak naar onderen.

•  Trek de plastic haken over het frame. 

Assemblaggio del cestello di raccolta

•  Porre il telaio nel cestello, con il lato rigido del cestello verso 

il basso.

•  Serrare gli agganci di plastica intorno al telaio.

(1)  TELAIO  DEL  CESTELLO                                     

(2)  AGGANCI  DI  PLASTICA                                       

(3) APERTURA DEL TELAIO

Содержание YP56-675DWA

Страница 1: ...understand them before using this machine Anleitungshandbuch Bitte lesen Sie diese Anleitungen sorg f ltig durch und vergewissern Sie sich da Sie diese verstehen bevor Sie die Maschine in Betrieb nehm...

Страница 2: ...IO 11 12 REGOLAZIONE 12 14 AVVIAMENTO ED ARRESTO 15 16 USO DELLA FALCIATRICE 16 17 MANUTENZIONE 17 19 INFORMAZIONI GENERICHE 20 CONTENTS SAFETY RULES PAGE 3 8 TECHNICAL DATA 9 OVERVIEW 10 ASSEMBLY 11...

Страница 3: ...onal injury Disengage all blade and drive clutches before starting the engine Start the engine or switch on the motor carefully ac cording to instructions and with feet well away from the blade Do not...

Страница 4: ...der Maschine alle Blockierungen der Klingen und des Antriebs l sen Beim Starten der Maschine und Einschalten des Motors vorsichtig vorgehen Halten Sie sich an die Gebrauchsan leitung und achten Sie d...

Страница 5: ...en place Conserverler gimederotationdumoteuretnejamais le faire fonctionner au dessus de son r gime nominal car cela peut tre dangereux D brayer toutes les lames et actionner l embrayage avant de mett...

Страница 6: ...or el silenciador el comportamiento de la bater a limpios de c sped hojas y de demasiado grasa Verifique frecuentemente el recogedor del c sped para ver si hay uso o deterioraci n Para la seguridad re...

Страница 7: ...een overmaat aan smeervet Controleerdeopvangzakvaakopslijtageofverwering Vervang versleten of beschadigde onderdelen om veiligheidsredenen Als de brandstoftank afgetapt moet worden moet dit buiten wo...

Страница 8: ...e lame e le frizioni prima di avviare il motore Avviare o accendere il motore ponendo molta at tenzione attenendosi alle istruzioni e con i piedi ben lontani della lame Non inclinare mai la macchina a...

Страница 9: ...ans les publications fournies avec le produit Ap prenez comprendre la signification de ces symboles Estos s mbolos pueden aparecer sobre su unidad o en la literatura proporcionada con el producto Apre...

Страница 10: ...10 5 2 3 1 9 4 6 7...
Страница 11: ...HIERBA 2 GANCHOS DE PLASTICO 3 ABERTURA DEL MARCO 1 FRAME VOOR GRASVERGAARBAK 2 PLASTIC HAKEN 3 FRAME OPENING To Assemble Grass Catcher Put grass catcher frame into grass bag with stiff part of bag on...

Страница 12: ...presi n de la tapa sobre el marco del colector Monteren van de grasvergaarbak Degrasvergaarbakwordtopzijnplaatsgehoudendoordedruk die het luik uitoefent op het frame van de grasvergaarbak Montaggio de...

Страница 13: ...rge 2 est install Para Convertir la Segadora PARA EL ENSACADO TRASERO El recogedor del c sped instalado PARA EL ACOLCHAMIENTO La tapa posterior 1 cerrado PARA NO RECOGER LA HIERBA La tapa posterior 1...

Страница 14: ...dem Hebel am jeweiligen Rad einstellen Hebel gegen das Rad dr cken und Schneidh he regeln Alle R der m ssen auf gleicher H he montiert sein andernfalls ergibt sich eine ungleichm ige Schnitth he Regl...

Страница 15: ...mando Starten en Stoppen Zet de maaier op een vlakke ondergrond Niet op een grind pad of iets dergelijks Vul de benzinetank met benzine geen oliemengsel Nooitbenzinetankvullenterwijldemotordraait Hou...

Страница 16: ...e nicht in einem Gel nde ben tzt werden das eine Neigung von mehr als 15 Grad hat In solchen F llen k nnen Schmierungsprobleme im Motor auftreten Utilisation La tondeuse ne doit pas tre utilis e sur u...

Страница 17: ...oni pulizie o lavori di menutenzione Dopo 5 ore di funzionamento stringere viti e dadi Controllare l olio Piegando la falciatrice sul fiancolare attenzione che la candela sia il punto pi alto Regularl...

Страница 18: ...t weer aanbrengen de schroef goed vastdraaien Controllo annuale All fine della stagione Rettifica e bilanciamento della lama Rimuovere il cavo di ac censione Inserire e rimuovere la lama solamente ind...

Страница 19: ...manual Het schoonmaken van het luchfilter Draai de schroef los verwijder de deksel en haal het filter eruit Uw motor loopt niet goed en kan beschadigd worden door een vuile luchtfilter Vervang de luch...

Страница 20: ...g aus Schalten Sie Schlauch von Anschluss 2 ab Joindre tuyau 1 pose 2 Ouvrir l eau suppl er Commencer moteur S arr ter moteur quand pur teindre l eau suppl er D tacher tuyau de pose 2 Conecte manga 1...

Отзывы: