background image

10

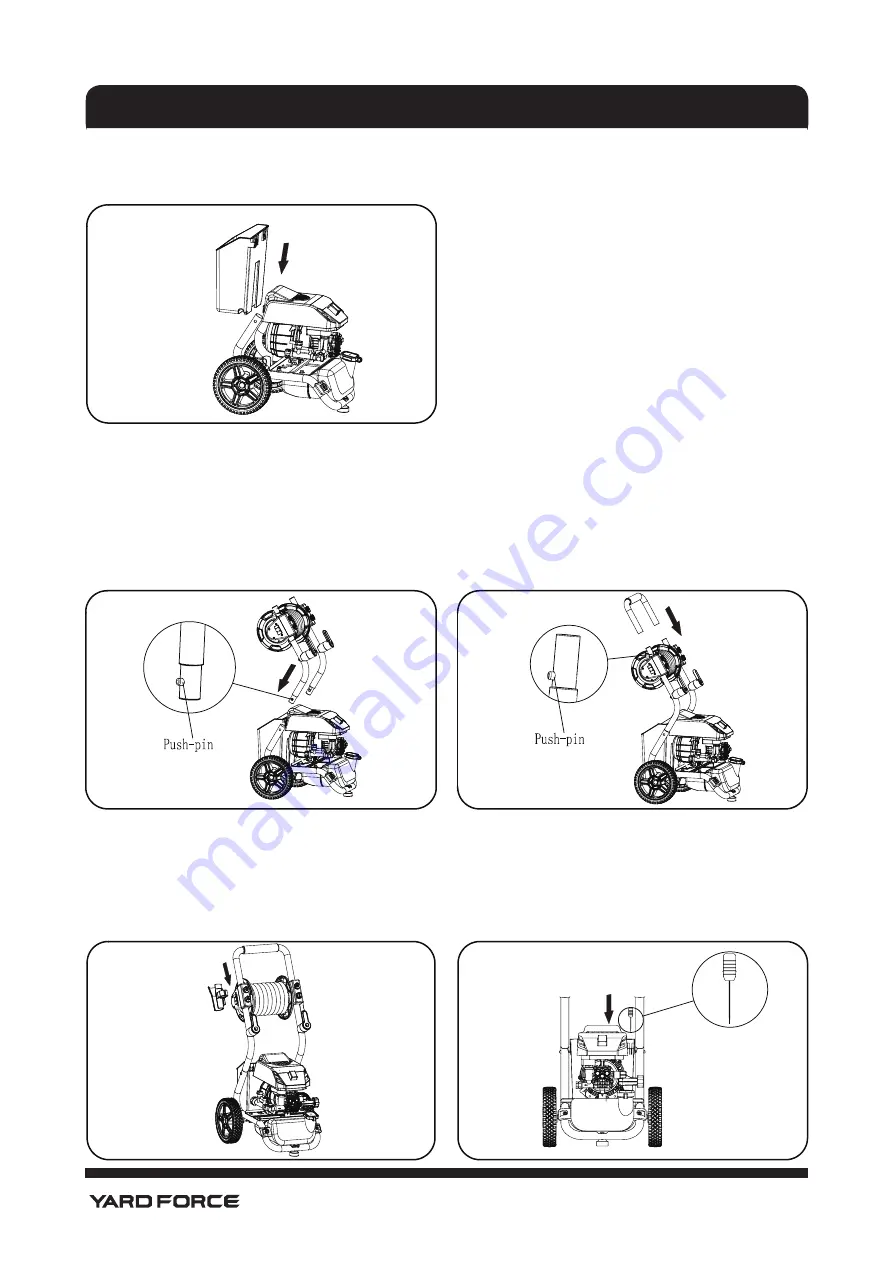
2. Attach storage bucket. (Fig. 3)
Attach the storage bucket onto pressure washer main unit by sliding open slot over tab.

ASSEMBLY AND OPERATION INSTRUCTIONS

Fig. 3

3. Assemble middle handle. (Fig. 4)
Push and hold the push-pin buttons on the sides of the middle handle as sliding the middle handle onto the 
frame. 

4. Assemble upper handle. (Fig. 5)
Push and hold the push-pin buttons on the upper sides of the middle handle as sliding the upper handle 
onto the middle handle.

Fig. 4

Fig. 5

5. Assemble gun holder. (Fig. 6)
Assemble the gun holder onto pressure washer.

6. Assemble the nozzle cleaning needle. (Fig. 7)
Take out the nozzle cleaning needle and put into the slot on the base of the bucket.

Fig. 6

Fig. 7

Содержание Y0EWN22WR01

Страница 1: ...p from our facility For immediate help with assembly or for additional product information visit www YardForceUSA com or email support MerotecUSA com You will need this manual for safety instructions operating procedures and Warranty The original sales receipt is required for warranty service YF2200LC Y0EWN22WR01 ELECTRIC PRESSURE WASHER OPERATOR S MANUAL ...

Страница 2: ...ructions 3 Safety features 5 Parts and diagram list 6 Technical data 8 Assembly and operation instructions 9 Machine assembly 9 Operation instruction 13 Cleaning detergents dispenser 14 Shutting down and storage 16 Cleaning and maintenance 17 Troubleshooting 18 Warranty 20 ...

Страница 3: ...he maintenance instructions specified in the manual 9 If replacement of the plug or cord is needed use only identical replacement parts 10 This product or its power cord contains lead a chemical known to cause cancer birth defects or other reproductive harm Wash hands after handling WARNING Risk of injury Injection Hazard Equipment can cause serious injury if the spray penetrates the skin Do not p...

Страница 4: ...r proper use of detergents Always protect eyes skin and respiratory system from detergent if used 13 Always lock the trigger of spray gun in the safety position when not in use 14 Do not use pressure that exceeds the operating pressure of any of the parts hoses fittings etc in the pressurized system Never use with any other manufacturer s accessories or components 15 Do not spray electrical appara...

Страница 5: ...ore indoors while not in use Use only extension cords having an electrical rating not less than the rating of the product Do not use damaged extension cords Examine extension cord before using and replace if damaged Do not abuse extension cord and do not yank on any cord to disconnect Keep cord away from heat and sharp edges Always disconnect the extension cord from the receptacle before disconnec...

Страница 6: ...6 PARTS AND DIAGRAM LIST PARTS AND DIAGRAM LIST Fig 1 ...

Страница 7: ...e washer main unit x1 7 Storage bucket x1 8 Center Handle x1 9 High pressure hose x1 10 Gun holder x1 11 Upper Handle x1 12 Spray gun x1 13 Spray wand x1 14 Turbo nozzle x1 15 15 º nozzle x1 16 25 º nozzle x1 17 40 º nozzle x1 18 Soap nozzle x1 19 Nozzle Cleaning Needle Packed together with the manual x1 20 Operating manual x1 WARNING If any parts are damaged or missing do not operate this tool un...

Страница 8: ...rking pressure 2200 PSI Max pressure 2500 PSI Rated Flow rate 1 20 GPM 272 5LPH Max Flow rate 1 35 GPM 306 LPH Inlet pressure 20 PSI Supply water temperature max Cold tap water 104 F 40 C Electrical cord 35 ft 10 7 m High pressure hose 25 ft 7 6 m Detergent injection rate 3 12 TECHNICAL DATA ...

Страница 9: ...essure washer to draw in water contaminated with solvents e g paint thin ners gasoline oil etc Dirt in the water inlet will damage the unit To avoid this risk we recommend checking the wa ter filter located inside the water inlet To clean it out see Maintenance section Always prevent debris from being drawn into the unit by using a clean water source and an additional accessory water filter if req...

Страница 10: ...f the middle handle as sliding the middle handle onto the frame 4 Assemble upper handle Fig 5 Push and hold the push pin buttons on the upper sides of the middle handle as sliding the upper handle onto the middle handle Fig 4 Fig 5 5 Assemble gun holder Fig 6 Assemble the gun holder onto pressure washer 6 Assemble the nozzle cleaning needle Fig 7 Take out the nozzle cleaning needle and put into th...

Страница 11: ... Connect the spray wand to the spray gun and then attach the nozzles you wanted Fig 10 Fig 11 CAUTION Placing any spray tip too close to a surface can result in permanent damage to the surface being sprayed Maintain at least a 24 distance between the tip and the surface being sprayed until you have determined it is safe to move the tip closer to the surface 11 Connect garden hose Fig 12 Attach the...

Страница 12: ...to ensure it is off 14 Connect to power socket Fig 15 Insert the plug into the power socket WARNING The pressure washer is equipped with a main power ON OFF I O switch located on the unit It should always be moved to the OFF O position when the pressure washer is not being used to prevent possible injury or damage Ground Fault Circuit Interrupter Protection This device provides additional protecti...

Страница 13: ...gun trigger until there is a steady stream of water Change the spray tip as per the recommendation above if necessary Before changing spray tip switch the machine OFF depress trigger to release pressure and engage the trigger lock Fig 17 CAUTION Make sure spray tip and wand is well locked Do not remove the spray tip while trigger is depressed CAUTION If painted surfaces are peeling or chipping use...

Страница 14: ...essure equivalent to the lowest garden hose The high pressure setting is used for cleaning you cannot apply detergents when working at high pressure Always test detergent in an inconspicuous area before use NO BLEACH 1 Engage gun safety lock Fig 19 Fig 20 2 Attach the low pressure spray tip black for soap or detergent application Detergent application will only work with low pressure spray tip 3 A...

Страница 15: ... and rinse a small section at a time Avoid working on hot surfaces or in direct sunlight Never use Bleach chlorine products and other corrosive chemicals Liquids containing solvents i e paint thinners gasoline oils Tri sodium phosphate products Ammonia products Acid based products These chemicals will harm the unit and will damage the surface being cleaned ASSEMBLY AND OPERATION INSTRUCTIONS ...

Страница 16: ... connect wand from trigger handle disassemble and replace the spray tip to tip holder on the unit insert the wand into the wand holder 7 Store the machine and accessories in a room that does not reach freezing temperatures Do not store near furnace or other sources of heat as it may dry out the pump seals WARNING Turn off water supply and squeeze trigger to depressurize the unit Failure to do so c...

Страница 17: ...lean the water filter screen by carefully inserting the water filter cleaning tool provided or a thin and sharp instrument e g paperclip into the filter to remove any dirt deposited Rinse with clean water 6 Using needle nose pliers carefully reinsert the water filter screen into the wand Ensure the screen fits tightly into the wand s water inlet opening Main body cleaning Use only mild soap and da...

Страница 18: ...pressure varies high and low Not enough inlet water supply Turn water on fully Check garden hose for kinks leaks or blockage Pump is sucking air Check that hoses and fit tings are airtight Turn OFF machine and purge pump by squeezing trigger gun until a steady flow of water emerges through the nozzle Water inlet filter is clogged Remove filter and rinse with warm water Discharge nozzle is obstruct...

Страница 19: ...s running on this circuit System has residual pressure Turn unit OFF squeeze trigger on spray wand to release pressure then turn unit ON Voltage loss due to extension cord Unplug any extension cords attached and plug the unit directly into the outlet Pressure washer not used for long periods Call the Toll Free Hot line Residual friction among components Unit might hum Disconnect water supply and p...

Страница 20: ...of use or other consequential damages arising from any of the above nor does it cover repairs made or attempted by unauthorized persons This warranty is void if the product is used for commercial rental or industrial purposes Certain parts attachments and accessories are subject to normal wear and tear and are excluded from the warranty Service and Warranty Claims Process Contact the Yard Force Su...

Страница 21: ...Merotec Inc 3655 Kennesaw North Industrial Parkway Kennesaw GA 30144 Copyright 2019 Merotec Inc Made in China at a SUMEC manufacturing facility MADE IN CHINA ...

Отзывы: