– 65 –
STORAGE
1
2
3
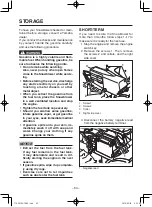
1. Fuel cock lever
2. “ON”
3. “OFF”
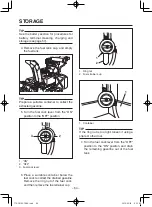
8. Turn the fuel cock lever from the “ON”
position to the “Carb Drain” position.
Drain the gasoline from the carburetor
into the container through the fuel drain
hose.
1
2
3
4
1. “ON”
2. “Carb Drain”
3. Fuel cock lever
4. Fuel drain hose
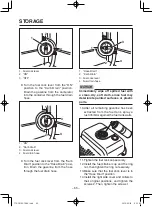
9. Turn the fuel cock lever from the “Carb
Drain” position to the “Hose Drain” posi-
tion. Drain the gasoline from the hose
through the fuel drain hose.
1
2
3
4
1. “Hose Drain”
2. “Carb Drain”
3. Fuel cock lever
4. Fuel drain hose
NOTICE
Immediately wipe off spilled fuel with
a clean, dry, soft cloth, since fuel may
deteriorate painted surfaces or plastic
parts.
10. After all remaining gasoline has been
extracted from the fuel tank, spray a
rust inhibitor against the fuel tank walls.
11. Tighten the fuel tank cap securely.
12. Install the fuel strainer cup and the ring
nut, then tighten the ring nut securely.
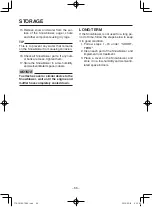
13. Make sure that the fuel cock lever is in
the “Hose Drain” position.
14. Install the right side cover and collars to
their original positions, and tighten the
screws 2. Then, tighten the screws 1.
7T0-28199-70-E0.indd 65
2019/05/01 9:23:04
Содержание YT624
Страница 2: ...7T0 28199 70_cover indd 2 2019 05 01 9 24 35 ...
Страница 41: ... 36 OPERATION 1 2 1 Auger clutch lever 2 Drive clutch lever 7T0 28199 70 E0 indd 36 2019 05 01 9 22 59 ...
Страница 76: ...YAMAHA MOTOR CO LTD PRINTED IN JAPAN 2019 05 1 E 7T0 28199 70 E0 7T0 28199 70 E0 indd 71 2019 05 01 9 23 04 ...

