ELECTRICAL COMPONENTS
7-39
the battery quickly and can cause battery
overheating and battery plate damage.
●
If it is impossible to regulate the charging
current on the battery charger, be careful
not to overcharge the battery.
●
Remove the battery when charging it. (If
charging has to be done with the battery
mounted on the vehicle, disconnect the
negative lead from the battery terminal.)
●
To reduce the chance of sparks, do not
plug in the battery charger until the battery
charger leads are connected to the battery.
●
Before removing the battery charger lead
clips from the battery terminals, be sure to
turn off the battery charger.
●
Make sure the battery charger lead clips are
in full contact with the battery terminal and
that they are not shorted. A corroded bat-
tery charger lead clip may generate heat in
the contact area and a weak clip spring may
cause sparks.
●
When the battery is charging, if abnormal
heat is generated, disconnect the battery
from the charger and allow the battery to
cool down. Recharge the battery after its
temperature has dropped. Hot batteries
can explode!
●
The open-circuit voltage of a MF battery
stabilizes about 30 minutes after charging
has been completed. Therefore, wait 30
minutes after charging is completed before
measuring the open-circuit voltage.
▼▼▼▼▼▼▼▼▼▼▼▼▼▼▼▼▼▼▼▼▼▼▼▼▼▼▼▼▼▼▼▼
Charging method using a variable-current
(voltage) charger
a. Measure the open-circuit voltage before
charging.
NOTE:
Voltage should be measured 30 minutes after
the machine is stopped.
b. Connect a charged and AMP meter to the
battery and start charging.
NOTE:
Set the charging voltage at 16
–
17 V.If the setting
is lower, charging will be insufficient. If too high,
the battery will be over-charged.
c. Make sure that the current is higher than the
standard charging current written on the bat-
tery.
NOTE:
If the current is lower than the standard charging
current written on the battery, set the charging
voltage adjust dial at 20
–
24 V and monitor the
amperage for 3
–
5 minutes to check the battery.
d. Adjust the voltage so that the current is at the
standard charging level.
e. Set the time according to the charging time
suitable for the open-circuit voltage.
Refer to “Battery condition checking steps”.
f. If charging requires more than 5 hours, it is
advisable to check the charging current after
a lapse of 5 hours. If there is any change in
the amperage, readjust the voltage to obtain
the standard charging current.
g. Measure the battery open-circuit voltage af-
ter leaving the battery unused for more than
30 minutes.
▲▲▲▲▲▲▲▲▲▲▲▲▲▲▲▲▲▲▲▲▲▲▲▲▲▲▲▲▲▲▲▲
▼▼▼▼▼▼▼▼▼▼▼▼▼▼▼▼▼▼▼▼▼▼▼▼▼▼▼▼▼▼▼▼
Charging method using a constant voltage
charger
a. Measure the open-circuit voltage before
charging.
NOTE:
Voltage should be measured 30 minutes after
the machine is stopped.
b. Connect a charger and AMP meter to the bat-
tery and start charging.
c. Make sure that the current is higher than the
standard charging current written on the bat-
tery.
NOTE:
If the current is lower than the standard charging
current written on the battery, This type of bat-
tery charger cannot charge the MF battery. A
variable voltage charger is recommended.
d. Charge the battery until the battery’s charg-
ing voltage is 15 V.
NOTE:
Set the charging time at 20 hours (maximum).
e. Measure the battery open-circuit voltage af-
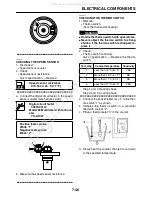
Reach the standard charging current
Battery is good.
Does not reach the standard charging
current
Replace the battery.
12.8 V or more --- Charging is complete.
12.7 V or less --- Recharging is required.
Under 12.0 V --- Replace the battery.
All manuals and user guides at all-guides.com
Содержание XT250X 2008
Страница 2: ...All manuals and user guides at all guides com...
Страница 8: ...All manuals and user guides at all guides com...
Страница 50: ...CABLE ROUTING 2 31 A D C I H G 1 2 3 4 5 6 8 E L K M J B A A 7 F All manuals and user guides at all guides com...
Страница 54: ...CABLE ROUTING 2 35 All manuals and user guides at all guides com...
Страница 82: ...ELECTRICAL SYSTEM 3 27 a b All manuals and user guides at all guides com...
Страница 170: ...VALVES AND VALVE SPRINGS 5 24 All manuals and user guides at all guides com...
Страница 220: ...AIR INDUCTION SYSTEM 6 9 EAS27040 AIR INDUCTION SYSTEM 1 2 4 6 7 3 5 All manuals and user guides at all guides com...
Страница 224: ...AIR INDUCTION SYSTEM 6 13 All manuals and user guides at all guides com...
Страница 237: ...CHARGING SYSTEM 7 12 2 A C magneto 3 Rectifier regulator 4 Fuse 6 Battery All manuals and user guides at all guides com...
Страница 239: ...CHARGING SYSTEM 7 14 All manuals and user guides at all guides com...
Страница 243: ...LIGHTING SYSTEM 7 18 All manuals and user guides at all guides com...
Страница 249: ...SIGNALING SYSTEM 7 24 All manuals and user guides at all guides com...
Страница 253: ...CARBURETOR HEATING SYSTEM 7 28 All manuals and user guides at all guides com...
Страница 256: ...ELECTRICAL COMPONENTS 7 31 2 1 8 9 5 4 3 7 6 All manuals and user guides at all guides com a l l g u i d e s c o m...
Страница 279: ...All manuals and user guides at all guides com...
Страница 280: ...YAMAHA MOTOR CO LTD 2500 SHINGAI IWATA SHIZUOKA JAPAN PRINTED IN U S A All manuals and user guides at all guides com...

