ENGINE
3-7
EAM20135
ENGINE
EAM30226
ADJUSTING THE VALVE CLEARANCE
TIP
•
This section is intended for those who have ba-
sic knowledge and skill concerning the servic-
ing of Yamaha motorcycles (e.g., Yamaha
dealers, service engineers, etc.). Those who
have little knowledge and skill concerning ser-
vicing are requested not to undertake inspec-
tion, adjustment, disassembly, or reassembly
only by reference to this manual. It may lead to
servicing trouble and mechanical damage.
•
Make sure that the valve clearance is checked
or adjusted while the engine is cold (at room
temperature).
•
While the valve clearance is checked or adjust-
ed, make sure that the piston is positioned in
the top dead center (TDC).
1. Remove:
•
Seat
•
Side cover (left/right)
•
Air scoop (left/right)
•
Fuel tank
Refer to “FUEL TANK” on page 6-1.
•
ECU (Engine Control Unit)
2. Remove:
•
Spark plug
•
Cylinder head cover
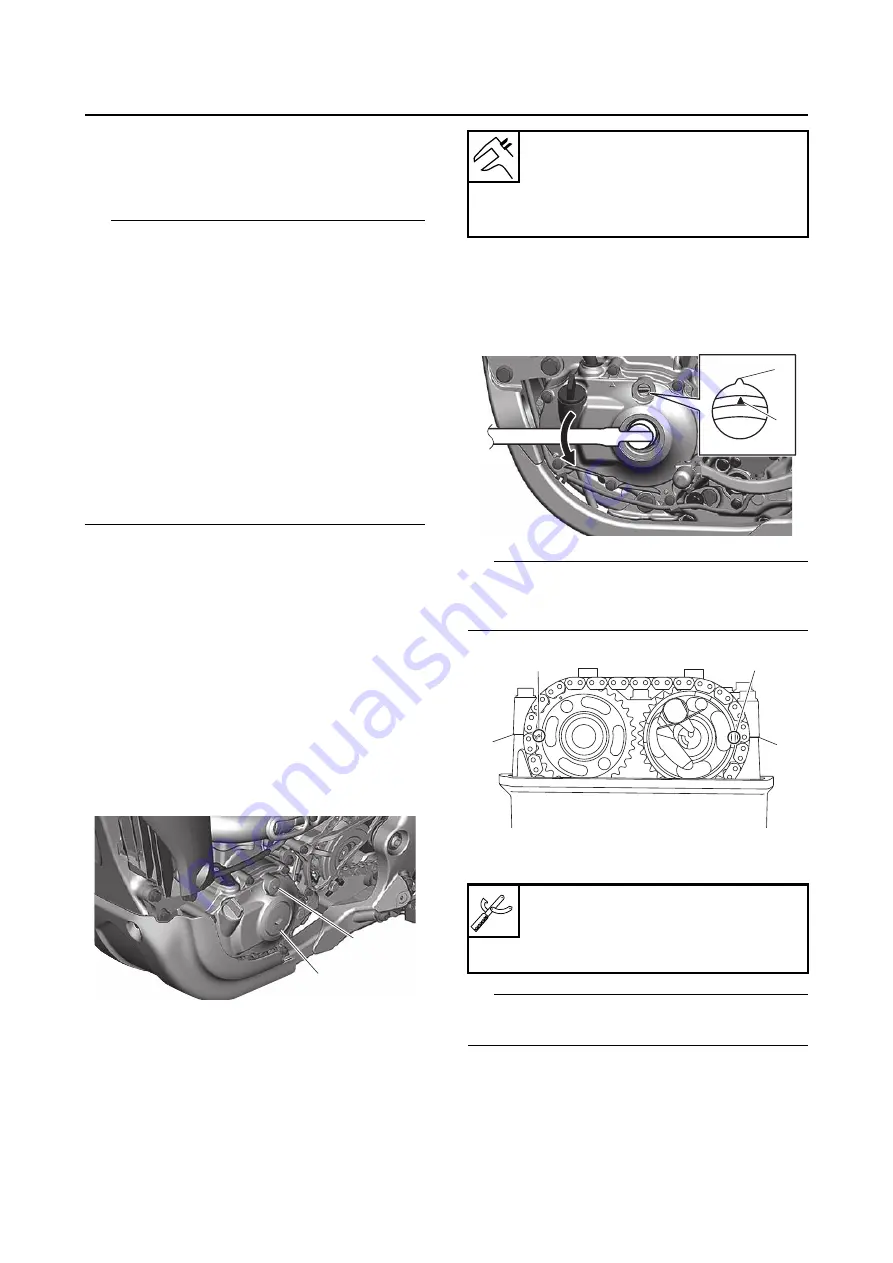
3. Remove:
•
Timing mark accessing screw “1”
•
Crankshaft end accessing screw “2”
•
O-ring
4. Check:
•
Valve clearance
Out of specification
Regulate.
a. Turn the crankshaft counterclockwise with
a wrench.
b. Align the top dead center (TDC) mark “a”
on the generator rotor with the alignment
mark “b” on the crankcase cover.
TIP
Check that the alignment marks “c” on the cam-
shaft sprockets are aligned with the edge of the
camshaft cap surfaces “d”.
c. Measure the valve clearance using a
thickness gauge “1”.
TIP
Record the measured reading if the clearance is
incorrect.
1
2
Valve clearance (cold)
Intake
0.10–0.17 mm (0.0039–0.0067 in)
Exhaust
0.15–0.22 mm (0.0059–0.0087 in)
Thickness gauge
90890-03268
Feeler gauge set
YU-26900-9
b
a
d
c
d
c
Содержание WR450F 2022
Страница 8: ......
Страница 15: ...LOCATION OF IMPORTANT LABELS 1 5...
Страница 16: ...LOCATION OF IMPORTANT LABELS 1 6 AUS NZL ZAF EUR...
Страница 90: ...ELECTRICAL SYSTEM 3 32...
Страница 94: ...GENERAL CHASSIS 4 2 a Projection b Slot c Rib side cover d Rib rear fender a a a 1 1 c c b b d d...
Страница 134: ...CLUTCH 5 7...
Страница 135: ...1 2 3 4 5 6 7 8 9 10 FUEL SYSTEM FUEL TANK 6 1 REMOVING THE FUEL TANK 6 1 INSTALLING THE FUEL TANK 6 1...
Страница 138: ...FUEL TANK 6 3...
Страница 146: ...ELECTRICAL COMPONENTS 7 7...
Страница 160: ...SELF DIAGNOSTIC FUNCTION AND DIAGNOSTIC CODE TABLE 8 13...
Страница 170: ...CHASSIS 9 9...
Страница 172: ...PRINTED IN JAPAN E...


