


7
Initial Preparation
Note
As the head will stretch over time, readjustment should be performed periodically
(starting with step
7
).
5
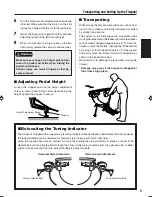
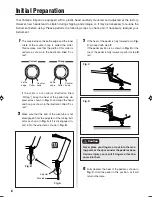
Using the supplied timpani key, tighten the tun-
ing bolts by 1/4 of a turn (90
°
) in the order shown
below.
It is very important to always turn all tuning
bolts by the same amount.
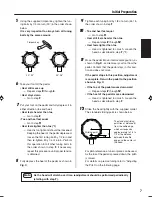
9
Tighten each tuning bolt by 1/8 of a turn (45
°
) in
the order shown in step
5
.
10
• Toe and heel feel equal
→
Go to step
11
.
• Heel still feels heavier than toe
→
Repeat steps
8
through
10
.
• Heel feels lighter than toe
→
Head is tightened too much. Loosen the
head as described in step
7
(
*1
).
11
Move the pedal into an intermediate position, as
shown in
Fig. D
, and remover your foot from the
pedal. Confirm that the pedal stays in this posi-
tion and does not move.
If the pedal stops in this position, adjustment
is complete. Return the pedal to the position
shown in Fig. C.
• If the toe of the pedal moves downward
→
Repeat steps
8
through
10
.
• If the heel of the pedal moves downward
→
Head is tightened too much. Loosen the
head as described in step
7
.
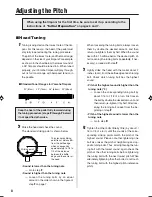
12
Strike the head lightly with the supplied mallet.
The standard striking point is shown below.
6
Take your foot off the pedal.
• Heel still moves up
→
Repeat steps
4
through
6
.
• Heel stays down
→
Go to step
7
.
7
Put your foot on the pedal and fully depress it in
either direction (toe and heel).
• Heel feels heavier than toe
→
Go to step
8
.
• Toe and heel feel equal
→
Go to step
11
.
• Heel feels lighter than toe (*1)
→
Head is too tight and should be loosened.
Keeping the heel of the pedal depressed,
loosen the first tuning bolt by 1/2 turn and
then re-tighten it by 1/4 of a turn. Perform
this operation for all other tuning bolts in
the order shown in step
5
. If necessary,
repeat this procedure, until proper tension
is obtained.
8
Fully depress the heel of the pedal as shown in
Fig. C
.
Timpani key
29”, 32”
23”, 26”
The standard striking
point lies at distance B
from the kettle edge,
which corresponds
approximately to 1/4 to
1/3 of the distance
between the kettle
edge and the center of
the head.
Striking point
For pitch reference, a tuner or piano can be used.
As the toe of the pedal is pressed down, the pitch
is raised.
For details on precise tuning refer to “Adjusting
the Pitch” on the following page.
tp3100ea_en_om.6pm
08.2.5, 9:28 AM
7


