background image

How to Use This Manual

The MOTIF XF Reference Manual (in PDF format) is equipped with special features that are exclusive to electronic files, such 
as the Link function and the Search function which lets you jump to the desired page by clicking the page number of the 
specific term.

n

The MOTIF XF lets you select one of eight different color types (page 220). This manual uses the screen shots which are shown by setting the 
Color parameter to “Yellow” in the Utility mode. This is the most universal color visibility, allowing the manual to be easily viewed by many 
people having different types of color recognition. 

This function built into the viewer software is very useful if 
you want to know the meaning of unfamiliar terms. When 
using Adobe Reader to read this manual, enter a specific 
word in the search box, then press the <Enter> key of your 
computer keyboard to call up the relevant section in this 
manual.

n

Make sure to check and download the latest version of the 
Adobe Reader from the following site. 
http://www.adobe.com/products/reader/

When using Adobe Reader, click these buttons in the 
toolbar to return to the previous page view or go to the next 
page view.
This function is very useful if you want to return to the 
previous page view after jumping to a linked page.

n

If the previous page view/next page view buttons are not 
shown in the toolbar, hold the <Alt> key and press <

>/<

keys to move to the previous/next page view.

n

For more information on these and other functions in the 
software, refer to the owner’s manual of the software.

The Function Tree of the MOTIF XF is shown on the next 
page. Use this Function Tree to find desired pages. 
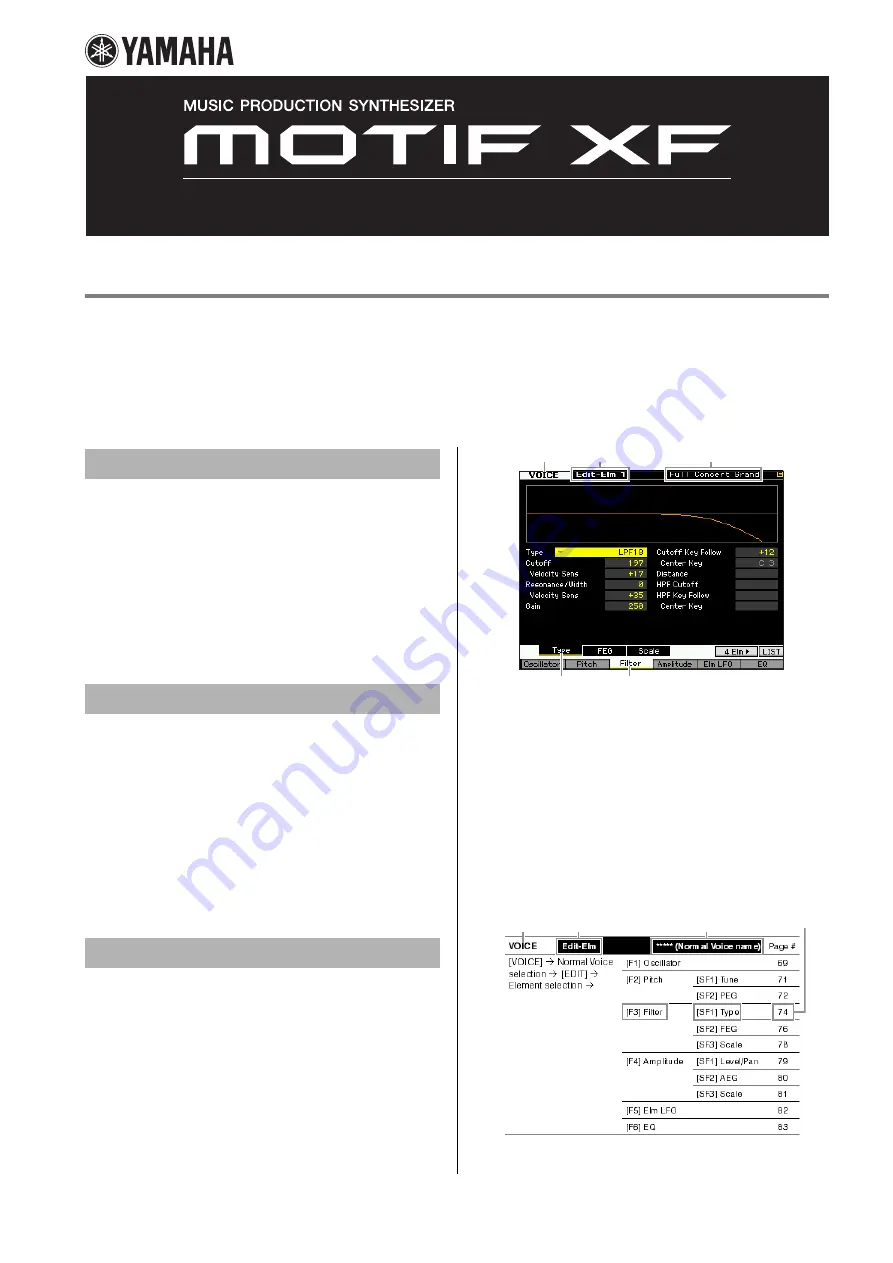
For example, if you make edits on the display shown below 
and you want to read explanations of the display, check the 
five points numbered here.

1

“VOICE” indicates the MOTIF XF is in the Voice mode. Refer to 
the Voice mode section of the Function Tree.

2

“Edit-Elm 1” indicates that this display lets you edit the 
Element parameters of the Normal Voice.

3

Here, you can confirm the current Voice Type, Normal Voice or 
Drum Voice.

45

These indicate that the [F3] Filter button then the [SF1] Type 
button have been pressed.

Applying the five points above to the Function Tree as 
shown below lets you easily find the desired page.

Search Function

Previous Page View/Next Page View

Using the Function Tree

2

1

3

4

5

2

1

3

4

5

Click here to jump.

Reference Manual

Summary of Contents for MOTIF XF

Page 1: ...toolbar to return to the previous page view or go to the next page view This function is very useful if you want to return to the previous page view after jumping to a linked page n If the previous page view next page view buttons are not shown in the toolbar hold the Alt key and press keys to move to the previous next page view n For more information on these and other functions in the software r...

Page 2: ...Normal Voice selection EDIT Element selection F1 Oscillator 69 F2 Pitch SF1 Tune 71 SF2 PEG 72 F3 Filter SF1 Type 74 SF2 FEG 76 SF3 Scale 78 F4 Amplitude SF1 Level Pan 79 SF2 AEG 80 SF3 Scale 81 F5 Elm LFO 82 F6 EQ 83 Voice Edit mode Drum Voice VOICE Edit Common Drum Voice name Page VOICE Drum Voice selection EDIT COMMON F1 General SF1 Name 85 SF2 Play Mode 85 SF3 Other 85 F2 ARP Main 85 F3 ARP Ot...

Page 3: ...F2 ARP Main 112 F3 ARP Other 114 F4 EG 115 F5 EQ 116 F6 Rcv Switch 116 Performance Job mode Performance Job Page PERFORM JOB F1 Init 117 F2 Recall 117 F3 Copy 118 F4 Bulk 118 Performance Store mode Performance Store Page PERFORM STORE 101 Song Play mode SONG Play Page SONG SF6 INFO 142 F1 Track View 139 F2 Play FX 141 F3 Track SF1 Out 142 SF2 Loop 143 F4 Chain 143 Song Record mode SONG Record Page...

Page 4: ...etup 178 F2 Arpeggio 147 Song Job mode Song Job Page Pattern Edit mode PATTERN Edit Page PATTERN EDIT 179 Pattern Job mode Pattern Job Page PATTERN JOB F1 Undo Redo 154 F2 Note 01 Quantize 154 02 Modify Velocity 155 03 Modify Gate Time 156 04 Crescendo 156 05 Transpose 156 06 Glide 157 07 Create Roll 157 08 Sort Chord 158 09 Separate Chord 158 F3 Event 01 Shift Clock 158 02 Copy Event 159 03 Erase...

Page 5: ...5 Effect SF1 Connect 64 SF2 Ins A 66 SF3 Ins B SONG PATTERN Edit Elm Page SONG PATTERN MIXING Normal Voice selection F6 Vce Edit Element selection F1 Oscillator 69 F2 Pitch SF1 Tune 71 SF2 PEG 72 F3 Filter SF1 Type 74 SF2 FEG 76 SF3 Scale 78 F4 Amplitude SF1 Level Pan 79 SF2 AEG 80 SF3 Scale 81 F5 Elm LFO 82 F6 EQ 83 Mixing Voice Edit mode Drum Voice SONG PATTERN Edit Common Page SONG PATTERN MIXI...

Page 6: ...ENTER Record Trim display 207 F6 Slice Record Slice display 208 Sampling Edit mode SAMPLE Edit Page INTEGRATED SAMPLING EDIT F1 Trim 127 F2 Param 128 Sampling Job mode Sample Job Page INTEGRATED SAMPLING JOB F1 KeyBank 01 Copy 130 02 Delete 131 03 Move 131 04 Normalize 131 05 Time Stretch 132 06 Convert Pitch 132 07 Fade In Out 132 08 Half Sampling Frequency 133 09 Stereo to Mono 133 10 Loop Remix...

Page 7: ...1 Output 226 SF2 Connect 227 SF3 Ins A 227 SF4 Ins B F5 Control SF1 Remote 228 SF2 MIDI 228 SF3 Control 230 F6 Flash 231 Sequencer Setup mode Sequencer Setup Page PERFORM SONG PATTERN SEQ SETUP F1 Click 231 F2 MIDI Filter 232 F3 Quick 232 F4 Other 233 Utility Job mode Utility Job Page UTILITY JOB 231 Utility Store mode Utility Store Page UTILITY STORE 219 File mode File Page FILE F1 File SF1 Save ...

Page 8: ...quencer block page 12 16 track MIDI Sequencer Songs and Patterns Tone Generator block page 9 AWM2 Tone Generator 16 Parts Voices and Performances Song Mixing Pattern Mixing Sampling block page 21 Samples Waveforms Effect block page 22 System Effects Insertion Effect x 8 Element EQ Part EQ x 16 Master Effect Master EQ Audio Input block page 12 A D Input IEEE1394 External MIDI device Computer Microp...

Page 9: ...Elements here are distributed across both the note range of the keyboard and the velocity range a different Element sounds depending on which note you play and how strongly you play it In the note distribution Elements 1 and 2 sound in the lower range of the keyboard Elements 3 and 4 sound in the middle range and Elements 5 and 6 sound in the higher range In the velocity distribution Elements 1 3 ...

Page 10: ...a variety of traditional synthesizer parameters such as Oscillator Pitch Filter Amplitude and LFO shown below Oscillator This unit outputs the wave which determines the basic pitch You can assign the waveform or basic sound material to each Element of a Normal Voice or each Key of a Drum Voice In the case of a Normal Voice you can set the note range for the Element the range of notes on the keyboa...

Page 11: ...provided Each Bank contains 128 Performances Accordingly a total of 512 User Performances are provided Tone Generator block in the Song mode Pattern mode In these modes multiple Parts are provided and different Voices and different melodies or phrases can be played back for each Part Because these modes let you set the MIDI channel for each part of the tone generator block you can use an external ...

Page 12: ... by recording and editing your performances as MIDI data from the controller block then playing it back with the tone generator block Sequencer block in the Song mode A Song is made by the MIDI sequence data created by recording your keyboard performance to each track A Song on this synthesizer is effectively the same as a Song on a MIDI sequencer and playback automatically stops at the end of the...

Page 13: ...s tempo and Mixing do not change even when the Section is switched keeping the overall playback consistent in feel and rhythm through the changes For instructions on selecting a Pattern and Section see page 166 Pattern Chain allows you to string several different Sections within a single Pattern together to make a single complete Song You can have the MOTIF XF automatically change Sections by crea...

Page 14: ...find a setting you like you can convert it to actual MIDI data by using the Song Job page 153 or Pattern Job page 181 Sequencer Block applied to the Performance mode You can record your keyboard performance in the Performance mode to the Song or Pattern You can record knob operations controller operations and Arpeggio playback as well as your keyboard playing to the specified track as MIDI events ...

Page 15: ...nges of each Arpeggio type 2Z_ 1 90 91 127 4Z_ 1 70 71 90 91 110 111 127 8Z_ 1 16 17 32 33 48 49 64 65 80 81 96 97 108 109 127 PadL_ 1 1 2 2 3 127 PadH_ 1 112 113 120 121 127 ApKb Acoustic Piano Keyboard Organ Organ GtPl Guitar Plucked GtMG Guitar for Mega Voice Bass Bass BaMG Bass for Mega Voice Strng Strings Brass Brass RdPp Reed Pipe Lead Synth Lead PdMe Synth Pad Musical Effect CPrc Chromatic ...

Page 16: ...ve notes page 18 the Arpeggios created for use of Drum Voices page 18 and Arpeggios containing mainly non note events page 18 Arpeggio type with _AF1 _AF2 or _AF1 AF2 example Electro Pop AF1 When this Type is triggered the ASSIGNABLE FUNCTION 1 button 2 button or both buttons will be turned on during playback How to use the Arpeggio Type List The Arpeggio Type list in the Data List contains the fo...

Page 17: ...gger special sounds such as guitar fret noises when the note is released The following parameters affecting Random SFX are provided n For the displays that include Random SFX Random SFX Velocity Offset and Random SFX Key On Control refer to Arpeggio setting display below n For information on Arpeggio types that use this function refer to the Arpeggio Type List in the Data List Turning Arpeggio pla...

Page 18: ...e results These arpeggio types are programmed specifically for use with Drum Voices giving you instant access to various rhythm patterns Three different playback types are available Playback of a drum pattern Pressing any note s will trigger the same rhythm pattern Playback of a drum pattern plus additional played notes assigned drum instruments Pressing any note will trigger the same rhythm patte...

Page 19: ...Voice For detailed instructions on storing a Voice see page 54 Call up some of the Performances in User Banks 1 4 and play some of the Arpeggios assigned by default to the Performances In the Performance mode each of four Arpeggio types is assigned to each of four Parts This means up to four Arpeggio types can be played back simultaneously Let s play the Performance making full use of this functio...

Page 20: ...ng and you have the basic blocks to build an original Song 4 Create the Pattern Chain data by programming the playback order of the Sections Pattern Chain allows you to string several different Patterns together to make a single Song For details see page 171 5 Convert the Pattern Chain data to Song data For details see page 174 Creating an original Arpeggio type In addition using the preset Arpegg...

Page 21: ...han Pitch Bend can be assigned to the Pitch Bend wheel in the Controller Set display page 61 of the Voice Edit mode Modulation wheel Even though the Modulation wheel is conventionally used to apply vibrato to the sound many of the preset Voices have other functions and effects assigned to the wheel The more you move this wheel up the greater the effect that is applied to the sound Try out the Modu...

Page 22: ...sounds that use an effect unintended for other sounds You can also set the balance so that only the effect sound is heard by setting Wet to 100 This synthesizer features eight sets of Insertion Effects one set has A and B units They can be applied to all Parts of the Performance and applied to eight Parts maximum of the Song Pattern Another important Insertion Effect is the Vocoder which can be ap...

Page 23: ...tively and sets the related parameters These can be set in the Connect display page 64 and the Insertion A B display page 66 of Voice Common Edit 4 Determines the Send Level Return Level to from the Reverb Chorus and the signal level sent from the Chorus to the Reverb This block also selects the Effect Types of Reverb and Chorus respectively and sets the related parameters These can be set in the ...

Page 24: ...e 193 and the Reverb display Chorus display page 193 of Mixing Common Edit 4 Selects the Master Effect type and sets the Effect parameters in the Master Effect display page 193 of Mixing Common Edit 5 Sets the Master EQ parameters in the Master EQ display page 193 of Mixing Common Edit n The Effect settings of 1 3 in the Voice mode illustrated on page 23 are available for up to eight parts for whi...

Page 25: ...o delay synchronized with the tempo of Song Pattern Arpeggio CONTROL DELAY Delay with delay time controllable in real time DELAY LR Produces two delayed sounds L and R DELAY LCR Produces three delayed sounds L R and C center DELAY LR Stereo Produces two delayed sounds in stereo L and R Effect Type Cho Ins Description G CHORUS A Chorus Effect that produces a richer and more complex modulation than ...

Page 26: ...ogy CLASSIC COMPRESSOR Conventional type of compressor MULTI BAND COMP 3 band type compressor Effect Type Ins Description VCM AUTO WAH Modulates the tone via the LFO VCM TOUCH WAH Modulates the tone via the volume note on velocity VCM PEDAL WAH Modulates the tone via the pedal control For best results assign the Pedal Control parameter of this Effect type to the Foot Controller in the Controller S...

Page 27: ...meter of Multi Band Comp This parameter determines the amount of time that elapses between the releasing of a note and the end of the effect Compress Determines the minimum input level at which the compressor effect is applied Control Type This is a parameter of Control Delay When set to Normal the delay effect is always applied to the sound When set to Scratch the delay effect is not applied if b...

Page 28: ... of the high frequencies When Multi Band Comp is selected this parameter determines the ratio of the compressor for the high frequencies Parameter name Descriptions High Threshold Determines the minimum input level at which the effect is applied to the high frequencies Horn Speed Fast Determines the speed of the horn when the slow fast switch is set to fast Horn Speed SLow Determines the speed of ...

Page 29: ...itch in semitones for each of the 1st series and 2nd series PM Depth Determines the depth of the pitch modulation Pre Mod HPF Cutoff Frequency Determines the Cutoff frequency of the High Pass Filter before the modulation Pre LPF Cutoff Frequency Determines the Cutoff frequency of the Low Pass Filter before the modulation Pre LPF Resonance Determines the Resonance of the Low Pass Filter for the inp...

Page 30: ...annel MIDI Receive Channel matches the Transmit Channel the receiving instrument will sound according to the data sent by the transmitting instrument For information on how to set the MIDI transmit channel and the MIDI receive channel see page 228 MIDI messages transmitted recognized by this synthesizer The messages transmitted received by the MOTIF XF are shown in the MIDI Data Format and MIDI Im...

Page 31: ...8 These parameters specify the value of RPN MSB RPN LSB page 32 NRPN MSB and NRPN LSB events The value is represented by two control change data numbers the MSB and the LSB Volume Control Number 007 Sets the volume for each individual Part No sound is produced when the value is 0 and 127 produces maximum volume Pan Control Number 010 Sets the pan position for each individual Part The sound is pann...

Page 32: ...hat RPN Prevent operational errors by transmitting an Null message 7FH 7FH after using these messages to perform a control operation Refer to RPN for information about the parameter All Sound Off Control Number 120 Turns all currently sounding notes off for all Parts Reset All Controllers Control Number 121 Resets all controllers to their initial values The following parameters are affected Pitch ...

Page 33: ...is processed as the value of that NRPN Prevent operational errors by transmitting an RPN Null message 7FH 7FH after using these messages to perform a control operation For filter cutoff frequency resonance and other independent control change parameters it is normal to use the independent control change parameters rather than the NRPN n This MIDI event cannot be handled by the tone generator block...

Page 34: ...the Sampling feature on SDRAM you should copy them to the optional Flash Memory Expansion Module FL512M FL1024M as Waveforms allowing you to recall them quickly Flash Memory Expansion Module optional FL512M FL1024M The sample obtained via the Sampling function can be stored as a Waveform by installing the optional Flash Memory Expansion Module FL512M FL1024M to the MOTIF XF The sample on the Flash...

Page 35: ...AM Voice Edit Mixing Voice Edit Performance Edit Performance Record Song Record Song Mixing Edit Song Chain Pattern Record Pattern Patch Pattern Mixing Edit Pattern Chain Utility and Sequencer Setup settings Master Edit Sampling Audio Record Play User Memory Flash ROM User Voice Normal Drum User Performance User Arpeggio Song Song Mixing Pattern Pattern Mixing Phrase Pattern Chain Song Chain Syste...

Page 36: ...ted mode Depending on the currently selected mode up to five functions sub functions are available and can be called up with the SF1 SF5 buttons the SF6 button is used mainly to call up the INFO and LIST displays Keep in mind that the available functions differ depending on the selected mode Some displays may not have any sub functions for these buttons The example display below is called up by pr...

Page 37: ...e parameter you can call up a convenient pop up List by pressing the SF6 LIST button from which you can select the desired parameter setting or item When the cursor is located on such a parameter indicated with an upside down triangular arrow the LIST icon appears at the lower right corner of the display In this condition press the SF6 button to call up the List To select the desired item or setti...

Page 38: ...he other instrument along with the MOTIF XF Make sure to match the MIDI Transmit Channel of the MOTIF XF with the MIDI Receive Channel of the external MIDI tone generator The MIDI Transmit Channel in the Voice mode and Performance mode can be set in the MIDI display page 228 of the Utility mode The Transmit Channels of each track can be set in the Song Track display page 142 of the Song Play mode ...

Page 39: ...to an MTR Multi track Recorder Since this synthesizer can receive the MTC MIDI Time Code and can transmit the MMC MIDI Machine Control you can produce music by synchronizing to an MTC or MMC compatible multi track recording device You can use two types of MTR control illustrated below by setting the MIDI Sync to MTC in the MIDI display page 228 of the Utility mode n MTC and MMC are available only ...

Page 40: ...d of the Owner s Manual for advice or visit the following website http www yamahasynth com support faq n Although CD R W drives can be used to load data to the instrument they cannot be used for saving data However you can transfer the data to a computer and save it to a CD using the CD R W drive on the computer Formatting USB storage media When an unformatted USB storage device is connected to th...

Page 41: ...omagnetic interference n If your computer is not equipped with an ETHERNET connector install a commercially available LAN adaptor to the PCI slot or PC Card slot of your computer n If you have a broadband router to connect your computer to the Internet use an unused ETHERNET connector on the router to connect the MOTIF XF Keep in mind however that this does not allow you the MOTIF XF to be connect...

Page 42: ...For instructions on setting these parameters consult your network administrator or provider For information on the other parameters refer to the explanation of the Network display page 221 in the Utility mode 3 Press the ENTER button to actually apply the settings to the MOTIF XF 4 Set the shared directory on your computer On your computer set the folder which you want to access from the MOTIF XF ...

Page 43: ...enter no password 7 Mount the desired directories In the Sharing Point box you can mount the shared directory by moving the cursor to the desired directory then pressing the ENTER button The mount indicator appears at the left side of the mounted directory s name By following the instructions above you can access a computer from the MOTIF XF via the LAN network For details see page 41 File Sharing...

Page 44: ...lect window 3 Select a Group Press one of the A to H buttons to select a Group If you ve selected a Drum Bank in the previous step press one of the A to D buttons to select a Group The name list of the 16 Voices in the selected Group will appear on the display Note that the GM Drum Bank contains only one Drum Voice indicating that you cannot select a Group 4 Select a Voice Press one of the 1 to 16...

Page 45: ... window appears 3 Select your favorite Voice Find the desired Voice by following the instructions on the Owner s Manual 4 Register the Voice to the Favorite Category Press the F5 button to register the Voice and turn on the Favorite Switch A checkmark appears in the box to the left of the Voice name indicating that the Voice has been included in the Favorite Category Pressing the F5 button again t...

Page 46: ...NANCE Raises or lowers the Resonance page 51 to boost the level of the signal in the area of the cutoff frequency By emphasizing the overtones in this area this can produce a distinctive peaky tone making the sound brighter and harder Knob 3 ATTACK Increases or decreases the EG Attack Time page 51 of the current Voice The smaller the value the faster the attack Knob 4 DECAY Increases or decreases ...

Page 47: ...ay want to shift the pitch down lower to get extra bass notes or shift up to get higher notes for leads and solos The Octave Up Down controls let you do this quickly and easily Each time you press the OCTAVE UP button on the panel the overall pitch of the Voice goes up by one octave Likewise each press of the OCTAVE DOWN button takes the pitch down by one octave The range is from 3 to 3 with 0 bei...

Page 48: ...play F1 Play The Voice Play display called up via the VOICE button has two design types which can be specified in the Screen Setting display page 220 of the Utility mode Type 1 of the Voice Play display Type 2 of the Voice Play display 1 Voice Bank Indicates the Bank of the current Voice The Voice Bank is the memory that includes data of Normal Voices and Drum Voices There are 16 Voice Banks as fo...

Page 49: ...is is same as the Control Function window page 46 8 Assign Settings This section indicates whether or not each of the controllers is assigned to the source of the Controller Set 9 SF1 ARP1 SF5 ARP5 Arpeggio 1 5 The Arpeggio types are assigned to the buttons with the 8th note icon on the display tab You can call them up by pressing these buttons any time during your keyboard performance Assigning A...

Page 50: ...onding Element is muted although the Element Switch parameter is turned on A hyphen indicates the corresponding Element Switch parameter is turned off 8 Portamento Indicates the Portamento Switch on off status page 50 of the current Voice 9 Pitch Bend Range Indicates the Upper Lower setting of the Pitch Bend Range page 56 for the current Voice Effects Indicates the Effect settings for Insertion A ...

Page 51: ...se Time are not available appears at each of the corresponding columns and these parameters cannot be edited 2 FEG Filter EG Using the FEG you can control the transition in tonal color Cutoff Frequency from the moment the sound starts to the moment the sound stops Actual transition of tonal color differs depending on the Filter type page 74 of the Voice Element Attack Attack Time Determines the sp...

Page 52: ...to control how wide or narrow the bandwidth is On the other hand the EQ shape of the High and Low band is the Shelving type which lets you attenuate boost the signal at frequencies above or below the specified Frequency setting 5 EQ graph Indicates the EQ settings as a graph The vertical axis indicates the gain and the horizontal axis indicates the frequency Arpeggio settings F4 Arpeggio This disp...

Page 53: ...Character input page 37 Number button function page 36 and List display selection page 37 The function called up via the SF6 button differs depending on the selected parameter where the cursor is located 5 Move the cursor to the desired parameter 6 Edit the value by using the INC YES DEC NO buttons and the data dial 7 Repeat steps 3 6 as desired 8 Enter the desired name for the edited Voice Use th...

Page 54: ...ht top of the display press the EDIT button the lamp lights continuously and the C indicator changes back to the E indicator Compare the edited sound with the unedited sound as desired by repeating steps 1 and 2 n While Compare is active you cannot make edits to the Voice 1 Press the STORE button to call up the Voice Store window 2 Set the destination for storing the Voice Select the destination U...

Page 55: ...instruments There are up to five Sub Categories for each Main Category indicating more detailed types of instruments Settings See the following list n You can call up the list by pressing the SF6 LIST button then select the desired one from the list For details see page 37 From this display you can make various settings such as Mono or Poly Pitch Portamento and Micro Tuning 1 Volume Determines the...

Page 56: ... and synth lead this allows a more natural and smooth sounding legato performance than when this parameter is set to poly poly When set to poly the selected Voice is played back polyphonically multiple notes can be played back simultaneously or a chord is played back What is Micro Tuning This function lets you change the keyboard scale from normal tuning equal temperament to one of a variety of sp...

Page 57: ... the specified time within an octave Portamento Legato Slope When the Mono Poly is set to mono legato playing may produce an unnatural attack depending on the waveform assigned to the selected Voice To solve such a problem you can use this parameter to adjust the attack of the Voice Normally this should be set to a low value for waveforms with short attack times and should be set to a high value f...

Page 58: ...the Arpeggio from two separate velocity ranges soft 1 34 and hard 93 127 Notes played at middle velocities between 35 and 92 do not play the Arpeggio Settings 001 127 5 Note Limit Determines the lowest and highest notes in the Arpeggio s note range Notes played in this range trigger the Arpeggio For example setting a Note Limit of C5 C4 lets you trigger the Arpeggio by playing notes in the two ran...

Page 59: ... button then select the desired one from the list For details see page 37 Type Determines the desired Arpeggio Type number from the specified Category The name of the selected Arpeggio Type is shown at right of the specified number on the display Refer to the Arpeggio Type List in Data List n For details about how to use the Arpeggio Type List see page 16 Velocity Rate Determines the offset value ...

Page 60: ...s increase it downward This parameter can be changed via the Knob directly Settings 3 0 3 8 Loop When this is set to on the Arpeggio cycles while notes are held When this is set to off the Arpeggio plays only once even if notes are held Settings off on 9 Trigger Mode When this is set to gate pressing the note starts Arpeggio playback and releasing the note stops it When this is set to toggle press...

Page 61: ...0 to the MOTIF XF via MIDI Assign1 Assign2 Indicates the Knobs printed ASSIGN 1 and ASSIGN 2 with the TONE 1 lamp turned on A Func 1 A Func 2 Indicates the built in ASSIGNABLE FUNCTION 1 and 2 buttons n You can determine the degree to which the Pitch Bend wheel affects the Destination parameter below by setting the Pitch Bend Range Upper 4 and Pitch Bend Range Lower 5 in the Play Mode display page...

Page 62: ...se point for the LFO Wave when it is reset Settings 0 90 120 180 240 270 5 Tempo Sync Determines whether or not the LFO speed is synchronized to the tempo of the Arpeggio or sequencer Song or Pattern Settings off not synchronized on synchronized n When this parameter is set to on and the MIDI sync parameter in the MIDI display of the Utility mode page 228 is set to MIDI the LFO speed is synchroniz...

Page 63: ... level A higher value results in a longer Hold time A setting of 127 produces no fade out Settings 0 126 hold Fade Out Time Determines the amount of time for the LFO effect to fade out after the Hold time has elapsed A higher value results in a slower fade out Settings 0 127 From this display you can select the destination parameter for the LFO which aspect of the sound the LFO controls the Elemen...

Page 64: ...alues of all odd steps are set to 64 n You can call up the list by pressing the SF6 LIST button then select the desired one from the list For details see page 37 n You can use the SF5 Random button to call up the base wave at random Each time you press the SF5 Random button a different LFO wave appears on the display randomly 2 Slope Determines the slope or ramp characteristics of the LFO wave Set...

Page 65: ...he Vocoder see page 66 n When ins L is selected the audio signal will be output from this instrument in mono 3 Insertion A Insertion A Category Type 4 Insertion B Insertion B Category Type Determines the Effect type for Insertion A and B From the Category column you can select one of the Effect Categories each of which contains similar Effect types From the Type column you can select one of the Ef...

Page 66: ...er of parameters and values available differs depending on the currently selected effect type Refer to page 27 for details about the Effect parameters Refer to the separate Data List for information on the parameters for each Effect type From this display you can set the Vocoder related parameters This display called up via the SF2 button is available only when the INSERTION CONNECT parameter is s...

Page 67: ...her values emphasizes the higher frequency consonant and sibilant sounds which make words easier to understand Settings thru 500Hz 16 0kHz 7 HPF Output Level Determines the level of the microphone sound output from the HPF High Pass Filter Settings 0 127 8 Formant Shift Determines the amount in BPF by which the cutoff frequency value of the BPFs for the Inst Input is shifted This parameter can be ...

Page 68: ...he Output Select parameter to ins L in the Output display page 226 of the Performance Edit mode When using the Vocoder in the Song Pattern mode set the Output Select parameter to ins L in the Audio In display page 193 of the Mixing Edit mode 2 Set the Input Gain of the A D INPUT connector to microphone In the Utility mode press the F2 button to call up the Input Output display page 223 then set th...

Page 69: ...hown at the tab menu corresponding to the SF6 button In this condition you can call up the list by pressing the SF6 LIST button then select the desired item from the list For details see page 37 1 Element Switch Determines whether the currently selected Element is on or off When this is set to off the currently edited Element will not sound Settings off inactive on active 2 XA Control Expanded Art...

Page 70: ...ist in the separate Data List 8 Key On Delay Determines the time delay between the moment you press a note on the keyboard and the point at which the sound is actually played The higher the value the longer the delay time Settings 0 127 9 Delay Tempo Sync Determines whether or not the Key On Delay above is synchronized to the tempo of the Arpeggio or sequencer Song or Pattern Settings off not sync...

Page 71: ...d will be C 2 to C4 and C5 to G8 Settings C 2 G8 n You can also set the Key directly from the keyboard by holding down the SF6 INFO button and pressing the desired key For details see page 37 Ins Effect Output Insertion Effect Output Determines which Insertion Effect A or B is used to process each individual element The thru setting lets you bypass the Insertion Effects for the specific key This p...

Page 72: ...he adjoining points of the level parameters below A higher value results in a longer time until reaching the next level Settings 0 127 1 Hold Time Determines the time between the moment you press a note on the keyboard and the moment the envelope starts to rise 2 Attack Time Determines the speed of attack from the initial pitch Hold Level to the normal pitch of the Voice after the hold time has el...

Page 73: ...me Velocity Sensitivity Determines how the PEG transition time speed responds to velocity or the strength with which the note is pressed When this is set to a positive value high velocities result in a fast PEG transition speed while low velocities result in a slow speed as shown below When this is set to a negative value high velocities result in a slow PEG transition speed while low velocities r...

Page 74: ...rea of the Cutoff Frequency This filter type is most popular and useful for producing classic synthesizer sounds LPF24D A dynamic 24 dB oct low pass filter with a characteristic digital sound Compared to the LPF24A type below this filter can produce a more pronounced resonance effect LPF24A A digital dynamic low pass filter with characteristics similar to a 4 pole analog synthesizer filter LPF18 3...

Page 75: ...can be set Only the LPF graph is shown on the display LPF12 BPF6 A combination of a low pass filter and band pass filter You can edit the distance between the two Cutoff Frequencies 2 Cutoff Determines the Cutoff Frequency for the Filter or the central frequency around which the Filter is applied The tonal characteristics of the Voice and function of the Cutoff Frequency differ depending on which ...

Page 76: ...ed Element assuming C3 as the basic pitch A positive setting will lower the Cutoff frequency for lower notes and raise it for higher notes A negative setting will have the opposite effect Settings 64 0 63 8 Center Key Indication only This indicates that the central note for Cutoff Key Follow 7 above is C3 Keep in mind that this is for display purposes only the value cannot be changed Cutoff Key Fo...

Page 77: ...ay 2 Level Determines the cutoff frequency which will be maintained while a note is held Release Level Determines the final cutoff frequency reached after the note is released EG Depth Determines the range over which the cutoff frequency envelope changes A setting of 0 will cause the cutoff frequency not to change The farther from 0 the value is the larger the range of the cutoff frequency For neg...

Page 78: ...en this is set to a negative value high velocities result in a slow Filter EG transition speed while low notes result in a fast speed When this is set to 0 the Filter EG transition speed does not change no matter what note is pressed Settings 64 0 63 Center Key Determines the central note or pitch for the EG Time Key Follow When the Center Key note is played the FEG behaves according to its actual...

Page 79: ...el Velocity Sensitivity 2 being used Settings above 64 will raise the level specified at the Level Velocity Sensitivity 2 Settings below 64 will reduce the level Settings 0 127 4 Level Velocity Sens Curve Level Velocity Sensitivity Curve The five curves determine how the actual velocity will be generated according to the velocity strength with which you play notes on the keyboard The selected curv...

Page 80: ... level after the key is pressed 2 Decay 1 Time Determines how fast the envelope falls from the Attack Level to the Decay 1 Level 3 Decay 2 Time Determines how fast the envelope falls from the Decay 1 Level to the Decay 2 Level sustain level 4 Release Time Determines how quickly the sound decays to silence after the key is released Level The Level parameters let you set the amount of the transition...

Page 81: ...cay The EG Time Velocity Sensitivity affects the Attack Time and Decay1 Time decay The EG Time Velocity Sensitivity affects the Decay Time atk rls attack release The EG Time Velocity Sensitivity affects the Attack Time and Release Time all The EG Time Velocity Sensitivity affects all the Amplitude EG Time parameters EG Time Key Follow Determines the degree to which the notes specifically their pos...

Page 82: ...angle square 2 Key On Reset Determines whether or not the LFO is reset each time a note is played Settings off on off The LFO cycles freely with no key synchronization Pressing a key starts the LFO wave at whatever phase the LFO happens to be at that point on The LFO resets with each note you play and starts a wave at the phase specified by the Phase parameter above 3 Delay Determines the delay ti...

Page 83: ...ines the standard frequency of the higher EQ band Settings 503 8 Hz 10 1 kHz 4 Low Gain Determines the amount by which signals below the Low Frequency 2 will be boosted attenuated Settings 12 00 dB 0 00 dB 12 00 dB 5 High Gain Determines the amount by which signals above the High Frequency 3 will be boosted attenuated Settings 12 00 dB 0 00 dB 12 00 dB The Parametric EQ for the single band is used...

Page 84: ...p the Key Edit display press the Number button 1 In the Drum Key Edit mode press the Key to which your desired drum instrument sound is assigned 4 Call up the desired display To find the desired display note the tab menu items corresponding to the F1 F6 buttons and SF1 SF5 buttons Each tab menu of the F1 F6 buttons contains sub menus which correspond to the SF1 SF5 buttons at the bottom of the dis...

Page 85: ...meters having the same name as those of the Normal Voice are not available for the Drum Voice This is the same as in Normal Voice Common Edit See page 55 This is the same as in Normal Voice Common Edit See page 55 This is the same as in Normal Voice Common Edit See page 57 Arpeggio settings F2 ARP Main Arpeggio Main This is the same as in Normal Voice Common Edit See page 58 Arpeggio settings F3 A...

Page 86: ...the Normal Voice Edit mode Key Determines the Drum Key to be edited The Insertion Effect Out 1 Key Reverb Send and Key Chorus Send can be set for each Drum Key Settings C0 C6 REV SEND Key Reverb Send Determines the level of the Drum key sound the bypassed signal that is sent to Reverb effect The setting here is available only when the Insertion Effect Out parameter 1 is set to thru Settings 0 127 ...

Page 87: ... in the Sampling mode FL1 and FL2 are available only when the optional Flash Memory Expansion Module FL512M FL1024M has been installed Settings PRE USR FL1 FL2 n For details about Waveform refer to the explanation of the Sampling Mode on page 119 4 Wave Main Category Waveform Main Category 5 Wave Sub Category Waveform Sub Category It is easier to find desired Waveforms 6 by setting these parameter...

Page 88: ...s 0 127 Output Select Determines the specific output s for the individual Drum key signal You can assign each individual Drum Key sound to be output from a specific hardware output jack on the rear panel This parameter is useful when you wish to apply a connected external effect to a specific drum instrument The setting here is available only when the Insertion Effect Output parameter is set to th...

Page 89: ... character to the sound Higher values result in a more pronounced effect Settings 0 127 4 HPF Cutoff High Pass Filter Cutoff Frequency Determines the Cutoff Frequency of the High Pass Filter Settings 0 255 Amplitude settings F4 Amplitude From the following displays you can set various parameters for the selected Drum Key such as Volume Pan and Amplitude EG 1 Level Determines the output level of th...

Page 90: ...nd to reach full volume Attack Level when a note is pressed 7 Decay 1 Time Determines how long it takes for the sound to fall from the Attack Level to the Decay1 Level after the note is pressed 8 Decay 2 Time Determines how quickly the sound decays from the Decay1 Level to silence after the note is released Level The Level parameter lets you set the AEG level Settings 0 127 9 Decay 1 Level Determi...

Page 91: ...f without storing will erase the Voice data Make sure to store the Voice data to internal memory by pressing the STORE button before selecting a different Voice or turning the power off Initializing the Voice F1 Init Initialize This function lets you reset initialize all Voice parameters to their default settings You can also selectively initialize certain parameters such as Common settings settin...

Page 92: ... vary depending on the type of Voice currently selected Normal Drum This parameter cannot be set when the Current Voice 2 is turned on 2 Current Voice When this is set to on the currently selected Voice the one you are editing now is selected as source Accordingly you can copy the parameter settings from an Element to the different Element of the same Voice 3 Data type of the source Voice Determin...

Page 93: ...e Number buttons 9 12 The lamp of the pressed button will be turned off and the corresponding Part will be muted Press the same button again to turn the lamp on and disengage the mute function for that Part You can turn multiple Parts on off by pressing their buttons n Parts can also be muted by using the MUTE and PART SELECT buttons Press the MUTE button the lamp lights then use the appropriate N...

Page 94: ...riety of parameters for the current Performance such as effect depth attack release characteristics tonal color and others These real time controls can be used to change the sound as you play or to quickly edit and customize the Performance One of six functions can be assigned to each knob alternatively selected via the SELECTED PART CONTROL button and the MULTI PART CONTROL button 1 Select the fu...

Page 95: ... Banks User 1 4 are provided Each Performance within a Bank is assigned to a Performance Number of 001 to 128 Performance Numbers 001 to 128 are converted to the format shown in parentheses of Banks A to H and Numbers 1 to 16 for the Bank This format corresponds to the Group buttons A H and the Number buttons 1 16 The Performance Numbers and the corresponding Group Numbers are listed below Active ...

Page 96: ...8 SF6 TAP The speed at which you press this button several times will determine the playback tempo of the Arpeggio F1 Play Pressing this button returns from the previous display to the Performance Play display F2 Voice Pressing this button calls up the display page 97 that lets you select a Voice for each Part and specify the note range it can be played from F3 EG Envelope Generator Pressing this ...

Page 97: ...reate a lower and an upper range for the Voice with a note range hole in the middle by specifying the highest note first For example setting a Note Limit of C5 C4 lets you play the Voice from two separate ranges C 2 to C4 and C5 to G8 Notes played between C4 and C5 do not play the selected Voice Settings C 2 G8 n You can also set the Key directly from the keyboard by holding down the SF6 KBD butto...

Page 98: ...nd note 63 80 16th note triplet 6 120 16th note 83 160 8th note triplet 8 240 8th note 43 320 1 4 note triplet 4 480 1 4 note 4 SW Switch Determines whether Arpeggio is on or off for each Part n When the PERFORMANCE CONTROL button is pressed so that its lamp is turned on the Number buttons 5 8 can be used to turn the Arpeggio playback of Parts 1 4 on or off 5 HOLD This is the same as in the Arpegg...

Page 99: ... 0 300 0 n When MIDI Sync page 228 is set to MIDI or auto MIDI or auto is displayed here and Tempo cannot be set n When the Sequencer Mode 1 is set to pattern the Tempo setting here will be recorded to the Pattern Even if the destination Pattern contains already recorded data the Tempo value will be replaced by the newly recorded one When the Sequencer Mode 1 is set to song the Tempo setting here ...

Page 100: ...5 buttons at the bottom of the display 5 Move the cursor to the desired parameter 6 Edit the value by using the INC YES DEC NO buttons and the data dial 7 Repeat steps 3 6 as desired 8 Enter the desired name for the edited Performance Use the Name display page 102 of the Performance Common Edit mode 9 Store the edited Performance Press the STORE button to call up the Store window page 101 then sto...

Page 101: ...l status When the C indicator is shown at the right top of the display press the EDIT button the lamp lights continuously and the C indicator changes back to the E indicator Compare the edited sound with the unedited sound as desired by repeating steps 1 and 2 1 Press the STORE button to call up the Performance Store window 2 Set the destination for storing the Performance Select a Performance Ban...

Page 102: ...ce Category can be used as a keyword representing the characteristic of the Performance The appropriate setting makes it easy to find the desired Performance from a variety of Performances The Main Category indicates the types of instruments and is divided into Sub Categories Settings See the following list Performance Category n You can call up the list and select the desired item by pressing the...

Page 103: ...y Determines the center frequency Frequencies around each of three points are attenuated boosted by the Gain setting below Higher values produce a higher frequency Settings 64 63 1 Low Frequency Determines the center frequency of the lower EQ band 2 Mid Frequency Determines the center frequency of the middle EQ band 3 High Frequency Determines the center frequency of the higher EQ band Gain Determ...

Page 104: ...ame as the Common Switch parameter in the Arpeggio display page 98 of the Performance Play mode 6 ARP Sync Quantize Value This parameter is the same as the Sync Quantize Value parameter in the Arpeggio display page 98 of the Performance Play mode Output Level and Master Effect settings F2 Level MEF 1 Volume Determines the output level of the entire Performance You can adjust the overall volume kee...

Page 105: ...one of two equalizer shapes shelving or peaking This parameter is available for Low and High Settings shelv peak shelv Shelving type This type of EQ shape lets you attenuate boost the signal at frequencies above or below the specified Frequency setting peak Peaking type This type of EQ shape lets you attenuate boost the signal at the specified Frequency setting 2 Frequency Determines the center fr...

Page 106: ...ings 0 127 6 Chorus Send Determines the Send level of the Audio Input Part signal sent to the Chorus effect The higher the value the deeper the Chorus Settings 0 127 7 Dry Level Determines the level of the Audio Input Part which has not been processed with the System Effects Reverb Chorus The higher the value the shallower the Reverb and Chorus Settings 0 127 From this display you can set the Inse...

Page 107: ...ameters in order to change how the sound is affected by the selected Effect type This parameter lets you call up the pre programmed settings of these effect parameters 4 Effect Parameters The number of parameters and values available differs depending on the currently selected effect type Refer to page 27 for details about the Effect parameters Refer to the separate Data List for information on th...

Page 108: ...A B display in the Audio In parameter of the Performance Common Edit mode For Parts 1 4 the Insertion Effect type parameter settings cannot be set in the Performance Edit mode because their settings are included in the Voice assigned to each Part If you wish to edit the Insertion Effect settings for each Part enter the Voice Edit mode then edit the Effect settings for the appropriate Voice n Depen...

Page 109: ...t its lamp lights press one of the 1 4 buttons to select a Part to be edited n For details about useful functions such as Mute Solo and Jobs see pages 101 and 117 Setting the Wave and Note range of the Part F1 Voice 1 Part Switch Determines whether the currently edited Part is on or off When this is set to off the currently edited Element will not sound Settings off inactive on active 2 Bank 3 Num...

Page 110: ...amento is applied to the current Performance or not Settings off on Portamento Time Determines the pitch transition time Higher values mean longer transition times Settings 0 127 Portamento Mode Determines how Portamento is applied to your keyboard performance Settings fingered fulltime fingered Portamento is only applied when you play legato playing the next note before releasing the previous one...

Page 111: ...in the Performance Common Edit mode 6 Assign 1 Value 7 Assign 2 Value Determines the value of Knob 7 ASSIGN 1 and Knob 8 ASSIGN 2 when the current Voice is selected and the TONE 1 lamp is turned on The functions assigned to these Knobs are shown at the right of the setting values Settings 64 0 63 n The functions of Knob ASSIGN 1 and ASSIGN 2 can be set from the Controller Set display page 61 1 PB ...

Page 112: ...rpeggio type is switched at the top of the next measure Settings realtime measure 4 Velocity Limit Determines the lowest and highest velocity which can trigger the Arpeggio playback This lets you set the velocity range with which you press the note to trigger the Arpeggio playback You can also create separate low and high trigger ranges for the Arpeggio playback with a velocity hole in the middle ...

Page 113: ...elected and the Key Mode is set to sort or thru no sound is produced even if you press a note on the keyboard 9 Velocity Mode Adjusts the velocity of the Arpeggio notes Settings original thru original The Arpeggio plays back at the preset velocities included in the Arpeggio sequence data thru The Arpeggio plays back according to the velocity of your playing For example if you play the notes strong...

Page 114: ...an be changed via the Knob directly Settings 120 120 5 Velocity Rate Determines how much the velocity of the Arpeggio playback is offset from the original value For example a setting of 100 means the original values are used Settings below 100 will reduce the velocities of the Arpeggio notes whereas settings above 100 will increase the velocities If the resultant velocity value is less than zero i...

Page 115: ...is parameter to on may solve such a problem If you feel that the Snare and Bass Drum sound is improper when the Arpeggio Type is changed via the SF1 SF5 buttons it is a good idea to set this parameter to on Settings on off MIDI Out Switch MIDI Output Switch When this is set to on Arpeggio playback data is output from the MIDI terminal Settings off not output on output MIDI Out Channel MIDI Output ...

Page 116: ...uency bandwidth Resonance is used to set the amount of Resonance harmonic emphasis applied to the signal at the cutoff frequency This can be used in combination with the cutoff frequency parameter to add further character to the sound The Width parameter is used to adjust the width of the band of signal frequencies passed by the filter with the BPFw Settings 64 0 63 Equalizer EQ Settings F5 EQ Fro...

Page 117: ...ce or turning the power off Initializing the Performance F1 Init Initialize This function lets you reset initialize all Performance parameters to their default settings It also allows you to selectively initialize certain parameters such as Common settings settings for each Part and so on 1 All Parameters All settings for the selected Performance are initialized When this is set to on the cursor c...

Page 118: ...t and Master EQ settings of a certain Voice assigned to a certain Performance to the currently edited Performance This would come in handy when a certain Performance has settings that you want to use in your Performance program 1 Performance Determines the Bank and the Performance number to be copied This parameter cannot be set when the Current Performance below is turned on 2 Current Performance...

Page 119: ...d Wave are sometimes used interchangeably however you should be careful to distinguish between Wave raw audio data and Waveform collected audio data used to make up a Voice Samples can be obtained into the instrument via the following methods Recording audio signal in the Sampling mode loading a WAV file or AIFF file from the USB storage device connected to the MOTIF XF in the File mode and loadin...

Page 120: ...s the Range of the Key Bank 3 Velocity Velocity Range Indication only Indicates the velocity range of the currently selected Key Bank 4 Sample Size Indication only Indicates the size of the Sample assigned to the selected Key Bank 5 Frequency Indication only Indicates the sampling frequency of the Sample assigned to the selected Key Bank n The rate at which digital readings are taken is referred t...

Page 121: ...dby button to call up the Record Standby display page 124 Set the following parameters on the Standby display Numbers in the parentheses are equivalent to the numbers pointing parameters on the Standby display Set the Trigger Mode 8 to determine the method by which Sampling will be triggered Normally set this to level If you set the Trigger Mode 8 to level you will also need to set the Trigger Lev...

Page 122: ... via which the signal to be sampled will be received Settings A D Input resample FW A D Input Analog audio from the A D INPUT jacks is recognized as the recording source resample Audio signal from the OUTPUT jacks of the MOTIF XF is received and recognized as the recording source FW Audio signal from the IEEE1394 connector available when the optional FW16E has been installed is recognized as the r...

Page 123: ...e is set to off this parameter cannot be set even if entering the Sampling mode from the Performance mode Settings off 1 4 Voice Determines the voice to which the Waveform 6 created via the Sampling is assigned by specifying the Voice Bank and Number Setting the Voice Bank to any of USR 1 4 assigns the Waveform 6 to the Element 1 of the new Normal Voice created via Sampling Setting the Voice Bank ...

Page 124: ...le in the level meter For best results set this as low as possible to capture the entire signal but not so low as to record unwanted noise Settings 000 127 8 Trigger Mode Determines the method by which Sampling will be triggered Settings level manual level Sampling starts as soon as an input signal exceeding the specified Trigger Level 7 is received manual Sampling starts soon after you press the ...

Page 125: ...r and confirm the Sample by pressing the SF1 Audition button If you are satisfied with the sound press the ENTER button to fix the Sampling result as Sample data If you are not satisfied with the Sampling result press the EXIT button then try again When SF1 Confirm is turned off before Sampling starts the Sampling operation will automatically fix the Sample data and return to the Setup display pag...

Page 126: ...d range of the Sample repeatedly in a loop One Shot on the other hand lets you play the entire Sample only once You ll need to determine which type Loop or One Shot is used by setting the Play Mode parameter in the Parameter display page 128 Fine tuning playback of One Shot Samples You can determine the playback range of the Sample by setting the Start Point 6 and End Point 8 in the Trim display p...

Page 127: ...int and the End point 8 Settings 0000000 End point 8 End Point Determines the End point for Sample playback The part at the right side of this point will not be played back The End Point will be automatically determined so that the length between the Start Point and the End Point matches the settings of the Tempo Meter and Measure Settings 0000000 depending on the Sample s length 9 Level Determine...

Page 128: ...tart point This is useful for creating reversed cymbal sounds and other special effects Key Range Indicates the key range of the Key Bank to which the selected Sample is assigned By assigning different Samples from a single Waveform to separate key ranges you can create a Voice that produces different sounds depending on what keys you play Settings C 2 G8 Velocity Range Indicates the velocity rang...

Page 129: ...amples assigned to the specified Key Bank 01 Copy This Job copies a specified Key Bank to another Waveform Also the Sample assigned to the Key Bank is copied 02 Delete This Job deletes the specified Key Bank and its Sample 03 Move This Job moves a specified Key Bank to another Waveform Also the Sample assigned to the Key Bank is moved 04 Normalize This Job maximizes normalizes the overall level of...

Page 130: ...e same network as the MOTIF XF page 241 8 Press the EXIT button twice to go back to the Sampling Main display n If there is no data in the specified Waveform and Key Bank No Data will appear on the display and the job cannot be executed n Some Jobs cannot be executed if there is not enough memory space The amount of the available memory space can be confirmed at the bottom of the Sampling Job disp...

Page 131: ...to another Waveform Also the Sample assigned to the Key Bank is moved 1 Source Key Bank 2 Destination Key Bank Determines the Key Banks of source and destination respectively by setting the Waveform number 001 128 Setting the source Waveform number calls up one of the Key Banks the Key range and Velocity range which can be changed by pressing the SF5 Keybank button and SF6 KBD button The Key range...

Page 132: ...hythm1 rhythm 2 sound4 sound1 These settings place emphasis on sound quality with the sound4 setting producing the highest sound quality normal Produces an optimum balance of sound quality and rhythmic feel rhythm1 rhythm2 These settings place emphasis on rhythmic feel with the rhythm2 setting producing the most accurate rhythmic feel NOTICE The Job execution is divided into two stages temporary d...

Page 133: ...mines the Key Bank to which the desired Sample is assigned by specifying the Waveform number 001 128 The Key range and Velocity range of the Key Bank to which the selected Waveform is assigned are automatically shown below the Waveform number NOTICE The Job execution is divided into two stages temporary data conversion via the SF4 Apply button and actual data entry via the ENTER button The Job res...

Page 134: ...the Lowest Key 7 parameter When entering this Job from the Song Pattern mode note data for playing the slices in sequence is also created Playing back the note data and the slices in order results in the same sound as the original un sliced Sample 1 Key Bank Determines the Key Bank to which the desired Sample is assigned by specifying the Waveform number 001 128 The Key range and Velocity range of...

Page 135: ... want to transpose by less than one octave set this to 0 and use the Note parameter below Settings 3 0 3 3 Note Determines the amount in semitones by which the Key Bank is transposed When you want to transpose by exact octaves set this to 0 and use the Octave parameter above Settings 11 0 11 This Job lets you assign a name to the selected Waveform 1 Waveform Determines the Waveform number to which...

Page 136: ...idway through the Song set the desired location by using the controls below then press the F Play button These operations can be also executed during playback When the Song is not played back properly Keep in mind that starting a Song from somewhere in the middle may cause playback problems such as the wrong sound incorrect pitch or unexpected volume changes This may occur because the MIDI events ...

Page 137: ... button will flash and only the corresponding track will be sounded Pressing the different Number button changes the soloed track 1 Move the cursor to Tempo 2 Edit the Tempo value by using the INC YES DEC NO buttons and the data dial You can assign five different snapshots of important Song related parameters such as transpose tempo track mute status and the basic Song Mixing setup to the SF1 SF5 ...

Page 138: ...will be stopped at that Song Press the F Play button to restart playback from the next Chain number If an end is assigned to the Chain number playback will stop at the end of the Song 3 If you wish to stop playback in the middle of a Song Chain press the J Stop button n The Song Chain can only be played back in the Song Chain display and not from any other display Knobs and Sliders By using the kn...

Page 139: ...ding to the desired track Note that track 1 does not always correspond to the Mixing Part 1 As illustrated below each track of the Song sequence data and each Mixing Part of the tone generator block are connected when the transmit channel TxCH equals the receive channel RcvCH In other words the sequence data of each track plays the corresponding Parts those having the same MIDI channel assignment ...

Page 140: ...assigned For Mixing Parts that correspond to MIDI tracks a Voice other than a Sample Voice is assigned For more information about Audio tracks and MIDI tracks see page 14 9 Mute Solo Indication only Indicates the Mute Solo status for each track For detailed instructions on setting Mute Solo see page 137 Blank Neither Mute nor Solo are assigned to this track m Indicates muted track s Indicates solo...

Page 141: ...0 results in no quantization A setting of 50 result that the note events are pulled to the half point between the 0 and 100 Settings 0 100 When quarter note quantization is applied to the original data 3 Swing Adjusts the timing velocity and gate time the length of time a note sounds of the even numbered back beat notes to enhance the swing feel This parameter delays notes on even numbered beats b...

Page 142: ...isplay by pressing the SF6 button or the EXIT button Output Channels and Loop settings for each track F3 Track This display lets you set the Output Channel and set the Loop Playback related parameters for each track This display lets you set the MIDI Transmit Channel for each track 1 Voice Indication only Indicates the Voice name of the Mixing Part corresponding to each track n In the Part 1 16 di...

Page 143: ...in Chain number that number will be skipped after a one measure count In addition to Song numbers skip end and stop commands can be assigned to the Song Chain numbers Settings skip end stop 01 64 skip Skips ignores the selected chain number and continues playback from the next chain number end Indicates the end mark of the Song Chain data stop Stops Song Chain playback at that chain number You can...

Page 144: ...tore the recorded Song to internal User Memory NOTICE The recorded Song will be lost when selecting a different Song calling up a different mode or turning the power off Make sure to store the Song data to internal memory by pressing the STORE button before selecting a different Song calling up a different mode or turning the power off 6 Save the created Song data to a USB storage device or to a c...

Page 145: ...only Indicates the Mute Solo status for each track For detailed instructions on setting Mute Solo see page 137 Blank Neither Mute nor Solo are assigned to this track m Indicates muted track s Indicates soloed track 8 Voice name Indication only Indicates the Voice name of the Mixing part corresponding to each track 9 REC TR Record Track Determines the track to be recorded Move the cursor to the des...

Page 146: ...ee page 189 Voice number 001 128 n You can call up the list and select the desired one by pressing the SF6 LIST button For details see page 37 Volume Determines the volume for the recording track The setting here is applied to the Volume setting for the Record Part Settings 0 127 Pan Determines the stereo pan position of the sound The setting here is applied to the Pan setting for the Record Part ...

Page 147: ...ne is registered to the corresponding button If the Arpeggio Type is set to off in the Arpeggio display of the Song Record pressing the corresponding Sub Function button in the Setup display Track View display will not change the Arpeggio type even if the 8th note icon is shown Realtime Recording Procedure This section explains how to record your performance using the Realtime Recording features P...

Page 148: ...display page 145 From this display set the Record track to Tempo Track then set the Recording type to replace If necessary set various parameters such as tempo time signature measure quantize 3 Press the F5 Click button to turn the Click on when you wish to use the metronome In the Click display page 231 called up via the SEQ SETUP button you can make various settings for the metronome click such ...

Page 149: ...is makes it easy to create Parts by recording them a little at a time The Overdub Recording procedure is almost same as the Replace except that the Record type is set to overdub n When the Record Track 5 is set to Tempo Track or Scene Track overdub cannot be selected here SONG I Record Record track selection Type punch F Play Realtime recording can also be done between specified start punch in and...

Page 150: ...Play display to call up the Event List display page 151 2 Select the track to be edited Pressing the F4 Track Sel button switches the Recording track among Tracks 1 16 the Scene track and the Tempo track When 1 16 tracks is selected you can select the track to be edited by pressing any of the Number buttons 1 16 3 Move the cursor to the event or parameter to be edited Use the L M Cursor Up Down bu...

Page 151: ...display Event List display In the Event List display MIDI events including mainly values such as note number velocity and control change value are listed and can be edited n Depending on the selected parameter the NUM icon is shown at the tab menu corresponding to the SF6 button In this condition you can use the SF1 SF5 and F1 F5 buttons as number buttons by pressing the SF6 NUM button For details...

Page 152: ... you to input a number directly by using these buttons For details see page 36 Changing the MIDI event view F3 View Filter MIDI song data generally has a large amount of recorded events and the Event List window may be overcrowded with them Since it may be difficult to find a specific event you can use the View Filter function to help narrow down your search This conveniently lets you specify whic...

Page 153: ...ocks 02 Copy Event This Job copies all data from a specified source range to a specified destination location 03 Erase Event This Job clears all specified events from the specified range effectively producing a segment of silence 04 Extract Event This Job moves all instances of specified event data from a specified range of a track to the same range in a different track 05 Create Continuous Data T...

Page 154: ...plied Keep in mind that the end point itself is not included in the range The actual range to which the Job is applied is from the start point to the point that is one clock less than the end point This rule applies to cases in which you specify only the Measure however the example illustration below shows specifying the Measure Beat and Clock n Some of the Jobs which enable you to copy the Sample...

Page 155: ...d A setting of 100 is equivalent to twice the length of a 8th note or 16th note A setting of 50 produces exact timing and therefore no swing feel Settings above 51 delays the note timing to increase the amount of swing with 66 being equivalent to a triplet delay n The Swing Rate is applied to notes which are located on even numbered beats backbeats by setting the Strength to 100 If the Strength is...

Page 156: ...alue to the Rate adjusted gate time values Settings below 0 shorten the gate time and settings above 0 lengthen the gate time A setting of 0 produces no change When the Set All parameter above is set to other than off this parameter cannot be set Settings 9999 9999 This Job lets you create a crescendo or decrescendo over the specified range of notes Crescendo is a gradual increase in volume and de...

Page 157: ...e specified range set the PB Range to a value of 12 or higher n Please note that the Song may not play back properly if you set the PB Range 3 to the value different from the one set via the Voice Edit mode In order that the Song plays back properly insert the MIDI event below to the corresponding track in the Song Edit display page 151 RPN 000 000 xxx Enter the Pitch Bend value to xxx This Job cr...

Page 158: ...xecuting this Job with this setting execute the Separate Chord Job to create a guitar like upstroke and downstroke strum 3 Grid Determines the type of note that serves as the basis for the Chord Sort Job Settings 32nd note 16th note triplet 16th note 8th note triplet 8th note 1 4 note triplet 1 4 note n You can call up the list and select the desired item by pressing the SF6 LIST button For detail...

Page 159: ...ing CC Ch Mode events Settings When Track is set to one of 01 16 Note Program Change Pitch Bend CC Ch Mode Control Change and Channel Mode Message Ch After Touch Channel Aftertouch Poly After Touch Polyphonic Aftertouch System Exclusive all You can specify the Control Number 000 127 all When Track is set to tempo Tempo Change When Track is set to scene Scene Memory Track Mute n You can call up the...

Page 160: ...ocks to be inserted between each created event Settings 001 999 5 Curve Determines the curve of the continuous data Refer to the graph below for approximate curve shapes Settings 16 16 6 Number of Times Determines the number of times the data creation is to be repeated For example if data is created in the range M001 1 000 M003 1 000 and this parameter is set to 03 the same data will be created at...

Page 161: ...be shifted from their original values When the Set All parameter above is set to other than off this parameter cannot be set Settings 000 200 5 Offset Adds a fixed value to the Rate adjusted event values When the Set All parameter above is set to other than off this parameter cannot be set Settings 127 127 8192 8191 for pitch bend This Job performs time expansion or compression over the selected r...

Page 162: ...ck 1 Source Song and Track Determines the copy source Song and track 01 16 When the Current box is checked the current Song is selected as Source 2 Data Type to be copied Determines the type s of data to be copied Settings Sequencer Event all events in the track Play Effect Mix Part Parameter all Mixing Part parameters Sample Voice n When there is no memory available in the destination Song for Sa...

Page 163: ... type by checkmarking the appropriate box Settings Sequencer Event all events in the track Play Effect Mix Part Parameter all Mixing Part parameters Sample Voice NOTICE Undo Redo cannot be used to undo redo a Clear operation for tracks that contain sample data n The Waveform on SDRAM cannot be deleted via this Job even if the Sample Voice box is checked If you want to actually delete the Waveform ...

Page 164: ...stination The Arpeggio name can contain up to 20 characters You can call up the Character List display by pressing the SF6 CHAR button and enter the name For detailed instructions in naming refer to Basic Operation on page 37 NOTICE Any previous Arpeggio data in this number will be overwritten 4 Original Notes Root Determines the root note when the Convert Type of any track is set to org notes Set...

Page 165: ... 001 999 2 Copy Sample Voice When this box is checkmarked Sample Voices used by the source Song are copied to the destination Pattern as Sample Voices and are assigned to the Mixing Part corresponding to the destination track This checkbox has no effect if no Sample Voices are assigned to the tracks in the source Song 3 Pattern Section Determines the destination Pattern and Section A P NOTICE This...

Page 166: ...the Pattern Play display page 168 2 Select a Pattern Move the cursor to the Pattern number then select the desired Pattern by using the data dial INC YES and DEC NO button The name of the selected Pattern is displayed If you press the PROGRAM button so that its lamp lights you can select the desired Pattern by using the Group A D buttons and the Number 1 16 buttons Pattern numbers and the correspo...

Page 167: ...e it during Pattern recording or playback to make instantaneous setting changes Pattern Scene parameters are same as the ones of Song Scene See page 137 Registering the Pattern Scene After making the desired settings for the Scene simultaneously hold down the STORE button and press one of the SF1 to SF5 buttons The 8th note icon is shown in the tab corresponding to the Sub Function button to which...

Page 168: ... H buttons printed SECTION A H and the USER1 ETHNIC buttons printed SECTION I P For details see page 167 Settings A P 3 Measure Determines the location at which playback starts This also indicates the current location of playback The Measure can be set via the SEQ TRANSPORT buttons For details see page 136 Settings Measure 001 256 Available range of measure differs depending on the length below Be...

Page 169: ...s up the Pattern Chain display page 171 C F6 Remix Calls up the Remix display page 175 This menu is shown only when the cursor is located on the track containing data Changing the rhythmic feel of the Pattern F2 Play FX Play Effect By changing the timing and velocity of the notes you can change the rhythmic feel of Pattern playback The Play Effect settings made here are only temporary and don t ch...

Page 170: ...efer to Basic Operation on page 37 3 SF4 Clear Pressing this button clears the Phrase assignment to the currently selected track and leaves the track empty Move the cursor to the Phrase track to be cleared then press the SF4 button 4 SF5 Copy Pressing this button copies a Phrase in another Pattern to the selected one then assign it to the specified track This is useful if you are creating a Patter...

Page 171: ...ss the STORE button to store the Pattern For detailed instructions on storing a Pattern see page 177 Pattern Chain F5 Chain Pattern Chain Pattern Chain allows you to string several different Sections together to make a one complete Song For example create a Section A for the intro a Section B for the verse a Section C for the chorus and a Section D for the ending and you have the basic blocks to b...

Page 172: ...hanges of the Section track mute and tempo all of which are indicated on the display in real time n You can confirm the Pattern Chain data by calling up the Pattern Chain Edit display From the Pattern Chain Record display you can record playback of the Pattern along with any realtime changes you make Press the I Record button from the Pattern Chain Play display to call up the Pattern Chain Record ...

Page 173: ... MEAS Measure 2 BEAT 3 CLOCK Indicates the location of the corresponding event Changing any of these values changes the location of the event accordingly Settings MEAS Measure 001 256 BEAT 01 16 The available range may change depending on the Meter CLOCK 000 479 The available range may change depending on the Meter 4 Event Type 5 Setting Values The following events are available in the Pattern Cha...

Page 174: ...he end position of the Pattern Chain 2 Inserting location Specifies the location at which the new event will be inserted Settings MEAS Measure 001 999 BEAT 01 16 depends on the meter CLOCK 000 479 depends on the meter 3 Value of the selected event type Enters the value of the event to be inserted The values available differ depending on the selected Event Type 1 Settings Time Signature 1 16 16 16 ...

Page 175: ...g a sliced sample voice the various segments of the sample are rearranged with varied timing The sample voices can be created by executing the Sampling with the Sampling Type set to slice seq or executing the Sample Slice Job n The Remix display is available only when the cursor is located on the track containing data 1 Type Determines how a single measure is divided The dividing point and the amo...

Page 176: ... to 2 the data is divided at three points the upbeat before beat 2 the downbeat of beat 3 and the upbeat before beat 4 5 Interval diagram Indicates the measures to which the Remix is applied These measures are located at the same interval determined by the Interval 3 parameter The example below results when setting the Interval 3 to 2 6 SF4 Cancel Pressing this button cancels the most recent Remix...

Page 177: ...gio set the necessary parameters from the Arpeggio display page 178 4 Record your keyboard performance in real time to create a Phrase Press the F Play button to start recording Press the J Stop button to stop recording 5 Edit the recorded Phrase using the Pattern Job page 181 and Pattern Edit page 179 6 Store the Pattern including the recorded Phrase to internal User Memory Press the STORE button...

Page 178: ...or press any of the Number buttons 1 16 with the TRACK lamp turned on so that the red circle is shown in the corresponding column of the REC TR Settings 1 16 Record Type Determines the Recording method Settings replace overdub replace You can use this method when you want to overwrite an already recorded track with new data in real time The original data will be erased overdub You can use this met...

Page 179: ... new events to the Pattern By using the Insert Event window you can input the events one by one The Event List display will always appear when the Pattern Edit mode is first called up Editing the recorded data Here in outline form is the process of correcting or deleting already recorded events 1 Select a track to be edited in the Pattern Play display If you wish to edit a certain phrase press the...

Page 180: ... the list For details about each event and parameter see page 30 3 Press the F6 Set button to insert the specified event at the specified location The Insert Event window remains open allowing you to continue inserting new events Press the ENTER button to actually insert the event and close the Insert Event window 4 Press the EXIT button to go back to the Event List display Event List display In t...

Page 181: ...his Job splits a selected Phrase into two separate Phrases 06 Get Phrase from Song This Job copies a segment of sequence track data from a Song into the designated destination Phrase 07 Put Phrase to Song This Job copies a selected user Phrase into a specified area of a selected Song 08 Clear Phrase This Job deletes all data from the selected Phrase F5 Track Track Jobs 01 Copy Track This Job copie...

Page 182: ...ecting a different Pattern or turning the power off without storing will erase the Pattern data Make sure to store the Pattern data to internal memory by pressing the STORE button before selecting a different Pattern or turning the power off n Some of the Jobs which enable you to copy the Sample Voice from the source to the destination execute the actual copy operation only when the Bank Select an...

Page 183: ...rase to be exchanged Determines the Pattern number 01 64 and Phrase number 001 256 to be exchanged respectively n If this Job is applied to Phrases which use Sample Voices the Sample Voices will not be exchanged This Job mixes all data from two selected user Phrases 1 and 2 and places the result in Phrase 2 This is useful if you wish to create a new Phrase by mixing two Phrases played for example ...

Page 184: ...56 measures 2 Destination Phrase Determines the destination Phrase by selecting the Phrase number 001 256 The destination Phrase can be specified among the Phrases of the current Pattern NOTICE Any previous data in the copy destination will be overwritten 3 Copy Sample Voice When the Copy Sample box is checkmarked Sample Voices used in the source data are copied to the destination Phrase as Sample...

Page 185: ...in the track Play Effect Mix Part Parameter all Mixing Part parameters Sample Voice n When there is no memory available in the destination Pattern for Sample Voice data an alert message will appear on the display and the Sample Voice data will not be copied even though the check box of the Sample Voice is marked If this occurs use Sample Job 02 Delete to delete any unused samples then try again NO...

Page 186: ...tern to a selected destination Pattern 1 Source Pattern 2 Destination Pattern Determines the source and destination Pattern by selecting the Pattern number 01 64 and Section A P all If you set the source Section to all the destination Section is also set to all automatically with the result that all source Pattern data is copied to the destination 3 Copy Pattern Chain When this box is checkmarked ...

Page 187: ... destination Pattern When either of the Pattern number or Section is set to off the part after the Split Point 3 of the original pattern 1 will be deleted NOTICE This Job overwrites any data already existing in the split destination Pattern 2 3 Splitpoint Measure Specifies the measure at which the Pattern will be split Settings 002 256 4 Keep Original Phrase When this box is checkmarked the Phrase...

Page 188: ... such as the Master Effect the Master EQ and the Controller settings Part Edit lets you adjust various parameters for each of 16 Parts according to the corresponding Song Pattern track Effect and EQ structure in the Mixing mode In the Mixing mode two EQ blocks and three Effect blocks are available The two EQ blocks in the Mixing mode are Part EQ and Master EQ Part EQ is applied to each of the Mixi...

Page 189: ...f a certain Song Pattern for another Song Pattern execute the copy operation page 200 in the Mixing Voice Job mode Note that up to 256 Mixing Voices can be stored for all Songs and Patterns Accordingly the Mixing Voice memory will become full and additional Voices cannot be stored if you ve stored 16 different Voices for 16 different Songs If such a situation occurs use the Delete Job page 200 to ...

Page 190: ...Part Edit mode The settings made here are automatically applied to the corresponding parameters in the displays in the Mixing Part Edit mode and vice versa 1 Part Indication only Indicates the Part numbers When the TRACK lamp is turned on the Part can be selected via the Number buttons 1 16 2 Mute Solo Edit Indication only Indicates the status of each Part When the MUTE lamp is turned on the Mute ...

Page 191: ...nput F5 Effect Calls up the Effect display page 193 in the Common Edit mode F6 Vce Edit Mixing Voice Edit Enters the Mixing Voice Edit mode letting you edit the Voice assigned to the current Part If the Drum Voice or Sample Voice is assigned to the current Part this button does not appear and the Mixing Voice is not available Audio Input settings F2 Audio From this display you can set parameters r...

Page 192: ... turned on and only the corresponding Part will be sounded Press any other number button to change the solo Part n To exit from the Mute and Solo conditions press the TRACK or PERFORMANCE CONTROL button When changing the value of the parameter in the Mixing Play or Edit mode the E Edit Indicator will appear on the top right corner of the LCD display This gives a quick confirmation that the current...

Page 193: ...plays you can set the Effect connection and values of other parameters For details about the Effect structure in the Mixing mode see page 24 SF1 Connect From this display you can set the Return level of the Reverb Chorus effect Effect Pan and Chorus to Send Level The function of this display is the same as the one in the Connection display page 107 in the Performance Common Edit mode SF2 Ins Switc...

Page 194: ...n the Performance Part Edit mode 1 Receive Channel Determines the MIDI receive channel for the selected Part Since MIDI data may be coming from many channels at once you should set this to match the particular channel over which the desired controlling data is being sent Settings 01 16 off SF2 Output From this display you can set the Reverb Chorus depth and the Output jack assignment for each Part...

Page 195: ...ired Mixing Job menu by pressing the appropriate button F1 F6 3 Set the parameters for executing the Job 4 Press the ENTER button The display prompts you for confirmation To cancel the Job press the DEC NO button 5 Press the INC YES button to execute the Job After the Job has been completed a Completed message appears and operation returns to the original display 6 Press the MIXING button to retur...

Page 196: ... Mixing and wish to use some parameter settings from another Mixing Source setup 1 In the Song mode Song number In the Pattern mode Pattern number Determines the source Mixing by selecting the Song number Pattern number while in the Pattern mode The name of the selected Song or Pattern is indicated at right To select the current Mixing as source enter the checkmark in the Current Mix checkbox 2 Da...

Page 197: ...ts 9 12 and channel 13 will be assigned to Parts 13 16 This function lets you send specified parameter settings for the currently edited Mixing to a computer or another MIDI device for data archiving To execute the Bulk Dump press the ENTER button n The Bulk Dump data includes only the MIDI messages and does not include the Waveforms n In order to execute Bulk Dump you ll need to set the correct M...

Page 198: ... You can also select the Voice here To do this press the PROGRAM button the lamp lights then select the desired Voice by using the Bank buttons PRE 1 GM Group buttons A H and the Number buttons 1 16 3 Press the F6 Vce Edit button to enter the Mixing Voice Edit mode 4 Call up the Common Edit display or Element Edit display for a Normal Voice Key Edit display for a Drum Voice To call up the Common E...

Page 199: ...ing the Mixing Voice Select a Mixing Voice MIXV number as destination by using the data dial INC YES and DEC NO buttons You can store the Voice edited in the Mixing Voice Edit mode also as a User Voice by setting the Voice Bank to USR1 USR4 or USER DR 3 Press the ENTER button The display prompts you for confirmation To cancel the Store operation press the DEC NO button 4 Press the INC YES button t...

Page 200: ...py the Mixing Voice stored to a specified Song Pattern to another Song Pattern 1 Source Mixing Voice Determines the source Mixing Voice by selecting Song or Pattern 01 64 then specifying the number 01 16 all The main category 1 main category 2 and name of the selected Mixing Voice is indicated in the lower line 2 Destination Mixing Voice Determines the destination Mixing Voice Same as above This J...

Page 201: ...en Samples Sample Voices and Mixings n For details about Samples Waveforms and Key Banks see page 119 Audio Recording to Song Pattern Because Songs and Patterns on the MOTIF XF handle only MIDI data audio signal cannot be recorded directly to a track even by executing the Sampling operation Audio data you ve recorded to a track via the Sampling operation will be stored as a Sample Voice to a Song ...

Page 202: ...e sound from both of the original Sample and the sliced Sample If this were the only result Slice wouldn t be of much use However once a Sample is sliced in this way it can be changed and played back in many convenient and creative ways Firstly you can change the tempo of the Sample in real time While the MOTIF XF features a Time Stretch Job for changing the tempo of the Sample this Job cannot be ...

Page 203: ... the currently selected Song Pattern Measure Indication only Indicates the measure number of the currently selected Song Pattern n Keep in mind that you can assign the User Voices created in the Sampling mode entered from the Voice Performance mode to Mixing parts of the Song Pattern You can also assign the Waveforms created in the Sampling mode entered from the Song Pattern mode to Elements of th...

Page 204: ...etermines the Waveform number as destination Settings 001 128 NOTICE This operation overwrites any data previously existing at the destination Waveform number Important data should always be saved to a USB storage device connected to the USB TO DEVICE terminal or to a computer connected to the same network as the MOTIF XF page 241 7 Keybank Determines the note number of the Key Bank as destination...

Page 205: ... You can change the measure number by using the G H Reverse Fast Forward buttons Settings When entering the Sampling mode from the Song mode 001 999 When entering the Sampling mode from the Pattern mode 001 256 6 Record Monitor Determines the output level of the monitor for the input signal This monitor signal is output from the PHONES jack or the OUTPUT R and L MONO jacks Settings 0 127 7 Record ...

Page 206: ...e and SF1 Confirm is turned on When Recording Type page 204 to slice seq From the FINISHED display you can listen to the just recorded Sample by pressing the SF1 button See below for details When F2 Confirm is turned on before the Sampling starts the FINISHED display below appears as soon as the Sampling is finished From this display you can hear and confirm the Sample by pressing the SF1 Audition...

Page 207: ...address value of the Start will be copied to the one of the Loop with the result that both of them share the same address value The menu indication of the SF2 button also changes from LP ST to LP ST 4 Press the ENTER button The display prompts you for confirmation If you wish to cancel the operation press the DEC NO button 5 Press the INC YES button to execute the Extract operation to delete unwan...

Page 208: ...mple in the display F6 Slice Pressing this button calls up the Record Slice display Slicing the Sample Record Slice display When the Recording Type page 204 is set to slice seq you can call up this display by pressing the F6 Slice button in the Record Slice display From this display you can divide the recorded Sample into several slices according to the rhythm of the original Sample By executing t...

Page 209: ...th notes for example the Meter should be set to 4 4 and Sub Divide to 1 2 This parameter has no effect when the Slice Type parameter is set to beat 1 2 Settings When Meter is set to 1 8 4 quarter note 1 1 8th note 1 2 4th note triplet 1 3 16th note 1 4 8th note triplet 1 6 32nd note 1 8 16th note triplet 1 12 When Meter is set to 1 16 8 8th note 1 1 16th note 1 2 8th note triplet 1 3 32nd note 1 4...

Page 210: ...riginal memory because a tail section is automatically added and fade in and fade out sections are automatically created at the beginning and end of the wave data This helps to maintain maximum sound quality when the tempo is increased and results in smoother connections between slices no tail section is created when the quick slice type is selected A memory work area is required for the processin...

Page 211: ...grams To call up the desired Master program select the appropriate Group and Number Playing the Keyboard in the Master Play mode MASTER In the Master Play mode you can select a Master program and play the keyboard according to the settings of the selected Master program Changing the Master number lets you call up one of the modes and various settings such as tone generator settings multi timbral o...

Page 212: ...ich you press this button several times will determine the playback tempo of the Arpeggio Song Pattern Master Edit The Master Edit mode lets you create your own original Master programs containing up to eight different Zones keyboard areas by editing the various parameters To enter the Master Edit mode press the EDIT button in the Master Play mode Press the EXIT button to return to the original di...

Page 213: ...ifferent mode or turning the power off Because User Memory to which the Master is stored is Flash Memory the edited and stored Master will not be erased even if the power is turned off You need not worry about losing your stored data The Master Store operation however will overwrite the Master data already stored to the destination Master number For this reason important data should always be back...

Page 214: ...he Mode is set to Pattern Pattern Number 01 64 When the Mode is set to Song Song number 01 64 3 Zone Switch Determines whether or not the keyboard will be divided into up to eight independent areas called Zones For details about Zones see page 212 Settings on off 4 Knob Ctrl Assign Knob Control Assign From this display you can set which row of Knob functions will be lit and selected When set to zo...

Page 215: ...transmitted to the internal tone generator even if the Int Switch parameter is set to on 3 Ext Switch External Switch Determines whether or not MIDI data for each Zone is transmitted to an external MIDI device From this display you can set the pitch and keyboard related parameters for each Zone allowing you to set up Zone splits and determine the pitch range for each Zone 1 Octave Determines the a...

Page 216: ...essing and holding a note on the keyboard 3 Modulation Wheel MIDI messages generated by using the Modulation Wheel 4 Ribbon Controller MIDI messages generated by using the Ribbon Controller 5 Foot Controller 1 6 Foot Controller 2 MIDI messages generated by using the optional Foot Controller connected to the rear panel 7 Sustain MIDI messages generated by using the optional Footswitch connected to ...

Page 217: ...or each Zone The function name is automatically shown below the number you select Settings 0 95 2 Control Slider No Determines which Control Change numbers are transmitted when you use the Control Sliders for each Zone The function name is automatically shown below the number you select Settings 0 95 Master Job The Master Job mode features convenient data initialization and archiving tools To ente...

Page 218: ... and the MIDI Transmit Channels to 1 8 respectively layer Sets the Zone 1 and Zone 2 to on then lets you layer two Parts Upper Ch and Lower Ch determine the MIDI transmit channels of the two Zones respectively 5 Upper Ch Upper Channel 6 Lower Ch Lower Channel Determines the MIDI transmit channels of Zone 1 and Zone 2 respectively when the Initialize Type is set to layer or split Settings 1 16 7 Sp...

Page 219: ...will be lost when the power is turned off without storing n The parameter settings in the Utility displays and Sequencer Setup displays are treated and stored as a single unit This means that when you execute the Store operation in the Utility mode the settings in the Sequencer Setup displays are also stored and vice versa 5 Press the EXIT button to exit from the Utility mode to the original mode ...

Page 220: ... with which you play notes on the keyboard The graph shown in the display indicates the velocity response curve The horizontal line represents the received velocity values strength of your playing while the vertical line represents the actual velocity values transmitted to the internal external tone generators Settings normal soft hard wide fixed normal This linear curve produces one to one corres...

Page 221: ...her computer on the same network can access files on the USB storage device connected to the USB TO DEVICE connector of the MOTIF XF Settings on off n Make sure to set the Password of this instrument before setting this parameter to on If this is set to on before the Password is set Password is unspecified appears 5 IP Address Determines the IP Address a string of numbers assigned to each computer...

Page 222: ...ry the password is not set Make sure to set the password if you wish to access the MOTIF XF from an external computer via the LAN network Mount User Name Determines the User Name necessary for accessing the computer on the network By storing this parameter to the MOTIF XF the User Name will be shown automatically on the dialog page 43 appearing when you log in to the computer From this display you...

Page 223: ...es GM 001 is selected automatically master When turning the power on next time the Master Play mode is entered and the first program number 001 is selected automatically n Make sure to store the Utility settings to the internal memory by pressing the STORE button before turning the power off Please keep in mind that the Utility settings will be lost if you turn off the power without executing the ...

Page 224: ...mance to the DAW software on the computer The audio signal of the MOTIF XF will be output directly via the OUTPUT L MONO and R jacks with the audio signal sent from the DAW software via an IEEE1394 cable Keep in mind that the Rec Monitor of the DAW software should be set to off in order to prevent double sound from occurring n When with PC is selected there may be a short delay between when you pl...

Page 225: ...ng in the User Bank You can copy a Micro Tuning to another number then create new one based on it This display is available only when entering the Utility mode from the Voice mode 1 Micro Tuning No Determines the destination to which the created Micro Tuning setting is stored Settings 1 8 2 Micro Tuning Name Enters the desired name for the Micro Tuning For detailed instructions on naming see page ...

Page 226: ...annels of the audio input are mixed and processed in mono 4 Output Select Determines the output jack assignment for the Audio Input Part Settings See the table below n You can call up the list and select the desired item by pressing the SF6 LIST button For details see page 37 5 Reverb Send Determines the Send level of the Audio Input Part signal sent to the Reverb effect The higher the value the m...

Page 227: ...sted in the selected Category Settings Details about the Effect categories and types are described on page 24 n You can call up the list and select the desired item by pressing the SF6 LIST button For details see page 37 From these displays you can set the Insertion Effect Types applied to the Audio Input signal in the Voice mode These displays are available only when entering the Utility mode fro...

Page 228: ...m exclusive messages Settings 1 16 all off all When this is selected system exclusive messages for all MIDI device numbers are received When system exclusive messages such as bulk dump are transmitted from the MOTIF XF with this setting the MOTIF XF is recognized as Device Number 1 off When this is selected system exclusive messages such as bulk dump and parameter change cannot be transmitted or r...

Page 229: ...s both in transmission and reception When this is set to on this synthesizer responds to incoming Program Change messages and it also transmits appropriate Program Change messages when using the panel When this is set to off Program Change messages cannot be transmitted received Settings off on Local Control This determines whether or not the tone generator of the instrument responds to your keybo...

Page 230: ...used or not in the Voice It is a good idea to use this function before executing the Delete operation 4 SF1 Delete one Use this button to delete only one Waveform After selecting the Slot number at 1 select the Waveform at 2 then press this button to delete the selected Waveform 5 SF2 Delete all Use this button to delete all the Waveforms listed on the display After selecting the Slot number at 1 ...

Page 231: ...and demo patterns Normally this should be set to off Settings on off NOTICE When the Power On Auto Factory Set parameter is set to on turning the power off erases all the User memory data such as Voice Performance Song Pattern and Utility settings For instructions on executing the Factory Set Job refer to the Owner s Manual Sequencer Settings SEQ SETUP In the Song mode Pattern mode or Performance ...

Page 232: ...ouch Polyphonic After Touch System Exclusive Channel Mode Message Settings B not transmitted recognized A transmitted recognized From this display you can instantly call up appropriate sequencer related panel settings by selecting convenient preset setups allowing you to simultaneously set a variety of important sequencer related parameters n The Track INT Switch and Track EXT Switch parameters ar...

Page 233: ... retained when Patterns are switched When set to off the tempo will switch to that stored with the new Pattern when Patterns are switched Normally set this to off Settings on off n The tempo setting data in the Pattern Chain is not affected by this parameter 3 Load Mixing Determines whether the Mixing settings are loaded on or not off when the Song Pattern number is changed Normally set this to on...

Page 234: ...sion types according to the particular data For details see page 235 Refers to the memory amount of the file The file size is determined by the amount of data saved to the file Generally the size of an audio file including the Waveforms is much larger than the size of a MIDI file File sizes are indicated in conventional computer terms by B Byte KB Kilo Byte MB Mega Byte and GB Giga Byte 1KB is equ...

Page 235: ...he following two lists File types that can be saved Automatically assigned to the saved file Path Mount Format Save Load Type File extension Description All X3A All data in this synthesizer s internal User Memory Flash ROM is treated as a single file and can be saved to the USB storage device All Voice X3V All the User Voice data in this synthesizer s internal User Memory Flash ROM is treated as a...

Page 236: ...instrument Voice 1bank voice X3A X3V A specific Voice or Voice Bank in a file that is saved to the USB storage device as All or All Voice type can be individually selected and loaded to the instrument Please note that the file icons F of X3A and X3V are changed to G as virtual folders when this file type is selected page 243 Performance X3A A specified Performance in a file that is saved to the US...

Page 237: ...e Directory File list box below The current directory can be changed in the Directory File list box below 3 Directory File list Indicates the directories and files in the current Directory In this box the directories and files are listed in alphabetical order with the exception of the top line which is provided for moving to the next highest directory You can distinguish the directory and file by ...

Page 238: ...sing this button calls up the Format window For details see page 240 F4 Audio Pressing this button calls up the window for recording your keyboard performance as an audio file or playing an existing audio file For instructions refer to the Owner s Manual 1 Press the FILE button to enter the File mode The File window page 237 appears 2 Mount the memory devices to which the file is saved or from whi...

Page 239: ...ress the SF1 Save button or the SF2 Load button For detailed instructions on saving and loading see pages 241 and 242 Online Device Mounting F2 Mount From this display you can mount the shared directories on the hard disk drive of a computer connected via network to the MOTIF XF 1 Host From the computers connected to the network this parameter determines the host computer containing the device is ...

Page 240: ...button without inputting any characters establishes the access between the MOTIF XF and your computer 4 Mount the desired directories In the Sharing Point box 2 you can mount the shared directory by moving the cursor to the desired directory then pressing the ENTER button The mount indicator appears at the left side of the name of the mounted directory You can unmount the shared directory by press...

Page 241: ...he file name press the ENTER button then the INC YES button to save the data of the specified type to the external memory device The file name can contain up to 20 characters For detailed instructions on naming refer to Basic Operation on page 37 You can save the sample of a specific Voice to an external memory device as a WAV file or an AIFF file for storage or editing on a computer This method i...

Page 242: ...lowing Basic Procedure in the File mode on page 238 n You can speed up this operation by selecting a file having a name similar to the desired one in this step since the operation will show the corresponding name by default on the window for entering the file name making it unnecessary to input the file name from scratch 2 Set the Type to SMF 3 Select the source data n The available source memory ...

Page 243: ...network as the MOTIF XF page 241 1 Select a device and directory as source by following Basic Procedure in the File mode on page 238 2 Set the Type to voice or 1bank voice Only available files according to the Type are listed in the Directory File list box on the display n In this step the Load menu corresponding to the SF2 button is not shown in the display The Load menu appears when selecting a ...

Page 244: ...his step the Load menu corresponding to the SF2 button is not shown in the display The Load menu appears when selecting a Waveform to be loaded in step 6 3 Select the file to be loaded You can select any of the files listed in the Directory File list box on the display 4 Press the ENTER button so that the three memory types USR FL1 and FL2 are shown on the display then move the cursor to the desir...

Page 245: ...ocedure in the File mode on page 238 2 Set the Type to performance Only available files according to the Type are listed in the Directory File list box on the display n In this step the Load menu corresponding to the SF2 button is not shown in the display The Load menu appears when selecting a Performance to be loaded in step 6 3 Specify the destination memory location in the User memory Select a ...

Page 246: ...e INC YES button to execute the Load operation NOTICE The Load operation overwrites any data previously existing in the destination internal memory Important data should always be saved to a USB storage device connected to the USB TO DEVICE terminal or to a computer connected to the same network as the MOTIF XF page 241 This method is available only when entering the File mode from the Song mode o...

Page 247: ...onveniently lets you check the sound before loading the audio file 3 Specify the destination memory location in the User memory Select an Element for a Normal Voice or Key for a Drum Voice to which the WAV or AIFF file loaded to an empty Waveform number is to be assigned n When entering the File mode from the Performance Song Pattern mode set a Part to which the Voice including the loaded WAV or A...

Page 248: ...F XF in the File mode for each memory block as shown below Waveform data structure to be saved Regarding the data on SDRAM the Save operation will save the sample data as a file regardless of the settings Regarding the data on the optional FL512M FL1024M you can select whether or not the sample is to be saved at the left bottom of the display below the file type before executing the Save operation...

Page 249: ...0 197 Bank LSB 216 Bank MSB 216 Bank Select 229 Basic Receive Ch 228 BEAT 151 173 Beat 140 145 168 178 231 Beat Stretch 161 beat1 3 209 BEF Band Elimination Filter 75 BEF12 75 BEF6 75 Boost 12 83 Boost 18 83 Boost 6 83 BPF Band Pass Filter 74 BPF1 10 Gain 67 BPF12D 74 BPF6 75 BPFw 75 Break 1 16 175 Break Point 1 4 78 82 Breath 61 Brightness 31 Bulk 92 118 197 218 Bulk Dump Interval 229 C Cancel 17...

Page 250: ...al LPF 75 Dual Type Filter 75 Duplication symbol 120 E E Indicator 47 54 96 101 192 199 213 each on 63 Edit 190 Edit Buffer 34 Edit Recall 92 117 Effect 49 64 86 96 107 191 193 Effect Block 22 Effect Category 24 Effect connection Mixing 24 Performance 23 Voice 23 Effect ON OFF Button System 220 Effect Parameters 27 66 105 107 108 227 Effect Type 24 Effect Unit Settings 118 Effects 50 97 EG Envelop...

Page 251: ...130 204 Keyboard 21 Keyboard MIDI transmit channel 47 Keyboard Octave setting 47 Keyboard Start 168 172 178 Keyboard Transmit Ch 228 Kirnberger 56 Knob 216 Knob Control Assign 57 104 Knob Ctrl Assign 214 Knobs 22 94 138 Function 46 Knobs 1 8 212 KnobSlider 217 L L R Gain 223 LAN connection 41 Length 133 168 170 178 Level 79 89 104 127 level 124 205 Level 1 16 64 Level Key Follow 79 Level Meter 124...

Page 252: ...t Edit 100 188 Mixing 194 Performance 109 Part EQ 22 103 Part number 196 Part Parameters 117 196 Part Switch 109 Password 222 Setting 222 PAT Polyphonic Aftertouch 32 151 Patch 169 170 Path 235 Pattern 165 236 create 171 defined 13 Pattern Chain 13 167 171 edit 173 174 Pattern Edit 179 Pattern Job 181 Pattern Jobs 186 Pattern name 168 169 178 Pattern number 99 168 196 Pattern Play 166 Pattern Reco...

Page 253: ...gle 57 87 single timbre 9 skip 143 Slice 134 202 208 Slice Type 210 slice seq 204 Slider 216 Slope 64 SMF Standard MIDI File 235 SMPL Sample Voice 146 Solo 140 145 168 178 190 Song 165 174 236 defined 12 Song Chain 13 138 143 Song Edit 150 Song Event Chase 233 Song Job 153 Song Jobs 165 Song name 139 143 145 Song number 99 139 143 196 Song Play 136 Song Position Line 140 Song Record 144 Song Scene...

Page 254: ... Velocity 120 124 127 142 205 Velocity Curve 220 Velocity Limit 52 58 71 110 112 Velocity Mode 59 113 Velocity Offset Random SFX 115 Velocity Range 128 156 Velocity Rate 59 60 113 114 Velocity Sens 89 Velocity Sens Depth Offset 112 ViewFilter 152 173 180 Vocoder 26 structure 68 use 68 Vocoder Attack 67 Vocoder Release 67 Voice 96 97 109 118 123 142 143 146 169 178 194 196 204 224 236 defined 9 sel...

Page 255: ...U R G Digital Musical Instruments Division 2010 Yamaha Corporation 006MW A0 Yamaha Web Site English http www yamahasynth com Yamaha Manual Library http www yamaha co jp manual ...

Reviews: