


02
Introduction
=
About the Manuals
The TENORI-ON is provided with the four manuals listed below.
•
Quick Guide
The Quick Guide provides instructions on setup and basic operation that will get you started
as quickly as possible.
•
TENORI-ON Manual
The manual is provided as an electronic document on the supplied CD-ROM, and it
provides detailed descriptions and procedures that will help you take full advantage of the
TENORI-ON's many advanced features. Refer to the Quick Guide for basic information such
as turning on the power, the functions of the panel controls, and more.
•
Precautions
This document lists a number of points you need to be aware of in order to use the TENORI-
ON properly and safely. Please read it carefully. Yamaha representative and authorized
distributor contact details are also included.
•
Installation Guide
Explains the procedure for installing the “TENORI-ON User Voice Manager” software that is
included on the supplied CD-ROM on your computer.
=
About the Supplied CD-ROM
In addition to a pdf manual and demo movie, the CD-ROM includes the “TENORI-
ON User Voice manager” software for Windows and Macintosh computers.
=
The illustrations and LCD screens as shown in this manual are for instructional purposes only, and may
appear somewhat different from those on your instrument. The illustrations and LCD screens from the
TNR-W are used for the instructions and descriptions in this manual.
=
is a registered trademark of the SD Card Association.
=
This product incorporates and bundles computer programs and contents in which Yamaha owns
copyrights or with respect to which it has license to use others' copyrights. Such copyrighted materials
include, without limitation, all computer software, style files, MIDI files, WAVE data, musical scores
and sound recordings. Any unauthorized use of such programs and contents outside of personal use
is not permitted under relevant laws. Any violation of copyright has legal consequences. DON'T MAKE,
DISTRIBUTE OR USE ILLEGAL COPIES.
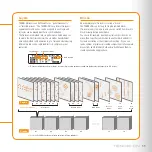
Backup and Initialization
Some data will be lost when the power is turned off. Save important
data to an SD Memory Card using the Save All Blocks function
(TENORI-ON Manual, page 69) before turning off. See page 39 of the
manual for the initialization procedure.
Increasing the volume excessively may cause some voices to
distort. In this case, lower the volume accordingly, or use an external
audio system.
=
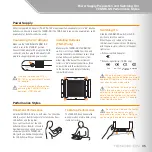
Supplied Items
(Please check that these are included.)
c
The TENORI-ON instrument
c
AC Adaptor
(PA-3C, PA-130 or equivalent Yamaha adaptor)
* May not be included depending on your particular area. Please
check with your Yamaha dealer.
c
MIDI cable
(Mini MIDI DIN – MIDI IN/OUT)
c
CD-ROM
c
Quick Guide
(This document)
c
Installation Guide
c
Precautions
TENORI-ON Hardware and Nomenclature
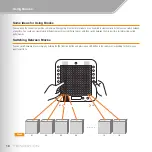
Connecting the TENORI-ON to External Devices
Power Supply Preparation and Switching On /
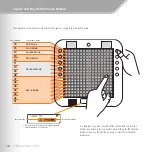
Basic TENORI-ON Operation: Score Mode
Basic TENORI-ON Operation: Function Buttons
Layers and the Performance Modes
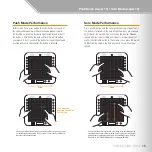
Draw Mode (Layer 12, 13) / Bounce Mode (Layer 14)
Push Mode (Layer 15) / Solo Mode (Layer 16)
Содержание TENORI-ON TNR-W
Страница 1: ......


