28
Setting the Menu List
■
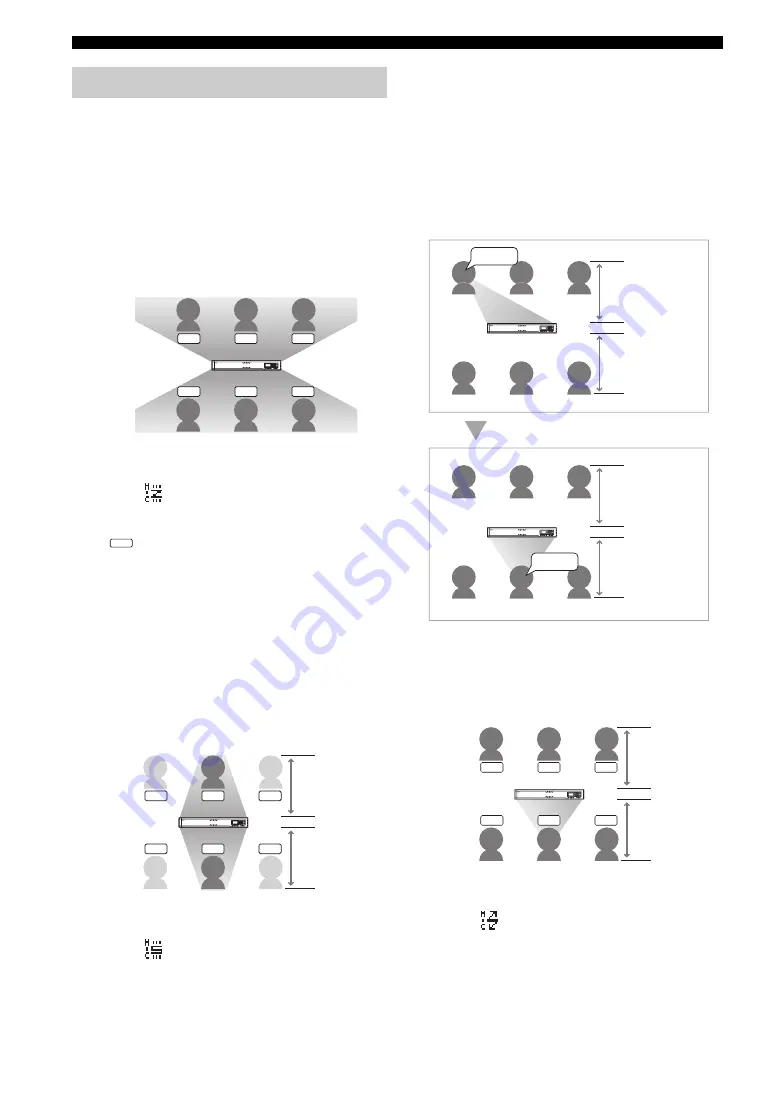
Selecting the audio pickup area
(microphone mode)
You can select the audio pickup area of the microphone
during a call. The default setting is “Zone”.
•
Zone
: Pick up the audio from a large area without
tracking the audio of a talker. It is suitable for a
relatively quiet environment. To specify the audio
pickup area, use the numeric keys in the “Microphone
Mode” menu. The audio in the area of the following
figure is picked up according to the pressed keys.
All microphone indicators (blue LED) from the direction
which audio can be picked up light up. This mode is
indicated by
on the display.
y
• Press
to pick up audio from all directions.
• The possible combinations are [1+2+7+8], [2+3+8+9], and all
areas.
•
Spot
: Fix the audio pick up area to the front of the
microphone by narrowing the directivity. This mode is
suitable when the number of talkers is limited to one or
two, or when there is equipment that produces noise
such as a projector nearby.
To specify the audio pick up area, use the numeric keys
in “Microphone Mode” menu. The area shown in the
next figure is enabled or disabled according to the
pressed keys.
Microphone indicators (blue LED) of which direction
audio can be picked up from all light up. This mode
indicated by
on the display.
y
The possible combinations are [1+7], [2+8], [3+9], and all areas.
•
Track
: The microphone system automatically tracks
and focuses the audio of the talker without fixing the
audio pickup area (only the one talker’s audio can be
picked up at any given time). The audio can be picked
up with narrow directivity so that the noises other than
the taker can be reduced. It is suitable to pick up the
audio clearly in the environment where there are noises.
To specify the area to which this feature is available, use
the numeric keys in the “Microphone Mode” menu. The
area shown in the next figure is enabled or disabled
according to the pressed keys.
All microphone indicators (blue LED) from the direction
which audio can be picked up light up. This mode
indicated by
on the display.
Configuring the sound settings
1
2
3
4
5
6
7
8
9
0
MUTE
LAN
VOL
DC I
N
12V
IN
A
U
DIO OUT
1
2
3
7
8
9
5
1
2
3
4
5
6
7
8
9
0
MUTE
LAN
VOL
DC IN 12V
IN
A
U
DIO OUT
1
2
3
7
8
9
Within 2 m
Within 2 m
1
2
3
4
5
6
7
8
9
0
MUTE
MUTE
MUTE
LAN
VO
VO
V L
L
L
DC
IN
12V
IN
A
U
DIO OUT
1
2
3
4
5
6
7
8
9
0
MUTE
LAN
VOL
DC I
N
12V
IN
A
U
DIO OUT
Today...
Next...
Within 2 m
Within 2 m
Within 2 m
Within 2 m
Tracking the talker’s direction automatically
1
2
3
4
5
6
7
8
9
0
MUTE
LAN
VOL
DC I
N
12V
IN
A
U
DIO OUT
1
2
3
7
8
9
Within 2 m
Within 2 m


