background image

10

PSR-S500  Owner’s Manual

Setting Up

Be sure to do the following operations 
BEFORE turning on the power.

Make sure that the [STANDBY/ON] switch of the 
instrument is set to STANDBY.

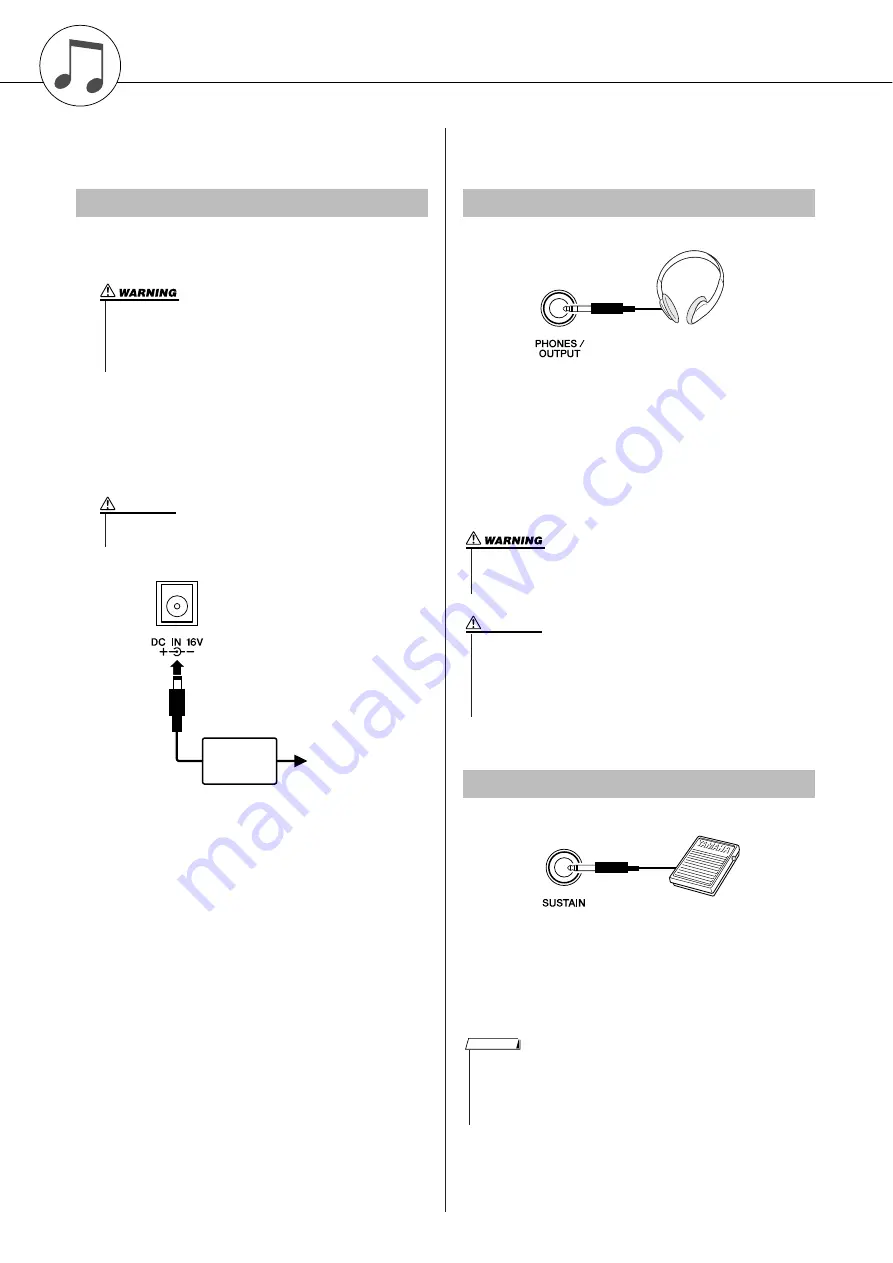
Connect the AC adaptor (PA-300, PA-301 or other 
adaptor specifically recommended by Yamaha) to the 
power supply jack.

Plug the AC adaptor into an AC outlet.

Make all necessary connections below 
BEFORE turning the power on.

The instrument speakers are automatically shut off 
when a plug is inserted into this jack. The PHONES/
OUTPUT jack also functions as an external output. You 
can connect the PHONES/OUTPUT jack to a keyboard 
amplifier, stereo system, mixer, tape recorder, or other 
line-level audio device to send the instrument’s output 
signal to that device.

The sustain function lets you produce a natural sustain 
as you play by pressing a footswitch. Plug the Yamaha 
FC4 or FC5 footswitch into this jack and use it to switch 
sustain on and off. 

Power Requirements

• Use ONLY a Yamaha PA-300 or PA-301 AC Power Adaptor (or 

other adaptor specifically recommended by Yamaha) to power 
your instrument from the AC mains. The use of other adaptors 
may result in irreparable damage to both the adaptor and the 
instrument.

• Unplug the AC Power Adaptor when not using the instrument, 

or during electrical storms.

CAUTION

PA-300 or 

PA-301

AC outlet

Connecting Headphones (PHONES/OUTPUT Jack)

Connecting a Footswitch (SUSTAIN Jack)

• Avoid listening with the headphones at high volume for long peri-

ods of time; doing so may not only result in ear fatigue, it may be 
damaging to your hearing.

• To prevent damage to the speakers, set the volume of the external 

devices at the minimum setting before connecting them. Failure to 
observe these cautions may result in electric shock or equipment 
damage. Also, be sure to set the volumes of all devices at their 
minimum levels and gradually raise the volume controls while 
playing the instrument to set the desired listening level.

CAUTION

• Make sure that the footswitch plug is properly connected to the SUS-

TAIN jack before turning on the power.

• Do not press the footswitch while turning the power on. Doing this 

changes the recognized polarity of the footswitch, resulting in reversed 
footswitch operation.

NOTE

Содержание PORTATONE PSR-S500

Страница 1: ...Owner s Manual EN ...

Страница 2: ...tion methods used to produce them meet these goals In keeping with both the letter and the spirit of the law we want you to be aware of the following Battery Notice This product MAY contain a small non rechargeable battery which if applicable is soldered in place The average life span of this type of battery is approximately five years When replacement becomes neces sary contact a qualified servic...

Страница 3: ...ted by Yamaha Corporation of America or its subsidiaries FCC INFORMATION U S A This applies only to products distributed by YAMAHA CORPORATION OF AMERICA class B OBSERVERA Apparaten kopplas inte ur växelströmskällan nätet så länge som den ar ansluten till vägguttaget även om själva apparaten har stängts av ADVARSEL Netspæendingen til dette apparat er IKKE afbrudt sålæenge netledningen siddr i en s...

Страница 4: ...ch disconnect the adaptor plug from the outlet and have the instrument inspected by qualified Yamaha service personnel CAUTION Always follow the basic precautions listed below to avoid the possibility of physical injury to you or others or damage to the instrument or other property These precautions include but are not limited to the following When removing the electric plug from the instrument or...

Страница 5: ...r data The panel settings and some other types of data are not retained in memory when you turn off the power to the instrument Save data you want to keep to the Registration Memory page 67 Saved data may be lost due to malfunction or incorrect operation Save important data to a USB storage device or other external device such as a computer pages 76 87 Backing up the USB storage device external me...

Страница 6: ...STYLE FILE The Style File Format is Yamaha s original style file format which uses a unique conversion system to pro vide high quality automatic accompaniment based on a wide range of chord types USB USB is an abbreviation for Universal Serial Bus It is a serial interface for connecting a computer with peripheral Devices It allows hot swapping connecting peripheral devices while the power to the c...

Страница 7: ...Make sure to keep this manual in a safe and handy place even after you finish reading and refer to it often when you need to better understand an operation or function The instrument package includes the following items Please check that you have them all Music rest Accessory CD ROM Owner s manual this book AC Power Adaptor May not be included depending on your particular area Please check with yo...

Страница 8: ...nt Styles The accompaniment styles provide the equivalent of a full backing band covering wide variety of styles from waltzes to 8 beat to samba and much more Select a style that matches the music you want to play or experiment with new styles to expand your musical horizons Easy Performance with Music Notation Display Page 30 When you play back a song the corresponding score will be shown on the ...

Страница 9: ... Playing with the metronome 49 Using Tap Start 51 Touch Response 51 EQ settings 52 Pitch Controls 53 Changing the pitch of the instrument in octaves 54 Style Auto Accompaniment Functions 55 Pattern Variation sections 55 One Touch Setting 58 Variation Change and OTS OTS LINK 58 Setting the Split Point 59 Playing a Style with Chords but without Rhythm Stop Accompaniment 60 Adjusting the Style Volume...

Страница 10: ...r adaptor specifically recommended byYamaha to power your instrument from the AC mains The use of other adaptors may result in irreparable damage to both the adaptor and the instrument Unplug the AC Power Adaptor when not using the instrument or during electrical storms CAUTION PA 300 or PA 301 AC outlet Connecting Headphones PHONES OUTPUT Jack Connecting a Footswitch SUSTAIN Jack Avoid listening ...

Страница 11: ...rol to the left and press the STANDBY ON switch to turn on the power Press the STANDBY ON switch again to turn the power OFF Backup data in the flash memory is loaded to the instru ment when the power is turned on If no backup data exists on flash memory all instrument settings are restored to the initial factory defaults when the power is turned on Connecting to a Computer USB Terminal Turning th...

Страница 12: ...uage item appears The currently selected display language will appear below the Language item Select a display language The button selects English and the button selects Japanese The language selection will be stored in the internal flash memory so that it is retained even when the power is turned off Press the EXIT button to return to the MAIN dis play Adjust the LCD CONTRAST control on the rear ...

Страница 13: ...Setting Up PSR S500 Owner s Manual 13 Music Rest Insert the music rest into the slots as shown ...

Страница 14: ... page 55 MAIN VARIATION A D buttons page 55 ENDING rit I III buttons page 55 SYNC STOP button page 57 SYNC START button pages 23 56 START STOP button pages 22 41 i SONG CONTROL r button page 28 f button page 28 A B button page 65 button page 28 button pages 28 41 o TRANSPOSE and buttons page 53 0 METRONOME button page 49 1 TAP TEMPO button page 51 2 TEMPO and buttons page 49 3 REGIST TRACK button ...

Страница 15: ...1 4 buttons page 58 6 VOICE page 17 7 VOICE CONTROL LEFT button page 19 DUAL button page 18 HARMONY button page 44 TOUCH button page 51 SUSTAIN button page 47 DSP button page 47 8 UPPER OCTAVE and buttons page 54 9 PITCH BEND wheel page 48 0 SUSTAIN jack page 10 1 USB TO HOST and TO DEVICE terminals page 80 2 CONTRAST knob page 12 3 PHONES OUTPUT jack page 10 4 DC IN 16V jack page 10 6 6 7 2 3 7 8...

Страница 16: ...utton to start the Demo The Demo display appears in the LCD Gradually raise the MASTER VOLUME control while playing the instrument to set the desired listening level The Demo Song will restart when playback reaches the end 3 Press the button to stop Demo Operation automatically returns to the Main display STYLE name SONG name Music Database name VOICE name The DEMO button doesn t function when the...

Страница 17: ...Voice selection display will appear The currently selected category name Voice number and name will be highlighted For this example select the Flute Clarinet category 2 Select the Voice you want to play Look at the highlighted Voice name and rotate the dial The available Voices will be selected and displayed in sequence The Voice selected here becomes the Main Voice For this example select the 010...

Страница 18: ...lay the keyboard 2 Press and hold the DUAL button for longer than a sec ond The Dual Voice selection display appears The currently selected category name Voice number and name will be highlighted 3 Select and press the desired Voice category button in the Voice section For this example select the PERCUSSION DRUM category Playing Two Voices Simultaneously DUAL Two Voices will sound at the same time...

Страница 19: ...MAIN display In the Left mode you can play different Voices from the keys to the left and right of the keyboard split point The Main and Dual Voices can be played to the right of the split point while the Voice played to the left of the split point is the Left Voice The split point setting can be changed as required page 59 1 Press the LEFT button The LEFT button turns the left Voice on or off The...

Страница 20: ...TAR category 4 Select the Voice you want to play Look at the highlighted Voice name and rotate the dial The available Voices will be selected and displayed in sequence The Voice selected here becomes the Left Voice For this example select the 041 FolkGuitar Voice 5 Play the keyboard Try playing the selected Left Voice Press the EXIT button to return to the MAIN display The currently selected Left ...

Страница 21: ...SFX Kit 1 017 Room Kit 022 Symphony Kit 027 SFX Kit 2 See the Drum Kit List on page 104 NOTE R i d e C y m b a l 1 T a m b o u r i n e C o w b e l l V i b r a s l a p B o n g o L H i H a t O p e n C r a s h C y m b a l 1 H a n d C l a p H i H a t C l o s e d H i H a t P e d a l O p e n R i m S h o t S i d e S t i c k C a s t a n e t S t i c k s B r u s h T a p B r u s h S l a p C o n g a H O p e n...

Страница 22: ...tening to just the basic rhythm The rhythm part is played using percussion instruments only 1 Select and press the desired Style category button in the Style section The Style selection display appears The currently selected category name Voice number and name will be highlighted 2 Select the Style you want to play Look at the highlighted Voice name and rotate the dial The available Styles will be...

Страница 23: ...ync Start on Press the SYNC START button to turn the Sync Start function on When Sync Start is on the bass and chord accompaniment included in a Style will start playing as soon as you play a note to left of the keyboard split point To cancel or disable Sync Start press the button a second time to turn the Sync Start function off Playing Along with a Style When automatic accompaniment is on The ar...

Страница 24: ...o three notes at the same time to the left of the split point The chord will change according to the left hand notes you play 5 Play a variety of left hand chords while playing a melody with your right hand 6 Press the START STOP button to stop Style playback when you re done You can switch Style sections to add variety to the accompaniment Refer to Pattern Variation sections on page 55 Split poin...

Страница 25: ... key to the left of it To play a seventh chord Press the root note together with the nearest white key to the left of it To play a minor seventh chord Press the root note together with the nearest white and black keys to the left of it three keys altogether CmM7 CM7 C6 Csus4 Caug CM7aug C7aug C7sus4 Csus2 C7 Cm Cdim Cdim7 C7 CmM7 9 CM7 9 Cm7 9 C7 b9 C7 b13 Cm7 11 CM7 11 C b5 9 C6 Cm add9 9 C7 11 C...

Страница 26: ...tegory 3 Play the chords with your left hand and the melody with your right The swing Style will start playing when you play a left hand chord to the left of the split point page 23 Refer to page 25 for information about playing chords You can check the assigned Voice and Style at this point by pressing the EXIT button to return to the MAIN display 4 Press the button to stop playback f r Split Poi...

Страница 27: ...tains your recorded Songs and Songs loaded from computer USB This contains USB Songs when a USB flash memory device is connected to the DEVICE terminal The Song selection display will appear The currently selected Song number and name will be highlighted 2 Select a Song Use the dial to select the Song you want to listen to Selecting and Listening to a Song Listen See Record Song Score Lyrics When ...

Страница 28: ...1 2nd Mov W A Mozart USER User Songs Songs you record yourself or Songs transferred from a computer pages 85 87 USB Songs in a USB flash memory connected to the instrument page 74 Song Fast Forward Fast Reverse and Pause Some of the preset songs have been edited for length or arrangement and may not be exactly the same as the original NOTE Song start PAUSE Press the pause button to pause playback ...

Страница 29: ...ngs loaded Songs and USB Song from storage to playback Types of Songs PRESET USER USB Record page 32 Connect USBTO DEVICE terminal and Save Load page 80 Connect USB TO HOST terminal and Transfer page 85 Your own performance Song Song Song Song Song Computer USB flash memory Song Storage location Preset Songs 001 005 User Songs 001 005 User Songs loaded Songs 006 USB Songs 001 SMF conversion Save L...

Страница 30: ...ill appear There are two types of score display single staff and double staff These are alternately selected each time the SCORE button is pressed 3 Press the button The Song will begin playing The triangular cursor will move across the top of the score to indicate the current location 4 To return to the MAIN display press the EXIT button Displaying the Song Score Both chords and lyrics will be sh...

Страница 31: ... while the lyrics and chords are shown on the display The lyrics will be highlighted to show the current location in the Song Preset Songs That Can be Used For Lyrics Display Displaying the Lyrics Song No Song Name 001 Annie Laurie 002 Oh Susanna If the lyrics display shows gar bled characters try changing the display language page 12 NOTE Songs downloaded from the Internet or commercially avail a...

Страница 32: ...ata consists of 16 tracks On this instrument you can record your performance step by step to each of tracks 1 8 For example you can select the Main Voice for recording to Track 1 then set the Dual Voice to Track 2 and so on When the Quick Recording mode is selected the playing parts and their corresponding tracks are set automatically Recording track When Multi track recording is selected you can ...

Страница 33: ...a niment track will be also set to recording ready mode automatically Make sure to turn the Dual Voice or Left Voice on when recording the Dual Voice or Left Voice Quick Recording Procedure Track 1 Main Voice part Track 2 Dual Voice part Track 3 Left Voice part Track ACMP Accompaniment part Melody or other parts Chord parts Track 1 Track 2 Track 3 Track 4 Track 5 Track 6 Track 7 Track 8 Track ACMP...

Страница 34: ...ng recorded data are indicated with framed rect angles 4 Press the button to play back the recording You can set the recorded user Song number and the parts for tracks individually 1 From the MAIN display press the USER button then use the dial to select the user Song number 001 005 you want to record to Multi track Recording Procedure Start recording Current measure number or ...

Страница 35: ...e set to record ready mode When ACMP track is set to REC ON the accompaniment will be automatically set to ON When press the REC button during accompaniment on the ACMP track will be automati cally set to REC ON ACMP ON OFF does not change while recording is in progress An assigned part cannot be specified to another track A maximum of three melody tracks can be recorded simulta neously NOTE If yo...

Страница 36: ...Song 001 to 005 you want to play 3 Press the button Save the User Song to USB flash Memory see page 76 Convert the Song data to SMF format and then save to USB flash Memory see page 77 To Record Other Tracks Repeat steps 2 through 4 to record any of the remaining tracks You can listen to the previously recorded tracks by pressing the appropriate 1 8 buttons while recording Previously recorded trac...

Страница 37: ...cancel the clear operation by pressing the NO button 5 Press the YES button again to clear the Song The clear in progress message will appear briefly on the display while the Song is being cleared Not recorded data The following data is recorded before the beginning of the Song Even if you change the data while recording is in progress the data is not recorded Reverb type Chorus type DSP type DSP ...

Страница 38: ...MEMORY track button 1 to 8 corresponding to the track you want to clear for longer than a second A confirmation message will appear on the display 4 Press the YES button A confirmation message will appear again on the display You can cancel the clear operation by pressing the NO button 5 Press the YES button again to clear the Song The clear in progress message will appear briefly on the display w...

Страница 39: ...ult values restored MEMORY Clear To clear the Song data or Style file that has been transferred to the inter nal memory from a computer simultaneously hold the highest white key on the keyboard and the three highest black keys and then turn the power on by pressing the STANDBY ON switch Backup Backup parameters USER Song Style file Registration memory Auto Fill In On Off Each parameters in the fun...

Страница 40: ...he sound heard via the instru ment s speakers or a pair of headphones plugged into the PHONES jack Rotate coun terclockwise to lower the volume Rotate clock wise to increase the volume Song category Style category Voice category 1 Use category buttons to select a CATEGORY Song category Select the Song category you want to play Style category Select the Style category you want to play Voice categor...

Страница 41: ...e the value of the selected item or counter clockwise to decrease its value Rotate the dial to con tinuously increase or decrease the value Currently selected category name Currently selected item YES NO buttons Press the YES button briefly to increment the value by 1 or press the NO button briefly to decrement the value by 1 Press and hold either but ton to continuously increment or decrement the...

Страница 42: ...rs when the FUNCTION button is pressed In the FUNCTION display you can use the CATEGORY and buttons page 41 to select 49 differ ent function items Press the CATEGORY button s as many times as necessary until the required function appears You can then use the dial or the YES and NO buttons to adjust the value of the function as required The Displays Call up the Main display Most basic operations ar...

Страница 43: ... Transpose page 53 Measure number page 36 OCTAVE page 54 REGISTRATION memory Song track indication Shows currently selected item REGIST TR 1 8 TR 9 16 or ACMP page 66 A B Repeat Appears when the Repeat function is on for Song play back page 65 USB status page 74 Chord Display page 25 Registration memory bank status page 67 Song track status page 66 Main Voice page 17 Dual Voice page 18 Left Voice ...

Страница 44: ...ding Harmony When you press the HARMONY button to turn this feature on the appropriate Harmony type for the currently selected Main Voice is automatically selected NOTE Hold for longer than a second Currently selected Harmony type The Harmony notes can be added only to the Main Voice not to Dual or Left Voices The keys left of the Split Point of the keyboard produce no Harmony notes when the Auto ...

Страница 45: ...FUNCTION display 2 Press the CATEGORY and but tons as many times as necessary to call up Reverb Type The currently selected Reverb Type will be dis played 3 Use the dial to select a Reverb Type You can check the sound of the selected Reverb Type by playing the keyboard Refer to the Effect Type List on page 110 for information about the available Reverb Types Adjusting the Reverb Level You can indi...

Страница 46: ...call up the FUNCTION display 2 Press the CATEGORY and but tons as many times as necessary to call up Chorus Type The currently selected Chorus Type will be dis played 3 Use the dial to select a Chorus Type You can check the sound of the selected Chorus Type by playing the keyboard Refer to the Effect Type List on page 111 for information about the available Chorus Types Adjusting the Chorus Level ...

Страница 47: ...n page 111 for information about the available DSP types Panel Sustain For certain Voices the sustain effect may not be obvious or audible even when the panel sustain function is turned on NOTE Adding DSP DSP is term of abbreviated form of Digital Signal Processor and it uses a micro processor to change the audio in various ways NOTE DSP button lights when DSP is on When DSP is turned on the optim...

Страница 48: ... to raise the pitch or downward to lower the pitch If you use this feature with a Voice such as the 042 Overdriven guitar Voice page 17 you can produce remarkably realistic string bending effects You can change the amount of pitch bend produced by the wheel as described on page 71 Pitch Bend Pitch Bend is not applied to the Left Voice when accompaniment is turned on NOTE ...

Страница 49: ...metronome To stop the metronome press the METRO NOME button again Set the metronome tempo 1 Press theTEMPO button to call up the tempo setting and use the buttons to raise or lower the tempo 2 Use the dial to select a tempo from 11 to 280 Press the EXIT button to return to the Main display Playing with the metronome Beat number Tempo Time Signature Tempo value The tempo can be changed by either pr...

Страница 50: ... the CATEGORY button once to call up the Time Signature Denominator display 4 Use the dial to select a beat length Select the required length for each beat 2 4 8 or 16 half note quarter note eighth note or 16th note For this example select 8 The time signature should now be set to 3 8 Press the METRONOME button to confirm the settings Adjusting the Metronome Volume 1 Press the FUNCTION button 2 Pr...

Страница 51: ...oduced no matter how hard or soft you play the keys Adjusting the Touch Response Sensitivity The sensitivity of the keyboard s Touch Response can be adjusted in three steps 1 3 The higher the number the greater the volume variation produced by the variation in how hard you play the keys i e the keyboard becomes more sensitive 1 Press the FUNCTION button to call up the FUNCTION display 2 Press the ...

Страница 52: ...nes and settings 4 and 5 are ideal for listening via external speak ers or when connecting to an external mixer 1 Press the FUNCTION button The currently selected function will appear in the display 2 Press the CATEGORY and but tons as many times as necessary to call up Master EQ Type 3 Use the dial to select an EQ Setting for the best sound EQ settings f r The currently selected EQ type will appe...

Страница 53: ... the TRANSPOSE buttons allows single step changes Pressing and hold ing either TRANSPOSE button continu ously increases or decreases the value Small Pitch Changes Tuning The overall tuning of the instrument can be shifted up or down by a maximum of 1 semitone in approximately 0 2 Hz steps The default setting is 440 Hz 1 Press the FUNCTION button 2 Press the CATEGORY and but tons as many times as n...

Страница 54: ... the UPPER OCTAVE button to lower the pitch by one octave The newly changed value now one octave lower is shown in the LCD Press the UPPER OCTAVE button again to lower the pitch one more octave Press the EXIT button to return to the Main display Changing the pitch of the instrument in octaves In the case of UPPER OCTAVE 1 One octave up When a Drum Kit is selected each percussion Voice assigned to ...

Страница 55: ...e main section The length of the intro in measures differs depending on the selected Style MAIN VARIATION section This is used for playing the main part of the Song It plays a main accompaniment pattern and repeats indefinitely until another section s button is pressed There are four variations on the basic pattern A D and the Style playback sound changes harmonically based on the chords you play ...

Страница 56: ...O I III buttons The selected Intro button lights 7 Play a chord in the accompaniment range and start the Intro section Try playing a C major chord See Playing Auto accompaniment Chords on page 25 Synchro Start When Synchro Start is on you can start the Style by playing any key in the accompani ment range of the keyboard The ACMP button lights when ACMP is turned on The SYNC START button flashes in...

Страница 57: ...t stops automatically You can have the Ending gradually slow down ritardando by pressing one of the ENDING rit I III buttons again while the Ending is playing back Synchro Stop When this function is selected the accompa niment Style will only play while you are playing chords in the accompaniment range of the keyboard Style playback will stop when you release the keys To turn the function on press...

Страница 58: ...he ONE TOUCH SETTING 1 4 buttons 3 Play the chord in the accompaniment range and start the Style Try selecting other ONE TOUCH SETTING 1 4 buttons and listen to the results When change the MAIN VARIATION A D to other MAIN VARIATION A D during OTS LINK is on OTS 1 4 automatically change the number according to the selected variation number see below Press the OTS LINK button to turn on the OTS link...

Страница 59: ... 1 Press the FUNCTION button 2 Use the CATEGORY and but tons as many times as necessary to call up Split Point 3 Use the dial to set the Split Point to any key from 000 C 2 through 127 G8 Setting the Split Point f r Split Point 54 F 2 Main Voice Left Voice Changing the Split Point here also changes the Auto Accompaniment Split Point The Left Voice sounds when the split point key is played NOTE ...

Страница 60: ... recognized by the instrument can be used page 25 Select a Style then press the ACMP but ton to turn Auto Accompaniment on If the instrument is in the Song mode press one of the Style category buttons to enter the Style mode page 22 1 Press the FUNCTION button 2 Use the CATEGORY and but tons as many times as necessary to call up Style Volume 3 Use the dial to set the Style Volume between 000 and 1...

Страница 61: ...ange the order of the notes to create different inversions Successive chords in a chord progression can be smoothly connected for example by choosing the appropriate inversions or chord voicings Reading Chord Names Chord names tell you just about everything you need to know about a chord other than the inversion voicing The chord name tells you what the root of the chord is whether it is a major m...

Страница 62: ...7b9 Seventh add flatted thirteenth 7 b13 1 3 5 b6 b7 C7b13 Seventh ninth 7 9 1 2 3 5 b7 C79 Seventh add sharp eleventh 7 11 1 2 3 4 5 b7 or 1 2 3 4 5 b7 C7 11 Seventh add thirteenth 7 13 1 3 5 6 b7 C713 Seventh sharp ninth 7 9 1 2 3 5 b7 C7 9 Seventh flatted fifth 7b5 1 3 b5 b7 C7b5 Seventh augmented 7aug 1 3 5 b7 C7aug Seventh suspended fourth 7sus4 1 4 5 b7 C7sus4 Suspended second sus2 1 2 5 Csu...

Страница 63: ... Refer to Transferring Performance Data to and from a Computer on page 83 for details on the file transfer proce dure If you are using a USB flash memory device refer to Loading User Files and Style Files on page 78 In Playing Along with a Style on page 23 we described two methods of playing Styles Multi Full Key board in which chords were either detected only to the left of the keyboard Split Poi...

Страница 64: ...d you can use the dial or the TEMPO buttons to set to tempo to anywhere from 011 and 280 quarter note beats per minute You can return to the original tempo by simultaneously pressing both the TEMPO and buttons Press the EXIT button to return to the Main display Pressing the TEMPO buttons allows single step changes Pressing and holding either button contin uously increases or decreases the value So...

Страница 65: ...ant to repeat the A point 2 Press the A B button a second time at the end of the section you want to repeat the B point 3 The specified A B section of the Song will now play repeatedly You can cancel A B repeat playback at any time by pressing the A B button A B Repeat A B Point A Point B The repeat start and end points can be specified in one measure increments The current measure number is shown...

Страница 66: ...tion 1 Press the REGIST TRACK button until the desired track is shown on the dis play and then select the track The following items appear on the display when you press the REGIST TRACK button REGIST TR 1 8 TR 9 16 or ACMP TR 2 Press the desired REGISTRATION MEM ORY 1 8 buttons to set the mute track To cancel the mute press the appropriate REG ISTRATION MEMORY 1 8 buttons again Muting Independent ...

Страница 67: ...and press one of the REG ISTRATION MEMORY 1 8 buttons The button corresponding to the stored Regis tration lights 8 Banks Memory 1 Up to 64 presets eight banks of eight each can be memorized Memory 2 Memory 3 Memory 4 Memory 5 Memory 6 Memory 7 Memory 8 Saving to the Registration Memory Bank number Data cannot be saved to the registration memory during Song play back NOTE You can also save your pa...

Страница 68: ...ank number Settings that can be saved to the Regis tration Memory Style settings Style number Auto Accompaniment ON OFF Split Point Style settings Main A B Style Vol ume Tempo Chord Fingering Upper Octave Voice settings Main Voice setting Voice number Volume Octave Pan Reverb Level Chorus Level Dual Voice settings Dual ON OFF Voice number Volume Octave Pan Reverb Level Chorus Level Left Voice sett...

Страница 69: ...s The Registration Memory button is lit in green if Registration data is stored to the memory 3 Press and hold the REGISTRATION MEMORY button corresponding to the Registration you want to clear for longer than a second A confirmation message will appear on the dis play 4 Press the YES button A confirmation message will appear again on the display You can cancel the clear operation by pressing the ...

Страница 70: ...e name of the previous item in the list appears to the upper left and the name of the next item in the list appears to the upper right of the currently selected item 4 Use the dial or the YES and NO buttons to set the parameters The YES and NO buttons are used to make ON OFF type settings YES ON NO OFF In some cases pressing the YES button will execute the selected function and press ing NO will c...

Страница 71: ...sent to the Chorus effect DSP Level Main DSP Level 000 127 Determines how much of the Main voice s signal is sent to the DSP effect Dry Level Main Dry Level 000 127 Determines how much of the Main Voice s unproc essed signal sounds no Reverb Chorus or DSP effect processing DUAL VOICE Volume Dual Volume 000 127 Determines the volume of the Dual voice Octave Dual Octave 2 2 Determines the octave ran...

Страница 72: ... you to instantly send a data snapshot of all panel settings to a computer or sequencer Press YES to send or press NO to cancel METRO NOME Time Signature Numerator Time Signature Numerator 00 60 Determines the time signature of the Metronome Time Signature Denominator Time Signature Denominator 2 4 8 16 Sets the length of each metronome beat Volume Metronome Volume 000 127 Determines the volume of...

Страница 73: ...ng the USB TO DEVICE terminal sec tion on page 82 For information about USB devices compatible with the instrument see Connection to a USB Storage Device on page 80 If you don t have a USB flash memory device you will need to purchase one or more as needed The instrument does not necessarily support all commercially available USB storage devices Yamaha cannot guarantee operation of USB storage dev...

Страница 74: ...s stored in these location can be selected and played as USB song page 28 Songs stored in third level folders created inside a second level folder cannot be selected and played by this instrument USB flash memory Root Can be selected played Cannot be selected played Song File Song File Song File Song Folder Song Folder Song Folder root IMPORTANT Menu Reference Page Format 75 Save 76 SMF Save 77 Lo...

Страница 75: ... Press the EXECUTE button again or the YES button and the format oper ation will begin 6 A message appears in the display indi cating that the operation is complete Press the EXIT button to return to the MAIN display Formatting USB Flash Memory If you format a USB flash memory that already contains data all of the data will be erased Be careful not to erase important data when using the format fun...

Страница 76: ... FILE folder in the USB flash memory device 8 Press the EXIT button to return to the MAIN display Saving Data To Overwrite an Existing File If you want to overwrite a file that already exists on the USB flash memory device use the dial or the YES and NO buttons to select the file then skip ahead to step 6 f r If the USB flash memory has been write protected an appropriate message will appear in th...

Страница 77: ...tion will begin The user song will be stored to the USER FILE folder in the USB flash memory device 10 A message appears in the display indi cating that the operation is complete Press the EXIT button to return to the MAIN display Convert a User Song to SMF Format and Save What is SMF Standard MIDI File The SMF Standard MIDI File format is one of the most common and widely compatible sequence form...

Страница 78: ...ress the EXECUTE button The dis play prompts you for confirmation You can cancel the load operation at this point by pressing the NO button 6 Press the EXECUTE button again or the YES button and the load opera tion will begin 7 A message appears in the display indi cating that the operation is complete Press the EXIT button to return to the MAIN display Loading User Files and Style Files Save impo...

Страница 79: ...ton 6 Press the EXECUTE button again or the YES button and the delete oper ation will begin 7 A message appears in the display indi cating that the operation is complete Press the EXIT button to return to the MAIN display 1 Make sure that the USB flash memory device containing the song you want to play has been properly connected to the instrument s USB TO DEVICE termi nal and that the CONNECT is ...

Страница 80: ...ist at end of the Owner s Manual for advice Connection to a USB storage device Connectors w q Connection to a USB Storage Device Avoid frequently turning the power on off to the USB storage device or connecting disconnecting the cable too often Doing so may result in the operation of the instrument freezing or hang ing up While the instrument is accessing data such as in the Save and Delete operat...

Страница 81: ... USB flash memory device from the hard disk of the computer Once you ve copied the data connect the device to the USB TO DEVICE terminal of the instrument and play back the MIDI songs or load the user file or style file on the instrument Saves internal data to a USB flash memory USB TO DEVICE terminal Instrument USB flash memory Disconnect the USB flash memory device from the computer and connect ...

Страница 82: ... to do so can cause the instrument and or the computer to hang up freeze possibly causing corruption or loss of data If the instrument or computer does hang up turn the power to both devices off and then on again and restart the computer Connecting a Personal Computer USB cable Instrument Computer USB TO HOST terminal Wake the computer from a sleep suspended standby mode before connecting the USB ...

Страница 83: ...e generator system the internal tone generator is active when local control is on and inactive when local control is off External Clock ON OFF These settings determine whether the instrument is synchronized to its own internal clock OFF or to a clock signal from an external device ON Keyboard Out ON OFF These settings determine whether keyboard performance data of the instrument is transmitted ON ...

Страница 84: ...ion lets you send the panel setup data to a computer Before you record performance data to a sequencer application running on your computer it is a good idea to first send and record the panel setup data before the actual performance data 1 Press the FUNCTION button 2 Use the CATEGORY and but tons to select the Initial Setup item 3 Press YES to send or press NO to cancel PC1 PC2 OFF Local OFF OFF ...

Страница 85: ...hen connect the computer and the instru ment page 90 2 After selecting the language double click the Musicsoft Downloader short cut icon that is created on the desktop This will launch the Musicsoft Downloader application and the main window will appear 3 Click the Add File button and the Add File window will appear 4 Click the button to the right of Look in and select the folder from the drop dow...

Страница 86: ...o the instrument s memory 7 Close the window to close the Musicsoft Downloader 8 To playback a song stored in the mem ory of the instrument press the USER button Use the dial to select the song you want to play then press the button to start playback q Click Electronic Musical Instruments and then Flash Memory Before playing back the song transferred from your computer make sure to close the Music...

Страница 87: ...ansmitted received as a single file As a result all backup data will be over written every time you transmit or receive Keep this in mind when transferring data CAUTION Do not rename the backup file on the computer If you do so it will not be recognized when transferred to the instrument CAUTION Using Songs with Notation In order to use songs with notation SMF format 0 only transferred from a comp...

Страница 88: ...tions or warranties with regard to the use of the software and documentation and can not be held responsible for the results of the use of this manual and the software This disk is a CD ROM Do not attempt to play the disk on an audio CD player Doing so may result in irreparable damage to your audio CD player Future upgrades of application and system software and any changes in specifications and f...

Страница 89: ...on page 82 5 Install the software Musicsoft Downloader See page 92 6 Launch the software For further software operation refer to the online help supplied with the software Refer to the Troubleshooting on page 93 when you have trouble with installing the driver CD ROM Contents q e w Folder Name Application Data Name Contents q MSD_ Musicsoft Downloader This application can be used to transfer data ...

Страница 90: ... XP Windows 2000 XP Home Edition XP Professional Digital Music Notebook Windows XP Professional Edition SP1a more Windows XP Home Edition SP1a more Windows 2000 Professional SP4 more 400MHz or higher Intel Pentium Celeron Processor family 1GHz or more is recommended 128 MB or more 256 MB or more is recommended at least 50 MB of free space 1024 x 768 HighColor 16 bit Digital Music Notebook Requirem...

Страница 91: ...he installation 8 When installation is complete a message indicating so appears Click Finish The driver has been installed Installing the driver on Windows 2000 1 Start the computer and use the Adminis trator account to log into Windows 2000 2 Select My Computer Control Panel System Hardware Driver Sign ing File Signature Verification and check the radio button to the left of Ignore Install all fi...

Страница 92: ... window The USB MIDI driver installation is complete Installing the Musicsoft Downloader and Digital Music Notebook Applications 1 Insert the Accessory CD ROM into your computer s CD ROM drive The start win dow will appear automatically showing software applications 2 Click Musicsoft Downloader or Digital Music Notebook 3 Click the install button or Digital Music Notebook Download button and follo...

Страница 93: ... the USB cable from the instru ment and make the connection again 5 Install the driver again Windows 98 Me users see page 91 Windows 2000 users see page 91 Windows XP users see page 92 Did you install the driver page 90 Is the USB cable connected correctly Are the volume settings of the instrument playback device and application program set to the appropriate levels Have you selected an appropriat...

Страница 94: ...edYamaha dealer within fourteen days with a copy of the receipt Yamaha is not responsible for replacing media dam aged by accident abuse or misapplication TO THE FULLEST EXTENT PERMITTED BY LAW YAMAHA EXPRESSLY DISCLAIMS ANY IMPLIED WARRANTIES ON THE TANGIBLE MEDIA INCLUDING THE IMPLIED WARRANTIES OF MERCHANTABILITY AND FITNESS FOR A PARTICULAR PURPOSE 5 DISCLAIMER OF WARRANTY ON SOFTWARE You expr...

Страница 95: ...s not have a Rhythm part so there is no rhythm sound for this Style Also this Style does not have a Fill In section The other parts will begin play ing when you play a chord in the accompaniment Not all of the voices seem to sound or the sound seems to be cut off The instrument is polyphonic up to a maximum of 32 notes If the Dual voice or Split voice is being used and a style or song is playing b...

Страница 96: ...en the transmission of Initial Send has been completed Error Displayed when writing has failed File information area is not large enough Indicates that saving data in the media cannot be executed since the total number of files have become too many File is not found Indicates there is no file File too large Loading is impossible Indicates that loading data cannot be executed since the file data is...

Страница 97: ...s not formatted Indicates the inserted media has not been formatted The media is write protected Indicates that the inserted media cannot be written since it is write pro tected Set to the write protect switch to the overwrite position before use The song data is too large to be converted to notation Indicates that the score cannot be displayed since the song data is too large There are too many f...

Страница 98: ... ModernEP 14 0 113 5 TremoloEP 15 0 117 6 SuperDX 16 0 117 5 StageEP 17 0 112 8 Clavi 18 0 113 8 WahClavi Organ 1 0 118 19 Cool Organ 2 0 117 17 Cool JazzOrgan 3 0 117 19 Cool RotorOrgan 4 0 115 19 Cool FullRocker 5 0 118 17 StadiumOrg 6 0 116 19 RotaryDrive 7 0 112 19 RockOrgan1 8 0 113 18 DanceOrgan 9 0 112 17 JazzOrgan1 10 0 114 19 PurpleOrg 11 0 118 18 Elec Organ 12 0 115 17 DrawbarOrg 13 0 11...

Страница 99: ... 31 Cool PowerLead 11 0 116 26 Dynamic Steel Voice No Bank Select MIDI Program Change 1 128 Voice Name MSB 0 127 LSB 0 127 12 0 117 30 Cool BluesGuitar 13 0 112 28 Cool CleanGuitar 14 0 115 25 Classic Guitar 15 0 115 28 PedalSteel 16 0 116 30 RockGuitar 17 0 126 28 VintageStrum 18 0 117 31 PowerChord 19 0 117 28 60 sClean 20 0 119 27 SmoothLead 21 0 115 30 VintageAmp 22 0 113 31 CrunchGtr 23 0 115...

Страница 100: ...ad 10 0 113 89 Symbiont 11 0 114 89 Stargate 12 0 112 90 Area51 13 0 113 90 DarkMoon 14 0 115 95 Ionosphere 15 0 115 89 GoldenAge 16 0 114 95 Solaris 17 0 117 89 Millennium 18 0 114 90 Dunes Synth 1 0 122 82 Oxygen 2 0 123 82 Matrix 3 0 120 82 WireLead 4 0 113 81 HipLead 5 0 117 81 HopLead 6 0 116 82 FireWire 7 0 115 82 Analogon 8 0 114 82 Blaster 9 0 115 85 Skyline 10 0 112 81 SquareLead 11 0 112...

Страница 101: ...40 20 Notre Dame 67 0 64 20 Organ Flute 68 0 65 20 Tremolo Organ Flute 69 0 0 21 Reed Organ 70 0 40 21 Puff Organ 71 0 0 22 Accordion 72 0 0 23 Harmonica 73 0 32 23 Harmonica 2 74 0 0 24 Tango Accordion 75 0 64 24 Tango Accordion 2 76 0 0 25 Nylon Guitar 77 0 43 25 Velocity Guitar Harmonics 78 0 96 25 Ukulele 79 0 0 26 Steel Guitar 80 0 35 26 12 string Guitar 81 0 40 26 Nylon Steel Guitar 82 0 41 ...

Страница 102: ...1 Shroud 207 0 64 81 Mellow 208 0 65 81 Solo Sine Voice No Bank Select MIDI Program Change 1 128 Voice Name MSB 0 127 LSB 0 127 209 0 66 81 Sine Lead 210 0 0 82 Sawtooth Lead 211 0 6 82 Sawtooth Lead 2 212 0 8 82 Thick Sawtooth 213 0 18 82 Dynamic Sawtooth 214 0 19 82 Digital Sawtooth 215 0 20 82 Big Lead 216 0 96 82 Sequenced Analog 217 0 0 83 Calliope Lead 218 0 65 83 Pure Lead 219 0 0 84 Chiff ...

Страница 103: ... Bird Tweet 317 0 0 125 Telephone Ring 318 0 0 126 Helicopter 319 0 0 127 Applause 320 0 0 128 Gunshot 321 64 0 1 Cutting Noise 322 64 0 2 Cutting Noise 2 323 64 0 4 String Slap 324 64 0 17 Flute Key Click 325 64 0 33 Shower 326 64 0 34 Thunder 327 64 0 35 Wind 328 64 0 36 Stream 329 64 0 37 Bubble 330 64 0 38 Feed 331 64 0 49 Dog 332 64 0 50 Horse 333 64 0 51 Bird Tweet 2 334 64 0 56 Maou 335 64 ...

Страница 104: ...4 Tom Rock 4 Tom Electro 4 Tom Analog 4 60 C 3 48 C 2 Mid Tom H Tom Room 5 Tom Rock 5 Tom Electro 5 Tom Analog 5 61 C 3 49 C 2 Crash Cymbal 1 Crash Analog 62 D 3 50 D 2 High Tom Tom Room 6 Tom Rock 6 Tom Electro 6 Tom Analog 6 63 D 3 51 D 2 Ride Cymbal 1 64 E 3 52 E 2 Chinese Cymbal 65 F 3 53 F 2 Ride Cymbal Cup 66 F 3 54 F 2 Tambourine 67 G 3 55 G 2 Splash Cymbal 68 G 3 56 G 2 Cowbell Cowbell Ana...

Страница 105: ... 1 1 Hi Hat Pedal Hi Hat Closed Analog 4 57 A 2 45 A 1 Low Tom Tom Analog 3 Tom Jazz 3 Tom Brush 3 Tom Jazz 3 58 A 2 46 A 1 1 Hi Hat Open Hi Hat Open Analog 2 59 B 2 47 B 1 Mid Tom L Tom Analog 4 Tom Jazz 4 Tom Brush 4 Tom Jazz 4 60 C 3 48 C 2 Mid Tom H Tom Analog 5 Tom Jazz 5 Tom Brush 5 Tom Jazz 5 61 C 3 49 C 2 Crash Cymbal 1 Crash Analog Hand Cymbal 62 D 3 50 D 2 High Tom Tom Analog 6 Tom Jazz ...

Страница 106: ... 54 F 2 42 F 1 1 Hi Hat Closed Telephone Ring 2 Bongo L Open 1 finger Bongo L Open 1 finger 55 G 2 43 G 1 Floor Tom H Bongo L Open 3 finger Bongo L Open 3 finger 56 G 2 44 G 1 1 Hi Hat Pedal Bongo L Rim Bongo L Rim 57 A 2 45 A 1 Low Tom Bongo L Tip Bongo L Tip 58 A 2 46 A 1 1 Hi Hat Open Bongo L Heel Bongo L Heel 59 B 2 47 B 1 Mid Tom L Bongo L Slap Bongo L Slap 60 C 3 48 C 2 Mid Tom H Timbale L O...

Страница 107: ...2 WorshipMed 13 DetroitPop 14 ModernR B 15 ComboBoogie Country 1 NewCountry 2 CountryHits 3 CountryBallad 4 CountryPop 5 CountryShuffle 6 Country2 4 7 FingerPickin 8 Bluegrass 9 Hoedown 10 CountryWaltz Latin 1 BrazilianSamba 2 FastBossa 3 Beguine 4 Mambo 5 Salsa 6 Calypso 7 Merengue 8 Bachata 9 CubanSon 10 RumbaIsland 11 RumbaFlamenca 12 HappyReggae 13 LatinDisco Ballroom 1 VienneseWaltz 2 English...

Страница 108: ...tar Apache 121 Hard Breakup 122 Have I Got It 123 He Kiss Crystal 124 Heaven Steps No MDB Name 125 I m A Pola 126 Land Wonderful 127 Lips Are Lucky 128 Lonely Night 129 Magic Puff 130 Marina s Song 131 Me Please 132 Mend A Chino 133 Motion Of Poetry 134 No Love Feeling 135 Pete Retite 136 Pillow Tears 137 Saw Her Standing 138 Star Of Movie 139 Teenie Bikini 140 The Ghetto 141 Tomorrow Love Me 142 ...

Страница 109: ...tugal InApril 373 Raindrop Head 374 Something Silly 375 The Wind And Me 376 Town Durham March Polka 377 Bogey March No MDB Name 378 Double Eagle 379 Polka Is Happy 380 Post Washington 381 Rosa 382 Stripes andStars 383 Teddy Picnic 384 Trombones Parade 385 Vienna Forever All Time Hits 386 All Of My Loving 387 At Heart Young 388 Away And Up 389 Born Smiling 390 Don t Be Bad 391 Game Makes Tears 392 ...

Страница 110: ...ote trills alternating notes when two notes are held The Tremolo effect Types 13 19 repeat all held notes up to four The Echo effect Types 20 26 create delayed repeats of each note played 07 Trill 1 6 note 08 Trill 1 8 note 09 Trill 1 12 note 10 Trill 1 16 note 11 Trill 1 24 note 12 Trill 1 32 note 13 Tremolo 1 4 note 14 Tremolo 1 6 note 15 Tremolo 1 8 note 16 Tremolo 1 12 note 17 Tremolo 1 16 not...

Страница 111: ...E Chorus effect without modulation created by adding a slightly pitch shifted sound 87 0 30 ROTARY SP5 Simulates a rotary speaker 66 18 31 NO EFFECT No effect 0 0 No Type Description MSB LSB 1 HALL1 Reverb simulating the acoustics of a hall 1 0 2 HALL2 1 16 3 HALL3 1 17 4 HALL4 1 18 5 HALL5 1 1 6 HALL M 1 6 7 HALL L 1 7 8 ROOM1 Reverb simulating the acoustics of a room 2 16 9 ROOM2 2 17 10 ROOM3 2...

Страница 112: ... distortion can be produced regardless of changes in input level 73 16 73 COMP DIST2 73 1 74 OVERDRIVE Adds mild distortion to the sound 74 0 75 OVERDRIVE2 74 9 76 ST OD Stereo Overdrive 74 8 77 DIST HARD Hard edge distortion 75 16 78 DIST HARD2 75 22 79 DIST HARD3 75 25 80 DIST SOFT Soft warm distortion 75 17 81 DIST SOFT2 75 23 82 DIST SOFT3 75 26 83 ST DIST HARD Hard edge stereo distortion 75 1...

Страница 113: ... switching 99 0 146 DUAL ROT SP2 99 1 147 AUTO PAN1 Several panning effects that automatically shift the sound position left right front back 71 16 148 AUTO PAN2 71 0 149 EP AUTOPAN 71 21 150 AUTO PAN3 71 1 151 TREMOLO1 Rich Tremolo effect with both volume and pitch modulation 70 16 152 TREMOLO2 71 19 153 TREMOLO3 70 0 154 EP TREMOLO 70 18 155 GT TREMOLO1 71 20 156 GT TREMOLO2 70 19 157 VIBE VIBRA...

Страница 114: ... Altered x Note 0 127 0 127 Number True voice 0 127 Velocity Note ON o 9nH v 1 127 o 9nH v 1 127 Note OFF x 9nH v 0 x After Key s x x Touch Ch s x x Pitch Bend o 0 24 semi o 0 24 semi 0 32 o o Bank Select 1 11 84 x 1 o 6 38 o o Data Entry 7 10 o o Control 64 o o Sustain 71 x 1 o Harmonic Content Change 72 o o Release Time 73 x 1 o Attack Time 74 x 1 o Brightness 91 93 94 o o Effect Depth 96 97 x 1...

Страница 115: ...mon Song Sel x x Tune x x System Clock o o Real Time Commands o o Aux All Sound OFF x o 120 126 127 Reset All Cntrls x o 121 Local ON OFF x o 122 All Notes OFF x o 123 125 Mes Active Sense o o sages Reset x x 1 Refer to 2 on page 116 Mode 1 OMNI ON POLY Mode 2 OMNI ON MONO o Yes Mode 3 OMNI OFF POLY Mode 4 OMNI OFF MONO x No ...

Страница 116: ...ystem Exclusive The values of mm is used for MIDI Master Volume Values for ll are ignored MIDI Master Tuning F0H 43H 1nH 27H 30H 00H 00H mm ll cc F7H This message simultaneously changes the tuning value of all channels The values of mm and ll are used for MIDI Master Tuning The default value of mm and ll are 08H and 00H respec tively Any values can be used for n and cc Reverb Type F0H 43H 1nH 4CH ...

Страница 117: ...e Pan Reverb Level Chorus Level DSP Level Dry Level EFFECT Reverb Type Chorus Type DSP Type Master EQ Type HARMONY Harmony Type Harmony Volume PC PC Mode MIDI Local On Off External Clock Keyboard Out Style Out Song Out Initial Setup METRONOME Time Signature Numerator Time Signature Denominator Metronome Volume SCORE Quantize Right Part Left Part UTILITY Demo Cancel LANGUAGE Language Effects Harmon...

Страница 118: ...76 Flash Clear 39 Flash Memory 29 Footswitch 10 Format File Menu 75 Fullkeyboard 63 FUNCTION button 15 70 FUNCTION display 42 Function Settings 70 72 H Harmony 44 HARMONY button 15 44 Harmony Type 44 110 Harmony Volume 72 Headphones 10 I Initial Send 84 Initial Setup 84 Initialization 39 INTRO I III buttons 14 55 K Keyboard Out 83 L Language 12 LEFT button 15 19 Left Part 87 Left Voice 19 Left Voi...

Страница 119: ...STOP button 14 22 41 Stop Accompaniment 60 Store Registration 67 Style 22 55 STYLE category buttons 14 22 Style File 63 Style List 107 Style Out 83 Style Volume 60 SUSTAIN Footswitch 10 Sustain Panel 47 SUSTAIN button 15 47 SUSTAIN jack 10 15 SYNC START button 14 23 56 SYNC STOP button 14 57 Synchro Start 56 Synchro Stop 57 T Tap Start 51 TAP TEMPO button 14 51 Tempo 64 TEMPO buttons 14 49 64 Time...

Страница 120: ...for assistance You may also contact Yamaha directly at the address provided below 2 Deliver the unit to be serviced under warranty to the retailer selling the product an authorized service center or toYamaha with an explanation of the problem Please be prepared to provide proof purchase date sales receipt credit card copy etc when requesting service and or parts under warranty 3 Shipping and or in...

Страница 121: ...147 Skiathou Street 112 55 Athens Greece Tel 01 228 2160 SWEDEN Yamaha Scandinavia AB J A Wettergrens Gata 1 Box 30053 S 400 43 Göteborg Sweden Tel 031 89 34 00 DENMARK YS Copenhagen Liaison Office Generatorvej 6A DK 2730 Herlev Denmark Tel 44 92 49 00 FINLAND F Musiikki Oy Kluuvikatu 6 P O Box 260 SF 00101 Helsinki Finland Tel 09 618511 NORWAY Norsk filial av Yamaha Scandinavia AB Grini Næringspa...

Страница 122: ...Instrument Division Yamaha Corporation 2006 Yamaha Corporation WH27920 XXXPOXXX X 01A0 Printed in China Yamaha Home Keyboards Home Page English Only http music yamaha com homekeyboard Yamaha Manual Library http www yamaha co jp manual ...

Отзывы: