background image

RECORDING THE RHYTHM GUITAR

Record the rhythm guitar on track 3 in sync with the
drums on track 1 and the bass guitar on track 2. Record-
ing preparations and operations are the same as when

recording the bass guitar. Be sure to use a guitar
preamplifier or guitar amp with a line output to provide
a line-level signal to the MT2X.

Track 1

Track 2

Track 3

Track 4

PING-PONG < PING-PONG RECORDING >

After the rhythm section has been recorded on tracks

1 — 3, only track 4 remains as an empty, spare track.

Since there are three more parts to be recorded, more
tracks will be needed.
The ping-pong technique (sometimes called bouncing, or
track transfer, or collapsing tracks) shown here allows
you to re-record these three tracks onto one track, thus
freeing up tracks for other recording operations. You can

also add other new parts during the ping-pong process.
As long as there are empty tracks, you can ping-pong
from one or more tracks to another as many times as
you like.

However, each time a track is ping-ponged onto another

track, some degradation in sound quality occurs. Most

noticeable is a loss of high frequency sounds, or "tre-
ble". Therefore, it’s best to plan for only 1 or 2 ping-pong
operations to preserve the sound quality of the instru-
ments you record. Now, let’s get started.

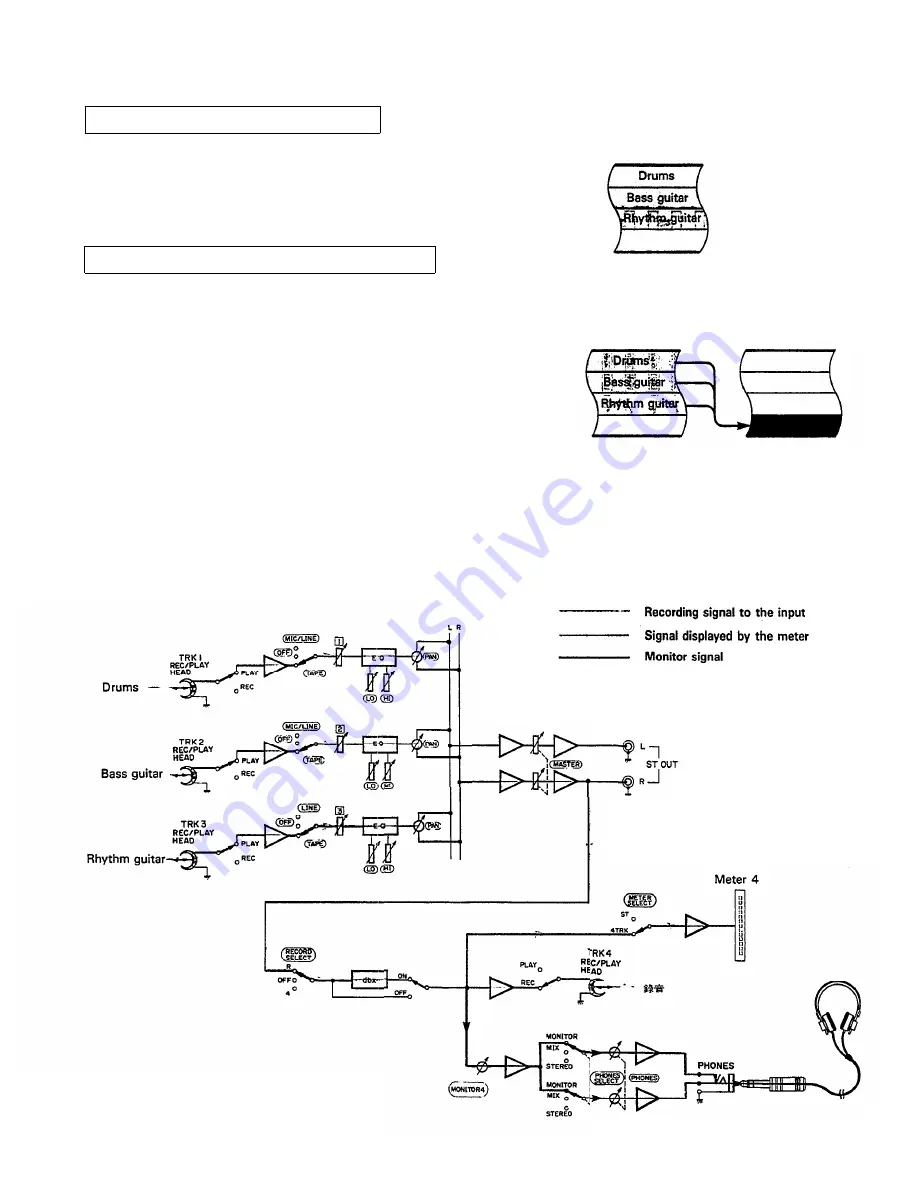
 — Signal Path during Ping-pong Recording —

Track 1

Track 2

Track 3

Track 4

25

2 5

Содержание MT2X

Страница 1: ... YAMAHA AUTHORIZED PRODUCT MANUAL Multitrack Cassette Recorder ...

Страница 2: ...YAMAHA Multitrack Cassette Recorder Operating Manual ...

Страница 3: ...ght It can vastly expand your creative scope To take full advantage of the outstanding features and performance capabilities of the MT2X we urge to read this owner s manual thoroughly CONTENTS BEFORE OPERATION 2 PLEASE NOTE THE FOLLOWING PRECAUTIONS 2 THE DIFFERENCE BETWEEN TRACKS AND CHANNELS 3 WHAT IS A MULTITRACK CASSETTE RECORDER 3 THE CONTROLS AND THEIR FUNCTIONS 4 MIXER SECTION 4 RECORDER SE...

Страница 4: ...ene or other power ful solvents and avoid the use of aerosol insecticides near the unit Clean the unit only with a soft dry cloth The rated supply voltage for U S and Canadian models is 120 VAC The General model is rated for use with 110 120 220 240 VAC supplies the bottom panel voltage selector is factory preset to 220 volts FCC CERTIFICATION USA This equipment generates and uses radio frequen cy...

Страница 5: ...entional stereo cassette deck records and plays back music The four tracks on a cassette tape represent the left and right for stereo For right channel track sound for each side of the tape The MT2X uses these For left channel track four tracks for single direction recording and playback For left channel track on the B side on only one side of a cassette tape For right channel track on the B side ...

Страница 6: ...orded on this channel Channels 1 4 correspond to tracks 1 4 on the tape MIC LINE Only input channels 1 and 2 accept microphone input This position on the chan nel 3 and 4 inputs is simply marked LINE Set this switch to the proper position when the output of a microphone keyboard instru ment or electric guitar is connected to the corresponding input jack on the front panel and 6 only accept line in...

Страница 7: ...le the HI high controls adjust the frequencies center ing around 10KHz with a 10dB boost or cut range for both controls Use of these equalizer controls will help 5 you to get the type of sound you desire and allow you to bring the sound forward clean up unclear sounds and push down sounds at annoying frequencies In order to properly use these equalizers it s important to understand the frequency r...

Страница 8: ...ect to the desired channel Amplified monitor speakers can also be connected to the AUX SEND jack Each AUX control adjusts the sources connected to the AUX SEND jack in the following manner CONNECTING AN EFFECTOR AUX MASTER SEND control AUX controls Channel 1 signal Channel 2 signal Channel 3 signal Channel 4 signal Channel 5 signal Channel 6 signal Effects device digital reverb digital delay etc A...

Страница 9: ...el adjusted by each AUX control as well as the AUX signal for monitoring use The final output is through the AUX SEND jack AUX RETURN CONTROL This control adjusts the input level of effects or sub mixers connected to the AUX RTN jack The level of the effect in relation to the dry sound can be set with this control SYNC SWITCH Normally left in the OFF position this switch should be set to REC or PB...

Страница 10: ...ignals are recorded on their respective track when the switches are in position NOTE Tracks 1 and 3 cannot be recorded from the right stereo signal and tracks 2 and 4 cannot be recorded from the left stereo signal REC INDICATORS Each track on the MT2X has its own REC indicator LED When the RECORD SELECT switches are used to set one or more of the tracks to the REC standby mode that is the selected...

Страница 11: ...and the loudest peaks to adequately record highly dynamic music If the dbx switch is put ON during recording highly dynamic music signals can be ade quately handled while the hiss noise inherent to cassette tapes is kept down below the range of human hearing If the dbx switch is kept ON during recording it must also be kept ON during playback PITCH CONTROL During recording or playback this control...

Страница 12: ...rting from the far left each meter cor responds to tracks 1 4 During playback the play back level is displayed during recording the record ing level is displayed Setting the switch to this posi tion during overdubbing enables easy reading of the recording level PEAK LEVEL METERS There are 14 LED indicators in each meter which show a range from 20dB to 6dB During recording setting levels high but b...

Страница 13: ...be monitored MONITOR Position This position is for monitoring the signal of each track You can freely monitor while mixing the sound of each track during recording or playback Using the MONITOR LEVEL Controls set the desired level for each track MIX Position This position allows you to simultaneously monitor both the sound heard in the STEREO position and the sound heard in the MONITOR position Se...

Страница 14: ...mixer has six channels and therefore six IN PUT jacks INPUT 1 and 2 can be used with microphones or line level sources such as electric and electronic instruments INPUTS 3 through 6 accept only line level input Plug a set of headphones into this jack for monitoring PHONES JACK Please use headphones rated from 8 40 ohms for best results PUNCH IN OUT JACK When directly connecting an electric guitar ...

Страница 15: ...e used as a sub mixer with the out put sent to a main mixer through this jack l A stereo amplifier or powered monitor speakers can be connected through this jack AUX SEND JACK This jack outputs the mixed signal from the Aux bus and is used as an output terminal for the connection of an effects device This can also be used as an additional monitor output AUX RTN JACKS These jacks are used to input ...

Страница 16: ...tem is provided by a pair of Yamaha KS10 powered speakers n MIDI TAPE SYNC SYSTEM In this system the YMC2 MIDI Converter converts the MIDI timing signals from the QX21 Digital Sequence Recorder into analog signals which are recorded on track 4 of the tape On playback the analog tape signals are converted back into MIDI form by the YMC2 and used to control START and STOP of the QX21 Thus playback o...

Страница 17: ...FF position and move the HI equalizer fader in the direction to reduce the high frequencies until the sound is satisfactory l Taking up tape slack If the tape is used when it is slack or some portion of the tape is out of the cassette shell there is a risk it may become tangled around the capstan or pinchroller In order to correct this insert a pencil or ballpoint pen into the center of one reel a...

Страница 18: ...ing out ideas Use the high speed mode when you need the best possible sound quality when recording an important demo for example PLAN CAREFULLY FOR MICROPHONE RECORDING Since the MT2X only permits microphone recording via channels 1 and 2 one or both of these channels must be kept available if you plan to record with microphones STEREO POSITIONING It s important to think about the acoustic positio...

Страница 19: ...struments will go on which tracks how and when effects will be used when recorded tracks will be ping ponged and what sort of end result is desired The recording process of the ex ample we will explain in this section is illustrated on page 16 The drums will be recorded on track 1 In recent years drum machines and rhythm machines have made an appearance with Yamaha coming out with the high perform...

Страница 20: ... controls to their nor mal positions referring to the control panel illustra tion on pages 4 10 Turn the power switches on for the effect and rhythm programmer and then turn the MT2X ON The POWER indicator will light 3 Setting up the recorder section Press the RESET switch to return the counter to 000 Turn ON the ZERO STOP switch Turn ON the dbx switch Select the appropriate tape speed the 9 5 cm ...

Страница 21: ...LINE position Set the MASTER fader to 7 Set the PAN controls for channels 1 and 2 between the center and the extreme L position as shown 19 Push the input faders for channels 1 and 2 up to 7 Set the GAIN controls to the LINE position start the rhythm programmer and adjust its output level so the 3 segment on the track 1 level meter lights only briefly on the signal peaks Pull the input faders back...

Страница 22: ...input signal with the AUX MASTER SEND control If necessary go over steps to several times until everything is just right Adjust the master recording level with the MASTER fader setting it at the point where the 3 in dicator on the far left level meter flashes occa sionally on the sound peaks 7 Recording Push the PAUSE switch to start recording Just before the rhythm programmer is started be sure t...

Страница 23: ...d check the sound record ed on track 1 by headphones and by looking at the level meter At this point if the track is recorded properly and there doesn t seem to be any problems press the REW switch and reset all the knobs and controls to their normal posi tions Now it s time to record the bass If the recording is not to your satisfaction you can re record the whole track Or you can use the punch i...

Страница 24: ...with the drum part already recorded on track 1 There are two ways to record the bass place a microphone in front of the bass amp or run a direct line from the bass into the recorder If you re after a really clear recording direct line record ing is the way to go If you re using an effect of some sort you ll want to insert a noise gate after the final stage of effect This is true with all electrifi...

Страница 25: ...steps Keep the ZERO STOP switch ON until mixdown This also goes for the rest of the steps Keep the dbx switch ON until mixdown This also goes for the rest of the steps Set the same tape speed as before This also goes for the rest of the steps Set the RECORD SELECT position to 2 the REC indicator will flash to show that the bass guitar con nected to input jack 2 will be recorded on track 2 Press th...

Страница 26: ...g on the meter second from the left Track 1 Track 2 Track 3 Track 4 6 Adjusting the monitor sound Press the PAUSE switch to start the tape and set the sound balance of the bass guitar and drums If necessary control the combined volume level with the PHONES volume control After you have adjusted the monitor levels to your satisfaction rewind the tape and set the recorder into the REC PAUSE mode 7 R...

Страница 27: ... ping pong technique sometimes called bouncing or track transfer or collapsing tracks shown here allows you to re record these three tracks onto one track thus freeing up tracks for other recording operations You can also add other new parts during the ping pong process As long as there are empty tracks you can ping pong from one or more tracks to another as many times as you like However each tim...

Страница 28: ...ONES SELECT switch to the MONITOR Turn the MONITOR LEVEL 4 control to about 7 position to monitor the sound recorded onto track 4 Turn the PHONES volume control to about 7 Make sure the METER SELECT switch is set to 4 TRK 3 Adjusting the level balance and sound characteristics Set input selector switches 1 3 to the TAPE position Press the PAUSE switch to start the tape Adjust the input balance of ...

Страница 29: ...ch in punch out technique Mastering it will allow you to re record even the smallest segment on a track without disturbing the rest of the track or the other tracks When all the tracks are playing back press the REC switch to start the tape punch in at the starting point of the section to be redone set the RECORD SELECT switch of the track to be redone to the REC position for the new recording and...

Страница 30: ... Signal Path during Punch in Punch out Operation 2 8 ...

Страница 31: ... the REC switch If the FS 1 is being used the unit is put into the REC PAUSE mode and the REC indicator lights If the FS 1 is connected set its foot switch so that the REC indicator flashes 3 Setting the monitor and meter sections Set the PHONES SELECT switch to MIX If it s not set to this position you won t be able to monitor the new recording sound and the playback sound of tracks 1 4 during pun...

Страница 32: ...ing level preferably at the same level as the initial recording 6 Recording Press the PAUSE switch to start the recording Punch in when you reach the passage that must be redone by sliding the RECORD SELECT switch to the 1 position When using the FS 1 press on the foot switch In both cases the REC indicator will light Punch out when you have finished redoing the passage by sliding the RECORD SELEC...

Страница 33: ...ertain sound balance in level In this next step the instruments are put in their place in the stereo sound field and a slight amount of reverb will be added to the vocal track with the SPX90 effects and stereo positioning and then recorded onto one side of a cassette tape in mono or stereo This tape is the final master Signal Path During Mixdown 3 1 ...

Страница 34: ...stics for each track with the equalizer controls for channels 1 4 Add the effects to the vocal track using the AUX 1 AUX MASTER SEND and AUX RTN controls Determine the stereo positioning of the instruments recorded on each track using the PAN controls 1 4 If necessary repeat steps through until every thing sounds right Watching level meters 1 and 2 use the MASTER fader to set the output level of t...

Страница 35: ...corder tracks have been recorded an additional two instruments may be added via mixer channels 5 and 6 at the mixdown stage When track 4 of the recorder is used to record an FSK signal via the YMC2 MIDI Converter or an external YMC10 MIDI Converter the playback signals from this track will frequently be used to control a stereo MIDI device such as an RX series Rhythm Programmer or a Sequence Recor...

Страница 36: ...a frequency to be recorded by conventional analog audio tape By using the MIDI converter the MIDI synchronizing signal is converted to an FSK signal that analog audio tape can handle l l An example of synchro recording using the RX17 rhythm programmer Set the RX17 to create the desired rhythm effects Connect the RX17 in the following manner After putting the MT2X into the REC PAUSE mode set the SY...

Страница 37: ...hen a source input to the INPUT jack is mixed and recorded with the sound from the effector connected between AUX SEND and RTN Set the RECORD SELECT switch of the track to be recorded to either L or R Then set the level meter select switch as shown below For ping pong recording Set the RECORD SELECT switch of the track to be recorded in ping pong to either L or R Then set the level meter select sw...

Страница 38: ...BLOCK DIAGRAM NOTE When the REC button is engaged the panel switches can be used to individually order recording on only those channels with RECORD SELECT not switched OFF 3 6 ...

Страница 39: ...dbx Incorporated All specifications subject to change without notice Chrome 70 microsec EQ 4 channel Permalloy rec play 4 channel ferrite erase 4 8 cm sec 9 5 cm sec 1 0 Less than 0 05 WRMS Approx 100 sec for C 60 tape DC servo 10 k ohms 10 to 50 dB fader nominal 10 dB trim min 56 dB trim fader max 10 k ohms 10 dB fader nominal 16 dB fader max 10 k ohms 10 dB fader nominal 16 dB fader max 1 k ohm ...

Страница 40: ...HE ACCESSORIES DIGITAL MULTI EFFECT PROCESSOR SPX90 GRAPHIC EQUALIZER GQ1031B 2 CHANNEL COMPRESSOR LIMITER GC2020B MIDI CONVERTER YMC2 POWER AMPLIFIER P2075 KEYBOARD SPEAKER KS10 SPEAKER SYSTEM S10X FOOT SWITCH FS 1 3 8 ...

Страница 41: ...d by Yamaha s worldwide network of factory trained and qualified dealer service personnel In the VD70420 SINCE 1887 YAMAHA NIPPON GAKKI CO LTD HAMAMATSU JAPAN event of a problem contact your nearest Yamaha dealer Printed in Japan ...

Страница 42: ...Yamaha Corporation of America 6600 Orangethorpe Avenue P O Box 6600 Buena Park CA 90622 6600 11 17 98 98109 YAMAHA ...

Отзывы: