Part Names and Functions
60
Remote Control
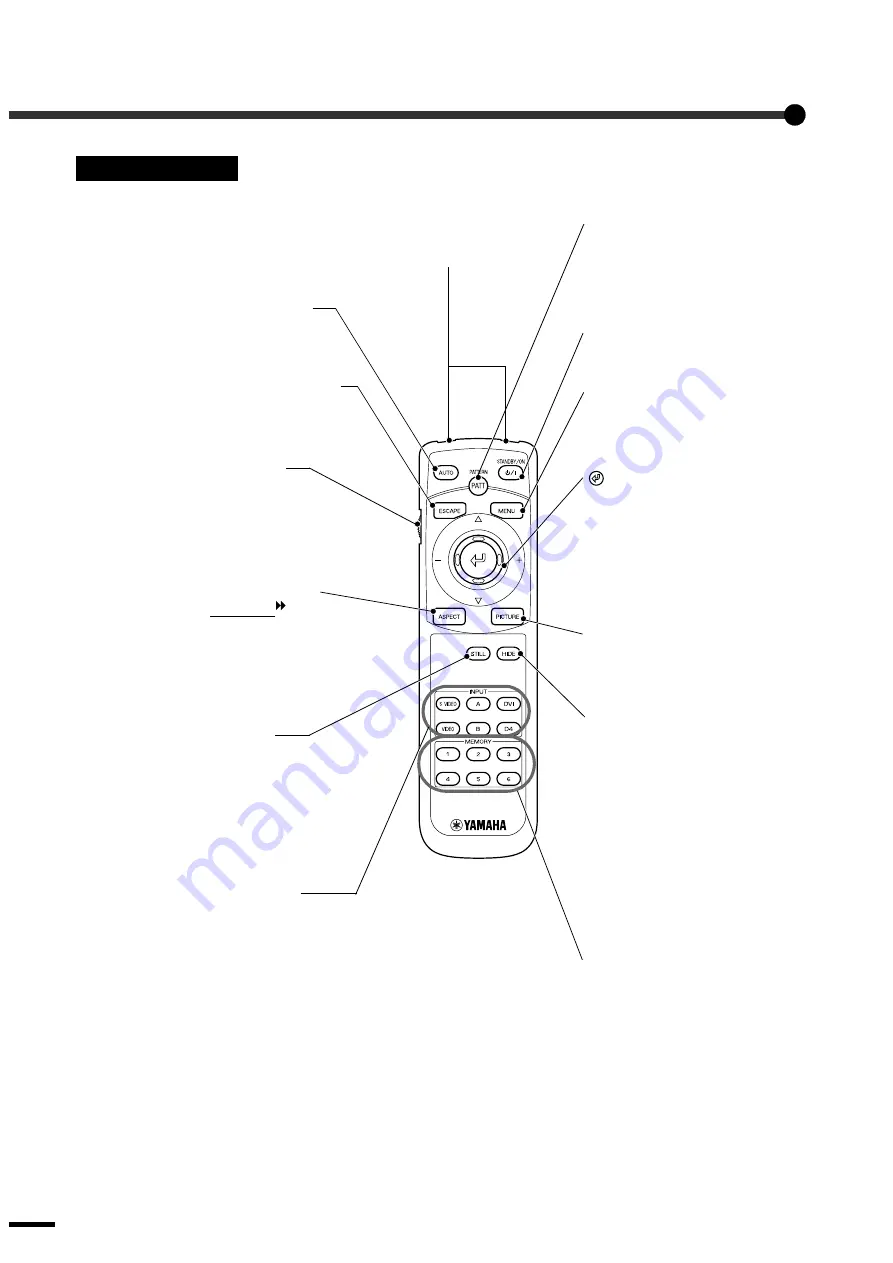
Remote control light-
emitting area (
Setup Guide
)
Outputs infrared remote control
signals.
[PATTERN] button (p.13)
Projects a test pattern for image
adjustment.
The test pattern switches between
Crosshatch
→
Grayscale Pattern
→
Off each time the button is pressed.
If pressed while a menu is being
displayed, the display returns to the
next-highest level.
When this button is pressed, the line
menu appears.
When a menu is being displayed, tilt
the button up, down or to the left or
right to select menu commands, and
press to accept and activate selected
commands.
[PICTURE] button (p.14)
This selects the picture mode. The
picture mode changes in the order A
→
B
→
C
→
PC
→
sRGB each time
the button is pressed.
[HIDE] button (p.31)
The projected images switch off and
on each time the [HIDE] button is
pressed.
When the images are switched off, the
screen will appear in accordance with
the setting made using the “Hide
Screen” command in the “Setup”
menu.
However, the video playback still
continues while moving images are
paused, so image playback will not
resume exactly from the point where
playback was paused.
[MEMORY] buttons (p.24)
Retrieves settings that have been
saved using the “Memory Save”
command in the “Image” menu and
applies them to the images being
projected.
[INPUT] button (p.7)
[S VIDEO] : Changes video input to the source connected to the
S VIDEO port.
[VIDEO]
: Changes video input to the source connected to the
VIDEO port.
[A]
: Changes video input to the source connected to the
INPUT A port.
[B]
: Changes video input to the source connected to the
INPUT B port.
[DVI]
: Changes video input to the source connected to the
DVI port.
[D4]
: Changes video input to the source connected to the
D4 VIDEO port.
[STILL] button
Screen image playback pauses and
resumes each time the [STILL]
button is pressed. However, the
video and audio playback still
continues while moving images are
paused, so image playback will not
resume exactly from the point where
playback was paused.
[AUTO] button (p.17)
Automatically adjusts computer
images to the optimum images.
[ASPECT] button (p.15)
Selects the aspect ratio for projected
images from one of five settings.
The aspect ratio switches between
Normal
→
Squeeze
→
Zoom
→
Zoom -Subtitle-
→
Through
→
Squeeze Through each time the button
is pressed.
[MENU] button (p.20)
The menus turn on and off each
time the [MENU] button is
pressed.
[LIGHT] button
(
Setup Guide
)
When slid up or down, the
[STANDBY/ON], [PATTERN],
[AUTO], [MENU], [ESCAPE],
[ASPECT] and [PICTURE] buttons
illuminate for 10 seconds.
[STANDBY/ON] button (p.7)
Press to turn the projector power on
and off.
Содержание LPX-500
Страница 1: ...OWNER S MANUAL LPX 500 Home Cinema Projector an English 403256900 U C A G B R T ...
Страница 8: ...3 Accessories Check the included accessories Remote control Setup guide Battery LR6 AA x 2 Power cord ...
Страница 59: ...56 Appearance 281 11 06 125 4 92 409 16 1 111 4 37 Units mm inch ...


