background image


FGDP-50 User Guide


68


Turning individual parts on/off


Item (Display) 

Description and Setting Range/Default Setting 

PartOnOff 

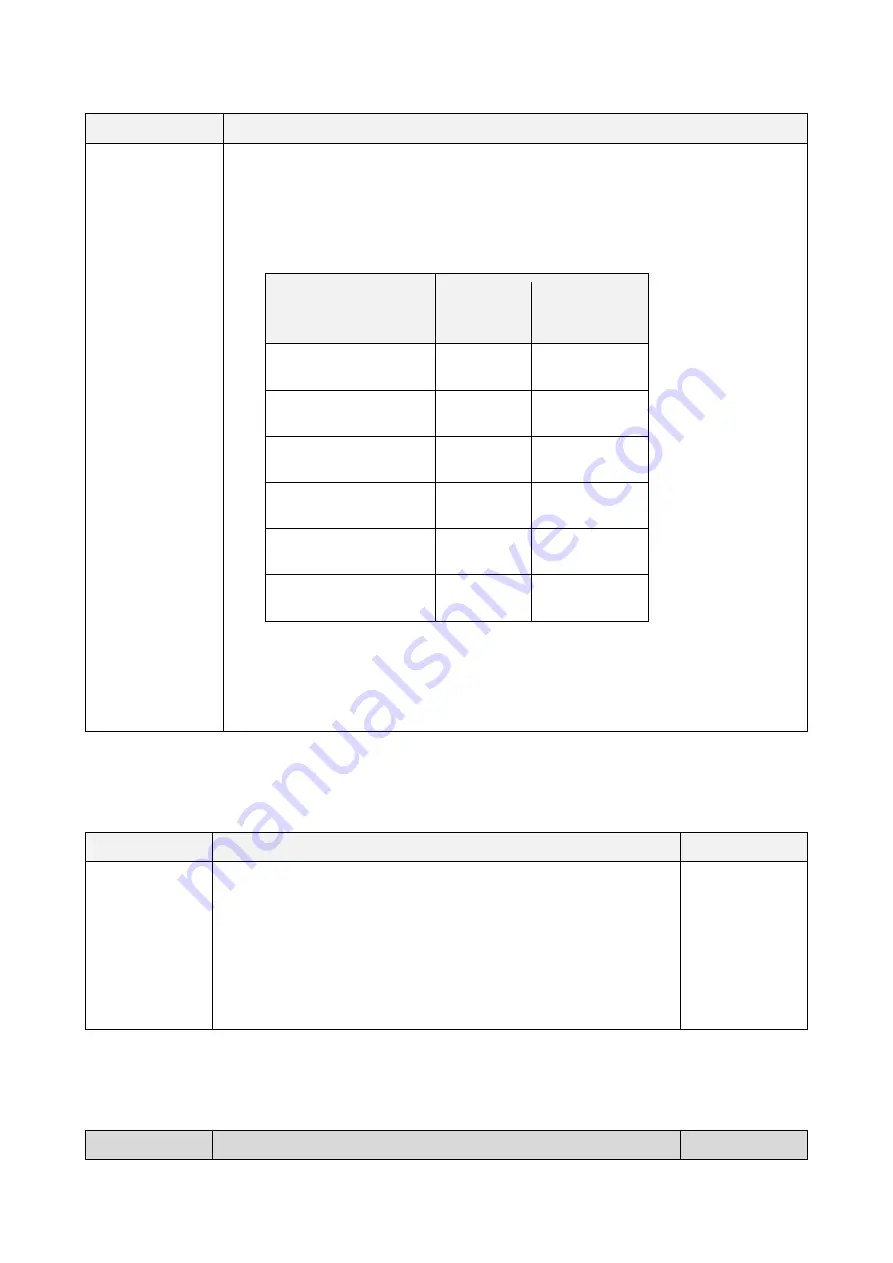
Turns on/off the individual parts of a session. Press the [ENTER] button to 
move to the menu level that displays each individual part. Then, use the [<] 
and [>] buttons to select individual parts, and use the [+] and [-] buttons to turn 
them on or off. 
 

Part in a Session 

Setting 
Range 

Default 
Setting 

Drum 

Off, On 

On 

Bass 

Off, On 

On 

Other1 

Off, On 

On 

Other2 

Off, On 

On 

Other3 

Off, On 

On 

Other4 

Off, On 

On 


NOTE 

The parts (Voices) assigned to Other1

4 vary from session to session. In 

some cases, a part might not be assigned. 


Hitting a Pad to start playing a session (synchronized start)


Item (Display)  Description and Setting Range 

Default Setting 

SynchroStart 

Off 

No setting is configured. 
 

On 

When a Pad (except the RGB Square Pads when in Session 
Creator Mode) is hit, the session will start playing.


Off 

@


Settings related to the timing for switching sections


Item (Display) 

Description and Setting Range 

Default Setting 

Содержание FGDP-50

Страница 1: ...instructions and additional information that might be helpful All illustrations included in this user guide are for the purpose of explaining operation Windows is a registered trademark of Microsoft...

Страница 2: ...d for finger drumming About the Manuals The following two manuals are available for the product Startup Guide Printed booklet included in the product package To help you use the product immediately th...

Страница 3: ...s pressed last will remain lit indicating the current mode a Menu button with LED This button lets you select Menu Mode See this page for details b Kit button with LED This button lets you select Kit...

Страница 4: ...y Press these buttons to switch between items on the same menu level Press ENTER to move down one menu level and press EXIT to move up one menu level See this page for details h Minus and Plus buttons...

Страница 5: ...how to check the battery level l Built in speaker Outputs the sounds you play and the sounds of devices that are connected to this product Audio operation buttons m n o m Record button with LED This...

Страница 6: ...d to these Pads By pressing these Pads further or applying pressure to these Pads MIDI Aftertouch you can confirm that the Pads work according to the settings made for each of the Pads in the current...

Страница 7: ...adjust the volume of the sound coming from the built in speaker or headphones connected to the PHONES OUTPUT jack Rear surface u Security slot Connect a commercially available security wire here to p...

Страница 8: ...aded into this product as data See this page for details See this page for details about the other functions x AUX IN jack This is a stereo mini jack By connecting your device like a digital keyboard...

Страница 9: ...ully charge the battery until the Standby On indicator red turns off Charging with a USB power adapter commercially available Connect the USB power adapter in the order of the numbers shown in the fig...

Страница 10: ...ult in damage to the product or overheating Follow the instructions that come with the connected USB power adapter or the USB mobile battery NOTICE Use a USB mobile battery that has a low current mode...

Страница 11: ...y On button until Shutdown is displayed on the LCD screen NOTE Although the power is off the product settings are maintained See this page for details When the battery is low AutoPowerOff Low Battery...

Страница 12: ...power off the product settings will not be maintained Auto Power Off To prevent unnecessary power consumption after a certain period of inactivity AutoPowerOff is displayed on the LCD screen and the...

Страница 13: ...electrical shock or even permanent hearing loss could occur To prevent damage to speakers make sure to set all volume levels to minimum 0 before connecting an external device NOTICE To avoid possible...

Страница 14: ...ive streaming device Connecting an external speaker equipped with an amplifier Connecting a live streaming device A Live streaming device B Streaming AUX IN jack By using this jack the built in speake...

Страница 15: ...en to this product USB TO HOST terminal This product is equipped with a USB TO HOST terminal Notice when using the USB TO HOST terminal When connecting a USB cable to this terminal make sure to hold t...

Страница 16: ...cting a USB cable If the smart device computer or the product freezes restart the application software or OS of the smart device computer or turn the power to this product off and then on again Connec...

Страница 17: ...able included with this product to make the connections in the order of the numbers shown in the figure below Connecting to a computer Windows 1 Install the Yamaha Steinberg USB Driver on your compute...

Страница 18: ...to use your USB device see the instruction manual for that device USB devices that can be used USB flash drives USB devices other than those listed above USB hubs mice computer keyboards etc cannot be...

Страница 19: ...our USB flash drive USB flash drives that have been formatted with other devices might not work properly with this unit See this page for details about how to format a USB flash drive NOTICE Formattin...

Страница 20: ...g for Aftertouch can be changed to a different function Pad operation Generated MIDI event Hitting a Pad Note On Pressing a Pad further pressure applied to Pad Aftertouch Hitting and then no pressing...

Страница 21: ...ssion playback in Session Creator Mode when the SESS button is lit They are not affected by the settings in MENU PadlayoutUtility PadLayout When playing primarily with your right hand When MENU Utilit...

Страница 22: ...op menu level This product has five modes One of the five buttons just below the LCD screen is always lit Menu Mode When the MENU button is lit you can use the item selection buttons buttons to make t...

Страница 23: ...the item selection buttons buttons to make the following settings Repeat RecSetting Session Creator Mode When the SESS button is lit the RGB Square Pads are used for Session Creator Mode allowing the...

Страница 24: ...e following operations are possible Moving horizontally through the current menu level If triangles appear at the left and or right ends of the top line on the LCD screen use the buttons to select an...

Страница 25: ...ta has been edited but not yet saved as user data not saved with a number beginning with U If you want to use the current settings at a later time press the ENTER button on the above screen to save th...

Страница 26: ...ames Editing user data names and file names For user data Kits Triggers Registration Memory Banks you can edit the name when saving the data Files in the root directory of a USB flash drive can be ren...

Страница 27: ...e Editing the name of a Registration Memory Bank See this page for details about how to edit a name when saving user data See this page for details about how to edit a name when saving data to a USB f...

Страница 28: ...bout the USB audio player See this page for details about the USB audio recorder 4 The applicable items are as follows Settings in Kit Mode Settings in Audio Mode excluding file selection numbers Sett...

Страница 29: ...some Pads the Voice will simply fade out and for others the Voice will repeat in time with the current tempo Adjusting the volume Use the Volume Up Down buttons on the side of the unit to adjust the...

Страница 30: ...volume and sound quality You can make individual volume adjustments to the various sounds that can be played by this product See this page for details Starting and stopping the Click sound You can pl...

Страница 31: ...the tempo If you press and hold this button the tempo will continue to speed up for as long as you hold it NOTE Press the and buttons at the same time in this state to return the value of the current...

Страница 32: ...play Descriptions P01 Maple A kit recorded on a drum kit with maple shells notable for its warm sound and enduring sustain P02 EDM Red A kit suitable for playing electronic music focusing on carefully...

Страница 33: ...y days of 50s rock and roll P16 Vintage70s A fat warm vintage sound reminiscent of rock s golden age in the 70s P17 ClassicJazz Based on the Vintage50s kit ClassicJazz has the ride cymbal bows positio...

Страница 34: ...for performing 80s dance music P38 PercsMaster A percussion kit featuring a range of percussion instruments from around the world that are sure to make sessions an immediate success P39 Cuban Perfect...

Страница 35: ...f you hit Pad H2 hi hat open cymbal and then Pad H1 or H3 hi hat closed cymbal you will hear that the sound of H2 hi hat open cymbal disappears This playing style is achieved with the following settin...

Страница 36: ...om an external device Playing along with Session Creator You can play the Pads while playing back musical phrases with the Session Creator See this page for details If you want to balance the volume o...

Страница 37: ...puter smart device NOTE If you want to balance the volume of the computer smart device with the sounds from the Pads either adjust the volume on the computer smart device or use MENU Mixer AudioVol In...

Страница 38: ...FGDP 50 User Guide 38 Execute the same operation again to disable the Panel Lock function NOTE Even when the Panel Lock function is enabled the power can still be turned off with the Standby On button...

Страница 39: ...tton on the top screen of Kit Mode to select a Kit See this page for details 2 Use the and buttons to select a setting and the and buttons to edit that setting The following four types of settings can...

Страница 40: ...Kit Name 6 Edit the Kit Name Use the and buttons to move the cursor and then use the and buttons to select a character at the cursor position Repeat these steps to finish the name See this page for de...

Страница 41: ...nds with Step 2 of the Basic procedure You can configure the settings for the currently selected Kit all Pads Press the ENTER button to move to the KitEdit menu level Use the and buttons to select a i...

Страница 42: ...ch Pad Voice is multiplied by the value set for VoiceEdit VarSend 0 127 Reverb Type List No Reverb Type Display Full Name of Effect 01 NoEffect No Effect 02 Room1 Room1 03 Room2 Room2 04 Room3 Room3 0...

Страница 43: ...mpoDelay1 D Tempo Delay1 Dotted 08 TempoDelay2 8 Tempo Delay2 8 09 TempoDelay2 T Tempo Delay2 Triplet 10 TempoDelay2 D TempoDelay2 Dotted 11 DelayLCR Delay LCR 12 CrossDelay1 Cross Delay1 13 CrossDela...

Страница 44: ...ssed further while Aftertouch is enabled When Note Repeat Type Down down beat If the time signature is 4 4 a Note Repeat setting of 1 repeats the Voice only on the first beat of the measure 1 2 repeat...

Страница 45: ...Note Repeat Rate for the designated Pad is set to anything other than Off setting this item to On will toggle start stop for Note Repeat each time the Pad is hit If a User Sample is assigned to a Voi...

Страница 46: ...signated Pad is playing back other Pads Send in the Link Group or being played back Receive Send Receive Send Receive Effective velocity range for Voices when operating Pads Velocity Limit Item Displa...

Страница 47: ...this page for details VoiceEdit This detailed explanation corresponds with Step 2 of the Basic procedure You can configure the settings for the Voices assigned to each Pad in the currently selected Ki...

Страница 48: ...dition sound is played See the Voice List for details 1 Press the ENTER and then move to Category 2 Hit the Pad for which you want to change the Voice 3 If necessary use the and buttons to select a Vo...

Страница 49: ...ro Kick 003 SnareAco Acoustic Snare 004 SnareElect Electro Snare 005 TomAco Acoustic Tom 006 TomElect Electro Tom 007 HHAco Acoustic Hi hat 008 HHElect Electro Hi hat 009 CymbalAco Acoustic Cymbal 010...

Страница 50: ...alue set for KitEdit ReverbSend 0 127 ChorusSend Adjusts the amount of chorus applied to the designated Pad Voice send amount The amount applied to each Pad Voice is multiplied by the value set for Ki...

Страница 51: ...FGDP 50 User Guide 51 If MENU Utility PadLayout is set to Left the settings for the Pads on the left are applied to the Pads on the right...

Страница 52: ...V files can be used for playback recording functions and WAV or AIFF files can be used as User Samples to assign to Pads The product will only recognize files in the root directory of a USB flash driv...

Страница 53: ...ting Range Default Setting RecGain This sets the gain volume level for the audio to be recorded 18 12 6 0 6 12 18 dB 0 dB RecSource This is for settings related to the recording source Press the ENTER...

Страница 54: ...on If this occurs try the following troubleshooting steps Disconnect the cable from the AUX IN jack and use only the USB cable for audio communication If you are using a USB cable to charge this produ...

Страница 55: ...5 Press the Record button to put the unit into recording standby You can cancel recording standby by pressing the Stop button If you want to record the playback of an audio file in the root directory...

Страница 56: ...ed by the product will be displayed on the LCD screen Due to limitations in the product specifications some characters cannot be used in the file names that are displayed by this product For example J...

Страница 57: ...les Audio files WAV or AIFF in the root directory of a USB flash drive can be imported into the User Sample Memory as User Samples Voices in Voice Category 017 Requirements for importing audio files S...

Страница 58: ...to display the import destination load destination selection screen and then use the and buttons to select a number 001 100 5 Press the ENTER button When the Load confirmation message is displayed pre...

Страница 59: ...Press the ENTER button to display the load screen 4 Press the ENTER button again When the Load confirmation message is displayed press the ENTER button again to load the file Completed is displayed t...

Страница 60: ...ple 3 Press the ENTER button to move to the Voice Category selection screen and then use the and buttons to select 017 4 Press the button to go to the Voice selection screen and then select the User S...

Страница 61: ...end of your performance You can switch between these sections at any time during your performance NOTE If you press the SESS button the last screen that was displayed when you were previously in Sess...

Страница 62: ...ack hit the 7 START STOP RGB Square Pad NOTE The parts that make up a session drums bass and 4 other parts can be turned on and off individually in SESS PartOnOff Session playback will continue even i...

Страница 63: ...ayback is set to start with the Intro section and then switch to the Main A section when Intro playback ends The 2 P04 HardRock Hard Rock 130 P21 HardRock P05 Pop Pop 165 P12 Birch P06 PopShuffle Pop...

Страница 64: ...ING RGB Square Pad turns off and 3 MAIN A comes on 3 You can switch freely between the Main A Main D sections You can configure a variety of settings regarding the timing at which the sections switch...

Страница 65: ...in the figure below Only the RGB Square Pad for the corresponding section is on Starting playback with the Ending section Other sections can be specified after playback starts If only the 2 INTRO END...

Страница 66: ...the timing at which the sections switch Switching to the Ending section while a Main section is playing Main A in the figure below The RGB Square Pad for the Main section that is playing is on and th...

Страница 67: ...re with a single touch during your performance register them in Registration Memory and set REG LoadSetting Session to On To display the settings screen during session playback press the button on the...

Страница 68: ...Drum Off On On Bass Off On On Other1 Off On On Other2 Off On On Other3 Off On On Other4 Off On On NOTE The parts Voices assigned to Other1 4 vary from session to session In some cases a part might no...

Страница 69: ...ely Sec Bar Imm Hit one time to switch at the end of the last measure of the current section two times to switch at the end of the current measure and three times to switch immediately Sec Bar Imm Set...

Страница 70: ...A PartOnOff All parts on regardless of whether a session is playing or stopped Hold Maintains the settings for switching sessions only during playback Lock Maintains the settings for switching session...

Страница 71: ...ory buttons For the I IV buttons the lamp state indicates the registration state of the setting described below Off No setting is registered for this button Blue A setting is registered for this butto...

Страница 72: ...re to save the Registration Memory Bank Saving settings in a User Registration Memory Bank You can save Registration Memories I IV together as one bank 1 Press the ENTER button on the top screen of Re...

Страница 73: ...s been saved NOTE User Registration Memory Banks U01 U50 can be saved in the root directory of a USB flash drive See the section on MENU File for details The edited state of the currently selected Reg...

Страница 74: ...ation Memory Bank List for an overview of the preset Registration Memory Banks included in this product 3 Press a button I IV to recall the registered settings short press NOTICE Be careful not to hol...

Страница 75: ...en Rim the Voice assigned to A4 will be generated only if either Pad is hit hard In addition by setting the A1 A3 RGB Square Pads to the same Link Group and setting different Note Repeat Rates for eac...

Страница 76: ...o facilitate ghost notes on the snare drum III With the preset kit P01 Maple selected the preset trigger P01 Normal Tx has been adjusted for this setting As the value for MENU Trigger A D Gain grows l...

Страница 77: ...item and then switch it On or Off Setting items are classified into the following eight categories Item Display Description Default Setting Kit Settings in Kit Mode See this page for details On Audio...

Страница 78: ...these settings and save up to 50 User Triggers Selecting a Trigger 1 On the top screen of Menu Mode press the button to move to the Trigger screen 2 Press the ENTER button to move to the Trigger Sele...

Страница 79: ...For all Pads VelFixVal and ATFixVal are set to 127 For all Pads MIDINote is set based on the GM General MIDI Drum Map These settings are for controlling an external tone generator via MIDI transmissio...

Страница 80: ...ese items you can edit them for each Pad Edited settings can be saved as User Triggers See this page for details Basic procedure from editing to saving a Trigger 1 Use the and buttons to select a Trig...

Страница 81: ...Name 6 Edit the Trigger Name Use the and buttons to move the cursor and then use the and buttons to select a character at the cursor position Repeat these steps to finish the name See this page for d...

Страница 82: ...sages that are transmitted or received when a Pad is operated Default values are unique to each Trigger Item Display Description Setting Range MIDICh Abbreviation for MIDI Channel Sets the MIDI channe...

Страница 83: ...ed to the external internal tone generator On or not Off Off On VelFixVal Abbreviation for Velocity Fixed Value Sets the MIDI Velocity that is transmitted when the designated Pad is hit When set to an...

Страница 84: ...phonic is transmitted as a MIDI Aftertouch message for the designated Pad Channel Poly ATPriority Abbreviation for After Touch Priority Select whether the MIDI Note message for the designated Pad is o...

Страница 85: ...Pad No matter how softly the Pad is pressed further the Aftertouch generated will not drop below this value 1 127 ATMax Abbreviation for After Touch Maximum Sets the upper limit of the Aftertouch for...

Страница 86: ...in the root directory of a USB flash drive Target Data Display Description All All settings to be backed up OneKit Selected User Kit AllKit All User Kits U01 U50 OneTrigger Selected User Trigger AllT...

Страница 87: ...hen selecting a User Sample OneSample or AllSample as the target data NOTE When loading a OneKit file the User Sample set in the User Kit is loaded together with that Kit When loading an AllKit file a...

Страница 88: ...s the EXIT button Saving files on a USB flash drive Saving data beginning with All 1 On the MENU File screen press the ENTER button to move to the Data Select screen 2 Use the and buttons to select Da...

Страница 89: ...rive the confirmation message Overwrite is displayed To overwrite the existing file press the ENTER button again Complete is displayed to indicate that the file has been saved Saving data beginning wi...

Страница 90: ...tons to move the cursor and then use the and buttons to select a character at the cursor position Repeat these steps to finish the file name See this page for details 7 Press the ENTER button A confir...

Страница 91: ...this page for the operation procedure when selecting a User Sample OneSample or AllSample as the target data Loading data beginning with All 1 On the MENU File screen press the ENTER button to move t...

Страница 92: ...load the file Completed is displayed to indicate that the file has been loaded Loading data beginning with One 1 On the MENU File screen press the ENTER button to move to the Data Select screen 2 Use...

Страница 93: ...tton When Load to is displayed use the and buttons to select the User Data number U01 U50 to be loaded 6 Press the ENTER button to display the confirmation screen for loading the file 7 Press the ENTE...

Страница 94: ...Name edit screen The cursor arrow in the figure below will appear at the left end of the file name 6 Edit the name of the file Use the and buttons to move the cursor arrow in the figure below and the...

Страница 95: ...een press the ENTER button to move to the Data Select screen 2 Use the and buttons to select Data 3 Press the ENTER button When Save is displayed use the and buttons to select Delete If the file to be...

Страница 96: ...can delete User Samples 001 100 of Voice Category 017 that are loaded in the User Sample Memory on this product instead of a USB flash drive Deleting all User Samples 1 On the MENU File screen press t...

Страница 97: ...ed is displayed to indicate that the User Samples have been deleted Deleting the selected User Sample 1 On the MENU File screen press the ENTER button to move to the Data Select screen 2 Use the and b...

Страница 98: ...Item Display Description USBMemFormat Abbreviation for USB Memory Format In some cases you might not be able to use a USB flash drive simply by connecting it to the USB TO DEVICE terminal In that case...

Страница 99: ...this product Optimization is the process of reorganizing the memory to expand the region that can be used Optimizing the memory might increase the amount of contiguous memory space available Press th...

Страница 100: ...0 32 24 OperationVol Abbreviation for Operation Sound Volume Adjusts the volume of the sound produced by pressing a button 0 32 0 Click Item Display Description Setting Range Default Setting ClickPatt...

Страница 101: ...ed to sound output Item Display Description Setting Range Default Setting SpeakerEQComp Abbreviation for Speaker EQ Compressor Type Select the type of EQ equalizer and compressor applied to the sound...

Страница 102: ...ected the Volume and SpeakerEQ Comp settings for PHONES OUTPUT are also applied to the sound from the built in speaker Off HeadphoneSw On HeadphoneSw USBAudioOutG Abbreviation for USB Audio Output Gai...

Страница 103: ...he RGB Square Pad LEDs 1 8 1 LEDPatAutoBar Abbreviation for LED Pattern Auto Bar When set to a value other than Off the LED lighting pattern of the RGB Square Pad will change every time the measure ad...

Страница 104: ...ff 1 127 100 LocalControl Sets whether a Pad is connected On or disconnected Off from the product s internal sound source Normally this value should be set to connected On but if you want to play only...

Страница 105: ...factory reset 3 Press the ENTER button again to execute a factory reset Completed is displayed to indicate that the factory reset is complete Executing a factory reset when turning the power on You ca...

Страница 106: ...FGDP 50 User Guide 106 Checking the firmware version You can check the firmware version of this product on the MENU Version screen...

Страница 107: ...Polyphonic Channel Assignable Functions Yes Other Interfaces Display LCD with backlight Tone Generator Type AWM2 Polyphony max 64 Kits Number of Kits Preset 48 User 50 Kit Edit Yes Voices Number of Vo...

Страница 108: ...Ending Parts Drum Bass Other 4 USB Audio Player Recorder Recording Time max approx 80 minutes per file Audio Format WAV 44 1 kHz 16 bit stereo Registration Memory Preset 4 Buttons 5 Banks User 4 Butto...

Страница 109: ...The contents of this manual apply to the latest specifications as of the publishing date To obtain the latest manual access the Yamaha website then download the manual file Since specifications equipm...

Страница 110: ...he corresponding numeric value Velocity or Aftertouch For this product the curves are designed to be the same for Note On Velocity and Aftertouch and there are 25 types to choose from Curves can be se...

Страница 111: ...Spline24 Spline25 Offset1 Offset2 Offset3 Offset4 Offset5 Setting functions for Pads Note On Aftertouch for Pads can be assigned for functions other than generating sounds and playing the Pads Althou...

Страница 112: ...generated when a Pad is hit If this item is set to anything other than NoAssgin no sound will be heard when the Pad is hit and no MIDI Note On will be generated DrumMute This function is the same as...

Страница 113: ...sed further Aftertouch In the display for KIT PadEdit ATFunc or SESS PadSetting ATFunc press the ENTER button and then use the and buttons to move to the following items and set their values These set...

Страница 114: ...e best musical sound ReverbSend Changes the mix for the Reverb Send for all parts of the sound output from this product ChorusSend Changes the mix for the Chorus Send for all parts of the sound output...

Страница 115: ...ltiplying those values by the value for this setting The setting range is 1 16 1 8 1 4 1 2 1 2 4 8 and 16 The larger the value the greater the effect Default settings Kit Mode Varies by Kit Session Cr...

Страница 116: ...r the MIDI Control Change message that will be output while the designated Pad is pressed further This value is the Aftertouch value when the Pad is pushed further The MIDI channel is set in MENU Trig...

Страница 117: ...Downloads https download yamaha com Block Diagram MIDI MIDI is a protocol for communication between digital instruments By connecting MIDI instruments to each other your music performance on one MIDI...

Страница 118: ...rnal device while MIDI messages transmitted from an external device will play the tone generator in this product NOTE MIDI related settings are configured here for each Trigger MIDI Reference This pro...

Страница 119: ...ddition instead of using the built in speaker connect an external audio device to the PHONES OUTPUT jack No sound or volume too low Problem Cause Solution There is no sound The product is set so that...

Страница 120: ...t the volume as described in the following sections Adjusting the volume No effect is applied even if the effect depth Send Level is set to a high value The effect is set too low for either the entire...

Страница 121: ...on Creator Mode and then hit the 2 INTRO ENDING 6 MAIN D RGB Square Pads The Sequencer s 16th notes are not equally spaced MENU Utility Swing is set to a value other than 0 Set MENU Utility Swing to 0...

Страница 122: ...cable and then connect it again See this page for details about the USB connection between this product and a smart device Sometimes the lighting pattern of the LEDs on the RGB Square Pads changes whe...

Страница 123: ...eed Recording has been stopped because the maximum recording time approximately 80 minutes per file has been exceeded Be sure to stop recording before the maximum recording time is exceeded Too Long A...

Страница 124: ...o free up space See this page for details about how to delete files USB Device Memory Slow Recording has been stopped due to the slow access speed of the USB flash drive Access speed might temporarily...

Отзывы: