background image

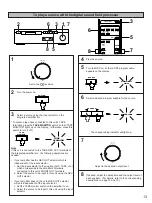
10

1

Set to the “ 

” position.

2

Turn on the power of this unit and the amplifier etc.

3

Turn the DSP on, so that a DSP program name appears
on the display.

4

Select the 

PRO LOGIC or 

PRO LOGIC

ENHANCED mode, so that the corresponding name is
illuminated on the display.

5

Select the center channel output mode according to
your speaker configuration.

(Refer to “SPEAKER CONFIGURATION” on page 5.)

On the feature of each mode, refer to the “Notes” shown
below.

6

SPEAKER BALANCE ADJUSTMENT

This procedure lets you adjust the sound output level balance between the front, center, and rear speakers using the built-in test
tone generator.  When this adjustment is performed, the sound output level heard at the listening position will be the same from
each speaker.  This is important for the best performance of the digital sound field processor.

POWER

EFFECT

CONCERT

HALL

PROGRAM

PRO LOGIC

CENTER

MODE

TEST

NORMAL

WIDE

PHANTOM

Flashes continuously.

ms

NORMAL

WIDE

PHANTOM

TEST

Notes

In step 5, when you select the center channel output mode,
note the following.
For 5 speaker configuration)
NORMAL: 
Select this mode when you use a center speaker

that is smaller than the front speakers.  In this
mode, the bass tone will be output from the front
speakers.

WIDE:

Select this mode when you use the center
speaker approximately same sized as the front
speakers.

For 4 speaker configuration)
PHANTOM: 
Select this mode when you do not use the

center speaker.  The center sound will be
output from the left and right front speakers.

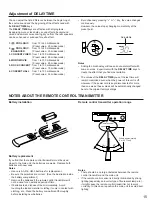
If you will select a DSP program on the remote control
transmitter, you can skip step 3. Pressing on a program
selector button will turn the DSP on and select the
corresponding program.

TEST

MASTER
VOLUME

PRO LOGIC

ENHANCED

HALL

CNCT VIDEO

EFFECT

ON/OFF

+

PROGRAM

MONO MOVIE

CENTER MODE

+

DELAY

TIME

ROCK

SUR.

4

6

3

5

2

5 3

1

6

4

Содержание DSP-E390

Страница 1: ...ications 16 IMPORTANT Please record the serial number of this unit in the space below Serial No The serial number is located on the rear of the unit Retain this Owner s Manual in a safe place for future reference WARNING TO REDUCE THE RISK OF FIRE OR ELECTRIC SHOCK DO NOT EXPOSE THIS UNIT TO RAIN OR MOISTURE RISK OF ELECTRIC SHOCK CAUTION TO REDUCE THE RISK OF ELECTRIC SHOCK DO NOT REMOVE COVER OR...

Страница 2: ...vice personnel when A The power supply cord or the plug has been damaged or B Objects have fallen or liquid has been spilled into the unit or C The unit has been exposed to rain or D The unit does not appear to operate normally or exhibits a marked change in performance or E The unit has been dropped or the cabinet damaged 16 Servicing The user should not attempt to service the unit beyond those m...

Страница 3: ...ound to comply with the requirements listed in FCC Regulations Part 15 for Class B digital devices Compliance with these requirements provides a reasonable level of assurance that your use of this product in a residential environment will not result in harmful interference with other electronic devices This equipment generates uses radio frequencies and if not installed and used according to the i...

Страница 4: ...tc to allow you to accurately recreate one of several live performance environments in your own home Dolby Pro Logic Surround The Dolby Pro Logic Surround Decoder program lets you experience the dramatic realism and impact of a Dolby Surround movie theater sound in your own home Dolby Pro Logic gets its name from its professional grade steering logic circuitry which provides greater effective fron...

Страница 5: ...ll be output from the center speaker and the ambience will be excellent Set the center channel mode to the NORMAL or WIDE position For details refer to page 10 4 Speaker Configuration The center speaker is not used in this configuration If the digital sound field program DOLBY PRO LOGIC or DOLBY PRO LOGIC ENHANCED is selected the center sound is output from the left and the right front speakers Ho...

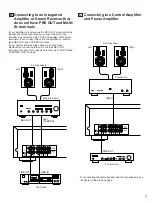
Страница 6: ...owner s manual for each component to be connected to this unit Choose one of the following three ways to connect this unit to your amplifier A Connecting to an Integrated Amplifier or Stereo Receiver with PRE OUT and MAIN IN terminals REC OUT AC OUTLET l0dB 0 dB FRONT LEVEL LOW PASS fc 200Hz CENTER OUT FRONT OUT REAR OUT SPEAKERS REAR CENTER REAR 8ΩMIN SPEAKER 8ΩMIN HAUT PARLEUR UNSWITCHED I20V 60...

Страница 7: ...displaced by connecting this unit to the tape REC OUT terminals reconnect your tape deck to this unit s TAPE PB and TAPE REC OUT terminals C Connecting to a Control Amplifier and Power Amplifier REC OUT l0dB 0 dB FRONT LEVEL LOW PASS fc 200Hz CENTER OUT FRONT OUT REAR OUT INPUT TAPE OUTPUT TAPE PB REC OUT AUX TAPE PB LINE OUT LINE IN Front speakers Integrated amp Right Left Tape deck REC OUT l0dB ...

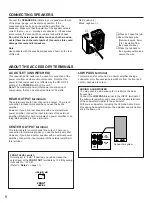
Страница 8: ...annel line output There is no connection to these terminals when you use the built in amplifier However if you drive rear speakers with an external stereo power amplifier connect the input terminals of the external amplifier MAIN IN or AUX terminals of a power amplifier or an integrated amplifier to these terminals CENTER OUTPUT terminal This terminal is for center channel line output There is no ...

Страница 9: ...es on off the digital sound field processor See page 14 0 TAPE MONITOR Used when the tape deck is connected to this unit s TAPE terminals to select that tape as the input source See page 13 A MASTER VOLUME Turns the master volume level up down B DELAY TIME Adjusts delay time See page 15 DIGITAL SOUND FIELD PROCESSOR PROGRAM EFFECT TAPE MONITOR POWER CENTER LEVEL VOLUME CINEMA DSP NATURAL SOUND DIG...

Страница 10: ...field processor POWER EFFECT CONCERT HALL PROGRAM PRO LOGIC CENTER MODE TEST NORMAL WIDE PHANTOM Flashes continuously ms NORMAL WIDE PHANTOM TEST Notes In step 5 when you select the center channel output mode note the following For 5 speaker configuration NORMAL Select this mode when you use a center speaker that is smaller than the front speakers In this mode the bass tone will be output from the...

Страница 11: ...sound level on your audio system by using the VOLUME control or the MASTER VOLUME keys on the remote control transmitter If you use external power amplifiers their volume controls may also be adjusted to achieve proper balance In step 8 if the center channel mode is in the PHANTOM position the sound output level of the center speaker cannot be adjusted This is because in this mode the center sound...

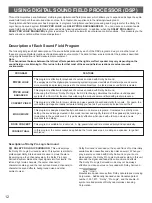
Страница 12: ...logy simulates the multi surround speaker ENHANCED systems of a 35 mm film theater thus widening the surrounded sound field with greater presence CONCERT VIDEO This program is effective for music videos and gives excellent depth and clarity for vocals For opera the orchestra and stage are ideally recreated letting you feel as if you were in an actual concert hall MONO MOVIE This program is designe...

Страница 13: ...his unit using the REC OUT selector If your amplifier does not have the REC OUT selector which is independent of the input selector 1 Set the TAPE monitor switch on the amplifier to on 2 Select the source to be input to this unit using the input selector 4 Play the source 5 Turn the DSP on so that a DSP program name appears on the display 6 Select a desired program suitable for the source The corr...

Страница 14: ...ifier etc the relationship between the center and rear channels may produce an unnatural effect If the connected external amplifier has a built in surround sound or ambience circuitry be sure that the surround or ambience circuitry on that amplifier is off while you are using this unit s Dolby Pro Logic Surround system If desired you can adjust the sound output level of the center speaker even if ...

Страница 15: ...when the power of this unit is off However if the power cord is kept disconnected for more than one week these values will be automatically changed back to the original factory settings DELAY TIME ms NORMAL WIDE PHANTOM TEST DELAY Adjustable NOTES ABOUT THE REMOTE CONTROL TRANSMITTER Battery installation Battery replacement If you find that the remote control transmitter must be used closer to the...

Страница 16: ...erly If the problem persists the cords may be defective Turning the unit off and then on will reset the protection circuit Connect the cords properly If the problem persists the cords may be defective Firmly connect the audio plugs If the problem persists the cords may be defective Turn the power to the component on Turn up the sound output level with the REAR LEVEL control Select another program ...

Отзывы: