background image

2

Connecting the Power
Cable

Connect the Disklavier’s power cable to an AC
wall outlet.

Important:

Make sure that the voltage of the AC

wall outlet matches that marked on the

Disklavier’s Serial No. plate.

Using the Remote
Control

The Disklavier is equipped with a remote control
which allows convenient control from almost
anywhere in the room. This chapter provides
notes on handling the remote control.

Installing Batteries in the Remote
Control

Before the remote control can be used, the two
batteries supplied with the Disklavier must be
installed.

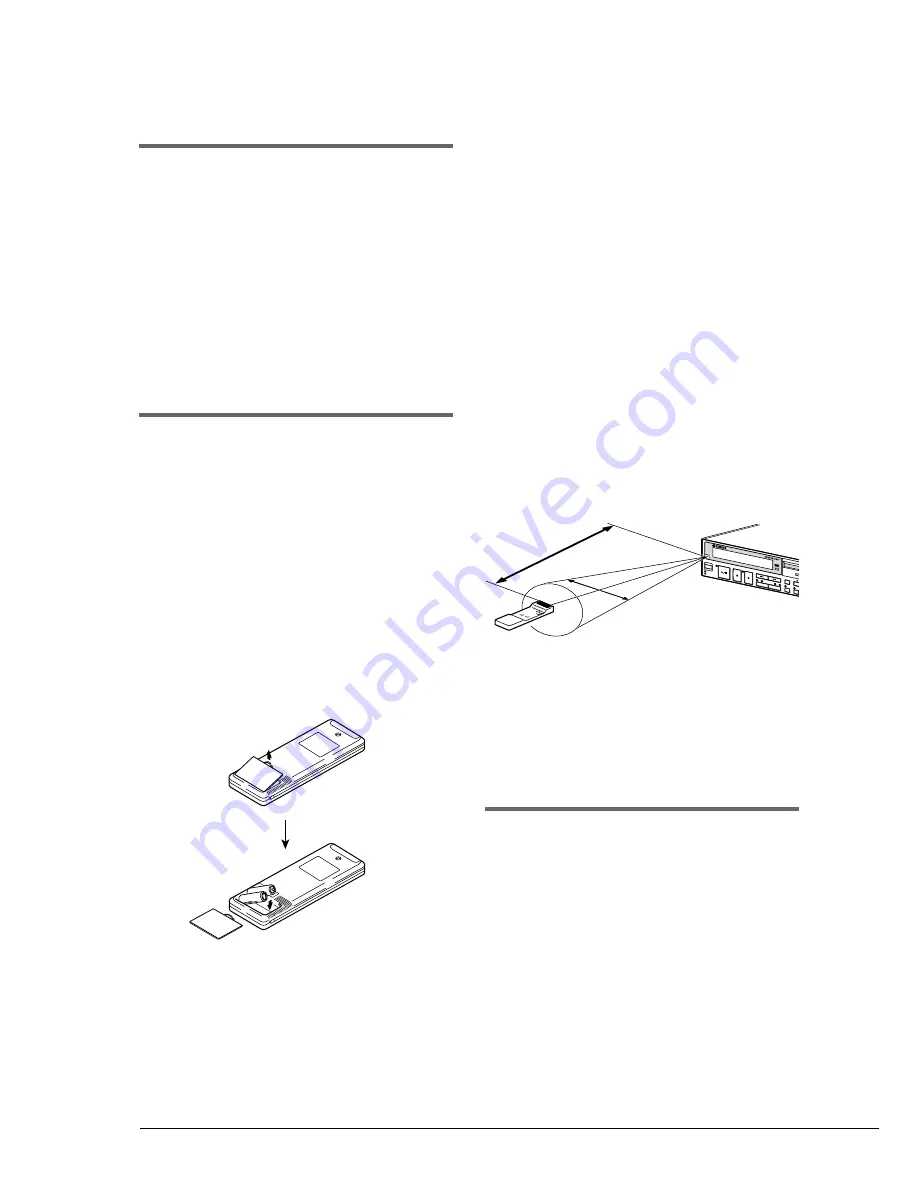
Remove the battery cover from the rear of the
remote control, install the batteries, and then
replace the cover.

A diagram inside the battery compartment shows
which way the batteries should be installed. Make
sure you insert them correctly.

Battery Replacement

When the remote control fails to work from a
distance, replace the batteries.

Replacement batteries should be UM-3, AA,

R6P, or LR6 type.

Always replace both batteries.

If the remote control is not to be used for a

prolonged period of time, remove the batteries

to prevent possible damage by battery leakage.

Important:

Be sure to read the section on Handling

Batteries on page ii of “Important” for

details on the safe handling of dry

batteries.

Using the Remote Control

To use the remote control, point it at the remote
control sensor on the Control Unit.

Approx. 5 m (16 ft.)

Connecting Other
Equipment

To connect audio instruments to the AUX

connectors, see Chapter 11 “Using the AUX

Connectors.”

To connect MIDI equipment, tone generator or a

synthesizer to the Disklavier, see Chapter 16 “The

Disklavier & MIDI.”

To connect a personal computer to the Disklavier,

see Chapter 17 “The Disklavier & Personal

Computers.”

PLAY/PA

USE

STOP

REC

SONG S

ELECT/

REV • FW

D

PART

L

R

ENTER

VOICE

FUN

CONTRO

L UNIT D

KC55RC

D

GENER

AL

INSTRU

MENT

STANDB

Y

ON

30˚

30˚

Содержание Disklavier

Страница 1: ......

Страница 2: ...being affected by the interference Utilize power outlets that are on different branch circuit breaker or fuse circuits or install AC line filter s In the case of radio or TV interference relocate reor...

Страница 3: ...friendly We sincerely believe that our products and the production methods used to produce them meet these goals In keeping with both the letter and the spirit of the law we want you to be aware of th...

Страница 4: ...sumed that unobstructed ventilation is required 7 Temperature considerations Electronic products should be installed in locations that do not significantly contribute to their operating temperature Pl...

Страница 5: ...vis et le corps du piano 1 Entfernen Sie die vier Schrauben von den Seiten des Steuerger tes 2 Schieben Sie den mit dem Disklavier gelieferten Metallhalter ber das Steuerger t und befestigen Sie ihn m...

Страница 6: ...ecteur D SUB en raccordant le c ble 5 Glisser les fentes du support m tallique contenant le bo tier de commande sur les vis mentionn es l tape 3 6 Apr s avoir install le bo tier de commande l enfoncer...

Страница 7: ...Mark III Series Playback Models Operation Manual...

Страница 8: ...inest Before using your Disklavier piano please read this manual thoroughly and retain it for future reference There are two types of Mark III Playback pianos Playback models Playback models with Sile...

Страница 9: ...could lead to fire or electric shock hazard When moving the Disklavier to another location turn off the power remove the power plug from the AC outlet and remove all cables connected to external devic...

Страница 10: ...h the and poles reversed Misaligning the poles of dry batteries can lead the dry batteries to be charged or shorted or it can cause them to heat up leak electrolyte or burst which in turn may result i...

Страница 11: ...yback 36 Using an Optional Foot Switch or Foot Controller 36 Chapter 10 Advanced Ensemble Song Playback Tuning the Tone Generator TG Master Tune 38 Basic Operations Chapter 1 Setting Up Your Disklavie...

Страница 12: ...sk Types 60 Formatting Disks 61 Converting Song Format 62 Converting Disk Type 63 Chapter 16 The Disklavier MIDI Start Stop Control of a MIDI Instrument with the Disklavier 65 Receiving Data from a MI...

Страница 13: ...e control cable extending from the piano is firmly connected to the TO CONTROL CABLE FOR PIANO connector on the rear panel of the Control Unit Note The control cable should be connected to the Control...

Страница 14: ...the remote control fails to work from a distance replace the batteries Replacement batteries should be UM 3 AA R6P or LR6 type Always replace both batteries If the remote control is not to be used for...

Страница 15: ...An acronym for Musical Instrument Digital Interface MIDI allows electronic musical instruments to communicate with each other The PianoSoft Disk Collection is a library of prerecorded song disks made...

Страница 16: ...a PianoSoft or PianoSoft Plus song disk here 5 Floppy disk eject button Used to eject the disk from the floppy disk drive 6 PLAY PAUSE button Used to start and pause playback 7 STOP button Used to sto...

Страница 17: ...uttons Used to select options and parameters and to adjust the volume i LED volume level indicators Indicates the playback volume level Also functions as a visual metronome Control Unit Rear Panel 1 T...

Страница 18: ...the AC power cable here 2 MAINS ON OFF switch Press to switch on off the Disklavier 3 AUX OUT L L R R Used to connect external audio equipment 4 AUX IN L L R R Used to connect external audio equipment...

Страница 19: ...eadphones 5 REVERB knob Used to adjust the amount of reverb for the digital piano tone generator Remote Control 1 Number keypad Used for direct song selection and to enter a start time for song playba...

Страница 20: ...d to select a disk Toggles the floppy disk and Memory Disks 0 9 and A F w TRANSPOSE buttons Used to transpose song playback transposes down transposes up and 0 resets the transposition value to 00 e T...

Страница 21: ...f a disk Do not store or place disks near a television radio loudspeaker or any other device that generates a magnetic field Do not expose disks to extreme temperature or humidity The working temperat...

Страница 22: ...the disk drive and the floppy disk Memory Disks The Disklavier has 16 Mbytes 1 Mbyte 16 Memory Disks of internal flash memory for storing song data They are numbered 0 to 9 and A to F Memory Disks are...

Страница 23: ...NDBY ON on the Control Unit 2 Set the MAINS switch to OFF Setting the MAINS switch to OFF is effectively the same as disconnecting the power cable from an AC wall outlet If the Disklavier is used regu...

Страница 24: ...select year month date hours minutes and seconds and use the NO and YES buttons to set a value Pressing both NO and YES simultaneously in each respective field sets the year to 1990 month and day to...

Страница 25: ...dal data on off pedal data or continuous pedal data half pedal On off pedal data turns the pedals on and off It is indicated by angle brackets around the time display as shown below Song number Select...

Страница 26: ...is replaced by the tempo display when tempo is being adjusted Piano Data Velocity Meters The velocity of the piano part notes as they are played back is indicated on the display as shown below For L R...

Страница 27: ...play back songs you need to first specify which disk you want to play back as the Disklavier has a total of 17 disks 1 floppy disk and 16 Memory Disks 1 Press DRIVE and specify the disk for playback...

Страница 28: ...f the piano part notes currently being played as shown Pausing Playback 1 Press PLAY PAUSE Playback stops and the PLAY PAUSE indicator flashes 2 Press PLAY PAUSE again to continue playback Stopping Pl...

Страница 29: ...LECT buttons or number pad on the remote control Using the SONG SELECT Buttons Press SONG SELECT to select the previous song Press SONG SELECT to select the next song Using the Number Pad 1 To select...

Страница 30: ...se mode fast forward and reverse allow you to quickly locate a desired position in a song Fast Forward and Reverse search faster than preview and review and the piano does not play Reverse can also be...

Страница 31: ...e adjusted simultaneously so it is a good idea to first balance the volume of the piano and XG tone generator See Balancing the Ensemble Volume TG Master Balance on page 21 The LED volume level indica...

Страница 32: ...Adjusting the Tone You can also adjust the tone using the BASS and TREBLE knobs on the Amplifier if necessary BASS knob Turning it clockwise increases and counterclockwise decreases the bass sound TR...

Страница 33: ...ff 1 Play back an Ensemble song 2 Press the Selector until the BALANCE indicator lights The following display appears 3 Use the NO and YES buttons to adjust the volume of the internal XG tone generato...

Страница 34: ...nce transposed the transposition value is shown continuously on the display Flashes Changing the Tempo You can speed up or slow down the playback tempo Slowing down the playback tempo can be useful wh...

Страница 35: ...klavier incorporates Yamaha s innovative Silent system in which a push of the SILENT button keeps the hammers from striking the strings effectively silencing the acoustic piano Sound information is se...

Страница 36: ...piano as desired to a level softer than what is possible on the acoustic piano Playback volume is adjusted using the VOLUME knob on the Silent Control Box The standard volume level is roughly the thr...

Страница 37: ...the knob clockwise to increase and counterclockwise to decrease the reverb Reverb is off when the REVERB knob is turned fully counterclockwise Follow the procedure below to apply reverb to the digital...

Страница 38: ...then press ENTER The Silent menu appears 3 Press until the c cursor is next to the Key parameter then press NO to set the parameter to OFF Keyboard movement is now canceled To re enable keyboard move...

Страница 39: ...dal use are played back in 32 note stereo sampling polyphony the number of notes beyond 32 are lost although these notes are minor notes that are barely audible 1 Press FUNC The FUNC indicator lights...

Страница 40: ...tlined in Tuning the Tone Generator TG Master Tune on page 38 Disengaging the Silent System Press the SILENT button so that the SILENT ON indicator goes out The Silent system is disengaged Note You ma...

Страница 41: ...peat There are three Repeat modes ALL RPT RND as described below The functions differ slightly when a Memory Disk group is selected and when it is not selected See Chapter 13 Chain Play Playing Back M...

Страница 42: ...B again Point B is memorized and the B of A B stops flashing Playback stops the song returns to point A and Pause mode is engaged 3 Press PLAY to play back the specified section Playback starts from p...

Страница 43: ...of A B flashes on the display 2 When you want to return to point A press SONG SELECT Alternatively you may press PAUSE followed by SONG SELECT to return to point A In this case playback stops the son...

Страница 44: ...an be set with the remote control only 1 Press SEARCH on the remote control The time counter on the display flashes 2 Enter the time that you want to search for For example to search for 2 56 first pr...

Страница 45: ...urself with the Disklavier playing the other 1 When an L R song is selected the PART indicators light as shown 2 To cancel the left hand part press PART L To cancel the right hand part press the PART...

Страница 46: ...keyboard when the Silent system is engaged Using the Built in Metronome You can sound the built in metronome to practice playing songs on the Disklavier With each beat of the metronome a digital clic...

Страница 47: ...time format you can sound the metronome along with song playback 1 Play back a song recorded using the measures and beats time format 2 Press METRONOME The METRONOME indicator lights and the metronom...

Страница 48: ...metronome starts and the following display appears 2 Press the until the c cursor is next to the Vol parameter then use the NO and YES buttons to set the volume level The volume can be set between 50...

Страница 49: ...r to Control the Tempo By connecting an optional Yamaha FC 7 controller pedal playback tempo can also be controlled The following table shows which functions can be controlled using the controller ped...

Страница 50: ...ime the Disklavier is turned on the tuning settings are sent automatically to the internal tone generator so you need only perform this fine tuning operation once This function can also be used to tun...

Страница 51: ...yed back by the piano You can however change this so that the piano parts are also played by the internal XG tone generator or a MIDI instrument connected to the MIDI OUT connector You can use this to...

Страница 52: ...internal XG tone generator These Program Change messages tell the tone generator which voices to select for each ensemble track During playback you can display the voice assignments of each track and...

Страница 53: ...ce this is a percussion part the results are odd to say the least 1 Play back an Ensemble song then press A display similar to the following appears From the above display we can see that the Disklavi...

Страница 54: ...ff use an audio cable optional to connect the Disklavier s AUX OUT connectors to the appropriate connectors LINE IN or AUX IN on the external device you want to connect to 2 Turn the VOLUME knob on th...

Страница 55: ...device then turn on the Disklavier 3 Gradually turn up the volume on the external device until a desirable volume is obtained Note The volume of the Amplifier is linked with the AUX IN connectors Mak...

Страница 56: ...details The Memory Disks are formatted in the SMF Standard MIDI File disk format giving you the most versatility as both SMF and E SEQ songs can be stored They can however be re formatted as E SEQ typ...

Страница 57: ...unction menu appears 3 With the c cursor next to the Disk option press ENTER The Disk menu appears 4 Press to position the c cursor next to the Song Copy option then press ENTER A display similar to t...

Страница 58: ...destination disk is formatted and its erasure protection tab is set to unprotected See Formatting Disks and Floppy Disk Accidental Erasure Protection on page 61 If the destination disk has not been f...

Страница 59: ...he following display appears Eject the source disk if the source disk is a floppy disk then insert a formatted destination disk Note1 Make sure that the destination disk is formatted and its erasure p...

Страница 60: ...songs at once If you want to delete all songs on a disk it may be quicker to re format the disk See Formatting Disks on page 61 1 Specify a disk Note If you are deleting songs from a floppy disk be s...

Страница 61: ...e renumbered For example if you have six songs on a disk and song No 4 is deleted song No 5 becomes song No 4 and song No 6 becomes song No 5 and so on Rearranging the Song Order Song Sort You can rea...

Страница 62: ...ata to disk it is asking if you want to sort some more songs before saving the sorted song data and exiting the song sort function Press YES if you want to sort more songs 8 Press NO to save all the s...

Страница 63: ...s then use the NO and YES buttons to select the time display TIME minutes and seconds display METRONOME measures and beats display 7 Press ENTER Note You cannot change the time display of copy protect...

Страница 64: ...l your classical songs is set playback to Grp1 You do not need to make settings for the next disk after each disk has finished You can have up to 9 groups 1 to 9 Each group can contain a maximum of 16...

Страница 65: ...ely without the need to make settings after each Memory Disk has finished playing This is called Memory Disk Chain Play Chain Play can also be set to start from any disk within the group Note Chain Pl...

Страница 66: ...ally played back Canceling Group Functions You can choose to manage your disks in disk units instead of group units by setting Memory Disk Chain Play to OFF and selecting a target disk in the Memory D...

Страница 67: ...roup 5 With the cursor at the End option press ENTER to restart the Control Unit This is the same as turning off the Control Unit and then turning it back on The standard disk title display appears Th...

Страница 68: ...of 99 timer settings and your Disklavier will perform them unattended This function is called Timer Play The Timer Play Examples section provides some examples of programmed playback Important The Co...

Страница 69: ...ns to set a group 9 Repeat steps 4 to 8 to set as many programs as necessary Pressing and scrolls the display vertically through the programs 10 Press ENTER after you set all parameters for the progra...

Страница 70: ...avier will stop playing at 9 00 p m even if Grp3 is still playing Example 2 Location Cocktail bar Repeat RND 16 50 Turn on Control Unit manually 17 00 01 17 00 PLAY Grp1 19 00 02 19 00 STOP 19 30 03 1...

Страница 71: ...Grp1 Memory Disk 2 1 song to be played on the hour Grp2 Memory Disk 3 several songs for continuous play during lunch Grp3 Memory Disk 4 continuation of disk 3 Grp3 Memory Disk 5 3 songs for closing o...

Страница 72: ...sks as a factory presetting Note The terms SMF type disk and E SEQ type disk are unique to the Yamaha Disklavier and should not be confused with SMF and E SEQ song formats Nevertheless with the Diskla...

Страница 73: ...rotection tab is set to unprotected 1 Press DRIVE and specify the disk to format Note If you are formatting a floppy disk make sure that the floppy disk s erasure protection tab is set to unprotected...

Страница 74: ...mal display Converting Song Format SMF songs can be converted to E SEQ songs and vice versa Note When converting songs from SMF to E SEQ song format if there is an instrumental part on track 3 increme...

Страница 75: ...verted the file name extension changes Converting Disk Type SMF type disks can be converted to E SEQ type disks and vice versa This can be helpful when you want to play back a song recorded in the SMF...

Страница 76: ...the size of the disk the following display may appear Eject the destination disk and insert the source disk You may need to repeat this several times until the conversion is complete If all data canno...

Страница 77: ...he Disklavier In this setup song disks are played back on the Disklavier and a MIDI drum machine or sequencer plays in synchronization When PLAY is pressed the MIDI instrument starts to play It can al...

Страница 78: ...avier in Real Time on page 68 The Disklavier s Piano Rcv Ch parameter must be set to match that of the sequencer track that contains the piano parts For example if the piano part is recorded on sequen...

Страница 79: ...option press ENTER The following display appears 5 Use the NO and YES buttons to select a MIDI channel See page 66 for a list of available options 6 Press until the c cursor is next to the Delay In pa...

Страница 80: ...hat of the other keyboard s MIDI transmit channel If the channels do not match the Disklavier will not respond to the MIDI data Refer to the other keyboard s user guide for information on setting its...

Страница 81: ...y channels 1 to 16 and the rest of the channels will be played by the external tone generator See Playing Back More than 16 Channels on page 74 For the best compatibility your external MIDI instrument...

Страница 82: ...rsor is next to the MIDI Setup option then press ENTER The following display appears 4 With the c cursor next to the Piano Part option press ENTER Then press until the following display appears 5 Use...

Страница 83: ...lavier The Disklavier can be connected to a personal computer using the TO HOST connector It can also be connected via MIDI IN OUT connectors but a separate MIDI interface is required The TO HOST conn...

Страница 84: ...uter and Disklavier power switches off before making the connections and setting the HOST SELECT switch Connecting to an Apple Macintosh Series Computer Use a standard Macintosh 8 pin system periphera...

Страница 85: ...he Piano Rcv Ch parameter use the NO and YES buttons to select the channel for the piano part The selected channel will be played by the Disklavier piano and the other channels by the internal XG tone...

Страница 86: ...return to the normal display Playing Back More than 16 Channels You can play back from a computer song data that contains up to 32 channels by connecting the Disklavier s TO HOST connector to the seri...

Страница 87: ...selected disk only If you select Memory Disk 0 the disk is reset in SMF format and an opening song is automatically re recorded on the disk If you select Memory Disk 1 to F the disks are reset in SMF...

Страница 88: ...1 F F O 7 2 1 o t 0 p u t e S I D I M h C v c R o n a i P 1 0 l l a g r P g r P 2 1 6 1 1 0 s m 0 0 5 n I y a l e D N O F F O N O L e l i F t r o p m I g r P l l a g r P g r P 6 1 1 0 R e l i F t r o...

Страница 89: ...e Control Unit s remote control sensor Make sure that you are within the remote control s specified operating range See Using the Remote Control on page 2 Make sure that the remote control s batteries...

Страница 90: ...function is not set to PDoff See Operating the Pedals Yourself on page 34 Tone Generator Ensemble Playback During Ensemble song playback the Ensemble parts cannot be heard Make sure that the amp s vo...

Страница 91: ...unprotected See Floppy Disk Accidental Erasure Protection on page 61 No more song data can be copied onto the disk because the disk is nearly full The current function cannot be performed because this...

Страница 92: ...g Format A song file format developed by Yamaha for saving songs E SEQ Type Disk One of two disk types that the Disklavier uses to format disks E SEQ type disks are compatible with earlier Disklavier...

Страница 93: ...other Piano Parts Refers to the left and right hand piano parts of a song The left hand piano part is recorded onto track 1 and the right hand piano part is recorded onto track 2 These track assignme...

Страница 94: ...cted directly by entering the song number using the remote control s number pad Song Sort A Disklavier function that allows you to rearrange the order of songs on a disk Split Point When a keyboard sp...

Страница 95: ...rred to as velocity Voice The sounds produced by a tone generator expressing various instruments See Chapter 22 Internal XG Tone Generator Voice Drum Kit List for a listing of basic voices XG Yamaha X...

Страница 96: ...uitar 025 NylonGtr Acoustic Nylon Guitar 026 SteelGtr Acoustic Steel Guitar 027 Jazz Gtr Electric Jazz Guitar 028 CleanGtr Electric Clean Guitar 029 Mute Gtr Electric muted Guitar 030 Ovrdrive Overdri...

Страница 97: ...Effect 097 Rain SFX 1 rain 098 SoundTrk SFX 2 soundtrack 099 Crystal SFX 3 crystal 100 Atmosphr SFX 4 atmosphere 101 Bright SFX 5 brightness 102 Goblin SFX 6 goblins 103 Echoes SFX 7 echoes 104 Sci Fi...

Страница 98: ...2 2 4 6 9 m m 0 8 1 2 1 2 7 t h g i e W s b l 5 3 g k 6 1 n o i t a c i f i l p m A W 0 6 s l o r t n o c e m u l o v d n a e n o t 2 s r e k a e p S r e f o o w 4 1 6 m c 6 1 r e t e e w t 1 m c 5 2...

Страница 99: ...m e s n e f o e m u l o v g n i c n a l a B s r e h t O n i t n u o c l a d e p l e c n a c l a d e p l e c n a c d r a o b y e K g n i d r o c e R s n o i t c n u F s k c a r T o n a i p r o f 2 g n...

Страница 100: ...Tune System Real Time Clock Commands Aux All Sound OFF Reset All Cntrls Local ON OFF All Notes OFF Mes Active Sense sages Reset Notes 1 Received transmitted if switch is on 2 Only ESBL Part can recog...

Страница 101: ......

Отзывы: