


26
The Assign2 value of course doesn‘t correspond to the
Note Shift parameter. As we have already pointed out earlier,
you should always consider to the relationship between the
modulation intensity and its starting value. Always orient
yourself first by the Note Shift value. If for example it‘s set to
+00 you should use a modulation value of +17 to enable a
shift of exactly two octaves. If the Note shift value however
is set to +12 you should use a modulation value of +25. You
can try this out with Performance TP118.
Pulling out all the Stops
To round up this chapter we would like to look at sounds
that you will want to use again and again, not just for live per-
formance.
We are talking about the Hammond sounds. These
sounds are a good basis on which to explore further aspects
of sound programming.
First a look at the concepts involved. The organ‘s registers
comply with the laws of Additive Synthesis. In contrast to
Subtractive Synthesis, where certain frequency regions are
selectively eliminated, here sine based tone frequencies cor-
responding to the position of a pipe organ or the partial-tone
components of the treble range are mixed together, or
‘added’. Individual drawbars or stops, also known as
“choirs”, are used to regulate the sine oscillations levels per
position (pitch).
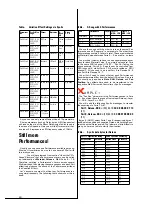
The classic Hammond organ has a total of nine drawbars
(see table). The first two bars (Sub) lie an octave below the
fundamental tone (16’) and a 5th (5 1/3’) above respectively.
Die positions 8’ to 2’ make up the second section. The last
drawbar cluster includes the upper three positions which
correspond to the fifth, sixth and eighth harmonic sequence
of partial tones.
We want to emulate exactly this drawbar principle with the
CS1x. To this end we are also adding single sine oscillations
and tuning them for the relevant frequency behaviour. We
need to improvise a little however as the CS1x is limited to
four Layers. Don‘t panic, they are sufficient if you cleverly
adopt only a part of the drawbar method. Each Layer can only
be transformed however by +/-24 semi tones. In order to
keep the total position’s range intact you can for instance
subtract -12 from all Note shift values (see the table‘s right
column).
About the sound programming: we have designed two
detailed sound examples for you to make this as easy to
follow as possible, broken up the entire programming ses-
sion into four steps and finally additionally documented
them. The only real difference between these two examples
can be found in the different sine waves and positions used.
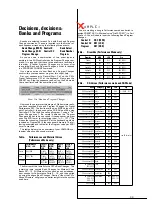
Drawbar Position
Note Shift Note Sft – CS1x
1
16’
-12
-24
2
5 1/3’
+7
-5
3
8’
0
-12
4
4’
+12
0
5
2 2/3’
+19
+7
6
2’
+24
+12
7
1 3/5’
+28
+16
8
1 1/3’
+31
+19
9
1’
+36
+24
❯
Step 1 =
Layering sinewaves and
determining Positions
To begin with we have settled on four positions and chosen
an appropriate Material voice. The first organ (TP121) con-
sists of positions 16’ – 2 2/3’ – 2’ – 4’ and a simple sine
wave (PRE1#48). Not so with the foundation of the second
organ sound (TP125): here you will a hear a sine-like wave-
form along with a characteristic click sound during the attack
phase (PRE7#074). With the classic Hammond sounds this
‘organ percussion’ occurs at 4’ and 2 2/3’. We have however
set the positions a little differently: 8’ – 5 1/3’ – 2’ – 16’.
❯
Step 2 = Setting
Drawbar Positions
To get this right you have to regulate the volume relation-
ships between all four Layers. Be careful, though; the biggest
mistakes happen here. If the drawbar relationships, i.e. the
level relationships between the different sine waves don‘t
harmonise properly, your sound will seem completely unbal-
anced. The first example emphasises the popular 2 2/3’ reg-
ister (Layer2 – Volume 123). This is essential for authentic
jazz registration. The remaining examples however reside in
the middle position (Layer1/3/4 – Volume 63). The second
drawbar setting (TP126) is considerably more ‘neutral’ and
can as such be applied more universally. This is achieved by
accentuating, i.e. stabilising the fundamental tone (Layer1) a
little.
❯
Step 3 = Programming
the Leslie Effect
Even the most perfect Hammond sound isn‘t convincing
until a Leslie effect is applied! Both Performances (TP123/
127) utilise a slow rotary speed as a starting point, which can
however be increased in real-time with Knob3. The constant
changing of rotary speed via the a controller is an important
part of authentic organ playing, and should always be taken
into account when programming such sounds. We leave the
choice of “Slow Leslie” or “Fast Leslie” entirely up to you. To
break up the monotony we have increased the rotary speed
(LFO Freq) in our last step (TP124/128).
❯
Step 4 = Preparing the
Drawbar modifications
Just as enticing as changing the speed of the Leslie effect
is the spontaneous control of the drawbar positions, an
effect which thanks to the wide control possibilities of the
CS1x can also be recreated here. This is achieved simply by
volume modulation. As you will know by now, this is the job
of Knob6/Assign2. You simply need to program different
modulation values for each Layer. You can emphasise the
characteristic register (2 2/3’) with the first organ sound
(TP124) by turning Knob6 clockwise (Layer2 – Volume =
+32). In the second example (TP128) a different octave posi-
tion is accentuated instead (2’). Please take an extra hard
look at Knob6 and its effects. You can of course always work
with Scene morphing, allowing drawbar changes to be made
with the Mod wheel instead. Performance TP128 is a good
example of this.