background image


8


AUDIOGRAM 3 Owner’s Manual


Quick Guide


This quick setup and operation guide covers everything from installing the Cubase AI
software to using Cubase AI for recording and mixdown. While going through this section
you might find it useful to also refer to the “Controls and Functions” section on page 18, as
well as the pdf manual supplied with the Cubase AI software.


Since the End-User Software License Agreement (EUSLA) shown on your PC-display
in your installing the “DAW” software is replaced by the agreement at the end of this
manual, you should disregard the EUSLA. Read the Software License Agreement at
the end of this manual carefully, and install the software if you agree to it.


1


Start the computer and log on to the Administrator account.


2


Insert the included DVD-ROM into the computer’s DVD-ROM drive.


3


Double-click on the “CubaseAI4.msi” icon in the “Cubase AI 4 for Windows” folder (for 
Windows users), or double-click the “CubaseAI4.mpkg” in the “Cubase AI 4 for MacOS 
X” (for Macintosh users).


Follow the on-screen instructions to install the Cubase AI software.


In order to have continuous use of Cubase AI, including support and other benefits, you will
need to register the software and activate your software license by starting it while the com-
puter is connected to the Internet. Click the “Register Now” button shown when the software
is started, then fill in all required fields for registration. If you do not register the product, you
will be unable to use the application after a limited period of time expires.


1


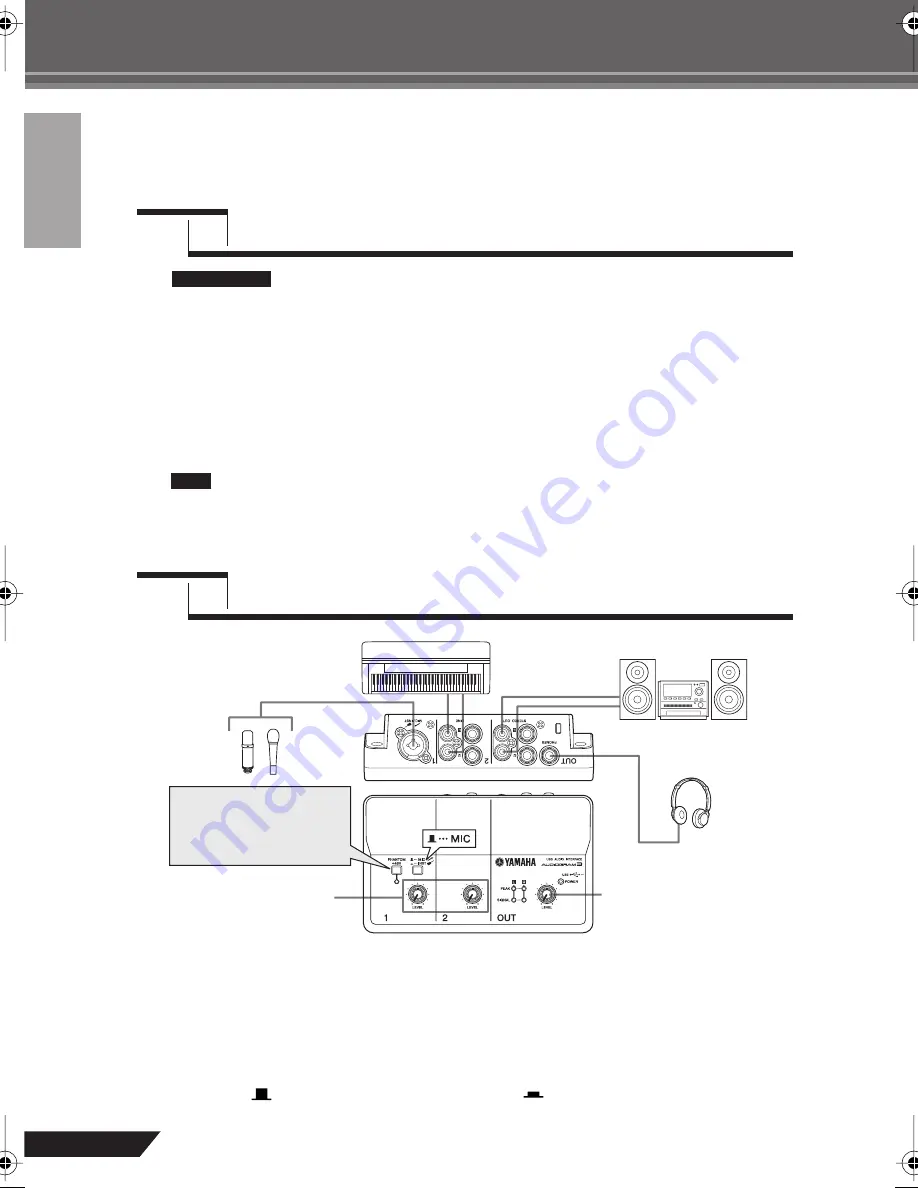
Turn all gear that is to be connected to the AUDIOGRAM off or to standby mode (except 
the computer), and set the LEVEL controls and OUT LEVEL control to their minimum 
settings.


2


Connect microphones and/or instruments.


For details on making connections refer to the “Setup” section on page 7 and the “Controls and Func-
tions” section on page 18.


3


Set the MIC/INST switch according to the type of device connected to channel 1.


Select MIC (

) if a microphone is connected, or INST (

) if a guitar or similar instrument is con-

nected.


Step


1


Installing Cubase AI


Step


2


Connecting to the AUDIOGRAM interface

IMPORTANT !

NOTE

OUT LEVEL control

LEVEL controls

Be sure to turn the 


 PHAN-

TOM +48V switch on when 
using a phantom-powered 
condenser microphone.

audiogram3̲en.book Page 8 Wednesday, April 2, 2008 2:40 PM

Содержание Audiogram 3

Страница 1: ...Owner s Manual Bedienungsanleitung Mode d emploi Manual de instrucciones Руководство пользователя 取扱説明書 USB AUDIO INTERFACE Русский English Deutsch Français Español USB AUDIO INTERFACE ...

Страница 2: ...n be deter mined by turning the unit OFF and ON please try to eliminate the problem by using one of the following measures Relocate either this product or the device that is being affected by the interference Utilize power outlets that are on different branch circuit breaker or fuse circuits or install AC line filter s In the case of radio or TV interference relo cate reorient the antenna If the a...

Страница 3: ...damage the speakers Do not expose the device to excessive dust or vibrations or extreme cold or heat such as in direct sunlight near a heater or in a car during the day to prevent the possibility of panel disfiguration or damage to the internal components Do not place the device in an unstable position where it might accidentally fall over Do not use the device in the vicinity of a TV radio stereo...

Страница 4: ...reen displays as illustrated in this manual are for instructional purposes and may appear somewhat different from the screens which appear on your computer The illustrations and LCD screens as shown in this manual are for instructional purposes only and may appear somewhat different from those on your instrument This product incorporates and bundles computer programs and contents in which Yamaha o...

Страница 5: ...this manual carefully before beginning use so that you will be able to take full advantage of your interface s superlative features and enjoy trouble free operation for years to come After reading the manual please store it in a safe place Connect To Your Computer via a Single USB Cable page 8 The AUDIOGRAM interface connects to your computer via the supplied USB cable Stereo audio data is transfe...

Страница 6: ...ter Macintosh computer with built in USB interface OS Mac OS X 10 3 3 or higher CPU Macintosh G3 300 MHz or higher Intel processor Memory 128 MB or more Cubase AI 4 System Requirements Windows OS Windows XP Professional SP1 or higher XP Home Edition SP1 or higher Windows Vista 32 bit CPU 1 4 GHz or higher Intel Pentium processor Memory 512 MB or more Audio Interface Windows DirectX ASIO compatible...

Страница 7: ...the PHANTOM 48V switch on when using a phantom powered condenser microphone Microphone Keyboard etc Computer Headphones Audio system To connect a device such as a microphone To connect an instrument such as an electric guitar or bass USB cable Cubase AI ...

Страница 8: ...ions to install the CubaseAI software In order to have continuous use of Cubase AI including support and other benefits you will need to register the software and activate your software license by starting it while the com puter is connected to the Internet Click the Register Now button shown when the software is started then fill in all required fields for registration If you do not register the ...

Страница 9: ...s that could cause hearing loss or device damage 3 Connect the AUDIOGRAM interface to your computer using the supplied USB cable The POWER indicator will light to indicate that power is being applied to the AUDIOGRAM interface When connecting or disconnecting the USB cable be sure to turn the OUT LEVEL con trol all the way down The first time you connect to the computer s USB connector or change t...

Страница 10: ...ection describes the procedure for recording to the Cubase AI software we installed earlier via the AUDIOGRAM interface For details on operation of the Cubase AI software refer to the pdf format manual provided with the software Cubase AI Setup 1 Set the computer output to the maximum level For details on how to make the setting refer to the The recorded sound is too low in level section in the Tr...

Страница 11: ...ialog box will appear asking Do you want to switch the ASIO driver Click Switch Macintosh Select VST Audio System in the Device field on the left side of the window Select USB Audio CODEC 2 in the ASIO Driver field on the right side of the window and click OK Skip ahead to step 7 below Under Mac OS X you can select either USB Audio CODEC 1 or USB Audio CODEC 2 in the ASIO Driver field Normally you...

Страница 12: ... the window If the Port System Name field does not change close and restart the Cubase AI then open the Device Setup window The input ports may not be shown if you are using Windows Vista If so refer to the The input ports are not shown section in the Troubleshooting section page 20 7 Select New Project from the File menu to create a new project file The new project dialog window will open For thi...

Страница 13: ...appear Preparing to Record 1 Click in the track list the area in which the track names are displayed to select a track to record on The various settings for the selected track are available in the Inspector on the left side of the display You will normally use a stereo track when recording synthesizers and a monaural track when recording vocals or guitars Project window Transport panel Mixer windo...

Страница 14: ...dicator never lights 5 Specify the point at which you want to start recording via the ruler at the top of the project window Click the black area of the ruler to move the project cursor the vertical black line to that position Recording and Playback 1 Click the Transport panel Record button to begin recording When recording is started the project cursor will begin moving to the right and a box tha...

Страница 15: ...utput is set to the maximum level 5 To save the project file select Save from the File menu and enter a file name before actually saving the file Save your project file frequently to insure against losing large amounts of data if a problem occurs 6 Repeat steps 1 through 5 to record further material on the same track 7 To record additional material on a different track select a new track and repea...

Страница 16: ...of the channel strips left and right to set the stereo position of each track 5 At this point you can begin to use EQ to refine your mix and add effects As an example let s try adding reverb Click the Edit button on the left side of the channel strip to open the VST audio channel settings window Click Insert 1 and select Earlier VST Plug ins Reverb RoomWorks SE For further details refer to the pdf...

Страница 17: ...ile to create an audio CD select the WAV file type AIFF on Macintosh OS X Stereo Out stereo 44 1 kHz and 16 bit 8 Click Export Progress of the mixdown operation will be shown in a progress window When the progress window closes the mixdown is complete Files created by mixdown can be directly played back using the Windows Media Player or iTunes NOTE ...

Страница 18: ...cted to the MIC INST jack set this switch to MIC Otherwise noise may occur 3 LEVEL Controls Adjusts the level of the channel signal Use these controls to adjust the balance between the channels 4 POWER Indicator This indicator lights when power is applied to the AUDIOGRAM interface via the USB cable supplied that connects it to the computer 5 Level Indicators These indicators show signal levels pr...

Страница 19: ...m the device connected to the phone jacks is input 0 STEREO OUT Jacks These output the mixed signal from chan nels 1 and 2 The output level can be adjusted using the OUT LEVEL control These jacks would typically be connected to an audio system monitor speakers You can use either the phone jacks or pin jacks but not both at the same time If both jacks are used the signal is only output from the pho...

Страница 20: ...000 Hz DVD Quality in the Default Format field No sound Are your speaker cables connected properly or are they shorted Are the volume controls of your sources audio devices applications software computer operat ing system etc set at appropriate levels Is the output of your computer operating system muted Do you have several applications running at the same time Be sure to quit all applications you...

Страница 21: ... icon and select Properties 3 Click the Levels tab then set the volume slider to its maximum level Close the Properties dialog window 4 Click the Sounds tab in the Sound dialog window then select No sounds in the Sound Scheme Windows XP 1 From the START menu click Control Panel then double click the Sounds and Audio Devices icon to open the Sounds and Audio Devices Properties dialog window 2 Click...

Страница 22: ...START menu and double click the Sounds and Audio Devices icon to open the Sounds and Audio Devices Properties dialog window 2 Click the Volume tab and click Advanced in Speaker settings The Advanced Audio Properties dialog window will open 3 Click the Performance tab Set Hardware acceleration to Full and Sample rate conver sion quality to Good Don t change these settings if you are not familiar wi...

Страница 23: ...4 1 48 kHz 16 bit Controls MIC INST Switch x 1 MIC for microphones INST Hi Z for guitars etc LEVEL Control x 2 Adjust the level of CH 1 2 PHANTOM 48V Switch x 1 48 V only for CH1 OUT LEVEL Control x 1 Adjusts the overall signal Indicators Phantom Power x 1 Red Level Indicators x 1 2 points green red Power x 1 Green Power Supply USB bus powered Dimensions W x H x D 180 x 61 x 112 mm Net Weight 490 ...

Страница 24: ...40dBu 50dBu 60dBu PHONES 0 5mW 40ohms STEREO OUT 2dBu Clip Level Level MASTER Nominal 6dB ST CH IN LINE Gain Max 34dBu CH IN MIC Gain Max 60dBu CH IN MIC Gain Min 16dBu CH IN INST Gain Min 0dBu CH IN INST Gain Max 44dBu ST CH IN LINE Gain Min 10dBu 5V 48V 7 5V 7 5V DC DC DC DC 20dBu 20dBu 2dBu L R RE GR L STEREO OUT 2dBu PHONES 0 5mW 40ohms R USB D D 3 7V Vbus 5V SSPND GND LIN RIN LO RO OUT1 OUT2 ...

Страница 25: ...r double click the mpkg file to start installation For information about the minimum system requirements and latest information on the soft ware in the disk check the web site below http www yamahasynth com About software support Support for the DAW software in the accessory disk is provided by Steinberg on its website at the following address http www steinberg net You can visit the Steinberg sit...

Страница 26: ...ceipt Yamaha s entire liability and your exclusive rem edy will be replacement of the defective media if it is returned to Yamaha or an authorized Yamaha dealer within fourteen days with a copy of the receipt Yamaha is not responsible for replacing media damaged by accident abuse or misappli cation TO THE FULLEST EXTENT PERMITTED BY LAW YAMAHA EXPRESSLY DISCLAIMS ANY IMPLIED WARRANTIES ON THE TANG...

Страница 27: ...n Viale Italia 88 20020 Lainate Milano Italy Tel 02 935 771 SPAIN PORTUGAL Yamaha Música Ibérica S A Ctra de la Coruna km 17 200 28230 Las Rozas Madrid Spain Tel 91 639 8888 SWEDEN Yamaha Scandinavia AB J A Wettergrens Gata 1 Box 30053 S 400 43 Göteborg Sweden Tel 031 89 34 00 DENMARK YS Copenhagen Liaison Office Generatorvej 6A DK 2730 Herlev Denmark Tel 44 92 49 00 NORWAY Norsk filial av Yamaha ...

Страница 28: ...USB AUDIO INTERFACE ...

Отзывы: