background image

57

Single Finger Mode Chords

Chord Cancel

Chord Cancel allows you to instantly turn off the chord and bass accompaniment, and have the
rhythm pattern continue.  This lets you create dynamic rhythm “breaks” in your performance.
(Chord Cancel cannot be used in the Single Finger mode.)

To use Chord Cancel:

While the A.B.C. accompaniment is playing, simultaneously press three adjacent keys in the
Lower keyboard.

“Chord Cancel” appears in the display, and the rhythm of the Style plays without chord or bass
accompaniment.  To resume bass/chord accompaniment, play conventional chords.

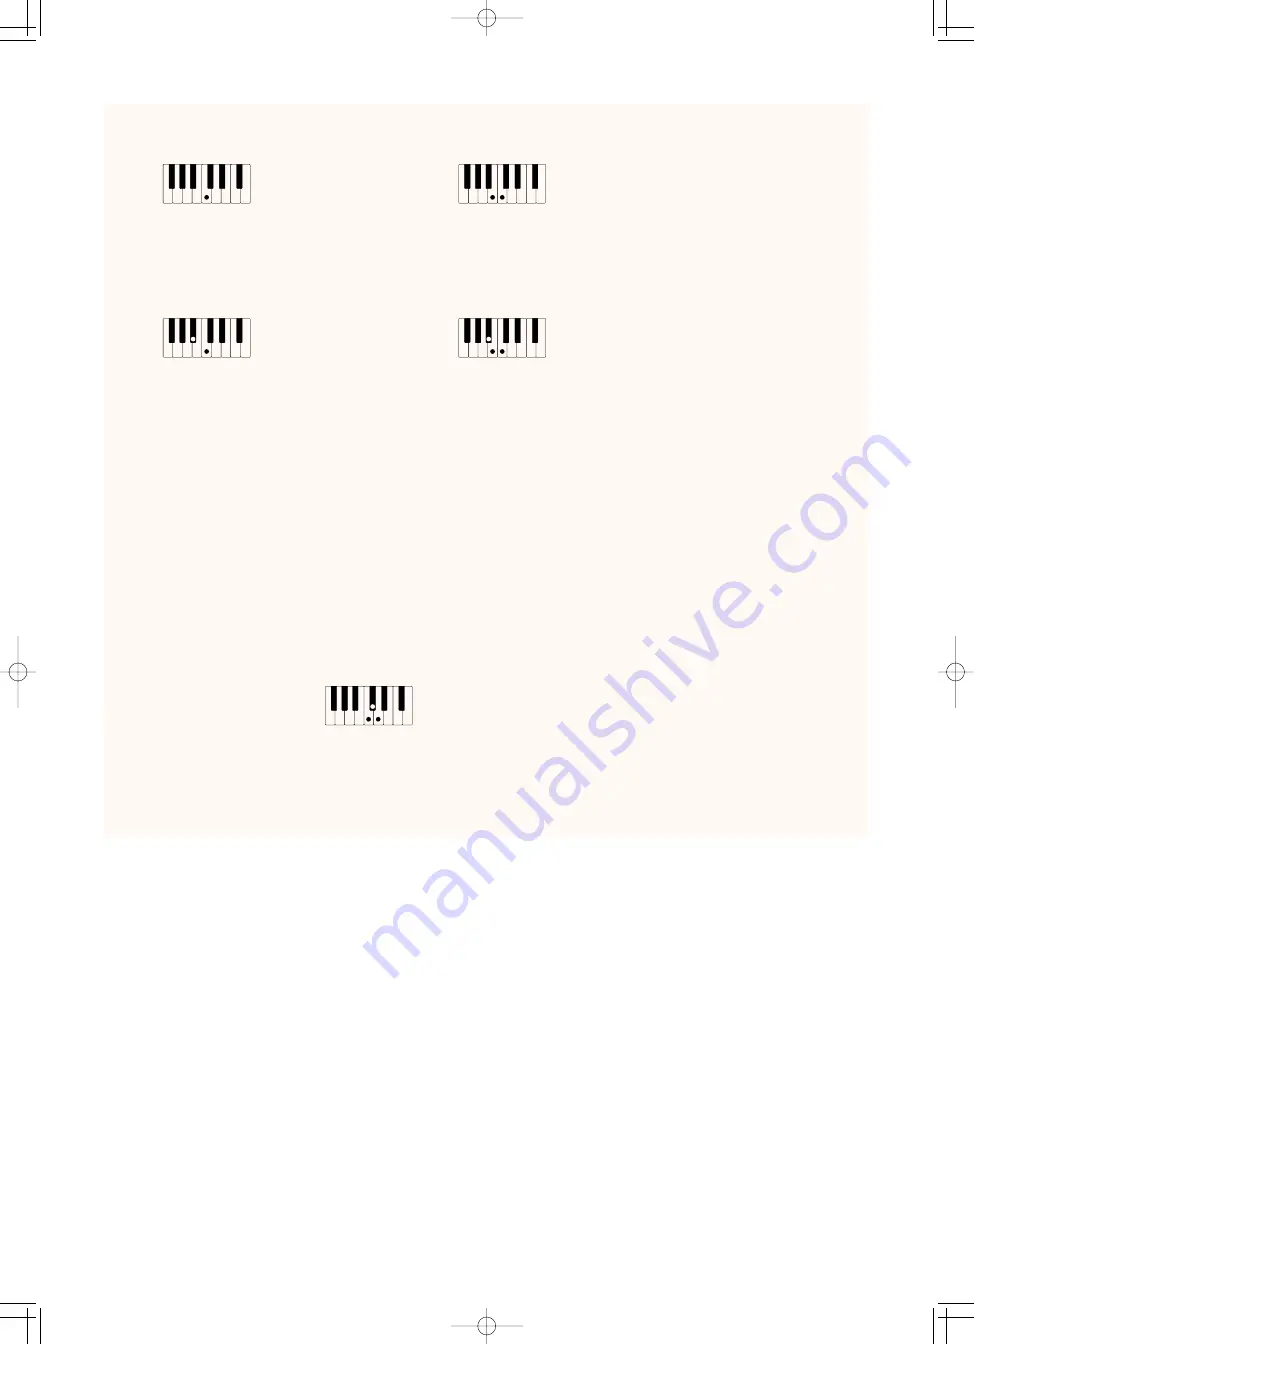
C

C

7

C

m

Cm

7

Major chords:
Press the root note of the chord.

Minor chords:
Press the root note together 
with any black key to the left of it.

7th chords:
Press the root note together 
with any white key to the left of it.

Minor 7th chord:
Press the root note together 
with any white and black key 
to the left of it (three keys altogether).

AR-80E-5/STYLE*  8/21/97 10:08 PM  ページ 57

Содержание Artiste AR-80 Electone

Страница 1: ...AR 80 ...

Страница 2: ...ecifications without notice or obligation to update existing units ENVIRONMENTAL ISSUES Yamaha strives to produce products that are both user safe and environmentally friendly We sincerely believe that our products and the production methods used to produce them meet these goals In keeping with both the letter and the spirit of the law we want you to be aware of the following Battery Notice This p...

Страница 3: ...gnificantly contribute to their operating temperature Placement of this product close to heat sources such as radiators heat registers and other devices that produce heat should be avoided 8 This product was NOT designed for use in wet damp locations and should not be used near water or exposed to rain Examples of wet damp locations are near a swimming pool spa tub sink or wet basement 9 This prod...

Страница 4: ...o not produce satisfactory results please contact the local retailer authorized to distribute this type of product If you can not locate the appropriate retailer please contact Yamaha Corporation of America Electronic Service Division 6600 Orangethorpe Ave Buena Park CA90620 The above statements apply ONLY to those products distributed by Yamaha Corporation of America or its subsidiaries This appl...

Страница 5: ...l smells or smoke should appear to be caused by it immediately turn off the power switch disconnect the electric plug from the outlet and have the instrument inspected by qualified Yamaha service personnel Only use the voltage specified as correct for the instrument The required voltage is printed on the name plate of the instrument Before cleaning the instrument always remove the electric plug fr...

Страница 6: ...e 29 4 Voice Controls and Effects 32 Voice Condition Pages 33 Effect Set Pages 37 Turning on the Effects 37 Calling Up the Effect Set Pages 37 TREMOLO SYMPHONIC Page 37 DELAY FLANGER Page 38 Panel selectable Effects Tremolo Sustain and Reverb 39 Tremolo 39 Reverb 41 Sustain 43 Glide 44 5 Styles Rhythm and Accompaniment 45 Selecting and Playing Styles 45 Style Condition Page 51 Selecting Styles fro...

Страница 7: ...25 Accompaniment Program Drum List 126 Drum Assignment 128 Recording a User Style 129 Mute 134 Delete 135 Direct Cancel Rhythm parts only 135 Editing Recorded Parts Copy and Quantize 136 Part Copy 137 Part Quantize 138 Other Settings Volume Reverb Chorus and Pan 139 Naming Your User Style 140 Saving Your User Style 140 Clear All Data 141 Quitting Accompaniment Program 142 Selecting and Playing Use...

Страница 8: ...LOW MID SLOW 16 8 5 1 3 4 2 2 3 2 1 1 3 1 CLICK PEDALS MID SLOW 16 8 CLICK 4 2 2 3 2 LENGTH OFF ORGAN VARIATION THEATRE JAZZ ELECTRONIC CLASSICAL STRING 8 STRING 8 MIX IV MAX MIN MAX UPPER KEYBOARD VOICE 1 UPPER KEYBOARD VOICE 2 LEAD VOICE PEDAL VOICE 2 PEDAL VOICE 1 BAR BEAT TEMPO MIN MAX MAX MIN RESPONSE FAST RESPONSE FAST SYMPHONY ORCHES WORLD MUSIC ENDING SYNCHRO START START MAINA MAIN B INTRO...

Страница 9: ...MAX ORGAN VARIATION THEATRE JAZZ ELECTRONIC CLASSICAL STRING 8 STRING 8 MIX IV TUBA16 TUBA16 SHORT SHORT LONG LONG LONG SUSTAIN LOWER REVERB SHORT PEDAL MAX MIN UPPER PEDAL VOICE 2 ORCHESTRAL PRESET REGISTRATION MENU AUTO BASS CHORD PEDAL VOICE 1 RESPONSE FAST ORGAN PRESET SYMPHONY ORCHES BALLROOM TRAD BALLROOM LATIN LATIN TRAD COUNTRY WORLD MUSIC BIG BAND JAZZ BAND POPS ORCHES MARCH POLKA POPS DI...

Страница 10: ...ccess to 288 different Registrations covering a broad range of musical styles Each Registration features complete Voice and Style rhythm accompaniment settings to perfectly match the type of music See page 9 Moreover twelve Registration Memory panel buttons let you store your own custom Registrations and call them up instantly as you perform See page 73 Original Voice Creation The Voice Edit featu...

Страница 11: ... with a full range of high quality effects including Tremolo for reproducing rotating speaker sounds Symphonic Celeste Flanger Delay Reverb and Sustain See page 32 Recording of Performances with the Music Disk Recorder The AR 80 also features a Music Disk Recorder M D R for recording your Registrations and performances The recording is completely digital and is stored to disk which means you can e...

Страница 12: ...omatically appears The Voice Display shows information on many important settings for the instrument including all Voice sections current Style and Transpose settings and the currently played chord in the Lower keyboard It also provides direct access to volume and pan settings See page 23 for more information POWER Yamaha products are manufactured specifically for the supply voltage in the area wh...

Страница 13: ... the entire instrument 4 Press the Expression pedal down with your foot Once you have set the MASTER VOLUME control to a suitable level you can use the Expression pedal to change the volume with your foot as you play Maximum volume Minimum volume MIN MASTERVOLUME MAX AR80E 01 Intro Guide 8 21 97 9 58 PM ページ 7 ...

Страница 14: ...tically starts playing all Demo Songs in order and the entire Demo repeats indefinitely You can use the Data Control buttons below the corresponding functions in the display to turn Repeat on off or change the Demo Song mode ALL all Songs in order RANDOM all Songs at random or SINGLE a single selected Song 2 To stop Demo play back and quit the Demo function press the DEMO button again Alternately ...

Страница 15: ...egistrations are divided into two types Organ Presets and Orchestral Presets To use the Registration Menu presets 1 Press the button in the REGISTRATION MENU section corresponding to the desired style DATA CONTROL ORCHESTRAL PRESET THEATRE FULL THEATRE SOFT THEATER U S A JAZZ ORGAN POP ORGAN CLASSIC ORGAN ORGAN PRESET SYMPHONY ORCHES BALLROOM TRAD BALLROOM LATIN LATIN TRAD COUNTRY WORLD MUSIC BIG ...

Страница 16: ... Style settings To play the corresponding Style simply press the START button in the ACCOMPANIMENT CONTROL section As you play chords in the Lower keyboard you may also hear the automatic accompaniment of the Style For more information on using automatic accompaniment see page 45 To stop the Style press the START button again 4 Try selecting and exploring other Registrations in the Registration Me...

Страница 17: ...s 3 DATA CONTROL buttons These are divided into eight sets of up down buttons and are used to make selections or ad just settings up or down correspondingly for functions shown directly above them For example use the four Data Control buttons directly underneath UP DOWN in the display to scroll up or down in the current Help message Pressing either of the top two buttons scrolls up and either of t...

Страница 18: ...AL value and press the bottom one to decrease it Holding down either button continuously changes the value 2 FEET Pressing either of these buttons changes the FEET setting The selected setting is indicated by the dark pointer 3 PAN In this four button group the two left buttons move the pointer to the left and the two right buttons move the pointer to the right DATA CONTROL 1 2 3 STRINGS GUITAR CL...

Страница 19: ...LAY SELECT section The lamp of the button lights 1 Use these Data Control buttons to select the desired language Top buttons select ENGLISH bottom buttons select DEUTSCH 2 Use the Menu buttons to select the desired subject Help Menu 3 Use the PAGE buttons to scroll through the entire set of Help Menus 4 Use these Data Control buttons to scroll up and down the individual screens of the selected Hel...

Страница 20: ...ain Other Controls COARSE button This lets you make quick jumps when adjusting values Simultaneously hold down the COARSE button and press the appropriate Data Control button For example in the above example display hold down the COARSE button and press the bottom right Data Control button below VOLUME to quickly decrease the value HOLD button This lets you keep the display at the current function...

Страница 21: ...e 1 The button s lamp lights 2 Select the desired Voice by pressing one of the Voice buttons in the Voice section For example if you have selected the ORGAN Voice the following display Voice Menu will appear Notice that several different Voice names are shown at the bottom of this display These are variations of the basic Organ Voice category STRINGS GUITAR CLARI NET VIBRA PHONE SAXO PHONE COSMIC ...

Страница 22: ...Some Voices such as Organ and Guitar have two pages of Voices To select the desired page press the Menu button next to it 4 Select Voices for the other Upper Voice sections in the same way steps 1 3 above if desired 5 Set the volume for each active Voice section There are two volume controls Coarse and Fine PAGE DATA CONTROL COARSE AR 80E 2 Voice Sections 8 21 97 9 59 PM ページ 16 ...

Страница 23: ...ly under VOLUME in the display to change the level of the selected Voice The level is indicated both by a numeric value 0 24 and a graphic bar DATA CONTROL COARSE STRINGS GUITAR CLARI NET VIBRA PHONE SAXO PHONE COSMIC CHORUS TUTTI HARMO NICA MIN MAX BRASS ORGAN PIANO UPPER KEYBOARD VOICE 1 2 1 Pressing a Voice button once calls up that Voice s Voice Menu display Pressing it again or the Menu butto...

Страница 24: ...l Voices to the Lower keyboard Simply press the TO LOWER button in the appropriate Voice section and that section s Voice will be playable from the Lower keyboard LEAD VOICE MAX OBOE VIOLIN TRUM PET FLUTE TO LOWER MIN 1 Turning Voice Sections On and Off The Voices of the various Voice sections in each keyboard sound together in a layer and the balance of the Voices in the layer is determined by th...

Страница 25: ...ses For playing any Voice of the Voice Menus from any of the keyboards or Pedalboard For example you can play any Voice from the various Voice Menu pages including User and not be limited to only the twelve Voice Menus available from the Upper keyboard panel buttons For having three different Voices from the same Voice Menu page available at the same time For example you can assign one of the Guit...

Страница 26: ...for example Muted Guitar by using the Data Control buttons The name of the selected Voice appears at the top of the display DATA CONTROL COARSE Use the Data Control buttons to select a Voice PAGE Select specific pages with the Menu buttons Use the PAGE buttons to scroll through the various Voice categories The Voice name at the top of the display is that of the currently assigned Voice and is unre...

Страница 27: ...ontra Bass1 Contra Bass2 Pizz Bass Upright Bass Acou Bass Fanfare Brass Bigband Brass Pop Brass Orch Brass Synth Brass1 Synth Brass2 Brass Section Brass Ensem Brass Band French Horn Horn Ensem Class Trp Dixie Trp Cornet Jazz Trp Bright Trp Muted Trp Smooth Trb Band Trb Flugel Horn Eupho nium Muted Trb Tuba Timpani Timp Roll Recor der Orch Flute Jazz Flute Piccolo Pan Flute Whistle Shaku hachi Blow...

Страница 28: ...oo Str Choir Choir Choir Ooh Choir Aah Harmo nica Blues Harm Accor dion Bando neon Musette 8ft 16ft 8 16ft Pipe Bass Grand Piano Stage E Piano Bright E Piano Elec Piano Clavi Mellow Piano Octave Piano Honky Tonk Harpsi chord Pipe Organ Cath edral Stop Flute Cinema Organ Theat Organ Click Organ Elec Organ Bright Combi Rock Organ Jazz Organ Pop Organ Theat Mix Organ Horn Post Horn SAXOPHONE TUTTI CH...

Страница 29: ...pe the currently played chord in the Lower keyboard The Voice Display is automatically called up when you turn on the AR 80 You can also call it up by pressing the VOICE DISPLAY button in the DISPLAY SELECT section The Voice Display also has Menu Pages for Manual Volume Pedal Volume and Voice Pan settings Use the appropriate Menu button to select the desired page To return to the main Voice Displa...

Страница 30: ...n also be set from the MANUAL BALANCE touch control PEDAL VOLUME Page 1 STYLE Controls RHYTHM This determines the level of the rhythm drum and percussion parts of the Style and the Keyboard Percussion sounds This can also be set from the panel RHYTHM touch controls B C Bass Chord This determines the level of the bass and chord accompaniment of the Style This can also be set from the panel BASS CHO...

Страница 31: ...nd of the selected Voice toward the left speaker channel Setting it to the right puts the sound toward the right Seven pan positions are available These settings are also available in the Voice Condition page for each Voice section When an effect has been turned on for a Voice section see page 34 the corresponding section in this page is disabled Saving and Recalling Panel Settings Turning the AR ...

Страница 32: ...e Tibia features eight footage settings with three additional footage settings for the Attack Chiff sound The Lower section has six footage settings and the Pedal section has two Click settings are available for all sections Creating Flute Tibia Voices Setting Footages 1 Turn off all Voice sections for the appropriate keyboard in the ENSEMBLE section except the Organ section For example press the ...

Страница 33: ...e appropriate FLUTE TIBIA section to change each footage volume Play the keyboard and listen to the changes in the sound as you adjust the footage volumes You may need to set the overall Flute Tibia level to properly hear the Voices see the next step FLUTE TIBIA THEATRE ATTACK CHIFF UPPER KEYBOARD MID SLOW 16 8 5 1 3 4 2 2 3 2 1 1 3 CLICK 4 2 2 3 2 LENGTH RESPONSE FAST 1 PAGE PEDAL VOICE 1 PEDAL V...

Страница 34: ...yboards and Pedalboard respectively Click produces a sharp key click sound Click must be turned on from the panel see Setting the Click and Response below Range 0 6 Setting the Click and Response To set Click and Response use the controls to the right of each Flute Tibia section CLICK Turns the key click sound on and off The lamp lights when Click is on RESPONSE FAST MID SLOW Determines the overal...

Страница 35: ...ronic and Classical Though they can be used on their own they are essentially designed to supplement the Flute Tibia sections The Upper and Lower keyboards each have four Extra Voices and the Pedalboard has two To use the Extra Voice sections 1 Turn off all Voice sections for the appropriate keyboards in the ENSEMBLE section except the Organ sections If you want to use the Extra Voices by themselv...

Страница 36: ...TE 16 OBOE 8 KINURA8 DIAP 8 CLARI 8 VOX HUM 8 OCT 4 STRING8 STRING8 SU OCT 2 STRING4 STRING4 MIX IV TROMB 8 SAX 8 TRUMP 8 HORN 8 TRUMP 8 LOWER KEYBOARD EXTRAVOICE DIAP 16 OBOE 8 KINURA8 OCT 8 CLARI 8 VOX HUM 8 UPPER KEYBOARD EXTRAVOICE GAMBA8 STRING8 STRING8 MIX IV STRING4 STRING4 OBOE 8 TROMB 16 SAX 16 CLAIRO 4 TRUMP 8 TRUMP 8 CLASSICAL JAZZ ELECTRONIC THEATRE ORGAN VARIATION TRUMP 8 EXTRAVOICE P...

Страница 37: ...ges to the Tremolo settings see page 40 SYMPH Symphonic Selects the Symphonic Celeste effect See page 37 2 EXTRA VOICE VOLUME LOWER UPPER PEDAL Determines the overall Extra Voice level for the Lower and Upper keyboards and Pedalboard respectively Range 0 24 3 EXTRA FEET LOWER UPPER Determines the octave or footage for the Extra Voice Lower and Upper sections When set to PRESET the octave setting i...

Страница 38: ...ws the various Voice controls and effects for the individual Voice sections Available functions are indicated by circles Touch Tone Initial After Feet Pan Brilliance Vibrato Lead Slide Lead Tune Sym phonic Celeste Delay Flanger Reverb Sustain Tremolo Upper Keyboard Voice 1 Ø Ø Ø Ø Ø Ø Ø Ø Ø Ø Upper Keyboard Voice 2 Ø Ø Ø Ø Ø Ø Ø Ø Ø Flute Tibia Ø Ø Extra Voice Ø Ø Ø Ø Lower Keyboard Voice 1 Ø Ø Ø ...

Страница 39: ...nding to the just selected Voice Press the Menu button corresponding to Condition from the Voice Menu page The Voice Condition pages of the various Voice sections have slight differences in their functions Each Voice control in these pages is applied independently to each Voice section 1 TOUCH TONE The Touch Tone function gives you expressive control over the volume and timbre of a Voice Two types...

Страница 40: ... OFF Cancels the effect TREM Tremolo Selects the Tremolo effect See page 39 SYMPH Symphonic Selects the Symphonic Celeste effect See page 37 DELAY Selects the Delay effect See page 38 FLANG Flanger Selects the Flanger effect See page 38 4 PAN Determines the position of the Voice in the stereo image Seven Pan positions are available 5 BRILL Brilliance Determines the timbre or tone of the Voice High...

Страница 41: ... harder on it to give the note Vibrato The harder you press the key down the greater the Vibrato will be 3 SLIDE Lead Voices only Slide applies a portamento effect to notes played in legato For example if you play one note then play another before completely releasing the first note the pitch of the first note will slide up or down to the second note The Slide function is effective within a one oc...

Страница 42: ...e amount of time that elapses between the playing of a key and the start of the Vibrato effect see diagram Higher settings increase the delay of the Vibrato onset Range 0 7 2 DEPTH Determines the intensity of the Vibrato effect see diagram Higher settings result in a more pronounced Vibrato Range 0 7 3 SPEED Determines the speed of the Vibrato effect see diagram Range 0 7 Delay Speed Depth Key On ...

Страница 43: ...n and use the Menu buttons to select the different pages TREMOLO SYMPHONIC Page 1 TREMOLO For more information see the Tremolo section on page 39 2 SYMPHONIC Determines the type of Symphonic effect Symphonic or Celeste Symphonic is a subtle effect that makes one Voice sound like an ensemble For example a solo violin Voice played through Symphonic would sound like several violins playing together T...

Страница 44: ...e 0 100 F B Feedback Determines the number of delayed repeats Range 0 100 BALANCE Determines the volume of the Delay effect relative to the original sound Higher settings produce a louder delay Range 0 100 2 FLANGER Flanger introduces a swirling animated modulation effect to the sound SPEED Determines the speed of the modulation Range 0 100 F B Feedback Controls the brightness and the metallic sou...

Страница 45: ...or driven speaker the characteristic tremolo effect gradually changes speed after it is switched For ELECTRONIC JAZZ ORGAN and ROCK ORGAN only You can also choose among different Tremolo types and adjust the maximum speed of the effect to suit your playing style The Tremolo effect can be switched in real time as you play with either the front panel TREMOLO button or the left footswitch when proper...

Страница 46: ...t has been turned on see Enabling the Tremolo Effect above and set you can control the effect in real time from the panel or from the left footswitch Panel Control Simply press the TREMOLO button to turn the Tremolo effect on and off while you re playing This button functions just like the fast slow switch on an actual rotating speaker cabinet When Tremolo is on the rotation effect is fast when of...

Страница 47: ...e type of Reverb effect Room Hall or Church Each type simulates a different acoustic environment Room is the smallest and Church is the largest 2 LENGTH Determines the acoustic liveliness of the simulated room in the effect Higher settings make the room more reverberant Range 0 6 3 DEPTH Fine adjustment of the depth of reverberation or the level of the reflected sounds Coarse Reverb depth settings...

Страница 48: ... REVERB K B P EFFECT Page 1 K B P Keyboard Percussion Determines the amount of Reverb effect applied to the Keyboard Percussion sounds This does not affect the drum and percussion sounds of the Styles Range 0 24 2 EFFECT TREMOLO SYMPH Symphonic DELAY FLANGER Determines the amount of Reverb applied to the sound of the corresponding effects Range 0 24 1 2 CONTRAST PAGE CONTRAST PAGE AR 80E 4 V Contr...

Страница 49: ...ee lever when properly set for knee lever operation Upper and Lower keyboards only To call up the Sustain page Press any of the buttons or touch controls in the SUSTAIN section then select Sustain Menu in the display with the bottom left Menu button SUSTAIN Page DATA CONTROL The lamp of each button lights up to indicate that Sustain is on Press the button again to turn Sustain off LOWER KNEE UPPER...

Страница 50: ...essing the left footswitch lowers the pitch and releasing it brings the pitch back to normal at an adjustable rate Glide can be enabled and set in the FOOTSWITCH page See page 155 44 The values here must be set high enough for the Sustain effect to be noticeable Remember that the SUSTAIN buttons are on off switches If you use them to simply check the Sustain length values you may unintentionally c...

Страница 51: ...le and can be selected by using the display To select and play a Style 1 Press one of the ten STYLE buttons the buttons with names not numbers 2 Select a specific Style from the Style Menu in the display with the Data Control buttons As with the Voice section buttons each Style button represents a category of Styles and within each category are 16 variations of the Style These are shown in the Sty...

Страница 52: ...ven in beats per minute just as on a conventional metronome The tempo range is 40 to 240 beats per minute While the Style is playing the TEMPO display changes function to a BAR BEAT indicator The number on the left indicates the current bar or measure and the one on the right indicates the number of the beat in each bar The beat indicator lamp above the display also flashes at the first beat of ev...

Страница 53: ...f the MAIN patterns Each Style has two Intro variations as well as Main Press the INTRO A or INTRO B button then press START The Intro A or B Style plays and is followed by the corresponding Main pattern To stop the Accompaniment press START again Pressing the ENDING button while the pattern is being played will automatically add an ending phrase before stopping the Accompaniment Synchro Start Any...

Страница 54: ...ootswitch for Style control see page 154 Depending on the A B C mode and the Memory setting the Accompaniment may stop when you release keys on the Lower keyboard or Pedalboard Refer to page 60 for details on Auto Bass Chord and Memory About Automatic Accompaniment and Playing Chords One of the main advantages of the Styles is that they can be used to create automatic backing parts accompaniment f...

Страница 55: ...ng the appropriate button INTRO A FILL TO A or INTRO B FILL TO B For best results press the button just at the beginning or the first beat of a measure ENDING SYNCHRO START START INTROA FILLTOA ACCOMPANIMENT CONTROL INTRO B FILLTO B MAINA MAIN B ENDING SYNCHRO START START INTROA FILLTOA ACCOMPANIMENT CONTROL INTRO B FILLTO B MAINA MAIN B Playing partial Fill In patterns You can also start Fill In ...

Страница 56: ...iment Press the ENDING button while the Accompaniment is playing This automatically plays a short ending phrase before stopping the Accompaniment There are two ending patterns Ending A and B which correspond to the Main A and B patterns You can also stop the Accompaniment without playing an Ending pattern by pressing the same button that you used to start the Accompaniment START or SYNCHRO START S...

Страница 57: ...t CONDITION from the display with the appropriate Menu button from the Style Menu page Adjust the settings with the appropriate Data Control buttons 1 RHYTHM Fine control of the drum percussion volume Range 0 24 2 BASS CHORD Fine control of the bass and chord accompaniment volume Range 0 24 3 ACCOMP Accompaniment PART For turning on off specific parts of the accompaniment Rhythm 1 2 Bass Chord 1 2...

Страница 58: ...dotted buttons 1 Press one of the dotted buttons in the Style section 2 Scroll through the various categories with the PAGE buttons 3 SEQ 1 4 2 POP R B USER 5 POP ROCK USER 1 TRADI TIONAL USER 6 ENTER TAIN USER 2 COUNTRY FOLK USER 7 BALLAD USER 3 LATIN POPS USER 8 LATIN USER 4 SWING JAZZ MIN MIN MAX MAX RHYTHM STYLE BASS CHORD BALL ROOM SEQ SEQ SEQ 2 1 As with the Voice sections dotted buttons you...

Страница 59: ...ata Control buttons The name of the selected Style appears at the top of the display DATA CONTROL Use the Data Control buttons to select a Style PAGE The Style name at the top of the display is that of the currently assigned Style and is unrelated to the Style menu at the bottom You can directly view and select Style Menu pages by holding down one of the dotted buttons and simultaneously pressing ...

Страница 60: ...ce Classic Busby Piano Ballad 8Beat Ballad2 Bolero Lento Tango Conti St Bern Waltz Paso 4 4 Slow Rock Folk Rock Show Four Over ture 6 8 Ballad 1 4Beat Ballad Guara cha Haba nera BigBand Waltz Paso 3 4 R B New Age 4 4 March Swing Waltz Blue Grass Country Rock 1 Latin Rock Reggae 12 Afro Cuban City Swing Gospel Organ Rock Milit March Vienna Waltz Two Step Country Rock 2 Pop Bossa Reggae 16 Swing Ser...

Страница 61: ...d accompaniment Setting the A B C Mode There are three Auto Bass Chord modes Single Finger Fingered Chord and Custom A B C To set and use A B C Press the appropriate mode button in the AUTO BASS CHORD section SINGLE FINGER FINGERED CHORD or CUSTOM A B C The selected button lights and the A B C Menu selection appears in the display Selecting the A B C Menu is optional pressing the panel button chan...

Страница 62: ...nnot be played from the Pedalboard regardless of the volume setting Fingered Chord mode The Fingered Chord mode automatically produces bass and chord accompaniment for chords played in the Lower keyboard It allows you to use a wider range of chord types than in the Single Finger mode In the Fingered Chord mode you play all the notes of the chord while the Auto Bass Chord function automatically sel...

Страница 63: ...jacent keys in the Lower keyboard Chord Cancel appears in the display and the rhythm of the Style plays without chord or bass accompaniment To resume bass chord accompaniment play conventional chords C C7 Cm Cm7 Major chords Press the root note of the chord Minor chords Press the root note together with any black key to the left of it 7th chords Press the root note together with any white key to t...

Страница 64: ...jor seventh flatted fifth Flatted fifth Minor major seventh flatted fifth Cm C7 Notes in parentheses can be omitted Chord types marked with an asterisk can be played in any inversion i e the root does not have to be the lowest note in the chord If you play any three adjacent keys including black keys the chord sound will be canceled and only the rhythm instruments will continue playing CHORD CANCE...

Страница 65: ... fingers from the Lower keyboard and or Pedalboard If you wish you can set Lower Memory and Pedal Memory independently from the display To do this select LOWER or PEDAL with the appropriate Data Control buttons When set to on the corresponding box is highlighted 1 LOWER Selecting this keeps the chord accompaniment playing even after you release your fingers from the Lower keyboard 2 PEDAL Dependin...

Страница 66: ...r keys are released chord accompaniment stops but rhythm continues When Lower keys are released chord accompaniment and rhythm continue When Lower keys are released chord accompaniment stops and rhythm continues played pedal notes are held When Lower keys are released chord accompaniment and rhythm continue played pedal notes are held When Lower keys are released accompaniment and rhythm stop When...

Страница 67: ...u freely assign the 72 available sounds to any key or pedal you wish The two Keyboard Percussion buttons on the panel function as on off switches for both Keyboard Percussion modes To use the Preset Keyboard Percussion 1 Turn on the Keyboard Percussion function by pressing the LOWER and or PEDAL buttons in the KEYBOARD PERCUSSION section on the left side of the panel Pressing the LOWER button the ...

Страница 68: ...ENSEMBLE section 4 Play some notes on the Lower keyboard and Pedalboard The 49 percussion sounds have been assigned to the keyboards as shown in the chart 3 SEQ 1 4 2 POP R B USER 5 POP ROCK USER 1 TRADI TIONAL USER 6 ENTER TAIN USER 2 COUNTRY FOLK USER 7 BALLAD USER 3 LATIN POPS USER 8 LATIN USER 4 SWING JAZZ MIN MIN MAX MAX RHYTHM STYLE BASS CHORD BALL ROOM SEQ SEQ SEQ 2 1 AR 80E 5 STYLE 8 21 97...

Страница 69: ... 1 H i H a t O p e n H i H a t P e d a l H i H a t C l o s e d H a n d C l a p S i d e S t i c k O p e n R i m S h o t S t i c k s C a s t a n e t B r u s h S l a p B r u s h T a p S a m b a W h i s t l e L S a m b a W h i s t l e H C a b a s a A g o g o H T i m b a l e H C o n g a L C o n g a H M u t e B o n g o H R i d e C y m b a l 2 C r a s h C y m b a l 2 S p l a s h C y m b a l R i d e C y m...

Страница 70: ...by pressing the LOWER 1 button in the KEYBOARD PERCUSSION section The numbers 1 and 2 on the LOWER and PEDAL buttons refer to User 1 and User 2 respectively Keyboard Percussion Mode Page In the display above the LK Preset is currently selected The Mode can be changed between LK Lower Keyboard PRESET and USER 1 When the PEDAL 2 button is used to call up the Mode display Here the Mode can be changed...

Страница 71: ...iate Menu button 5 To assign an instrument to a particular key or pedal simultaneously hold down the Data Control button corresponding to the desired instrument and press the upper lower key or pedal to which the instrument is to be assigned Continue assigning additional sounds to the other keys as required PAGE Instrument categories Clears all assignments See page 66 Individual instrument sounds ...

Страница 72: ...al corresponding to the instrument you wish to erase A short click sound indicates that the instrument has been erased To erase all instrument assignments 1 Press the Data Control button corresponding to CLEAR in the display see step 3 above 2 At the prompt select OK with the appropriate Data Control buttons to erase all assignments or Cancel to abort the operation DATA CONTROL AR 80E 5 STYLE 8 21...

Страница 73: ...nese Cym Snare Drum M O Rim Shot Floor Tom H Bass Drum M Conga H Open Cuica Open Timbale L Shaker Wood Low Agogo L Finger snap Snare Drum H Low Tom Bass Drum H Conga L Mara cas Seq Click H Trian gle M Whip Slap Mid Tom L Claves Seq Click L Trian gle O Scratch Push Ride Cym1 HH Open Brush Tap Sticks Mid Tom H Bongo H Surdo Mute Cowbell Casta net Click Noise Tambou rine Scratch Pull Ride Cym2 HH Clo...

Страница 74: ...setups without having to start from scratch To copy the Lower Preset Keyboard Percussion to User 1 1 Call up the K B P 1 Mode page and select USER 1 Press the LOWER 1 button in the KEYBOARD PERCUSSION section then use the appropriate Data Control buttons to select USER 1 2 With USER 1 highlighted press one of the Data Control buttons below LK PRESET in the COPY window DATA CONTROL DATA CONTROL The...

Страница 75: ...age momentarily appears in the display The Pedal Preset Keyboard Percussion PK PRESET can be copied in the same way when USER 2 is selected as the Mode Copying User Locations You can also copy the assignments from User 1 to User 2 or vice versa For example to copy from User 2 to User 1 select USER 2 in step 2 above DATA CONTROL AR 80E 5 STYLE 8 21 97 10 08 PM ページ 69 ...

Страница 76: ... harmonies of up to four notes in a range relatively distant from the melody played 2 KNEE On off switch for knee lever control over Melody On Chord operation To use the Melody On Chord function with knee lever control first switch the Knee setting to ON then select one of the three modes described above When the control is on you can play auto matic harmonies by pressing the knee lever to the rig...

Страница 77: ... SPLIT button and select the L M Split page with the appropriate Menu button 2 Turn on the Split function Press the Data Control button corresponding to SPLIT in the display When SPLIT is highlighted L M Split is on DATA CONTROL Graphically shows key split point Indicates split point In this case keys up to C3 are in the Left side and keys Db3 and above are in the Right Press this to move Split Ke...

Страница 78: ...orresponding side of the Lower keyboard as set in step 3 above 5 Change the Octave Up setting if desired When this is on highlighted the selected Left Voices are transposed up one octave This allows you to play both the Left and Right sounds in the same octave If you intend to play bass sounds from the Left side this should be turned off DATA CONTROL 72 The same Voice section cannot be used on bot...

Страница 79: ...companiment Program except for User Styles currently assigned to the dotted buttons Sequence Program sequences MIDI settings Keyboard Percussion User Assign settings Storing Registrations Newly created Registrations you make can be stored to the Registration Memory panel buttons All Registrations in Registration Memory can also be saved to floppy disk for future recall To store Registrations to th...

Страница 80: ...se If the disk is new and unformatted you will have to format it Refer to the instructions on formatting a disk on page 85 For instructions on saving recalling Registrations to from the M D R see pages 95 96 Using the D Disable button The Styles also change when you select different Registration Memory buttons Pressing the D Disable button allows you to keep the same Style and its tempo throughout...

Страница 81: ...Memory button This operation saves all 12 Registrations in Registration Memory to one song The other 39 available songs on the disk can be used for saving additional sets of 12 Registrations Recalling Recorded Registrations and Bulk Data The Registrations and bulk data recorded to song numbers in the above operation can be easily loaded back to the AR 80 For instructions on this operation see page...

Страница 82: ...ode each press of the right footswitch selects the next Registration in numerical order After the last preset is reached the function wraps around to select the first preset again The numbered buttons light up as they are selected 1 2 3 4 HELP DISK ACCOMP PROGRAM HOLD PITCH MIDI SEQUENCE PROGRAM VOICE EDIT REGIST SHIFT EFFECT SET PAGE M O C L M SPLIT FOOT SW VOICE DISPLAY DATA CONTROL For best res...

Страница 83: ...r 4 USER In the User mode each press of the right footswitch selects the next Registration according to the order you specify Up to 80 steps can be stored To set the User mode 1 Select USER in REGIST SHIFT page DATA CONTROL COARSE DATA CONTROL COARSE User settings can be saved to and loaded from floppy disk See pages 95 96 for instructions AR 80E 6 Registration Memory 8 21 97 10 09 PM ページ 77 ...

Страница 84: ...ted button lights then press the appro priate Data Control button to enter the selected number INS Insert Inserts a Registration number just before the selected step moving all subsequent numbers to the right Press the desired numbered Registration Memory button the selected button lights then press the appropriate Data Control button to insert the selected number DEL Delete Deletes the Registrati...

Страница 85: ...ctory set Registration Memory settings are restored in this process You can also restore the factory settings by using the Initialize Registration function See page 81 To reset the all settings 1 Turn off the power 2 While holding down the top left Data Control button turn the power back on Be careful when using this operation since it erases all your existing data Always save your important data ...

Страница 86: ... button corresponding to Recall Panel in the display to restore the previous settings Startup Settings UPPER Voice 1 STRINGS Chamber Strs LOWER Voice Voice 2 PIANO Grand Piano Voice 1 Voice 2 Organ Organ 16 8 4 1 Ø Extra ALL OFF LOWER Voice 1 STRINGS Class Strs Voice 2 PIANO Grand Piano UPPER Voice Organ 8 4 2 Voice 1 Voice 2 Organ Lead Extra ALL OFF Ø LEAD FLUTE Orch Flute PEDAL Voice 1 ORGAN BAS...

Страница 87: ... Memory Buttons 1 Press one of the ORGAN PRESET buttons in the REGISTRATION MENU section Initial Reg All appears at the top left of the display 2 Press the Menu button corresponding to Initial Reg All in the display All Registration Memory buttons to which you have assigned Registration settings are automatically initialized reset to the original factory settings ORCHESTRAL PRESET REGISTRATION MEN...

Страница 88: ...button corresponding to Initial Regist in the display The factory preset Registration settings for the selected Registration Memory button is recalled and the panel settings change accordingly THEATRE FULL THEATRE SOFT THEATER U S A JAZZ ORGAN POP ORGAN CLASSIC ORGAN ORGAN PRESET ORCHESTRAL PRESET SYMPHONY ORCHES BALLROOM TRAD BALLROOM LATIN LATIN TRAD COUNTRY WORLD MUSIC BIG BAND JAZZ BAND POPS O...

Страница 89: ...ject button slowly as far as it will go the disk will automatically pop out When the disk is fully ejected carefully remove it by hand Never attempt to remove the disk or turn the power off during recording reading and playing back when the DISK IN USE lamp is lit Doing so can damage the disk and possibly the disk drive If the eject button is pressed too quickly or if it is not pressed in as far a...

Страница 90: ...event accidental erasure of important data slide the disk s write protect tab to the protect position tab open If you attempt to modify the disk when the write protect tab is set to on position a Disk write protected or Disk error message appears in the display indicating that the operation is not possible Select OK at the prompt and change the tab setting if desired Data Backup For maximum data s...

Страница 91: ...disk label facing up into the disk slot If the disk is blank the following display will automatically appear If the disk is not blank another display may be shown If you want to format the disk which will erase all data on the disk select the UTILITY page with the appropriate Menu button DATA CONTROL XG GM DOC or Style File disks cannot be formatted AR 80E 7 M D R 8 21 97 10 10 PM ページ 85 ...

Страница 92: ...the prompt select OK to begin formatting or Cancel to abort the operation When the REMAIN section in the display reaches 001 formatting is completed and the CONTROL PANEL page is automatically called up DATA CONTROL PAGE DATA CONTROL AR 80E 7 M D R 9 8 97 4 09 PM ページ 86 ...

Страница 93: ...others 3 Control data All changes you make on the Electone during your performance are recorded in real time These include Registration changes the use of the expression pedal footswitches and knee lever About the Logos On the M D R panel next to the controls are several logos These indicate that the M D R is compatible with and can play disks in the corresponding data formats General MIDI XG Disk...

Страница 94: ...istration that you will use at the beginning of the song 2 Insert a formatted disk into the disk slot 3 Select the CONTROL PANEL page with the appropriate Menu button if the page is not already shown DATA CONTROL COARSE PAGE Inadvertently pressing another panel button during M D R recording or playback may change the content of the display If this happens press the DISK button in the DISPLAY SELEC...

Страница 95: ... 01 STOP PLAY SONG SELECT REC MUSIC DISK RECORDER DISK IN USE 01 If the selected song number already contains recorded data two dashes appear at the left part of the M D R LED display and flash along with the song number warning you that the selected song number already contains recorded data If you want to execute recording operation over the song number press the REC button again To avoid record...

Страница 96: ...M D R is still recording press the Data Control button corresponding to RETRY in the display You can perform the same operation by pressing the PLAY button or by selecting PLAY in the display This stops the recording and returns you to the starting point of the song The letters rE retry appear on the left side of the LED display with the song number on the right and the PLAY LED starts flashing in...

Страница 97: ...80 automatically assigns a name and number to a newly recorded song for example Song 1 However you can assign an original name to the song with the Input Name function see page 97 STOP PLAY SONG SELECT REC MUSIC DISK RECORDER DISK IN USE Never attempt to press the eject button or turn the power off during recording reading and playing back Doing so can damage the disk and possibly the disk drive B...

Страница 98: ... in recording parts separately are the same as for normal recording on page 88 1 Memorize all the Registrations needed for your performance to the Registration Memory numbered buttons and set the Registration that will be used at the beginning of the song 2 Insert a formatted disk 3 Select the song number to which you will record your performance in the Control Panel page 4 Press the REC button to...

Страница 99: ...ng a part that has been recorded 3 Press the PLAY button and start playing after numbers appear in the display For example if you ve set LOWER PEDAL and CONTROL to RECORD and all other parts to PLAY or OFF play the Lower keyboard and Pedalboard 4 After you ve finished recording the first part s stop recording by pressing the STOP button 5 Press RECORD to set up recording of the next part In this e...

Страница 100: ...en to playback of the previous parts play the new part you wish to record When the end of the recorded performance is reached playback is automatically stopped and the STOP status is resumed Alternately in step 8 you can press the PLAY button or select PLAY with the appropriate Data Control button DATA CONTROL The length of a subesquently recorded part cannot exceed the length of the previously re...

Страница 101: ...rations to one song on the disk Small dashes flash across the LED display from left to right indicating that the M D R is recording the Registrations and bulk data After recording the M D R is automatically stopped STOP PLAY SONG SELECT REC MUSIC DISK RECORDER DISK IN USE 01 M TO DISK Method 2 1 Set up the Registrations insert a formatted disk and select the song number Follow the same procedure a...

Страница 102: ...umbers on the M D R before the performance If possible you should record the Registrations in the order that you ll use them for easy access during the performance 2 During the performance after all 12 Registrations from a certain song number have been used select the next song number and press the PLAY button on the M D R This replaces all 12 Registrations in Registration Memory with the new ones...

Страница 103: ...nction To name your newly recorded song 1 Call up the UTILITY page with the appropriate Menu button 2 Select INPUT NAME with the appropriate Data Control buttons 3 Select the desired set of characters A N O Z NUMBER or EDIT with the Menu buttons PAGE DATA CONTROL PAGE AR 80E 7 M D R 8 21 97 10 10 PM ページ 97 ...

Страница 104: ... a blank space at the cursor position INSERT Inserts the selected character at the cursor position moving other characters to the right DELETE Deletes character at the cursor position OK Saves the entered Song name CANCEL Exits the operation without saving the Song name The OK and CANCEL operations can also be selected with the appropriate Menu buttons from any of the INPUT NAME pages 7 Save the e...

Страница 105: ...he SONG SELECT controls in the display by pressing the appropriate Data Control buttons If the disk contains more than five songs you can quickly scroll up or down through the songs by using the Page Up and Page Down menus in the display Press the corresponding Menu button STOP PLAY SONG SELECT REC MUSIC DISK RECORDER DISK IN USE 01 DATA CONTROL Song data recorded on the AR 100 Electone can also b...

Страница 106: ...s function is especially useful for manually playing a single part such as the melody over previously recorded accompaniment parts To play back a selected part or parts of a song 1 Select the number of the song to be played back Use the SONG SELECT buttons or the SONG SELECT controls in the display 2 Select the part or parts for playback Set the parts you wish to play back to PLAY and set the part...

Страница 107: ... REPEAT Repeatedly plays back all songs automatically in their numerical order starting with the selected song RANDOM REPEAT Repeatedly plays back all songs automatically in random order starting with the selected song SINGLE REPEAT Repeatedly plays back the selected song REPEAT OFF Turns off the Repeat Play function Select this during repeat playback and the M D R will stop playback after the end...

Страница 108: ... PART page to determine the parts ALL PLAY The All Play mode lets you play all parts of the song You can also use the PLAY PART page by pressing the corresponding Menu button to turn playback of parts on or off SOLO PLAY The Solo Play mode lets you select a specific part for playback muting turning off all other parts Use the PART SELECT controls in the CONTROL PANEL page shown in step 1 above to ...

Страница 109: ...e elapsed song time is shown on both the M D R display and the main display Playback automatically stops at the end of the selected song All playback controls Pause Stop Rewind Fast Forward are the same as in song playback for Electone disks see page 108 REPEAT PLAY This function is the same as for Electone disks See page 101 DATA CONTROL PAGE AR 80E 7 M D R 8 21 97 10 11 PM ページ 103 ...

Страница 110: ...he display 3 Select the desired parts for playback LEFT RIGHT and or ORCHESTRA Use the corresponding Data Control buttons Highlighted parts are on and will playback You can also use the PLAY PART page by pressing the corresponding Menu button to turn playback of parts on or off LEFT This turns the left hand chord part of the DOC song on or off RIGHT This turns the right hand melody part of the DOC...

Страница 111: ...e Stop Rewind Fast Forward are the same as in song playback for Electone disks see page 108 REPEAT PLAY With the exception of the Phrase Repeat function described below this function is the same as for Electone disks See page 101 PHRASE REPEAT This enables the Phrase Repeat function which allows you to repeat playback of specific sections of a DOC song Phrase Repeat can only be used with songs whi...

Страница 112: ...buttons 2 To repeatedly play back the selected Phrase press the PLAY button or select PLAY in the display Playback of the selected Phrase continues indefinitely To stop playback press the STOP button or select STOP in the display DATA CONTROL Phrase Number AR 80E 7 M D R 8 29 97 5 11 PM ページ 106 ...

Страница 113: ...FILE SELECT controls 3 Select the destination User Style number for loading the selected Style by pressing the corresponding Data Control button 4 To load the selected Style to the specified User Style number select LOAD in the display Press the appropriate Data Control button 5 At the prompt select OK to actually load the Style or CANCEL to abort the operation After the Style has been loaded you ...

Страница 114: ...from the point at which the song was paused press the PAUSE button again PAUSE is also available during recording Rewind and Fast Forward These controls function much like the similar controls on a tape recorder Select F F with the corresponding Data Control button to advance to a later point in the song or select REW to return to an earlier position While either of these buttons is held down play...

Страница 115: ...an 100 indicate a faster tempo You can quickly restore the normal tempo by pressing the Menu button corresponding to Norm Tempo in the display Norm Tempo is also available in the REPEAT PLAY page DATA CONTROL The TEMPO controls on the panel are related only to Style playback and have no effect on M D R operations Tempo changes remain in effect even through changes in song number If you have change...

Страница 116: ... step if you wish to select a different destination song number than the one displayed The M D R will display only those song numbers that have no data If all songs numbers contain recorded data a Song full message appears on the display In this case you should erase one of the songs on the disk by using the Song Delete function see below The source and destination song numbers are indicated both ...

Страница 117: ...returns to the original UTILITY page Disk Copy Disk Copy allows you to duplicate the contents on one floppy disk to another Yamaha recommends that you keep copies of your important data on two separate floppy disks by using this function 1 Have handy the source disk and a formatted blank disk to which you wish to copy the data The source disk and destination disk must be indentical in type For exa...

Страница 118: ...source disk The REMAIN window and M D R display both count down the remaining amount of data to be copied 6 When changing the disk prompt appears press the eject button to take out the source disk 7 Insert the destination disk The amount of data remaining to be copied is shown in the display and counts down as the copy operation continues 8 When changing the disk prompt appears press the eject but...

Страница 119: ...e operation again Make sure to follow the display prompts closely taking special care not to mix up the disks Inserting the wrong disk may damage the disk and possibly the disk drive CAUTION Disk error Cannot continue An error occurred during reading from or writing to a disk Try changing the disk Message Problem and Possible Solution An error occurred because the disk was removed during a disk op...

Страница 120: ...Menu Also in order to properly hear the to be edited Voice make sure that all other Voice sections are turned off in the ENSEMBLE section 2 While holding down the VOICE EDIT button press the same Voice button again If you hold down VOICE EDIT without selecting a Voice the following display will prompt you to complete the step If you release VOICE EDIT without selecting a Voice the display returns ...

Страница 121: ...an original name to the edited Voice For details see page 118 2 REPEAT The Repeat function produces repeating notes when you hold a key or chord on the keyboard There are two modes All and Twin These modes only change the Repeat sound when more than one note is held The repeat speed is adjustable MODE OFF ALL TWIN OFF Turns Repeat off ALL Repeats all of the notes in a held chord TWIN Alternately r...

Страница 122: ...lt in a brighter sound Range 50 50 RES Resonance Determines the emphasis given to the cutoff frequency set in Cutoff above See diagram below Higher values result in a more pronounced effect Range 50 50 Resonance Cutoff Frequency 1 2 PAGE Some Voices may not sound properly if the Speed parameter is set too high fast These include Voices with naturally slow attacks such as some of the Strings Chorus...

Страница 123: ... quickly the sound reaches its maximum level after the key is played The higher the value the quicker the attack Range 50 50 DECAY Determines how quickly the sound reaches its sustain level a slightly lower level than maximum The higher the value the quicker the decay Range 50 50 REL Release Determines how quickly the sound decays to silence after the key is released The higher the value the short...

Страница 124: ... and select INPUT NAME with the appropriate Data Control buttons 2 Follow the instructions on pages 97 98 steps 2 6 The procedure for naming User Voices is the same as that of naming songs described in the Music Disk Recorder section PAGE PAGE PAGE PAGE This operation only saves the name of the Voice it does not save the Voice itself See Saving Your User Voice below AR 100E 10 Voice Edit 8 22 97 1...

Страница 125: ...ct OK to save the Voice or Cancel to abort the operation Use the appropriate Data Control buttons A Completed message briefly appears when the Voice has been saved DATA CONTROL PAGE This operation automatically erases any Voice that had been previously saved to the selected User Voice number You should check the User Voices see page 120 before saving a Voice to make sure that you will not be erasi...

Страница 126: ...l a User Voice 1 Press the dotted button to which you wish to assign the User Voice 2 1 STRINGS GUITAR CLARI NET VIBRA PHONE SAXO PHONE COSMIC CHORUS TUTTI HARMO NICA MIN MAX BRASS ORGAN PIANO UPPER KEYBOARD VOICE 1 CONTRAST HELP DISK ACCOMP PROGRAM HOLD PITCH MIDI SEQUENCE PROGRAM VOICE EDIT REGIST SHIFT EFFECT SET PAGE M O C L M SPLIT FOOT SW VOICE DISPLAY DATA CONTROL COARSE Keep in mind that u...

Страница 127: ...to save them to disk Doing so allows you to free up memory in the AR 80 for creating additional Voices Also the User Voices you ve saved to disk can be loaded back to the AR 80 any time User Voice data is included in the bulk data that is saved when you record Registrations to disk Refer to the section Recording Registrations page 95 for instructions Loading User Voices from Disk The User Voice da...

Страница 128: ...r keyboard your custom recorded accompaniment changes chords automatically The AR 80 lets you store up eight User Styles for instant recall However you can save additional User Styles to floppy disks letting you create an unlimited library of Styles for future use When recording a User Style you can select an existing Style and customize it for your own requirements or create a completely new Styl...

Страница 129: ...lly copied to the sections of the new Style INTRO A is copied to INTRO MAIN A is copied to MAIN A MAIN B is copied to MAIN B FILL IN AA is copied to FILL IN ENDING A is copied to ENDING DATA CONTROL 3 SEQ 1 4 2 POP R B USER 5 POP ROCK USER 1 TRADI TIONAL USER 6 ENTER TAIN USER 2 COUNTRY FOLK USER 7 BALLAD USER 3 LATIN POPS USER 8 LATIN USER 4 SWING JAZZ MIN MIN MAX MAX RHYTHM STYLE BASS CHORD BALL...

Страница 130: ...the ACCOMP PROGRAM button to enter the Accompaniment Program function automatically stops playback of Styles or User sequences About Accompaniment Program Recording Sections Parts and Measures Before going on to record a User Style in Accompaniment Program you should understand a little about the elements that make up a User Style Each Style can have up to five sections Intro Main A Main B Fill an...

Страница 131: ... 98 SoundTrk 35 PickBass 99 Crystal 36 Fretless 100 Atmosphr 37 SlapBas1 101 Bright 38 SlapBas2 102 Goblins 39 SynBass1 103 Echoes 40 SynBass2 104 Sci Fi Strings 41 Violin Ethnic 105 Sitar 42 Viola 106 Banjo 43 Cello 107 Shamisen 44 Contrabs 108 Koto 45 Trem Str 109 Kalimba 46 Pizz Str 110 Bagpipe 47 Harp 111 Fiddle 48 Timpani 112 Shanai Ensemble 49 Strings1 Percussive 113 TnklBell 50 Strings2 114...

Страница 132: ...om 5 Jazz Tom 5 49 C 2 Crash Cymbal 1 Analog Cymbal 50 D 2 High Tom Room Tom 6 Rock Tom 6 E Tom 6 Analog Tom 6 Jazz Tom 6 51 D 2 Ride Cymbal 1 52 E 2 Chinese Cymbal 53 F 2 Ride Cymbal Cup 54 F 2 Tambourine 55 G 2 Splash Cymbal 56 G 2 Cowbell Analog Cowbell 57 A 2 Crash Cymbal 2 58 A 2 Vibraslap 59 B 2 Ride Cymbal 2 60 C 3 Bongo H 61 C 3 Bongo L 62 D 3 Conga H Mute Analog Conga H 63 D 3 Conga H Ope...

Страница 133: ... 43 G 1 Brush Tom 2 Jazz Tom 2 44 G 1 1 45 A 1 Brush Tom 3 Jazz Tom 3 46 A 1 1 47 B 1 Brush Tom 4 Jazz Tom 4 48 C 2 Brush Tom 5 Jazz Tom 5 49 C 2 Hand Cym Open L 50 D 2 Brush Tom 6 Jazz Tom 6 51 D 2 Hand Cym Closed L 52 E 2 53 F 2 54 F 2 55 G 2 56 G 2 57 A 2 Hand Cym Open H 58 A 2 59 B 2 Hand Cym Closed H 60 C 3 61 C 3 62 D 3 63 D 3 64 E 3 65 F 3 66 F 3 67 G 3 68 G 3 69 A 3 70 A 3 71 B 3 Ø 72 C 4 ...

Страница 134: ...S n a r e H S n a r e M B a s s D r u m H B a s s D r u m M B a s s D r u m L S n a r e L S n a r e R o l l B r u s h S w i r l H B r u s h S w i r l L S e q C l i c k H H L CLICK T S R L M H L L M H H L H M L M H H C 1 C 2 S R 1 R 2 R L H H L L H L H L S h a k e r T r i a n g l e M u t e C u i c a M u t e C l a v e s G u i r o S h o r t M a r a c a s A g o g o L T i m b a l e L C o n g a H O p e ...

Страница 135: ...ettings should be made from the Basic page First select the section you ll be recording then set the time signature Beat and length Measure of the Style to be recorded To do this Select the BASIC page with the appropriate Menu button and change the settings with the corresponding Data Control buttons PAGE Section Beat and Measure settings are shown in middle of display in all Accompaniment Program...

Страница 136: ...e recorded parts see page 135 The OTHER setting can only be selected when using data from disks that has measure lengths of nine or greater Settings 1 8 OTHER 5 METRO Metronome This turns the Metronome on and off See step 3 below 3 If there are no other recorded parts turn the metronome on From the display above use the appropriate Data Control button to set METRO Metronome to ON If you are record...

Страница 137: ...ROL COARSE As a rule of thumb it is best to record the parts in the order they appear left to right in the display For example first record the Rhythm parts then the Bass parts then Chord etc Since the Pad and Phrase parts are mainly for embellishment they should be recorded last When you first call up the page for recording Rhythm 1 is automatically set to record Rhythm parts can be overdubbed se...

Страница 138: ...xcept drums are available for the other parts If you wish you can set a different tempo each time you record a part For example you could set a relatively fast recording tempo for parts that are easy to play and set a slow tempo for parts that are more difficult to play However make sure to set a final tempo just before saving your User Style The advantage of having two separate Rhythm Chord and P...

Страница 139: ... looping For example you might first record a bass drum sound and then add other drum percussion sounds until you re satisfied with the rhythm you ve created If you wish to delete a specific percussion sound from the part and leave the others intact use the Direct Cancel function see page 135 Recording Non rhythm Parts Bass Chord Pad and Phrase The Bass Chord Pad and Phrase parts can also be overd...

Страница 140: ...ar See Mute below 3 Select PLAY to playback the corresponding part 4 Select DELETE to delete the corresponding part See Delete below Mute A Mute function is also available for the parts letting you temporarily turn off parts you do not want to hear while recording This does not erase the part but only temporarily disables playback for selective monitoring of the parts 1 2 3 4 For internal Styles o...

Страница 141: ... and saving a User Style see page 140 Direct Cancel Rhythm parts only This allows you to delete specific drum percussion sounds from the rhythm parts To use Direct Cancel 1 Set the desired rhythm part to REC 2 Find the key or pedal corresponding to the sound you wish to delete 3 Start recording by pressing the START button in the ACCOMPANIMENT CONTROL section All instances of the sound in the part...

Страница 142: ...in a part Quantize lets you clean up your recorded data making sure that all parts are rhythmically precise and accurate To use Copy and Quantize 1 Call up the RECORD page with the appropriate Menu button and select the part to be edited by setting the desired part to REC 2 Call up the EDIT page PAGE RHYTHM 1 is selected for editing E 11a Acc Prog 8 22 97 1 19 PM ページ 136 ...

Страница 143: ...he down button decreases it These settings determine the length of the phrase to be copied Phrase length is automatically limited by the actual length of the Style section itself 2 Set the DEST Destination measure This determines the measure number to which the phrase is to be copied 3 Select EXEC Execute to copy the data At the prompt select OK to copy the data or Cancel to abort the operation DA...

Страница 144: ...the nearest 8th note Aligns to the nearest 8th note triplet Aligns to the nearest 16th note Aligns to the nearest 16th note triplet Aligns to the nearest 32nd note 2 Select EXEC Execute to quantize the data of the part At the prompt select OK to actually quantize the data or select Cancel to abort the operation DATA CONTROL Quantize can be used with good results on all parts but it s especially ef...

Страница 145: ... to different Pan positions for a wide stereo spread Each part can also have independent Voice settings For details on the VOICE page see page 132 To make Volume Reverb Chorus and Pan settings for each part Call up the page corresponding to the desired function and use the Data Control buttons to change the various settings Use the A Data Control buttons to move the setting to the right and the B ...

Страница 146: ...t User Styles each with five separate sections Intro Ending etc 1 Select the SAVE page The FREE AREA indicates the amount of memory available as a percentage for saving User Styles A value of 0 indicates that no more memory is available You should periodically save your Style as you are making it and check the amount of remaining memory If the Style currently being edited cannot be saved because o...

Страница 147: ...ing to CLEAR ALL DATA in the display 2 Select OK to clear all data User Styles 1 Ð 8 or select Cancel to abort DATA CONTROL Clear All Data operation see below If you are recording each section of a User Style separately i e over several sessions select that User Style each time you record new data to it and always save it to the same User number Before using this function you may want to save your...

Страница 148: ...ct OK to quit Accompaniment Program or Cancel to continue editing HELP DISK ACCOMP PROGRAM HOLD PITCH MIDI SEQUENCE PROGRAM VOICE EDIT REGIST SHIFT EFFECT SET PAGE M O C L M SPLIT FOOT SW VOICE DISPLAY DATA CONTROL Keep in mind that unlike in most other pages and functions you cannot quit Accompaniment Program simply by pressing a different function s button in DISPLAY SELECT E 11a Acc Prog 8 21 9...

Страница 149: ... desired User Style by pressing the appropriate Data Control button This assigns a User Style to the dotted button selected in step 1 above 4 Press the START button in the ACCOMPANIMENT CONTROL section play the Style PAGE DATA CONTROL 3 SEQ 1 4 2 POP R B USER 5 POP ROCK USER 1 TRADI TIONAL USER 6 ENTER TAIN USER 2 COUNTRY FOLK USER 7 BALLAD USER 3 LATIN POPS USER 8 LATIN USER 4 SWING JAZZ MIN MIN ...

Страница 150: ...when you record Registrations to disk Refer to the section Recording Registrations page 95 for instructions Loading User Styles from Disk The User Style data saved to disk as part of bulk data can instantly be loaded back to the AR 80 Refer to the section Recalling Recorded Registrations page 96 for instructions 144 When loading your original User Style data back to the AR 80 be sure to stop the A...

Страница 151: ...nlimited library of sequences for future use Calling Up the Sequence Program Function To call up the Sequence Program function 1 Press the SEQUENCE PROGRAM button in the DISPLAY SELECT section The LEDs of the numbered Sequence buttons in the STYLE section on the panel will flash and the following display will prompt you to select a sequence number HELP DISK ACCOMP PROGRAM HOLD PITCH MIDI SEQUENCE ...

Страница 152: ...for the type of Style to be entered Use the appropriate Data Control buttons PAGE DATA CONTROL 3 SEQ 1 4 2 POP R B USER 5 POP ROCK USER 1 TRADI TIONAL USER 6 ENTER TAIN USER 2 COUNTRY FORK USER 7 BALLAD USER 3 LATIN POPS USER 8 LATIN USER 4 SWING JAZZ MIN MIN MAX MAX RHYTHM STYLE BASS CHORD BALL ROOM SEQ SEQ SEQ 2 1 E 11b Seq Prog 8 21 97 10 15 PM ページ 146 ...

Страница 153: ...l button in this situation selects the corresponding Style and automatically returns to the EDIT page DATA CONTROL Easy Method for Selecting User Styles You can directly select User Styles from the EDIT page by selecting USER in the display then pressing one of the appropriate STYLE buttons the ones labeled USER 1 8 in green E 11b Seq Prog 8 21 97 10 15 PM ページ 147 ...

Страница 154: ... Similarly entering an Ending section automatically defines the end of a sequence To enter sections Hold down the ACCOMPANIMENT CONTROL button corresponding to the desired section and simultaneously press the Data Control button corresponding to SET or INS Insert in the display The selected section of the selected Style is entered to the sequence The entered sections are indicated by abbreviations...

Страница 155: ...e sequence At the subsequent prompt select OK to clear the data or Cancel to abort the operation 6 Use the Position controls to select the position in the row then edit the data as needed as in step 5 above Jumps to the beginning of the sequence Moves the cursor arrow one position to the left Moves the cursor arrow one row up Moves the cursor arrow one row down Jumps to the end of the sequence Mov...

Страница 156: ...d when entering Sequence Program will be copied to the button selected here DATA CONTROL PAGE 3 SEQ 1 4 2 POP R B USER 5 POP ROCK USER 1 TRADI TIONAL USER 6 ENTER TAIN USER 2 COUNTRY FORK USER 7 BALLAD USER 3 LATIN POPS USER 8 LATIN USER 4 SWING JAZZ MIN MIN MAX MAX RHYTHM STYLE BASS CHORD BALL ROOM SEQ SEQ SEQ HELP DISK ACCOMP PROGRAM M O C L M SPLIT FOOT SW VOICE DISPLAY HOLD PITCH MIDI SEQUENCE...

Страница 157: ...es To play any of the Sequences you have created 1 Press the desired SEQ Sequence button on the panel 2 Press the START button or press SYNCHRO START and start the Sequence by playing the Lower keyboard or Pedalboard During playback of a Sequence the lamps of the STYLE buttons light to indicate which Style is currently playing 3 SEQ 1 4 2 POP R B USER 5 POP ROCK USER 1 TRADI TIONAL USER 6 ENTER TA...

Страница 158: ...t of a single Sequence Saving Sequence Data to Disk Once you have created your own sequences you ll want to save them to disk Doing so allows you to free up memory in the AR 80 for creating additional sequences Also the sequences you ve saved to disk can be loaded back to the AR 80 any time Sequence data is included in the bulk data that is saved when you record Registrations to disk Refer to the ...

Страница 159: ...an be set to control one of the following functions Glide Tremolo or certain Style playback operations Assignments of the functions are made in the Foot Switch pages To set the footswitch functions 1 Call up the Footswitch page by pressing the FOOT SW button 2 Select the mode OFF RHYTHM GLIDE or TREMOLO and make the desired settings FOOT SWITCH LEFT page OFF Cancels left footswitch control HELP DI...

Страница 160: ...ment Style playback executes the selected function 1 STOP Functions as an on off switch for the accompaniment 2 ENDING Switches the accompaniment to the Ending pattern after which the accompaniment is stopped 3 FILL TO A Plays the Fill In section and immediately switches to the Main A section 4 FILL TO B Plays the Fill In section and immediately switches to the Main B section DATA CONTROL 1 2 3 4 ...

Страница 161: ... CONTROL 1 Voice Sections The Glide function can be applied to any or all of the Voice sections shown in the display Upper 1 and 2 Lead Lower 1 and 2 Select the desired Voice section s 2 TIME Determines the speed of the Glide function or in other words how gradually the pitch returns when the footswitch is released Higher settings produce slower pitch changes Range 0 4 2 1 DATA CONTROL When the Gl...

Страница 162: ... Lever The knee lever located on the underside of the keyboard panel can be used to turn on and off the Sustain effect Melody On Chord function or Lead Slide effect Sustain Control To select knee lever control over Sustain 1 Make sure that the Upper and or Lower Sustain effect panel controls have been turned on otherwise the knee lever will have no effect 2 Fold the knee lever down LOWER KNEE UPPE...

Страница 163: ...RD page To do this press the M O C L M SPLIT button in the DISPLAY SELECT section then select the M O C page 2 Make sure that one of the Melody On Chord modes have been selected 1 2 or 3 3 Set the Knee setting to ON 4 Press the knee lever continuously to the right to produce the Melody On Chord effect as you play DATA CONTROL HELP DISK ACCOMP PROGRAM HOLD PITCH MIDI SEQUENCE PROGRAM VOICE EDIT REG...

Страница 164: ... select the VIBRATO page with the appropriate Menu button 2 Make sure that the Slide Time is set to a value other than 0 and set the Slide control to KNEE 3 Press the knee lever continuously to the right to produce the Lead Slide effect as you play DATA CONTROL PAGE IftheKNEEparameteris selected Lead Slide can only be applied by using the knee lever AR 100E 12 Footswitches Knee 8 21 97 10 16 PM ペー...

Страница 165: ... mixer recorder or amplifier speaker system Use these in recording or live performance applications 3 PHONES jack For connection of a stereo headphone set The built in speakers are automatically turned off when this is connected 4 MIC VOL Microphone Volume For adjusting the level of the microphone input 5 MIC Microphone jack 1 4 phone For connection of a microphone Rear Panel MIDI IN OUT terminals...

Страница 166: ...on in the DISPLAY SELECT section then press the appropriate Menu button to call up the PITCH page 2 Adjust the settings with the appropriate Data Control buttons 1 TRANSPOSE Determines the coarse pitch setting of all the voices and is adjustable in half steps semitones Range 6 6 one octave 1 PITCH Determines the fine pitch setting of all the voices Range 414 6 466 8Hz DATA CONTROL CONTRAST HELP DI...

Страница 167: ...RANSPOSE The default Pitch setting is 440 0Hz at A3 Pitch changes cannot be recorded to the Music Disk Recorder When tuning the AR 80 to match the pitch of another instrument use the Clarinet voice on the Lower keyboard and make sure that effects such as Tremolo or Symphonic are turned off About the Pitch of the Voice Sections The various Voice sections and sounds of the instrument are set to diff...

Страница 168: ...o play the sounds on the connected device from the keyboards of the AR 80 The instruments communicate with each other by sending messages or MIDI data These messages are transmitted over one of sixteen different MIDI channels Provided the MIDI channels are set properly and provided the connected instrument has multi timbral capability you can play separate sounds on the instrument from each keyboa...

Страница 169: ...n a D O C disk has been inserted in the M D R disk slot XG GM Select this setting when using the AR 80 with XG and GM compatible devices The Mode automatically changes to XG GM when a XG On or GM On MIDI message is received or when a XG or GM disk has been inserted in the M D R disk slot 2 OUTPUT UPPER LOWER PEDAL Determines the channels over which MIDI data is sent for each keyboard To restore th...

Страница 170: ...D R automatically switches the setting to EXT to allow MD R control over the expression pedal When it is set to INT you can manually control the expression pedal functions during M D R playback When it is set to EXT the M D R or a second connected Electone controls the expression pedal functions About the Receive Channels When using another MIDI device to play the Electone s voices you must set th...

Страница 171: ... happens very rarely Occasionally power surges and spikes due to electrical storms or other reasons may cause the Electone to malfunction and or alter the contents of memorized data If this happens use the Power On Reset operation to reset the Electone See page 79 The display doesn t change as expected when changing functions Make sure the HOLD button is not lit See page 14 Also depending on the f...

Страница 172: ... the Lower Keyboard or Pedalboard are pressed the sounds of percussion instruments are also heard The Keyboard Percussion function has been turned on When not using the function be sure to turn it off See page 61 Only one sound is heard when two notes of the Lead or Pedal Voices are simultaneously played For practical performance reasons the Electone has been designed so that one note of the Lead ...

Страница 173: ...ction cannot be heard The Upper Keyboard has been set to sound only Lead Voices Make sure that one of the Upper Keyboard Voice sections 1 2 or Organ has been turned on and that the volume setting is appropriate EFFECTS The Tremolo Symphonic Celeste Flanger and Delay effects cannot be heard even when they are turned on in the Voice Condition page Make sure that the corresponding effects are set to ...

Страница 174: ...ttons A total of 40 songs cannot be recorded If some song numbers contain a large amount of recorded data the disk may not have enough available memory left to record the normal maximum of 40 songs Recording is stopped before the performance is finished or the Song Copy function cannot be executed The amount of recorded data on the disk is close to the maximum limit Either use another disk or dele...

Страница 175: ...K 36 55 4 1 4ch 36 96 15ch 13 84 5 Received only in External mode 6 0 15 Registration Memory 32 47 Orchestral Preset 64 71 Organ Preset 1 4 11 64 Control Change Ø Ø 5 Modulation Wheel 2nd Expression Pedal Expression Pedal Sustain Default Changed Default Messages Altered True voice Note on Note off Key s Ch s Basic Channel Mode Note Number Velocity After Touch Pitch Bender Function Transmit Receive...

Страница 176: ...01 120 121 Ø Ø Ø Ø Ø Ø Ø Ø Ø Ø Ø Ø Ø Ø Bank Select Expression Data Entry Sound Controller Portamento Cntrl Effect Depth RPN Inc Dec NRPN LSB MSB RPN LSB MSB All Sound Off Reset All Cntrls Default Changed Default Messages Altered True voice Note on Note off Key s Ch s Basic Channel Mode Note Number Velocity After Touch Pitch Bender Function Transmit 1 Receive Remarks 1 16 1 16 Mode 3 0 127 0 127 Ø ...

Страница 177: ...epth Upper Lower Pedal Upper Voice 1 2 Upper Flute Extra Lower Voice 1 2 Lower Flute Extra Lead Pedal Voice 1 2 Type Speed Chorus Repeat All Twin Off Speed Output Level Filter Cutoff Resonance EG Rate Attack Decay Release Name Save User Voice 1 16 Mode Off 1 2 3 Knee On Off On Off Left Lower1 2 Lower Organ Octave Up Right Lower1 2 Lower Organ Key set 160 Styles Intro A B Main A B Fill In AA AB BA ...

Страница 178: ... DISPLAY SELECT buttons 11 DOC MIDI 163 DOC 87 104 dotted buttons Style 52 dotted buttons Voice 19 E Edit Registration Shift 78 Edit Sequence Program 146 Effect Extra Voice 31 Effect Flute Tibia 28 Effect Reverb 42 Effect Voice sections 34 Effect Set 37 EG Rate 117 Electone MIDI 163 Ending 50 148 154 ENSEMBLE buttons 15 18 26 29 62 EXP Expression MIDI 164 Expression pedal 7 Extra Feet Extra Voice ...

Страница 179: ...t DOC 104 S SECT Section Accompaniment Program 130 Sections 50 124 148 SEQ buttons 151 Sequence Program 145 Set Registration Shift 78 Set Sequence Program 149 Single Finger Mode Chords 57 Single Finger 56 Single Repeat Demo 8 Single Repeat M D R 101 Slide 35 158 Solo Play XG GM 102 Song Copy 110 Song Delete 111 SONG SELECT 75 89 Space Input Name 98 Speec Repeat 116 Speed Delay 38 Speed Flanger 38 ...

Страница 180: ...ER EUROPEAN COUNTRIES Yamaha Europa GmbH Siemensstraße 22 34 25462 Rellingen F R of Germany Tel 04101 3030 AFRICA Yamaha Corporation International Marketing Division Nakazawa cho 10 1 Hamamatsu Japan 430 Tel 053 460 2312 MIDDLE EAST TURKEY CYPRUS Yamaha Europa GmbH Siemensstraße 22 34 25462 Rellingen F R of Germany Tel 04101 3030 OTHER COUNTRIES Yamaha Corporation International Marketing Division ...

Отзывы: