19
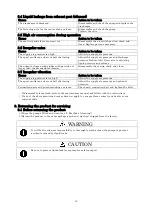
8.4 Liquid leakage from exhaust port (silencer)
Cause
Action to be taken
The diaphragm is damaged.
Disassemble and check the pump and replace the
diaphragm.
The fastening nuts for the center disk are loose.
Disassemble and check the pump.
Tighten the nuts.
8.5 High air consumption during operation
Cause
Action to be taken
The seal ring and sleeve are worn out.
Disassemble the air-switch portion, check and
clean. Replace parts as necessary.
8.6 Irregular noise
Cause
Action to be taken
The supply air pressure too high.
Adjust the supply air pressure.
The spool oscillates, and occur ball chattering.
Adjust the supply air pressure and discharge
pressure. Reduce inlet flow valve to adjusting
liquid pressure and volume.
The pump is clogged with sludge with particles of
larger than the permissible diameter.
Disassemble the casing, check and clean.
8.7 Irregular vibration
Cause
Action to be taken
The supply air pressure is too high.
Adjust the supply air pressure.
The spool oscillates, and occur ball chattering.
Adjust the supply air pressure and exhaust
pressure.
Connection parts and pump mounting are loose.
Check each connection part and tighten the bolts.
• If disassembly is required, refer to the maintenance manual and follow with the instructions.
• If any of the above mentioned causes does not apply to your problem, contact your dealer or our
regional office.
9. Returning the product for servicing
9.1 Before returning the product
1) Purge the pump of fluid and clean (see “6. Method of cleaning”).
2) Return the product in the same package as when it was first shipped from the factory.
WARNING
• It will be the end-user responsibility to thoroughly wash a clean the pumps to prevent
accidents caused by liquid leaks.
CAUTION
•Be sure to prevent liquid leak from pump for safe transport.

