background image

The icons and their meanings are presented in these categories:

  Soft Key Icons

  Overlay Icons

  Icons on System Off Screen and Alert Screens

  Main Menu Screens

  Submenu Icons Grouped by Menu

SOFT KEY ICONS

Some of the icons on the Operating Screen are called soft key icons because they associate an operation or
function with a nearby key (

1

2

3

4

#

, or 

*

) on the Display Panel. The result of pressing one of these keys

depends on which menu is currently active, because the icons nearest these keys change from one menu to
another. The soft keys are programmed to function in relation to the current menu context

Table 2

 shows the

soft key icons that appear on the Display Panel along with a short description of each one's purpose.

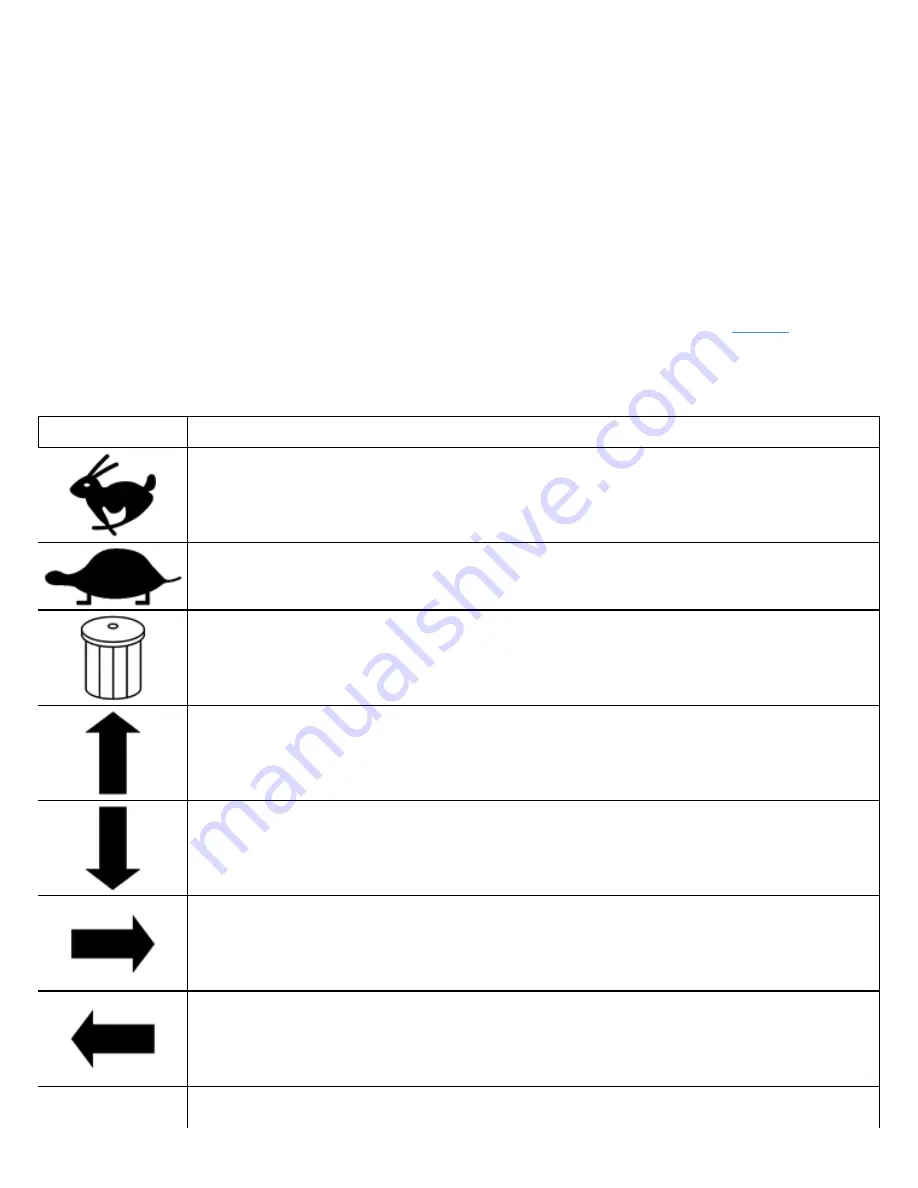
Table 2. Soft Key Icons

Icon

Description

Hare Performance Mode "increase" Icon. Press the 

1

 soft key (or the 

#

 soft key in some

cases) to increase performance.

Tortoise Performance Mode “decrease” Icon. Press the 

3

 soft key to decrease

performance.

Trash Can Icon. Used to delete all entries in a log. Press the 

4

 soft key (or the 

#

 soft key

in some cases) to empty a log.

Up Arrow soft key. Press 

2

 to scroll up in most screens. Also used to view next log entry

in log screen.

Down Arrow soft key. Press 

3

 to scroll down in most screens. Also used to view next

log entry in log screen.

View Next Device Log Icon. Press the 

#

 key for previous.

View Previous Device Log Icon. Press the 

*

 key for next.

This icon points to the 

*

 key (the soft 

Enter Key

) and is used to accept a value,

Содержание ERC40VH

Страница 1: ...20VT ERP030 040VT G807 ERP16 20VF ERP30 40VF A955 ERC22 35VG ERC045 070VG A968 ERC16 20VA ERC030 040VA A969 ERP22 35VL ERP045 070VL A976 ERP40 50VM ERP50 55VM6 ERP080 120VM ERP100VML A985 ERP80VNL6 ER...

Страница 2: ...T THE LIFT TRUCK ON BLOCKS in the Operating Manual or the Periodic Maintenance section Keep the unit clean and the working area clean and orderly Use the correct tools for the job Keep the tools clean...

Страница 3: ...Main Menu Structure Screens and Title Screens Submenus Returning to the Main Menu Icons and Settings Soft Keys Entering Numbers Icon Glossary Introduction Soft Key Icons Overlay Icons Icons on System...

Страница 4: ...Log Activity Log Menu Introduction Operator Checklist Log Password Log Impact Events Log Calibration Menu Introduction Load Weight Calibration Return to Set Tilt Stop Point Calibration E Hydraulic an...

Страница 5: ...Initial Adjustment of Soft and Hard Impact Settings Readjustment of Soft and Hard Impact Settings Auto Power Off Time Delay Return to Set Tilt Traction Speed Limit Scheduled Maintenance Reminder Mini...

Страница 6: ...oper service technician password a Service Technician can access menu items that are not visible at Operator or Supervisor password level access DISPLAY PANEL MENU ACCESS Turning the keyless start swi...

Страница 7: ...ing upon how the lift truck is equipped some of the functions described in this section may not be included in the on board menu structure for a particular lift truck NOTE The icons displayed on the O...

Страница 8: ...Figure 3 Supervisor Flowchart Sheet 1 of 4...

Страница 9: ...Figure 3 Supervisor Flowchart Sheet 2 of 4...

Страница 10: ...Figure 3 Supervisor Flowchart Sheet 3 of 4...

Страница 11: ...Figure 3 Supervisor Flowchart Sheet 4 of 4 Table 1 Supervisor Menu Flowchart A B C D E F G H...

Страница 12: ...d Maintenance Required 21 Minimum Pump Standby 22 Operator Checklist 23 Interlock Menu Screen Impact Monitor Shutdown 24 Cycle the Key Traction Switch Direction Select in Neutral Truck Disabled Due to...

Страница 13: ...nless Operator Passwords are deactivated in this case the Activity Log Title Screen appears After entering your password successfully the system displays the Operating Screen on the orange 1 5 x 2 5 i...

Страница 14: ...the Scroll Forward Key to move from one title screen to another Press the Enter Key to enter one of these main menus 1 OPERATING SCREEN 2 PASSWORD SCREEN 3 ACTIVITY LOG TITLE SCREEN 4 CALIBRATION TIT...

Страница 15: ...main menu The Activity Log Menu has only three submenus while the Truck Setup Menu has 13 submenus Each submenu is represented by a title screen When the title screen of the submenu you want is displ...

Страница 16: ...nly two values such as Enabled and Disabled while other settings may present a series of values you can select from by using the soft keys In some cases you need to enter a numerical value that is wit...

Страница 17: ...r a value directly These are The 1 2 3 and 4 soft keys These keys can be used as number keys only in the menus that accept numerical input These keys are programmed for use as soft keys in most menus...

Страница 18: ...that appear on the Display Panel along with a short description of each one s purpose Table 2 Soft Key Icons Icon Description Hare Performance Mode increase Icon Press the 1 soft key or the soft key...

Страница 19: ...e Hazard Flashers Icon Press the key to toggle the hazard flashers on and off Select system time for Fault Log event Press the 1 key to select system time this soft key toggles between system times an...

Страница 20: ...he System Off Screen and the various Alert Screens appear only briefly These screens also show interlocks such as Operator Not in Seat Refer to System Off Alert Screens for more information on these s...

Страница 21: ...Hydraulics Icon Alert Screens Cycle the Key Secure Battery Release Park Brake...

Страница 22: ...Operator Out of Seat Release Pedal Release Hydraulic Input Traction Switch...

Страница 23: ...Hydraulic Switch Temperature Too High Lift Limit Charge Battery...

Страница 24: ...you find the one you want by pressing the Scroll Back Key or Scroll Forward Key on the Display Panel Two main menu screens the Operating Screen and the Password screen have no associated submenus but...

Страница 25: ...Table 5 Main Menu Title Screens Operating Screen NOTE Icons for Front and Rear Lights are shown These are optional features Password Screen Activity Log Title Screen Calibration Title Screen...

Страница 26: ...Display Title Screen Status Title Screen Truck Setup Title Screen...

Страница 27: ...uch as warnings Refer to the Operating Screen topic for more information NOTE The icons displayed on the Operating Screen vary from any one time to another depending on the current operation of the li...

Страница 28: ...Displayed only on trucks that have the Hydraulic Filter Monitoring option Service Due Soon Warning Icon Hazard Flashers Icon See Table 2 for more information Forward Direction Indicator Icon Neutral I...

Страница 29: ...key switch or turn the keyless switch to the ON position See the Passwords Screen topic for more information Table 7 Password Screen Icons Icon Description Password Lock Icon A field with five blanks...

Страница 30: ...Password Log Submenu Impact Events Log Submenu Empty Log Icon Checklist Failed Icon Checklist Passed Icon Password Lock Icon Hidden or no password Field Log Entry Icon Clock Icon for occurrence date...

Страница 31: ...Icon Hard Impact Type Icon Calibration Submenu Icons Table 9 presents the icons that appear on the Calibration Submenus See Calibration Menu for more information Table 9 Calibration Submenus and Icon...

Страница 32: ...n Load Weight Value kg Prompt Icon This icon points to the key the Enter soft key and is used for load weight calibration in this submenu Return to Set Tilt Stop Point Submenu Return to Set Tilt RTST...

Страница 33: ...ompt Icon Valve Threshold Function 2 B Direction Prompt Icon Valve Threshold Function 3 A Direction Prompt Icon Valve Threshold Function 3 B Direction Prompt Icon Valve Threshold Function 4 A Directio...

Страница 34: ...u Center Steering Wheel Prompt Icon This icon points to the key and is used for steering wheel center point calibration in this submenu Steer Axle Position Submenu Steering Wheel Full Left Prompt Icon...

Страница 35: ...pt Icon This icon points to the key and is used for manual hydraulic end point calibration in this submenu Display Submenu Icons Table 10 presents the icons that appear on the Display Submenus Refer t...

Страница 36: ...lock Icon 12 Hour Clock Icon DD MM YY Europe Date Format Icon MM DD YY USA Date Format Icon YY MM DD ISO 8601 Date Format Icon Set Daylight Savings Submenu Daylight Savings Adjustment Enable Icon Dayl...

Страница 37: ...dicator Icon Daylight Savings End Day Indicator Icon First Sunday Icon Last Sunday Icon First Friday Icon Last Friday Icon NOTE Not all icons for setting daylight savings time are shown The four icons...

Страница 38: ...Clock Icon for setting time Calendar Icon for setting date Set Units Submenu Set Units Icon Imperial Units Indicator Icon Metric Units Indicator Icon...

Страница 39: ...s See Status Menu for more information Table 11 Status Submenus and Icons Icon Description Vehicle System Manager VSM Version Submenu Hardware Version Indicator Icon Software Version Indicator Icon Di...

Страница 40: ...Truck Serial Number Submenu Truck Serial Number Symbol Icon Hour Meters Submenu Truck Hour Meter Icon Traction Hour Meter Icon Pump Hour Meter Icon...

Страница 41: ...ndicator Icon E Hydraulic Controller Version Submenu Hardware Version Indicator Icon Software Version Indicator Icon Pump Motor Controller Version Submenu Hardware Version Indicator Icon Software Vers...

Страница 42: ...action Controller 1 Version Submenu Hardware Version Indicator Icon Software Version Indicator Icon Traction Controller 2 Version Submenu Hardware Version Indicator Icon Software Version Indicator Ico...

Страница 43: ...Light Controller Version Submenu Hardware Version Indicator Icon Software Version Indicator Icon Impact Sensor Version Submenu Hardware Version Indicator Icon...

Страница 44: ...he icons that appear on the Truck Setup Submenus See Truck Setup Menu for more information Table 12 Truck Setup Submenu Icons Icon Description Add Remove Password Submenu Password Icon Null Symbol Ico...

Страница 45: ...icon points to the key and is used for restoring defaults in this submenu Motion Alarm Submenu Motion Alarm Indicator Icon Motion Alarm Indicator Disabled Icon The X over the icon means the motion ala...

Страница 46: ...Impact Monitor Settings Submenu Soft Impact Force Icon Soft Impact Time Icon Hard Impact Force Icon Hard Impact Time Icon Auto Power Off Time Delay Submenu Auto Power off Time Delay Indicator Icon...

Страница 47: ...Return to Set Tilt RTST Submenu Return To Set Tilt Delay Icon Return To Set Tilt Truck Icon Tilt Both Ways Icon Infinity Symbol Icon Traction Speed Limit Submenu Forward MPH Icon...

Страница 48: ...Icon Scheduled Maintenance Reminder Submenu Scheduled Maintenance Reminder enabled ON Scheduled Maintenance Reminder disabled OFF Interval Month Setting Icon Interval Hourmeter Setting Icon Derated T...

Страница 49: ...Submenu Note The icons displayed when using this submenu correspond to the submenu icons for the various functions Up to 30 checklist items can be enabled for the Operator Checklist Check Park Brake...

Страница 50: ...Icon Check Service Brake Icon Press the key Enter Key below this icon to indicate proper operation of the current checklist item Press the key below this icon to indicate improper operation of the cu...

Страница 51: ...pact Shutdown Type Icon Impact Detection Icon ON Icon OFF Icon Disable Traction Icon Disable All Icon Motor Braking Submenu Regenerative Braking Indicator Icon Automatic Deceleration Rate Indicator Ic...

Страница 52: ...con With this setting the lift truck decelerates in proportion to how far the pedal is released in relation to the current traction speed Supervisor Icon Steering Wheel Friction and Steering Turns Adj...

Страница 53: ...ses small graphic images called icons to provide continuous feedback to the lift truck operator This feedback includes performance settings status and warning messages and essential truck operating in...

Страница 54: ...imum performance mode allowed it may be possible for the operator to use the Performance Mode soft keys on the Display Panel to change the current performance mode MODE 4 This is the highest performan...

Страница 55: ...on Hydraulic Fluid Level Icon Hydraulic Filter Icon Fasten Seat Belt Icon When the wrench icon is continuously ON it means that scheduled maintenance is due When it is flashing it indicates that an ac...

Страница 56: ...perating Screen before the ten seconds are up the fasten seat belt icon will no longer be displayed BATTERY DISCHARGE INDICATOR NOTE Because the Battery Discharge Indicator BDI algorithm determines th...

Страница 57: ...S If the lift truck is equipped with CAN controlled hazard flashers and lighting controls the icons that indicate the status of the lift truck s lights and hazard flashers are displayed on the Operati...

Страница 58: ...e the System Off Screen and Alert Screens The purpose of the System Off Screen is to supply brief status information as the system is powered off Alert Screens appear momentarily to attract attention...

Страница 59: ...reset by a Service Technician using the procedures described in the Status Menu section ALERT SCREENS There are two types of alert screens Fault Screens failure indication screens and Interlock Notif...

Страница 60: ...the accelerator pedal the system will switch from the Operating Screen to an alert screen showing the seat belt icon as shown in Figure 15 Figure 15 Example Interlock Alert Screen In this example if...

Страница 61: ...n and the Add Remove Password submenu accessed through the Truck Setup menu follow PASSWORD SCREEN NOTE Operator passwords are used only on trucks equipped with a software enable option As already sta...

Страница 62: ...vel access NOTE In certain circumstances a default operator password of 11111 will be in the currently stored password list NOTE If there are no Service Technician level passwords in the currently sto...

Страница 63: ...itial Password screen will display Enter new password using keys 0 through 9 Press Enter Key First Press the Up Arrow or Down Arrow Soft Key to select password access level Operator Supervisor or Serv...

Страница 64: ...u must have a privilege level equal to or greater than the privilege level of the password being modified This means a Service Technician can modify all passwords but a Supervisor can only modify the...

Страница 65: ...enu See the next section Activity Log Menu for more information This menu allows a Service Technician or a Supervisor to view the last 250 valid passwords entered into the system and the password acce...

Страница 66: ...the Impact Events Log menu press the Scroll Back Key or Scroll Forward Key and then press the Enter Key The following sections describe the Activity Log submenus OPERATOR CHECKLIST LOG This submenu i...

Страница 67: ...Checklist Log screen and indicates the available controls 1 PASSWORD VALUE AT LOG OCCURRENCE 2 TYPE OF ENTRY PASS FAIL 3 UP ARROW SOFT KEY ICON 4 CURRENT LOG ENTRY OR EMPTY SYMBOL 5 DOWN ARROW SOFT K...

Страница 68: ...CHECKLIST ITEM THAT FAILED 7 TRASH CAN SOFT KEY USED TO EMPTY LOG 8 TRACTION HOURS AT LOG OCCURRENCE 9 SYSTEM DATE AT LOG OCCURRENCE Figure 23 Failed Checklist Log Entry If there are no log entries or...

Страница 69: ...ssword log entry An empty log screen replaces this log screen Press either Scroll Key or to exit When a person with Supervisor password level access views the log any recorded events under Service Tec...

Страница 70: ...screen and indicates the available controls The process for viewing and removing password logs from the system is shown in Table 17 1 PASSWORD VALUE AT LOG OCCURRENCE 2 OPERATOR SUPERVISOR SERVICE TE...

Страница 71: ...at a Supervisor viewing the Password Log cannot see a Service Technician s password When viewing the log entry of a person with a higher access level the password is displayed as After removing a log...

Страница 72: ...creen and indicates the available controls 1 PASSWORD VALUE AT LOG OCCURRENCE 2 TYPE OF IMPACT SOFT HARD ICON 3 UP ARROW SOFT KEY ICON 4 CURRENT LOG ENTRY OR EMPTY SYMBOL 5 DOWN ARROW SOFT KEY ICON 6...

Страница 73: ...screen Press either Scroll Key or to exit When a person with Supervisor password level access views the log any recorded events under Service Technician level access are shown as instead of the actual...

Страница 74: ...e Position Steer Axle Center Point Manual Hydraulics The following sections describe the Calibration submenus LOAD WEIGHT CALIBRATION NOTE This measurement is not for trade This menu item shown in Fig...

Страница 75: ...Point Sequence 1 Starting from the Calibration Menu scroll to the Return to Set Tilt Stop Point screen and press the Enter Key 2 When prompted position the mast at the desired tilt angle 3 Press the E...

Страница 76: ...e lever toward the rear of the truck the B direction until the forks begin to creep and press the Enter Key The system records the valve reading Steps 5 and 6 provide the hydraulic input for function...

Страница 77: ...to the Calibration Menu STEER AXLE POSITION CALIBRATION NOTE This calibration must be done by a supervisor or service technician and is only available on trucks equipped with the Synchronized Steering...

Страница 78: ...at the straight ahead position to determine if correct 1 Starting from the Calibration Menu scroll to the Steer Axle Center Point Offset screen and press the Enter Key 2 Use the 2 up arrow soft key in...

Страница 79: ...is move each lever as far as it will go in both directions 4 Press the Enter Key The system records the extreme locations and returns to the Calibration Menu Display Menu INTRODUCTION The Display Men...

Страница 80: ...k Key or Scroll Forward Key a second time to return to the main menu The Display Menu offers these submenus see the Table 10 topic Set Date and Time Format Menu Set Daylight Saving Time Menu Set Time...

Страница 81: ...tions for the Current Date Format USA MM DD YY Europe DD MM YY ISO 8601 YY MM DD Use the 2 or 3 soft key to cycle through the Current Date Format options When you have the desired format displayed pre...

Страница 82: ...eases by one hour at 2 00 am on the selected Start Date and decreases by one hour at the same time on the selected End Date Figure 40 shows the title screen for this menu Figure 40 Set Daylight Saving...

Страница 83: ...ths to the desired start month and press the Enter Key 4 Set the day daylight saving time will begin a Press the 3 Down Arrow soft key to activate the Start Date indicator and press the Enter Key b Us...

Страница 84: ...CROLL SCROLL Daylight Save Start Month 01 Daylight Save Start Day 01 SCROLL Daylight Save Start Day Last Press Enter Key Daylight Save Start Last Su Select the Day of the Week from available selection...

Страница 85: ...ting Time and Date NOTE To exit from a menu at any time without making any changes press the Scroll Back Key or Scroll Forward Key 1 At the Display Menu scroll to the Set Time and Date Format submenu...

Страница 86: ...then the left segment displayed is the day of the month Current Date Format can be changed in the Set Date and Time Format submenu a Use the number keys to enter the correct value and press the Enter...

Страница 87: ...Status Title Screen is displayed as shown in Figure 44 Figure 44 Status Title Screen Press the Enter Key to enter the Status Menu and the system will display the Vehicle System Manager VSM Version su...

Страница 88: ...lists the manufacturer s hardware version the second line lists the manufacturer s software version Figure 46 Versions Screen DISPLAY VERSIONS NOTE The manufacturer s hardware and software versions ma...

Страница 89: ...ERSIONS NOTE The manufacturer s hardware and software versions may not match the hardware and software versions shown on the device s exterior label Use this submenu to view the manufacturer s interna...

Страница 90: ...OTE The Status Menu displays this item only if the CDF configuration indicates dual traction motors are present The manufacturer s hardware and manufacturer s software version information is presented...

Страница 91: ...to enter this submenu For a different submenu use the Scroll Back Key or Scroll Forward Key to move to the desired submenu and press the Enter Key Figure 50 Add Remove Password Submenu The Truck Setu...

Страница 92: ...on This menu provides settings for battery type installed on the truck There are two possible battery settings lead acid and lithium ion battery See Figure 51 1 LEAD ACID BATTERY SETTING 2 LITHIUM ION...

Страница 93: ...tion Alarm Setup Screen Use the 2 and 3 soft keys to toggle the setting between On and Off An X over the fork lift truck icon indicates the Motion Alarm feature is set to Off If this feature is Off an...

Страница 94: ...ime the second setting down from the top can be adjusted to require the impact monitor to see an impact force greater than the Soft Impact Force for 1 to 12 samples before a soft impact event will be...

Страница 95: ...adjustment period are hard impacts change the settings as follows Increase the Hard Impact Time by 1 sample for large adjustments Increase the Hard Impact Force by 0 1g for smaller adjustments After...

Страница 96: ...ter Key to save the new value When the delay time is set to 0 this feature is deactivated When set to Continuous the delay time is infinite limitless The lift truck icon in Figure 56 indicates the mas...

Страница 97: ...eminder Status set to ON and Setting one or both of the reminder intervals to nonzero numbers activates the maintenance reminders feature Once a previously active interval counts down to zero the main...

Страница 98: ...Screen Figure 60 Maintenance Reminder Alert Screen MINIMUM PUMP STANDBY FLOW RATE NOTE This submenu is available to logged in Supervisors and Service Technicians This menu can be used to adjust the mi...

Страница 99: ...from 0 to 100 in steps of 1 Figure 61 Minimum Pump Standby Flow Rate Screen OPERATOR CHECKLIST NOTE This submenu is available to logged in Supervisors and Service Technicians A Supervisor or a Servic...

Страница 100: ...on has an X over it press the Enter Key The system will enable the checklist function the icon represents and redraw the icon with no X over it and the checklist function will now be programmed to app...

Страница 101: ...chnicians and Supervisors There are three motor braking settings Regenerative Braking Rate Auto Deceleration Rate and Auto Deceleration Type See Figure 64 Regenerative Braking setting controls how muc...

Страница 102: ...leration allows the truck to coast until the pedal is fully released Proportional deceleration causes the truck to decelerate in proportion to how far the pedal is released in relation to the current...

Страница 103: ...out of range setting will not be saved 3 Enter adjustment using the keypad See Figure 67 Figure 67 Steering Friction Adjustment and Out of Range Screens 4 If valid setting is entered setting will be...

Страница 104: ...nd press enter See Figure 69 Figure 69 Steering Wheel Turns Adjustment Screen NOTE Setting must be within 4 0 and 6 0 turns If out of range setting will not be saved 3 Enter adjustment using the keypa...

Страница 105: ...Figure 71 Steering Wheel Number of Turns Valid Entry...

Отзывы: