4
Installation
07.2020
31
ba
-o
.2
.6
.0
-us
-3
.2
-ys
|
A1
18
67
50
1 Re
v A
E
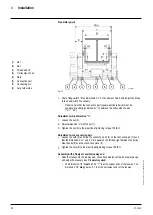
Assembly with an inaccessible runway end
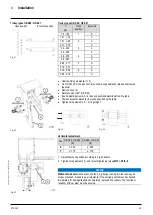
Loosen the nuts (2) on the threaded bolts (3) and unscrew by dimension “x”.
Slide the trolley side cheeks (4) apart parallel, to the unscrewed nuts (2) until the
dimension “B” + “y” is reached.
Mount the trolley on the axle holder side (8) in the bottom flange of the runway beam
and secure against slipping down.
Slide the trolley side cheeks (4) back against the nuts (1).
–
When doing so, thread in the drive-through mechanism (see section 7.5).
Tighten the nuts (3) to the prescribed tightening torque 159 lb
f
ft.
Check the track clearance “f/2” with a feeler gauge and adjust if necessary (see
“Preparatory work”
).
–
The dimension “f/2”
must
be 0.02
+0.04
in at the widest point of the runway. The
dimension “f/2”
may
be max. 0.1 in at the narrowest point of the runway.
Type
Ø D
Trolley
B
c
x
y
z
max
[in]
[in]
YKE/SKE
7.9
UE-S776
7.3…19.7
B+3.6
*1
3.7
7.4
1.8
Tab. 9
*
1
with I (INP/IPN) EN 10024 beam: -0.08 in
4.3.4
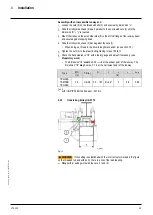
Articulated trolley (DKE-S4 / DKE-S6)
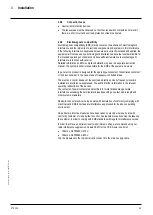
Fig. 17
WARNING
If the setting is established with the incorrect nuts (marked in the figure
on the threaded rod end with an X), there is a risk of the load toppling.
➢
Only
perform setting work with the nuts (1) and (2).


