background image

Set up the Memory Programmer

8.  Open  the  [Device  Manager]  dialog  box,  then  double-click  the  [Ports 

(COM&LPT)] button.

• 

When the “Prolific USB-to-Serial Comm Port (COM X)” (X: Comm Port 

Number)  is  displayed,  the  SCU-35  Programming  Cable  is  functioning 

normally.

• 

To connect the transceiver to the PC, keep the Comm Port Number in mind.

When the Driver Software Installation Fails

The driver installation may fail when:


The installation wizard is canceled during the installation.


The SCU-35 Programming Cable is connected to the computer before installing 

the driver.

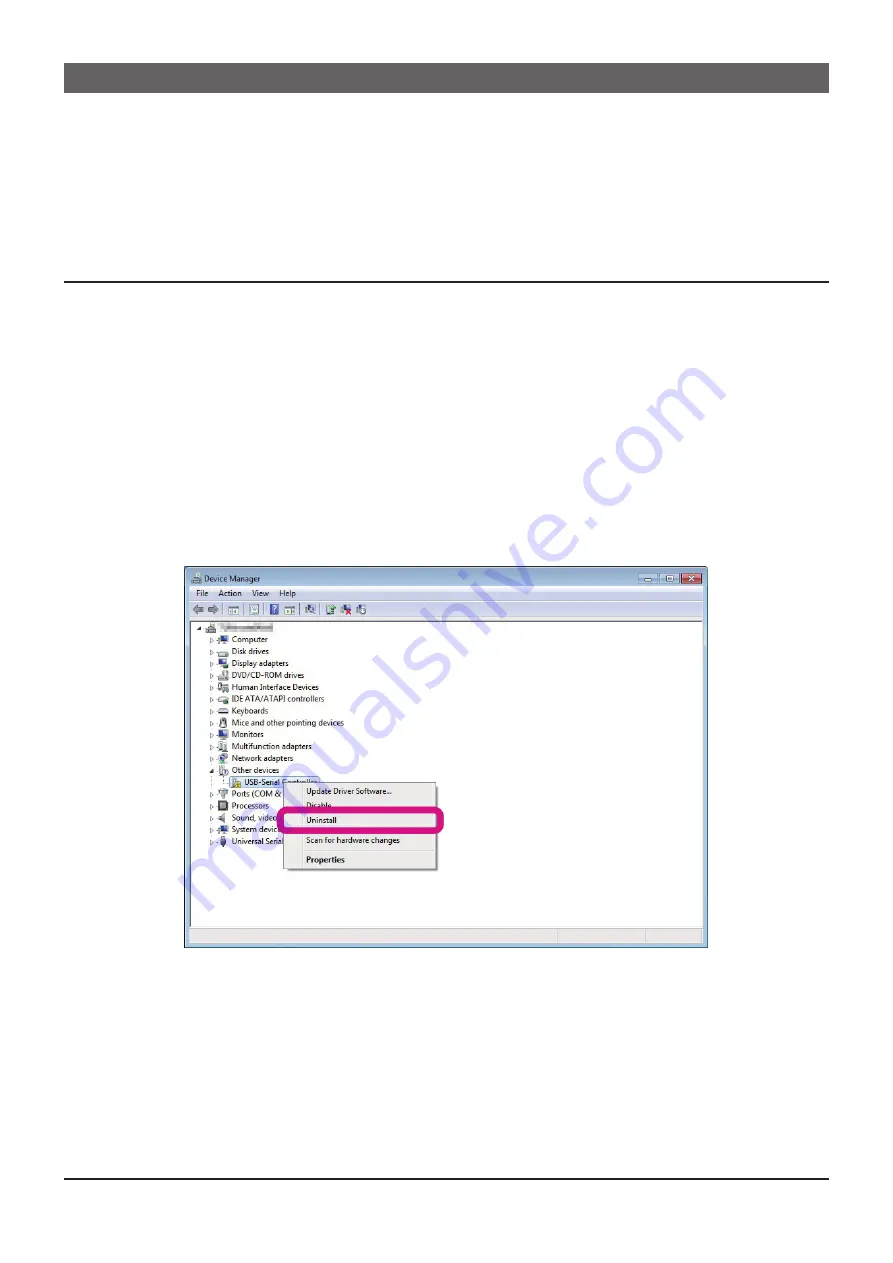
When the installation of the driver fails:

1.  Open the [Device Manager] dialog box, as described in step 6 of the “SCU-35 

Driver Software Installation” instruction section

2.  Right-Click [Other devices], which is appended to the “!” icon, then click [Un-

install], to uninstall the driver.

3.  Retry the installation of the driver.

5

FT-65R/E FT-25R/E Memory Programmer

Содержание FT-65E

Страница 1: ...provides convenient editing of the FT 65R E and FT 25R E memory channel frequencies channel information and alpha tags using a personal computer Also the transceiver parameters and the set menu mode i...

Страница 2: ...ansceiver 10 Edit the transceiver settings with the Memory Pro grammer 11 Write the settings to the transceiver 11 About Memory Programmer 12 Initial screen 12 Menu Bar 13 File menu 13 New 13 Open 13...

Страница 3: ...formation This icon indicates other pages containing relevant information The procedures on this manual is explained for a Windows 7 64 bit computer for the purpose of illustration Important Notes Bef...

Страница 4: ...eripheral interfaces USB port USB 1 1 USB 2 0 Required Cable Programming Cable SCU 35 Before using the SCU 35 Programming Cable install the designated driver on the computer Trademarks Microsoft Windo...

Страница 5: ...dialog box which is shown at the right will open Click the Next to initiate the in stallation of the driver 3 When the installation is finished the dialog box shown right will open Click the Finish t...

Страница 6: ...lation Fails The driver installation may fail when The installation wizard is canceled during the installation The SCU 35 Programming Cable is connected to the computer before installing the driver Wh...

Страница 7: ...Programming Cable from the computer 2 Click Start Control Panel Uninstall a program 3 Click PL 2303 USB to Serial then click Uninstall 4 Click Next 5 Click Yes to uninstall the SCU 35 program ming cab...

Страница 8: ...iles section Extract the downloaded zip file Start up the computer as an Administrator user For example the procedure to install the FT 65 memory programmer USA EU version on a Windows7 64 bit compute...

Страница 9: ...dows 7 64 bit computer is shown below 1 Disconnect the SCU 35 Programming Cable from the computer 2 Click Start Control Panel Uninstall a program When Uninstall a program is not displayed click Progra...

Страница 10: ...nu Connecting the FT 65R E or FT 25R E to the computer 1 Turn the transceiver OFF 2 Connect the SCU 35 Programming Cable to the USB port on the computer and connect the plug to the transceiver MIC jac...

Страница 11: ...the SCU 35 Driver Software Installation procedure Read the settings from the transceiver To write the settings to the transceiver see Write the settings to the transceiver on page 11 1 Click the Read...

Страница 12: ...ls on each channel row may not be Cut Copied or Pasted Ctrl X Ctrl C or Ctrl V For more details on the contents of each setting see page 12 Write the settings to the transceiver Memory programmer data...

Страница 13: ...menu to display or hide the Tool bar The Tool bar includes buttons for some of the most common commands in the Memory Programmer 16 Switching Button Click each button PMS VFO A etc to switch the displ...

Страница 14: ...ath This Open button operates the same as the right icon in the figures above Save Save the programming session to the disk with the same name and directory Click the Save parameter in the File menu a...

Страница 15: ...to customize the various functions of the FT 65 25 according to your preferences Click the Function Setup parameter in the Edit menu to open the Function Setup window Bank Channel A combination of up...

Страница 16: ...d From Radio This command transfers the settings data of the FT 65 25 to the memory programmer This Read From Radio operates the same as the right icon in the figure above Read data may be stored to t...

Страница 17: ...ck the Status Bar parameter in the View menu to display or hide the Status Bar The Status Bar displays the date and the time A check mark appears next to the Status Bar parameter when the Status Bar i...

Страница 18: ...tings VFO A Click the VFO A button to change the default settings of VFO A VFO B Click the VFO B button to change the default settings of VFO B Home Click the Home button to change the default setting...

Страница 19: ...e repeater Plus The transmit frequency is shifted to the plus offset Minus The transmit frequency is shifted to the minus offset Simplex The transmit frequency is not shifted CTCSS Decode To set the r...

Страница 20: ...ry radio Step Sets the channel step for receiving channels Normally when a frequency is entered the optimal channel step will be automatically set according to the frequency SQL Type This item selects...

Страница 21: ...depleted Charge the battery or replace the battery with the new one Is the computer COM Port setting correct Set the COM Port correctly The data transmission has stopped before completion Disconnected...

Страница 22: ...roduced without the permission of YAESU MUSEN CO LTD YAESU MUSEN CO LTD Tennozu Parkside Building 2 5 8 Higashi Shinagawa Shinagawa ku Tokyo 140 0002 Japan YAESU USA 6125 Phyllis Drive Cypress CA 9063...

Отзывы: