background image


Page 30 


6.1  Quick Setup with the Wizard 

To make the setup process slightly quicker for users, we have created a Setup Wizard which takes you through common 
options to getting your Y-cam setup wirelessly and with your custom settings. 
 
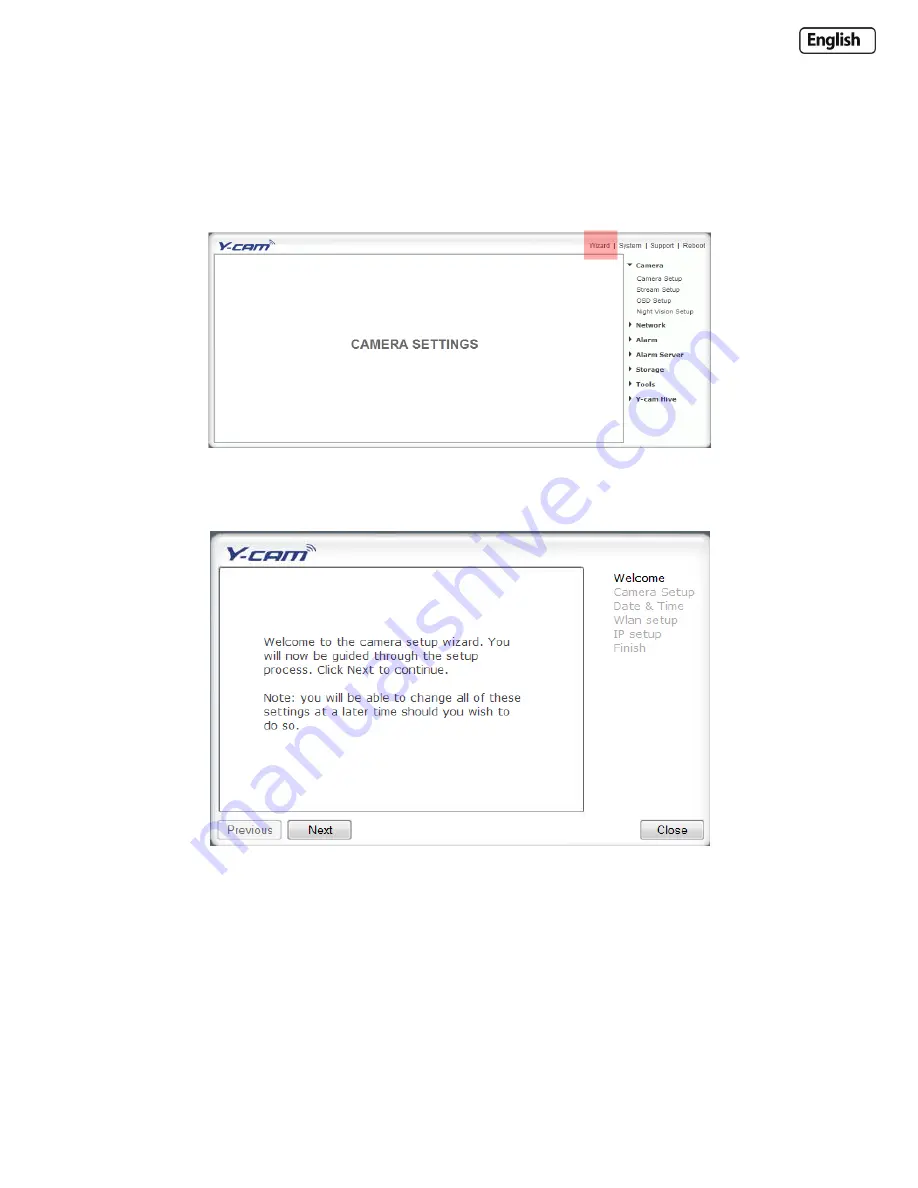
From the Settings screen, click on “Wizard” in the Header Menu. 


The Wizard will launch in a new window.   Follow the simple instructions on the screen and enter the required details, 
clicking next to proceed through each step.  


With this Wizard, you will be able to set the: 


Name of Camera 


Quality of Picture you wish to view 


Time Zone 


System Time 


Wi-Fi Setup 


TCP/IP Setup 

 
This should help you get your camera setup and working very quickly at a basic level. 


Содержание YCW003

Страница 1: ...e YCBL03 Y cam Bullet Black YCBLB3 HD Range Y cam Bullet HD YCBLHD5 Y cam EyeBall YCEB03 Features and operations listed in this manual depend on the specific model Each cameras model name can be found...

Страница 2: ...5 3 0 INSTALLATION 16 4 0 Y CAM SOFTWARE INSTALLATION 17 4 1 Y CAM SOFTWARE INSTALLATION FOR WINDOWS 17 4 2 Y CAM SOFTWARE INSTALLATION FOR MAC 19 4 3 FINDING YOUR CAMERA WITH Y CAM SETUP 20 5 0 WELCO...

Страница 3: ...N EMAIL SERVER SETTINGS 62 6 9 STORAGE 63 6 9 1 STORAGE SETUP 63 6 9 2 RECORD ON ALARM 64 6 9 3 SNAPSHOT ON ALARM 65 6 9 4 CONTINUOUS RECORD 66 6 9 5 SNAPSHOT AT INTERVAL 67 6 9 6 FTP SENDING 68 6 9 7...

Страница 4: ...Page 4 7 8 4 TROUBLESHOOTING WITH MOBILE DEVICES 84 7 8 5 VIEWING BULLET HD ON IPAD AND IPHONE 85 8 0 TROUBLESHOOTING 86 9 0 GLOSSARY OF TERMS 88...

Страница 5: ...tion against harmful interference in a residential installation this equipment generates uses and can radiate radio frequency energy and if not installed and used in accordance with the instructions m...

Страница 6: ...uence a heart pacemaker 4 DO NOT use this product for any illegal activities It is the user s responsibility to ensure that the usage of this camera is of a legal nature 1 3 Power Supply This product...

Страница 7: ...o repair the camera doing so might cause damage to the product and will invalidate warranty Applies to products YCB004 YCK004 YCB003 YCBP03 YCK003 YCBL03 YCBLB3 YCBLHD5 Please note Infrared LEDs produ...

Страница 8: ...m IV 2GHz or higher recommended Memory RAM 128Mb 256Mb or higher recommended Operating System Windows 2000 XP Vista Windows 7 Web Browser Internet Explorer Version 5 5 or above Mozilla Firefox Google...

Страница 9: ...SD Range at a glance Applies to products YCW004 YCWP04 YCB004 YCK004 YCW003 YCB003 YCBP03 YCK003 not available on White S YCW004 White S POE YCWP04 or White SD YCW003 not available on S range not ava...

Страница 10: ...from the lens array Be careful not to break the lens or infrared LEDs The status LED of the camera will be visible Please note To reset your Y cam Bullet back to factory default settings you will nee...

Страница 11: ...ote Pressing and releasing the reset button on the side of the EyeBall will perform a reset The reset button should not be pressed for more than 4 seconds as this will put the camera into firmware dum...

Страница 12: ...eakout Box at a glance Applies to products YCBL03 YCBLB3 YCEB03 YCBLHD5 Please note The Y cam Breakout Box is not waterproof and if used outdoors should be sealed in a waterproof junction box or other...

Страница 13: ...nstallation microSD Important Notes and Information 1 There is a limit to the number of rewrites possible on any MicroSD memory card If you notice the card becoming slow or sluggish after a reasonable...

Страница 14: ...card into the Y cam Bullet requires you to remove the front section of the camera For this reason it is advised not to do this once the camera has been mounted in a wall or in a non easily accessible...

Страница 15: ...nstallation for Y cam EyeBall The microSD memory card slot can be found on the inner rim of the Y cam The card can only be inserted into the camera with the golden pins of the microSD card facing towa...

Страница 16: ...rk Using the standard Ethernet network cable plug this in to the network connection socket on the Y cam at one end and plug the other end in to a spare port on your router switch Using the Power Adapt...

Страница 17: ...and displays any cameras it finds It s very useful if you ever forget the address of you camera or in this case when you first install it 4 1 Y cam Software Installation for Windows 1 Insert the Setu...

Страница 18: ...want to change the default folder click Change to replace otherwise click Next 4 Click Install to install the Y cam Setup utility 5 Click Finish to end the installation You should now find a Y cam ico...

Страница 19: ...section 3 Select Firewall tab then click Advanced 4 Make sure the check box next to Block UDP Traffic is un ticked then click Ok 5 Quit System Preferences and test the Y cam Setup software again OSX 1...

Страница 20: ...h to search for cameras again Refresh Searches your local network for cameras Setup Select the required camera and click Setup to configure the network settings for the camera Open Select the required...

Страница 21: ...ttings The address in the web browsers address bar should look something like http 192 168 1 50 this is your cameras internal IP address Accessing this homepage is a common way to access the camera wh...

Страница 22: ...f lower and uppercase alpha numeric characters Extended characters are not permitted 5 1 Live View using Internet Explorer Upon verification of the username and password the camera image will load Ple...

Страница 23: ...Recording options Click this button to set the recoding parameters You can set record path video file size and select whether to start recording automatically when motion is detected and the length o...

Страница 24: ...lled on your system to record videos directly from the web browser if you are using a program other than Internet Explorer The links at the top of the screen are Home Settings Secondary Stream and Mot...

Страница 25: ...t time you will be prompted to install an ActiveX Control Please follow the on screen instructions to download and install this control You will then view the following screen The two links at the top...

Страница 26: ...ically assigned the data time of the snapshot 6 Recording Press the Record button to record from the Live View to your local hard disk 7 Recording Config Click this button to set the recording paramet...

Страница 27: ...QuickTime Pro Installed on your system to record videos directly from the web browser if you are using a program other than Internet Explorer The links at the top of the screen are Home Settings Seco...

Страница 28: ...lick on the word Settings from the Y cam Homepage This is the default Settings screen The Menu Panel contains a range of dropdown sections which expand and contract depending on selection Please note...

Страница 29: ...password admin 123456 ycam or your personal details Please note Keep this password safe The only way to recover from a lost password is to reset the camera back to its default settings and this will w...

Страница 30: ...e Settings screen click on Wizard in the Header Menu The Wizard will launch in a new window Follow the simple instructions on the screen and enter the required details clicking next to proceed through...

Страница 31: ...nt status and strength of your wireless connection if in use IP address The internal IP address of your camera so you can access it on your local network DNS Servers If this option is empty it may pre...

Страница 32: ...is available for your Y cam product at http support y cam com Our Support Centre offers help by ticket support as well as a Knowledge Base of common problems and advanced settings Free Technical Supp...

Страница 33: ...in the Header Menu to access the Camera Reboot page Click Reboot to restart the Y cam Rebooting the camera will retain all the settings and configurations A reboot is normally necessary when you inser...

Страница 34: ...sion Setup option will not be available on all models 6 5 1 Camera Setup For most users many of these settings can be left as default Camera Setting Options Light Frequency Two options 50Hz 60Hz This...

Страница 35: ...ctiveX visible in Internet Explorer only Microphone Audio Setting Options Microphone Enables or disables the built in microphone Volume Adjusts the sensitivity of the microphone from 0 14 where 0 is t...

Страница 36: ...ilable You can configure settings for the primary and an optional secondary video stream Configuring a secondary stream is useful for providing a video stream that is at a lower resolution than the pr...

Страница 37: ...the bitrates are listed a lot lower but retain the same principle MJPEG Quality This sets the quality of the video when viewing the camera using Motion JPEG without audio It can be from 20 to 100 wher...

Страница 38: ...ct unless the camera is synchronized to a time and date server on the internet This is accessible under the Tools menu and will be covered in more detail in the manual Display system name Set the OSD...

Страница 39: ...if the light level of the room is too dark to produce a good quality image This may be useful if the LEDs are reflecting off a nearby surface and obstructing your view Black and white mode Auto switch...

Страница 40: ...k a sub menu of network setup options will be displayed 6 6 1 Wireless Setup The Y cam can connect to any wireless network through standard Wi Fi connections Wireless Setup Options Wireless Enable or...

Страница 41: ...e next section for Adhoc setup 6 6 1 1 Infrastructure Wireless Setup Options Security mode Select the type of security mode that your wireless network is using None i e off WEP64 WEP128 WPA PSK or WPA...

Страница 42: ...fy these settings 6 6 1 2 Adhoc Wireless Setup Options If you want to make a direct wireless connection from your camera to your computer you will need to setup the Y cam in Adhoc mode In order to vie...

Страница 43: ...mask Required Default gateway Type the default gateway Required Primary DNS IP address Type the IP address of the primary DNS server Required Secondary DNS IP address Type the IP address of the second...

Страница 44: ...nt to Point Protocol over Ethernet PPPoE dial up Enable or disable for PPPoE connection Service name Enter your ISP name or class of services that are configured on the PPPoE service This field may be...

Страница 45: ...vider from the drop down list then click Register This will take you to the service provider s website where you can register your own personal host name Please follow the instructions on the provider...

Страница 46: ...his function Refer to your router manual for further details External HTTP RTSP port range By default this port range is 8150 8350 The ports are assigned in order so if you only have one camera attach...

Страница 47: ...http yourname dtdns com Port 8150 So with the above information your camera would have the address of http yourname dtdns com 8150 Open any internet browser on your computer and type your own DDNS acc...

Страница 48: ...s to the Internet over a series of ports and sometimes the default ports used by the Y cam are blocked from access over the Internet therefore these ports need to be made accessible This is achieved u...

Страница 49: ...attached Digital I O connector Pin Function Description 4 GND Common Ground 3 Digital Input Connect to GND to activate or deactivate by software setting 2 Digital Output With a maximum load of 1A and...

Страница 50: ...Page 50 Wiring Diagram...

Страница 51: ...active low or High for active high Digital Output Enable or Disable the digital output Digital outputs active state is Open to switch off the transistor when motion is detected or Grounded to switch...

Страница 52: ...by the blue bar when motion is detected Sensitivity Determines how easily the camera detects motion Lower sensitivity means the camera is less likely to detect motion Higher sensitivity means the came...

Страница 53: ...tivity means the camera is more likely to detect motion Note Sliding the Sensitivity bar to the left will decrease the sensitivity of the motion detection i e More movement is required to trigger the...

Страница 54: ...p to 4 schedules and you can use these to send alarms to different places such as emails FTP or SD card Schedule Setup Options Schedule ID Select the ID you can save up to four schedules and use them...

Страница 55: ...triggered FTP Server ID Select the FTP Server number from the list set under Alarm Server Remote path Path where to save the image file to the FTP server Snapshot From Select the stream from which it...

Страница 56: ...rver number from the list set under Alarm Server File attachment Select if you would like a snapshot of the camera view attached to the e mail Snapshot From Select the stream from which it should get...

Страница 57: ...rver number from the list set under Alarm Server Remote path Path where to save the image file on the FTP server Snapshot From Select the stream from which it should get the snapshot Image file name A...

Страница 58: ...the list set under Alarm Server File attachment Select if you would like a snapshot of the camera view attached to the e mail Snapshot From Select the stream from which it should get the snapshot Ima...

Страница 59: ...e stream from which it should get the snapshot Image file name A name for the Image Suffix of file name Image file name suffix can be either date and time or a sequence number FTP automatic Sending En...

Страница 60: ...r upload on motion detection or upload periodically These functions are available under the Alarm menu FTP Server ID Select the ID of the FTP server You can connect to up to four FTP Servers FTP serve...

Страница 61: ...mail relaying Check with your system administrator or Internet service provider for more details SMTP server port The port number of the e mail server default is 25 Secure SSL Connection Select whethe...

Страница 62: ...gmail com SMTP server name smtp gmail com SMTP server port 465 Secure SSL Yes Authentication Yes Username YourUserName gmail com Password xxxxxxx gmx com SMTP server name smtp gmx com SMTP server por...

Страница 63: ...page will cover how to setup your Y cam to record to a NAS drive Storage Select Select whether you want to record on NAS or microSD card NAS remote path Address Path where to save the files on NAS Dri...

Страница 64: ...d record Record file name A name for the video file Suffix of file name Image file name suffix can be either date and time a sequence number or Date time with the record time length Split Time of Reco...

Страница 65: ...camera should keep saving images when motion stops Trigger FPS The number of frames per seconds that the camera should keep saving images when an alarm is triggered Snapshot From Select the stream fr...

Страница 66: ...le Suffix of file name Video file name suffix can either be date time a sequence number or date time with record time length Split Time of Record file This specifies the maximum duration of one file W...

Страница 67: ...ervals Interval Time Time interval between snapshots Snapshot From Select the stream from which it should get the snapshot Image file name A name for the Image Suffix of file name Image file name suff...

Страница 68: ...lect where the files should be uploaded to the FTP Server Always Upload the contents of MicroSD onto FTP Server when a file is present Schedule Upload the files according to the schedule File Period A...

Страница 69: ...and delete all the videos which were recorded upon motion detection Snapshot on Alarm Enables you to view and delete snapshots which were recorded upon motion detection Continuous Record Enables you t...

Страница 70: ...ity System Name Type a name to easily identify the Y cam System Contact Type the contact name of the administrator of the Y cam This is useful in large organisations System Location Type the location...

Страница 71: ...r name then enter the new password for that user twice and click Save To delete a user Click on the user name then click Delete Note A maximum of 16 users are allowed to access the camera simultaneous...

Страница 72: ...vice location Choose your time zone Daylight saving time tick the box to enable daylight saving time Date and Time format Select the format of the date and time Auto time setting SNTP Enable or disabl...

Страница 73: ...l users and settings will be lost requiring you to reconfigure the camera Backup Click Backup to backup the current configuration of the Y cam for future reference Once you have your camera setup as y...

Страница 74: ...t You will need to move or copy the file from this compressed folder some versions of Windows will allow you to do this but if not you will need a program like WinZIP or WinRAR to unzip the file to a...

Страница 75: ...grade completes you will be prompted to reboot the camera and after this your latest firmware will be recorded If the update hasn t worked after 15 20 minutes reset the camera via the side button on t...

Страница 76: ...elect a camera click on Setup and the following setup interface will pop up 4 Enter a unique name for the camera the location optional and leave the default port number as 80 Obtain an IP address auto...

Страница 77: ...of the camera is 192 168 1 150 This can be changed to any IP address on your IP range For example if the IP address of your PC is 192 168 1 52 then the IP address of your camera should be unique and...

Страница 78: ...k of image quality and delays in refresh intervals Consult your network administrator for further details Start Internet Explorer Select Tools Internet Options Connections tab and click LAN Settings V...

Страница 79: ...1 Open a new Internet Explorer window 2 From the menu bar select Tools and then select Internet options 3 From the Internet Options window select the Security tab 4 Click on the Custom Level button 5...

Страница 80: ...d the correct new firmware for your camera from http www y cam com and save this to your hard disk 2 Unzip uncompress the firmware to a directory on your PC Copy the firmware MFW file to an easy to ac...

Страница 81: ...LED will stop flashing This means the firmware is being loaded 17 Please wait until the LED starts flashing again this means the firmware has finished installing 18 Turn the power off to the camera 19...

Страница 82: ...IP settings 4 In the IP Address Field type in the number 192 168 1 20 5 In the Subnet Mask type in 255 255 255 0 6 In the Default Gateway type 192 168 1 150 The camera will automatically assign itsel...

Страница 83: ...the video stream You can also access video images from the network camera in the following ways Motion JPEG server push http ip port stream jpg Still JPEG images in a browser http ip port snapshot jpg...

Страница 84: ...Stream Live this will open the mobile stream of the Y cam and will try to play it on your cameras media player Settings allows you to setup both the 3GPP stream and the Picture Live view Please note t...

Страница 85: ...the iPad You can access the iPhone formatted stream by accessing http CameraIPaddress Port iphone You can access the iPad formatted stream by accessing http CameraIPaddress Port ipad Page 34 Image siz...

Страница 86: ...install ActiveX controls 2 Maximum 16 users are allowed to access the camera simultaneously through the network 3 Network traffic may prevent the viewing interface from appearing quickly Wait for a w...

Страница 87: ...herwise been damaged Please contact your place of purchase or Y cam Technical Support Motion Detection triggers unexpectedly 1 Motion detection is based on changes in pixel in the image This means tha...

Страница 88: ...etwork system in which devices communicate with each other by first going through the wireless router IP Address The unique 32 bit number assigned to each computer connected to the Internet IP numbers...

Отзывы: