background image

P 17

da Vinci Super 3D printer

da Vinci  Super

Print

Transfer files to be printed via the PC software “XYZware Pro”

Connect the printer and computer with a USB cable and install the “XYZware Pro” on the computer

to transfer the files you want to print.

XYZware Pro can be used with Windows 7, Mac OSX 10.10 or later versions of the operating systems. You can also use

the original manufacturer’s USB provided with the printer to install XYZware Pro or download installation files from the

official website.

Visit the official website for details: http://www.xyzprinting.com/

Select Import and choose the model files to print. After loading the files, the size, printing position, and angle of the objects

can be adjusted accordingly.

The user may use the Convert function and change relevant settings to satisfy printing speed and effectiveness.

After editing and adjustments, select Print to export the object. The model file will be sectioned and then printed 

accordingly. 

Visit the XYZprinting official website for more information on version updates, operating instructions, and technical 

support: http://www.xyzprinting.com/ for more details and information.

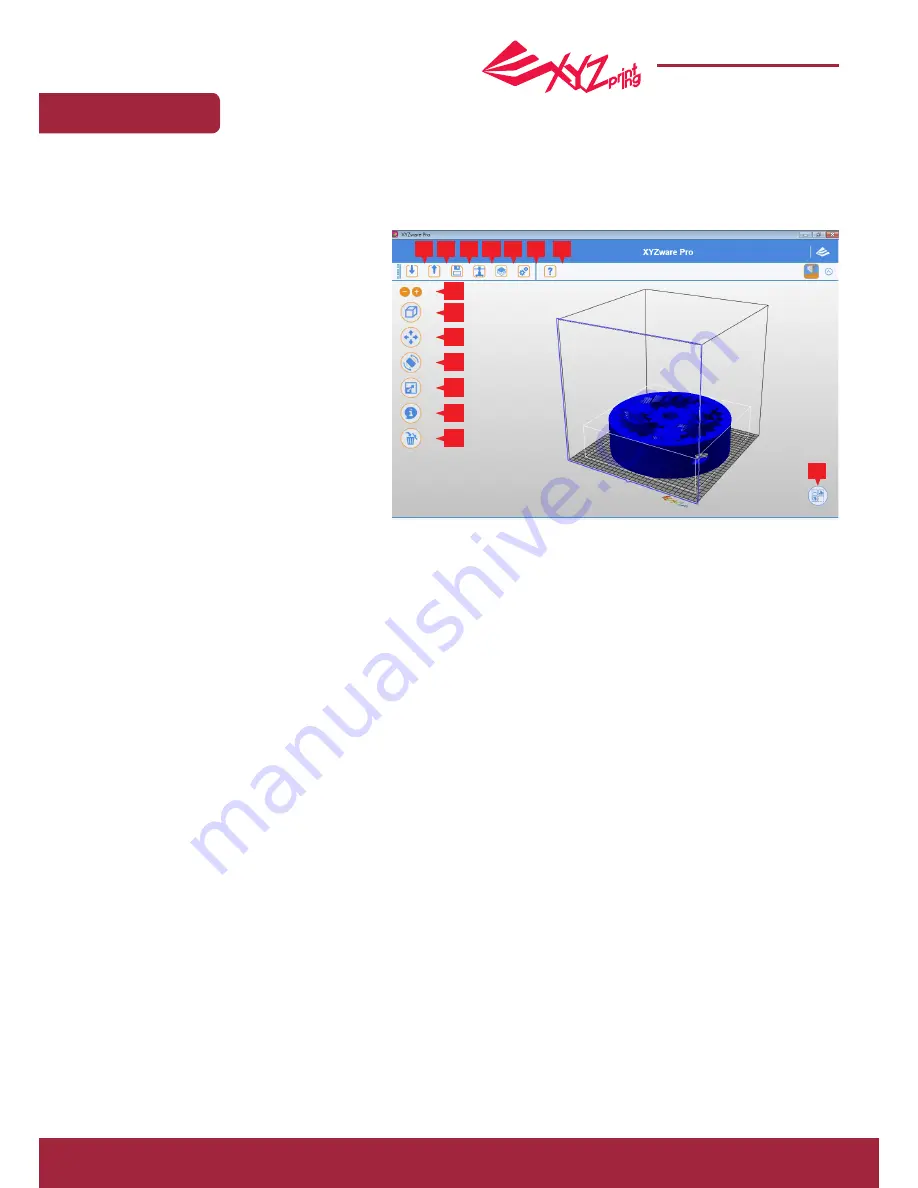
Import .stl or .3w files.
Convert to .3w files.
Save .stl files.
Set printing preferences and send files for printing.

Print list
Set the language displayed for the software
interface and preview color.

Check for and update the software and firmware
versions, and open a link to the official website.
Display zoom percentage

Quick switch to the preview perspective
Change model position
Change model angle
Shrink or enlarge model dimensions
Display model-related information
Delete the model from the virtual platform

Check printer temperature, filament data, and printing progress

A. 
B.
C.
D.
E.
F.

G.

H.
I.

J.

K.
L.
M.

N.

O.

A B C D E

F

G

H

I

J

K

L

M

N

O

Содержание da Vinci Super

Страница 1: ...de Safety Precautions Product instructions Unboxing and Installation Product specification Function Operation and Instructions Setting Print Supporting information ENG da Vinci Super 3D printer Septem...

Страница 2: ...rking in a well ventilated and open area to ensure operational comfort Do not leave the product or power cord to unattended children Otherwise personal injury or electric shock might occur Use the pro...

Страница 3: ...of the printing module The printing quality and printer operation as well as the measurement of the printing bed may be affected When this happens clean the printing module with the wire brush When p...

Страница 4: ...foam situated behind the front door Plug in the power cord Remove the top cover Remove the side of the carton Remove all tape from the body 4 pieces in total Insert the guide tube through the top cove...

Страница 5: ...inting bed calibration Print head diameter Print material Language Connection method Printing software File format Operation System FFF fused filament fabrication 511 581 670 mm 35 5kg Front feeding m...

Страница 6: ...Vinci Super Function Operation and Instructions USB printing 1 Check if the USB drive is plugged to the machine 2 Tap the USB Printing Menu in the main screen 3 Select the file 3w file to print 4 Chec...

Страница 7: ...nfirm the operation 7 Once the print head extrudes filament in a continuous thread loading is complete After the filament is loaded tap to confirm 5 Insert the filament into the auto feed module 3 Tap...

Страница 8: ...Tap Filament Load and Unload in the main screen 3 Confirm the unloading operation 5 When the unloading operation is complete tap to confirm 2 Tap Unload and confirm the operation 4 Once the print head...

Страница 9: ...be preheated and the machine will notify you when to insert filament into the feed module 6 Check if filament has been extruded from the nozzle after confirmation the printer will resume printing 4 Re...

Страница 10: ...er to manually adjust extruder temperature printing bed temperature and filament unloading temperature The printer will automatically read the NFC chip provided on the XYZprinting filament spool to au...

Страница 11: ...starts The printing bed goes up The print head will move to the three testing points and measure them in order Once the measurement is completed the motor under the print bed will automatically adjus...

Страница 12: ...rint head Return to the Home point Always return to the Home point prior to any movement in any direction Move in the X axle direction Move in the Y axle direction Move in the Z axle direction Home po...

Страница 13: ...eaches the operating temperature the cleaning operation starts Note do not touch the metal part of the print head as it becomes hot during the operation Inset the feed hole cleaning wire into the feed...

Страница 14: ...le the print head and the mechanism After the assembly check if the print head is secured without shaking 3 Turn on and use the printer 8 Hold the print head with one hand and remove the bus with the...

Страница 15: ...l or information from the original manufacturer on the product The wireless printing only supports 2 4 GHz and requires a channel width of 20 MHz For information on adjusting the channel width refer t...

Страница 16: ...n be changed by tapping Settings Languages in the main screen 1 Open XYZware Select the Printer Monitor button at the lower right corner of the interface 2 Select Connect by IP and then enter the IP a...

Страница 17: ...to satisfy printing speed and effectiveness After editing and adjustments select Print to export the object The model file will be sectioned and then printed accordingly Visit the XYZprinting officia...

Страница 18: ...d memory error User Action Please reboot or check the print bed heater thermistor harness connection need to open back cover Please check the Flexible flat cable and reboot Please reboot or check the...

Отзывы: