www.XtremeAirUsa.com
Page 10
STEP 4: Install Chimney
.
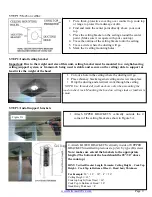
STEP 5: Attach Hood Body
Important note: first make sure your ductwork and electrical work are pulled down about 2.5 feet through
the ceiling and ready to go
HINT: Due to the heavy weight of this range hood, use vertical jack to lift and
the hold it place while screwing is highly recommend it.
STEP 5: Drop down outer Chimney
1.
Hold outer chimney and remove the screw driver
2.
Slightly drop outer chimney down until it perfectly sits on the hood body.
Note:
To avoid scratching the chimney, extend the lower or outer chimney
slowly
and
carefully
to the hood body.
1.
Feed electrical and ducting work through chimneys
2.
Place the base of the hood directly under the support brackets
3.
Screw hood to the support brackets on all 4 corners as show
(5A)
4.
Connecting the pipe (5B)
1.
Slide inner and outer chimney sleeve over support
brackets, covering the ceiling bracket
2.
Screw inner chimney into place at the top of ceiling
bracket
3.
Lift the outer chimney all the way up to ceiling, USE
screw driver to hold it from falling down


