


Page 19
mAINTENANCE AND qUICK bREAK DOWN GUIDE
n
Adjusting Gear Mesh
When you change pinion gears, you must readjust the gear mesh to ensure proper operation. If the gear mesh is too loose, the gears
may strip out. If the gear mesh is set too tight, the gears will bind, causing damage to the gears and/or the motor.
q
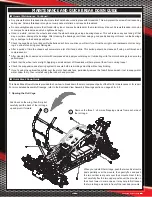
Remove the two 3 x 8mm machine screws that hold the main gear plate to the top
of the motor mount, then pull the motor and motor mount off the centre differential.
q
Remove the four 3 x 12mm machine screws that hold the motor to the motor mount,
then adjust the mounting position of the motor based on the size of the pinion gear
you're using. If you're using an XTM Racing 12T pinion gear, rotate the motor to the
right two holes. If you're using an XTM Racing 13T pinion gear, rotate the motor to
the right one hole. When reinstalling the motor, make sure to tighten the four mounting
screws firmly.
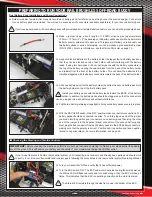
If you're using a pinion gear other than 12T, 13T or 14T, you can fine-tune the gear mesh by using two screws to hold the motor in
place instead of the standard four. Use one screw in the adjustment slot and a second screw in the centre hole directly opposite
the adjustment slot. You can then loosen both screws, pivot the motor to the desired position, then tighten the screws firmly. You will
need to reinstall the motor and motor mount assembly, then double-check the gear mesh. If it's not correct, remove the motor and motor
mount assembly, readjust the motor, then reinstall the assembly and check the gear mesh again. Repeat until you're satisfied that the
gear mesh is correct.
The gear mesh should be set so that there is very slight play between the pinion gear and the spur gear. If you're using either of
the XTM Racing 12T, 13T, or 14T pinion gears, the gear mesh is set correctly based on the particular motor mounting holes you
install the motor into. If using other brand pinion gears, you may have to experiment with the mounting hole positions.
After adjusting the position of the motor, you will need to pivot the motor heat-sink so that the top of the heat-sink is parallel with
the top of the motor mount. You can pivot the heat-sink by simply grasping it with your hand and twisting it. This will prevent the
heat-sink from interfering with the main gear plate or the chassis side frame when reinstalled.
13T
14T
12T
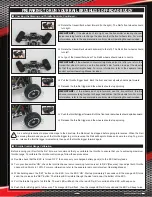
q
Unplug the motors wires from the ESC, then unplug the two motor heat-sink fans
from the Y-Harness adapter.
q
Unplug the throttle channel lead from the receiver, then pull it out from below the
motor heat-sink fans.
q
Remove the two 4 x 12mm self-tapping screws and the two 4 x 10mm machine screws
from the bottom of the chassis that hold the centre differential and motor mount in
place, then pull the motor assembly out.
q
Reinstall the motor assembly onto the centre differential, then refit it into the chassis. Installation is the reverse of the disassembly
procedure.
When you reinstall the parts, make sure to run the throttle channel lead under the two motor heat-sink fans and secure it to the
main gear plate, using two small cable ties (not included), to prevent it from coming into contact with the spur gear.
n
General Maintenance
Following a simple maintenance schedule will ensure that your Rail Brushless Off-Road Buggy operates in top condition every time
you use it. It is strongly recommended.
l
Check the chassis for any loose screws, especially the motor pinion gear and the differential pinion output joint grub screws. Tighten
them if necessary.
Continued On Next Page