background image


The Future Starts Now


12 

OXY 70 

10. Datalogger function 

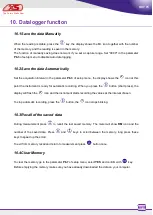
10.1 Save the data Manually 

When the reading is stable, press the 

  key, the display shows the M+ icon together with the number 

of the memory, and the reading is saved in the memory. 

The function of manually saving does not work if you set a capture range. Set "00.00" in the parameter 

P6.3

 of setup menu to disable Auto data logging. 


10.2 Save the data Automatically 

Set the acquisition interval in the parameter 

P6.3

 of setup menu, the display shows the 

  icon at this 

point the instrument is ready for automatic recording. When you press the 

  button (short press), the 

display will flash the 

  icon and the instrument starts recording the values at the interval chosen. 

To stop automatic recording, press the 

  button, the 

  icon stops blinking. 


10.3 Recall of the saved data 

During measurement press 

  to recall the last saved memory. The meter will show 

RM

 icon and the 

number  of  the  saved  data.  Press 

  and 

  keys  to  scroll  between  the  memory,  long  press  these 

keys to speed up the scroll. 

To exit from memory recall and return to measurement press 

  button once. 

10.4 Clear Memory 

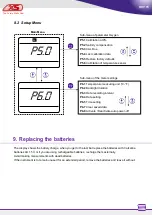
To clear the memory go to the parameter 

P6.7

 of setup menu, select 

YES

 and confirm with 

  key. 

Before emptying the memory make sure you have already downloaded the data on your computer. 


Содержание OXY Series

Страница 1: ...OXY 70 _ Ver 1 0 _ 02 2017 Serie OXY Portable oximeter OXY 70 Optical sensor O2 mg l Temp mbar The Future Starts Now...

Страница 2: ...calibration GLP function 6 4 Dissolved oxygen measurement 7 4 1 Before starting 7 4 2 Methods of measurement 7 4 3 Making the measurement 7 4 4 Compensation of the barometric pressure 7 4 5 Salinity c...

Страница 3: ...B connection 13 12 Calibration of temperature sensor 14 12 1 Useful information 14 12 2 Calibration procedure 14 13 Technical specifications 15 14 Accessories and spare parts 16 15 Disposal of electro...

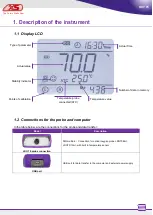
Страница 4: ...sfer Model Description LDO 70 probe connection DIN multipin Connection for optical oxygen probe LDO70 2mt LDO70 10mt with built in temperature sensor USB port USB port for data transfer to the compute...

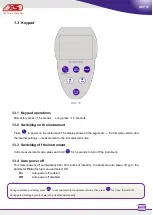
Страница 5: ...3 Switching off the instrument In the measurement mode press and hold for 3 seconds to turn off the instrument 1 3 4 Auto power off This meter powers off automatically after 20 minutes of inactivity...

Страница 6: ...mg l mbar Momentary press During measurement press to enter setup During calibration press to confirm when stable During setup press to select confirm the program Momentary press During measurement pr...

Страница 7: ...ven at low dissolved oxygen readings LDO70 sensor 2 1 Measuring principle On a membrane permeable to oxygen has been fixed a chemical substance called luminophore Inside the sensor a light source puls...

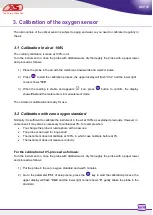
Страница 8: ...e The oximeter is calibrated and ready for use 3 2 Calibration with zero oxygen standard Normally it is sufficient to calibrate the instrument in the air at 100 as explained previously However in some...

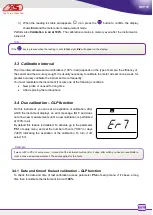
Страница 9: ...ion GLP function On this instrument you can set an expiration of calibration after which the instrument displays an error message Er 7 and does not allow new measurements until a new calibration is pe...

Страница 10: ...solved O2 Concentration expressed in mg L equivalent of ppm mg L ppm During measurement press key to change measuring method 4 3 Making the measurement Remove the electrode from the protective cap rin...

Страница 11: ...robe LDO70 If the instrument does not calibrate or reading does not stabilize it is necessary to perform a maintenance of the probe in the following way 1 Check that the luminophore is clean in case r...

Страница 12: ...hore 6 The reading is out of the measuring limits Check the connection between the probe and the instrument Check the integrity of the probe Perform a new calibration Calibration expired Perform a new...

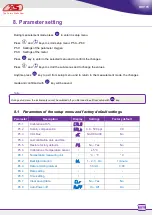
Страница 13: ...will be saved 8 1 Parameters of the setup menu and factory default settings Parameter Description Display Settings Factory default P5 1 Calibration at 0 0 P5 2 Salinity compensation 0 0 50 0 ppt 0 0 P...

Страница 14: ...rument is to remain unused for an extended period remove the batteries and leave it without Main Menu P5 1 Calibration at 0 P5 2 Salinity compensation P5 3 CAL Due P5 4 Last calibration data P5 5 Rest...

Страница 15: ...for automatic recording When you press the button short press the display will flash the icon and the instrument starts recording the values at the interval chosen To stop automatic recording press t...

Страница 16: ...and follow the wizard to install in order USB port Driver DataLink Software 70 The software DataLink 70 is available freely from www xsinstruments com 11 3USB connection Turn on the instrument connect...

Страница 17: ...atic bath pre thermostated together with the reference thermometer Wait 10 minutes for the stability if the reading is equal to the reference sensor 0 5 C then it is not necessary to perform any calib...

Страница 18: ...C 0 0 60 0 C Resolution 0 1 C 0 1 C Accuracy 0 5 C 0 5 C Automatic and manual temperature compensation Yes Yes only automatic Salinity measuring range 0 50 ppt 0 50 ppt Salinity compensation Yes manu...

Страница 19: ...O70 2MT LDO70 10MT 50010292 Standard zero 0 Oxygen single use 1 bottle for DO7 3MT LDO70 2MT LDO70 10MT For more accessories and spare parts visit the website www xsinstruments com 15 Disposal of elec...

Отзывы: