Xpress MXP5223TLT Скачать руководство пользователя страница 10

10

Manual Cooking

Note: Manual cooking must be enabled in user options, see page 18)

Use manual cooking when a specific entered time and cooking power levels are desired. It’s very useful when you are 

experimenting with new food items. Maximum cook time is 100 minutes. Microwave, fan and IR can be set to 11 different 

power levels between 0-100% with 10% increments.

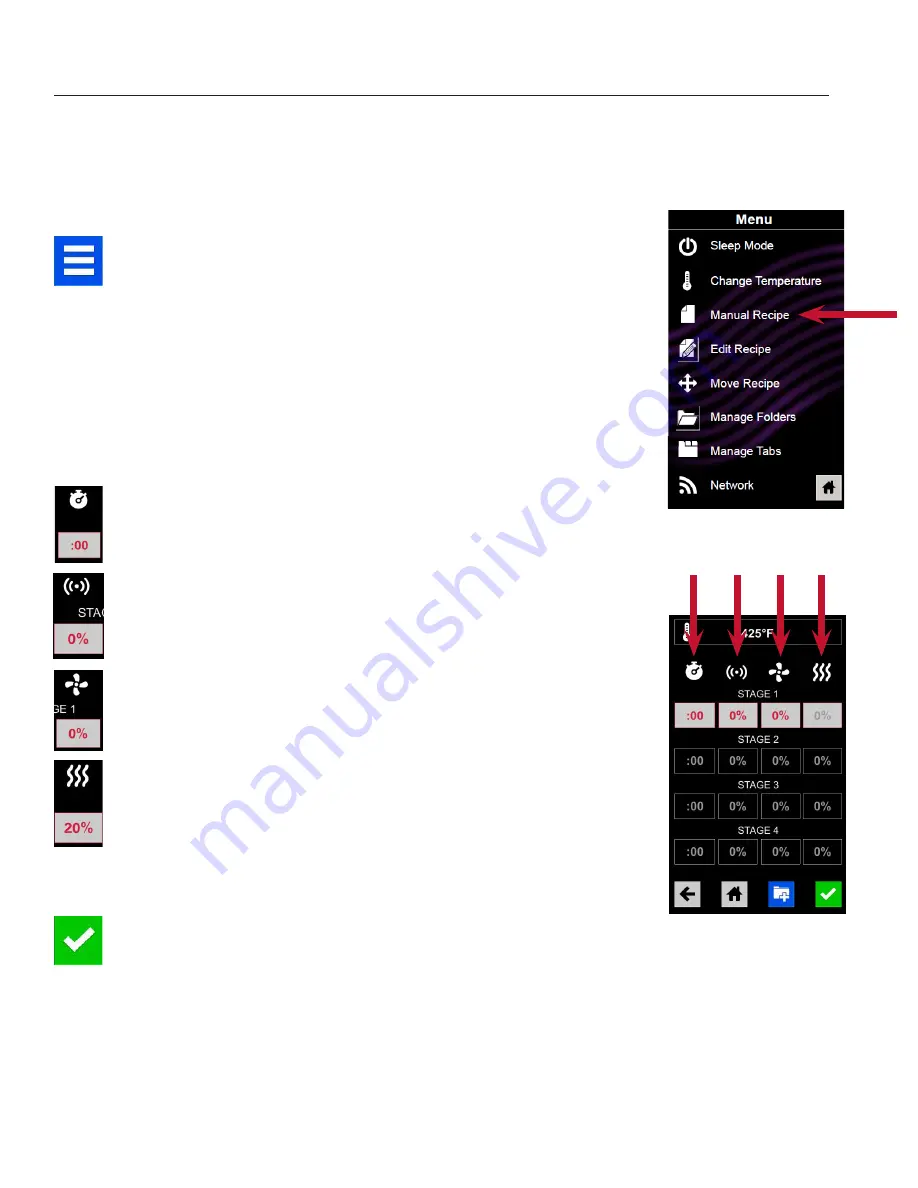
1.  After the oven has preheated to a desired temperature (200-

520°F / 95-270°C), touch the blue menu icon.   

2.   Touch the “Manual Recipe” option.

3.  To change the cooking temperature for the recipe from the 

standard defualt temperature, touch the temperature icon at 

the top and input a new temperature. Two frequently used 

temperatures will appear at the top for quick selection. Touch the 

green checkmark after inputing a temperature.

4.  For Stage 1, enter the cooking time by touching the time entry 

box (up to 60 minutes). Enter the time using the number pad that 

will appear, then touch the “OK” icon.

4.  Select the desired microwave power by touching the microwave 

power entry box. Choose from options ranging from 0% - 100% 

in increments of 10. 

5.  Select the desired fan speed by touching the fan speed entry 

box. Choose from options ranging from 0% - 100% in increments 

of 10. 

6.  Select the desired infra-red power by touching the infra-red 

power entry box. Choose from options ranging from 0% - 100% 

in increments of 10. 

7.  Repeat steps 2-6 for each cooking stage, if more than one 

cooking stage is necessary.

8.  Open the oven door and place the food in the oven, then touch 

the green checkmark icon to begin cooking. 


The display will return to the manual input screen at the end of 

the cycle. See instructions on page 11 to save and create a new 

menu item from manual cook.


2

3-7

Time  MW Fan IR

Содержание MXP5223TLT

Страница 1: ...ence If the equipment changes ownership be sure this manual accompanies equipment Please refer to the SAFETY INSTRUCTIONS for important safety information prior to using this oven Owner s Manual HIGH...

Страница 2: ...grounded Grounding reduces risk of electric shock by providing an escape wire for the electric current if an electrical short occurs This oven is equipped with a cord having a grounding wire with a g...

Страница 3: ...e oven To remove simply slide out 4 Touch Screen Display Display provides user interface Use for time input programming and oven operation 5 ON OFF Key Use to turn oven on 6 USB Port Protective Cover...

Страница 4: ...around top of oven Proper air flow around oven cools electrical components With restricted air flow oven may not operate properly and life of electrical parts is reduced B There is not an installatio...

Страница 5: ...ready to serve foods cut vegetables or soups f Pizza Stone ST10X Aids in crisping and browning breads and pizzas g Panini Grill Accessory GR10 or JR10 Aids in adding grill marks on a product 4 The mo...

Страница 6: ...main screen Green Checkmark Icon Press to begin cooking after manually entering a recipe Save Back Icon Press to return to previous screen Delete Icon Press to delete Time Entry Indicates the time en...

Страница 7: ...or the desired recipe Pause Icon Press to pause a cook cycle Stop Icon Press to stop and return to the main screen Tab Icons Used to organize programmed recipes Example AM or PM menus Folder Icons Use...

Страница 8: ...re Manual Recipe Manually enter settings for a recipe Edit Recipe Change current oven temperature Move Recipe Move reorganize individual programmed recipes Manage Folders Add or edit recipe folders Ma...

Страница 9: ...ted to the desired temperature open the oven door place food in oven and close door 2 Scroll to choose desired food item from the menu and touch the food item you wish to cook The cook cycle will begi...

Страница 10: ...inputing a temperature 4 For Stage 1 enter the cooking time by touching the time entry box up to 60 minutes Enter the time using the number pad that will appear then touch the OK icon 4 Select the de...

Страница 11: ...Touch the green checkmark to confirm or touch the X to dismiss 4 Note Skip this step if you do not want to cook anything Open the oven door and place the food in the oven then touch the green checkma...

Страница 12: ...b App See the Web App User Guide for instructions on how to do this 4 Touch the desired XML file to be uploaded 5 Once the file has uploaded touch the Home icon to return to the main screen Settings a...

Страница 13: ...g in information Username ACP_MXP Password Express 7 The oven and computer are now connected 1 After connecting the computer to the oven and logging in click on the Upload Recipes tab 2 Upload the zip...

Страница 14: ...new folder Note You may also make folder changes in the ACP Web App 1 Touch the blue menu icon at the bottom of the screen 2 Touch the Manage Folders option in the menu screen 3 Touch the desired fol...

Страница 15: ...e desired text and touch the green checkmark to save Relocate the tab Touch the Move Tab Right or Move Tab Left option Delete the tab Touch the Delete Tab option 4 After changes have been made touch t...

Страница 16: ...d detergent and warm water solution 1 Shut oven off by pressing ON OFF button Open the door for cooling The fan will run for a few minutes to cool the oven interior faster Let the oven interior reach...

Страница 17: ...dium or potassium hydroxide lye DO NOT use a water pressure type cleaning system DO NOT cook foods with plastic wrap on them DO NOT use abrasive scouring pads to clean ceramic side covers and the red...

Страница 18: ...hinese Mandarin Japanese Korean Russian German French Italian Polish Danish Greek Latin Swedish Portuguese Spanish Thai Lao Dutch Vietnamese Arabic Ukrainian Filipino Norwegian Hindi Bengali Temperatu...

Страница 19: ...uit Check fuse or breaker Oven operates intermittently Check air filters and discharge air vents If oven does not accept entries when pad is pressed Make sure oven is preheated Open and close door pre...

Отзывы: