background image

4 x Tricolor Programming LEDs

(red, green, orange)

Tricolor Status LED
Green - Access Granted
Red - Access denied
Orange - Idle Mode

OK Beep

- short + long beep

- 3 short beeps

Error Beep

Swipe Again - 2 short beeps

Follow the below instructions for correct finger swiping
Starting from the first finger joint, place the selected finger on the swipe
sensor and move it evenly towards oneself in one steady movement.

Result:

For a valid swipe: Tricolour Status LED turns green + OK Beep(short +
long beep)
For an invalid or misread swipe: Tricolour Status LED turns red + Error
Beep ( 3 short beeps)

Tap the sensor to enter Submenu or to confirm a command

Enter and confirm

Scroll the sensor DOWN to navigate the programming menu

Scroll the sensor UP to exit the programming menu

Navigate the Programming Menu

Exit the Programming Menu

6

6.0 R

S

T

ECOMMENDED WIPING ECHNIQUE

6.1 Taping the sensor

6.2 Scrolling the sensor up and down
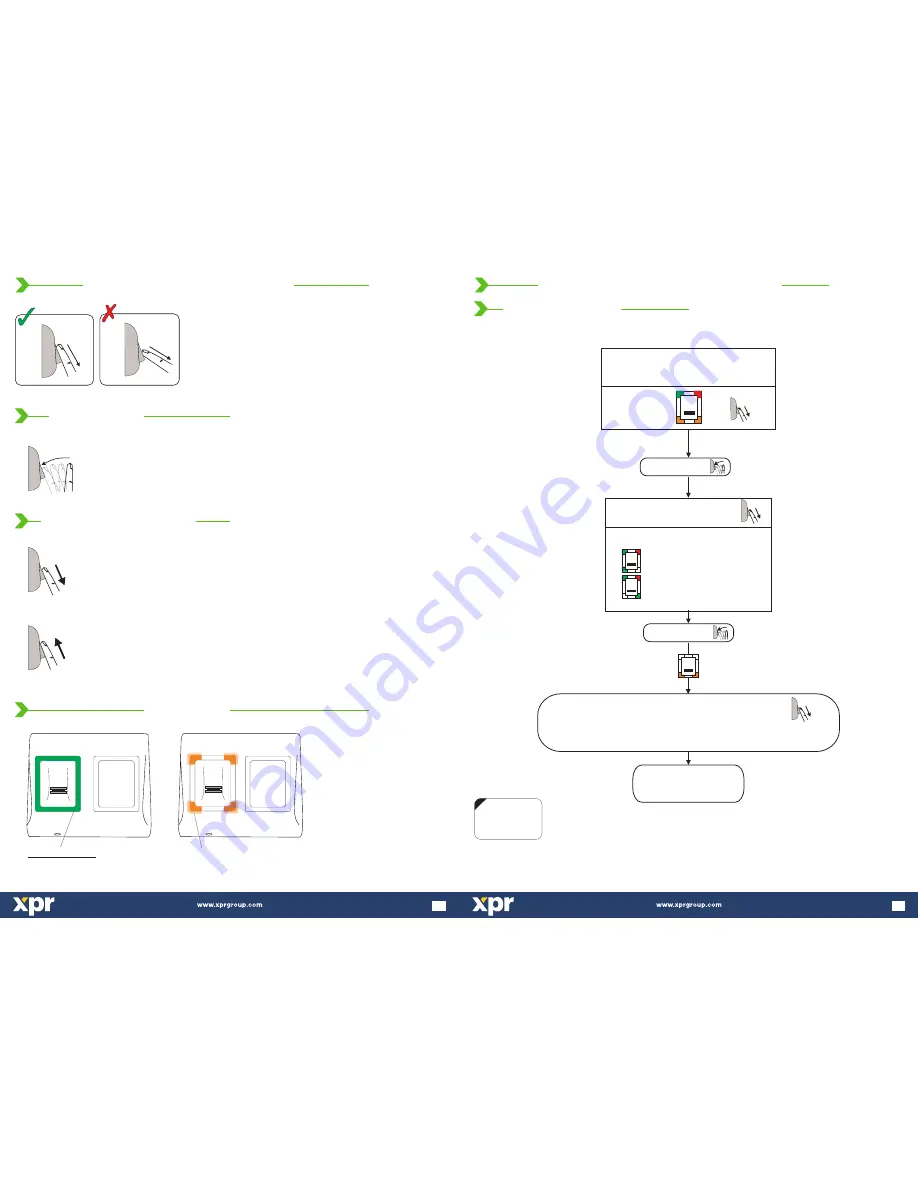
7.0 INDICATION

Select Admin nr.

(Orange Blinking)

Admin 1

Admin 2

Scroll down to select:

BL

BL

BL

Back to MAIN MENU

(to Add User menu)

Swipe the Master/Admin finger

unl

12 mes

the light pa ern on figure.10 is shown

Figure.10

Swipe the Admin finger

(Unl Ok beep)

min.6 mes.

Tap sensor

Tap sensor

x 12

x 6

- There is 1 Master Finger. The master finger can enroll/delete user and all the other se ngs.
- The Master finger can be changed ONLY with the jumper.
- There are 2 Aministrator Fingers. The administrator can do all the things that Master can do. The Master can delete the Administrator,
but the Administrator can not delete the Master.

NOTE:
Swipe UPWARDS
to exit the MENU

15

11.0 B100PROX-MF-SA P

M

ROGRAMMING

ENU

11.6 Add Administrator

Содержание B100PROX-MF-SA

Страница 1: ...MENU Blinking row BL BL BL BL BL BL BL BL Swipe the Master Admin nger 9 mes Tap sensor Tap sensor x 9 x 8 Tap sensor Tap sensor NOTE Swipe UPWARDS to exit the MENU Example Task Put Relay1 to stay ac...

Страница 2: ...dd Administrator 11 7 Delete Administrator 11 8 Settings 11 8 1 Double Swipe Unlocks Door Entry Mode Remote Relay Touch Function 11 8 2 Buzzer Sound Backlight Reset to defaults 11 9 Set Door Relay Tim...

Страница 3: ...ace of the TouchChip sensor provides protection from scratching and abrasion due to normal contact with fingertips and any incidental contact with fingernails The reader is capable of working in so ca...

Страница 4: ...ia converter and windows application R 485 S 150 mA max 9 14 V DC Tricolor Status LED and 4 x Programming LEDs Flush mount IP65 20 C to 50 C 5 to 93 RH without condensation 100 x 94 x 30 N 1 O COM N 1...

Страница 5: ...amp Blue Yellow Red Black Pink Violet Orange Gray White PB R 485 S _ 12VDC POWER SUPPLY _ NC COM GND PB PB _ Electro Magnetic Lock Green Blue Yellow Red Black Pink Violet Orange Gray White Green Colou...

Страница 6: ...sensor UP to exit the programming menu Navigate the Programming Menu Exit the Programming Menu 6 6 0 R S T ECOMMENDED WIPING ECHNIQUE 6 1 Taping the sensor 6 2 Scrolling the sensor up and down 7 0 IN...

Страница 7: ...r Groups With the Quick programming feature the Users are assigned in Group 1 or Group 2 For most of the installations 2 groups are enough and can be used as Group 1 for permanent residents Group 2 fo...

Страница 8: ...When using proximity reader for Finger Or And Card Mode first present the Card then swipe the finger min 6 times With this the quick programming is completed The system is now operational with default...

Страница 9: ...the Reader in Finger ON Card mode Follow the procedure on page 16 17 1 Swipe the Master or Admin Finger twice 2 Swipe the user finger min 6 times until Ok Beep 3 Present the Card and hold it in the p...

Страница 10: ...stand activation in longer periods 12 VDC 1N4007 RTT Black Red Pink Violet Black Brown Pink Violet Red White Yellow COM NO GND 12V out A RS485 B RS485 B100PROX MF SA Black Red Pink Violet B R 48 5 S 1...

Отзывы: