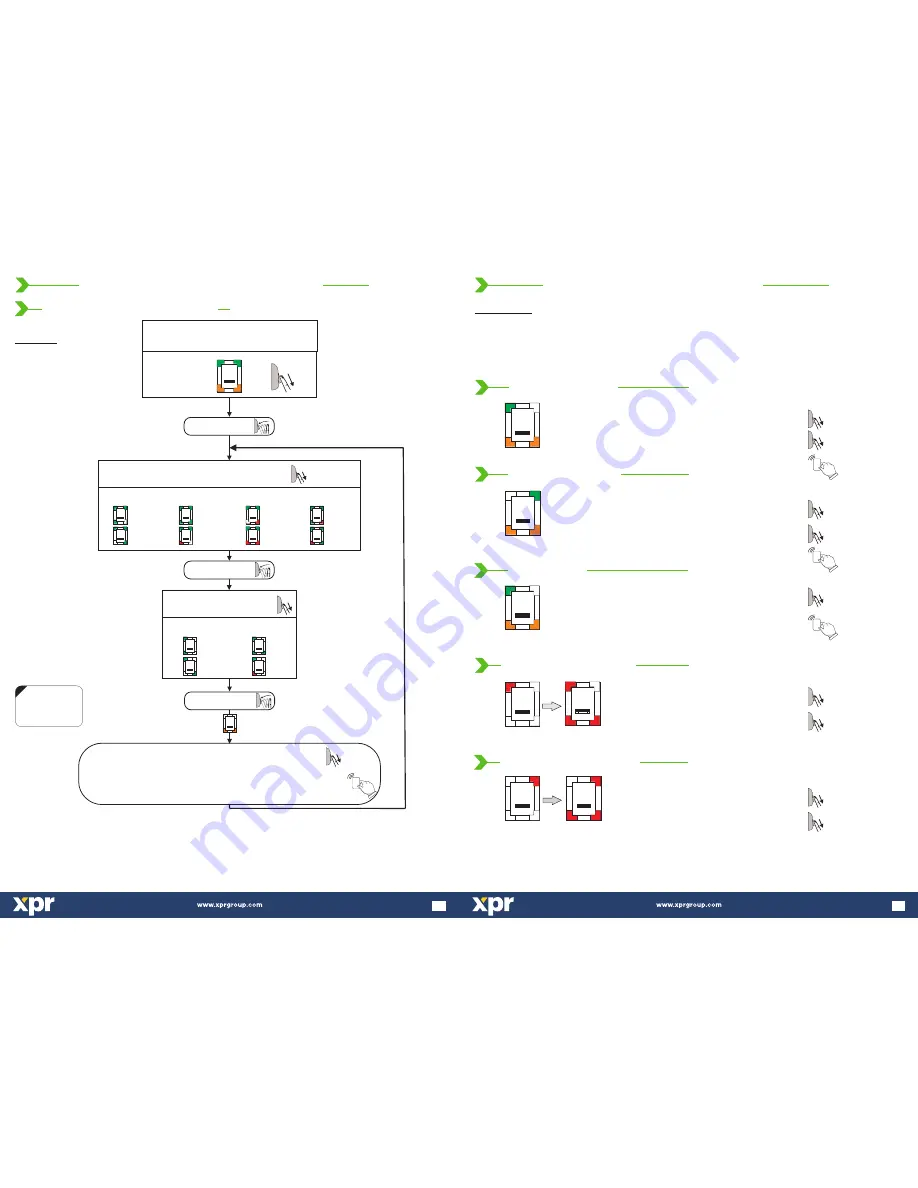
Select User Group
(Orange Blinking)
Group 1
Group 2
Group 3
Group 4
Group 5
Group 6
Group 7
Group 8
Assign Relay Output
Relay 1
Relay 2
Both
None
Swipe the finger to select:
Swipe the finger to select:
BL
BL
BL
BL
BL
BL
BL
BL
BL
BL
BL
BL
BL
BL
Swipe the Master/Admin finger
unl
5 mes
the light pa ern on figure.9 is shown
Figure.9
Swipe the user finger
(Unl Ok beep).
min.6 mes
The backlight starts to blink green and the buzzer beeps.
Present the Card and hold it in the proximity field unl OK beep,
which is indicaon that the finger enrolled is wri en in the card.
Tap sensor
Tap sensor
Tap sensor
x 6
NOTE:
Swipe UPWARDS
to exit the MENU
In “Finger on Card” mode, the fingerprint is stored only into the Mifare card (Mifare Classic 1K/4K or DesFire) and not in the reader. The matching is done by first
presenting the card, then swiping the finger.
Only one user finger can be stored in any type of Mifare card, irrespective to cards memory. Total fingerprint capacity of the system is limited to 97 fingerprints.
Example:
Task: Add a user in Group2, that will acvate Relay1.
Scroll Master Finger 5 mes, tap, scroll ones, tap, tap, swipe user finger 6 mes, present the card, swipe UP to exit.
x 5
11.0 B100PROX-MF-SA P
M
ROGRAMMING
ENU
11.2 Adding Users in Finger ON Card Mode
12
Important Note:
Before enrolling Finger ON Card, put the
Reader in Finger ON Card mode.
Follow the procedure on page 16/17.
1. Swipe the Master or Admin Finger
twice
2. Swipe the user finger min. 6 times (until Ok Beep)
3. Present the Card and hold it in the proximity field
(until OK beep)
1. Swipe the Master or Admin finger
,
3 times
2. Wait 6 seconds for the light pattern on fig.4
3. Swipe the Master or Admin finger once more
Figure.1
Figure.2
6 sec.
6 sec.
1. Swipe the Master or Admin Finger
2. Swipe the user finger min. 6 times (until Ok Beep)
3. Present the Card and hold it in the proximity field
(until OK beep)
Master Finger x 1
User Finger x 6
Master Finger x 2
User Finger x 6
Figure.1
1. Swipe the Master or Admin Finger
2. Present the card
Master Finger x 1
Master Finger x 3
Master Finger x 1
wait 6 seconds
1. Swipe the Master or Admin finger
,
4 times
2. Wait 6 seconds for the light pattern on fig.6
3. Swipe the Master or Admin finger once more
Master Finger x 4
Master Finger x 1
wait 6 seconds
Note: All fingers that are enrolled in Group 2 will be deleted.
Note: All fingers that are enrolled in Group 1 will be deleted.
Figure.4
Figure.6
9
8.7.1 Add User In Group 1
8.7.2 Add User In Group 2
8.7.5 Delete All Users in Group 2
8.7.4 Delete All Users in Group 1
8.7.3 Delete User
8.7 Quick Programming in “Finger ON Card” Mode
Important Note:
Before enrolling in “Finger ON Card” mode, put the Reader in “Finger ON Card” mode.
Follow the procedure on page 17/18.
Swipe the Master/Admin finger
tap, swipe, swipe, tap, swipe 6 mes, tap,
10 mes;
swipe UPWARDS to exit the MENU


