4
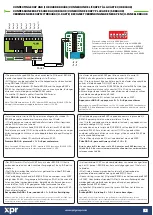
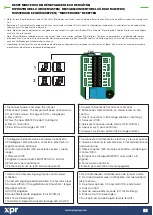
CONNECTING EX6P AND I/O BOARD RB0408/ CONNEXION DE L'EX6P ET À LA CARTE I/O RB0408/
CONNESSIONE EX6P E SCHEDA I/O RB0408/ CONEXIÓN DE EX6P Y PLACA DE E/S RB0408/
VERBINDEN DES EX6P MIT RB0408 I/O-KARTE/ BEZIG MET VERBINDING MAKEN EX6P EN I/O-PANEEL RB0408
R
S
4
8
5
TA
M
P
R
E
LA
Y
1
R
E
LA
Y
2
TAMP2
TAMP1
12V/24V
AC/DC
PB1
PB2
GND
NO1
NC1
COM1
P
O
W
E
R
P
U
S
H
B
U
T
TO
N
S
G
R
E
E
N
LE
D
NC2
NO2
COM2
A
B
GND
R
E
D
L
E
D
1
GND
GND
FI3
FI4
OK
Pow
TERM
A
B
COM
GND
+12V
FI1
01
02
03
04
05
06
07
08
2
3
4
5
6
DIP
ON
NO4
NC4
NO3
NC3
NO2
NC2
NO1
NC1
RS485 termination
Inputs mode
SW4 address
SW3 address
SW2 address
SW1 address
Outputs state LED
S
W1
S
W2
S
W3
S
W4
ID
O
N
O
F
F
O
F
F
O
F
F
O
F
F
0
O
F
F
O
F
F
O
F
F
O
F
F
1
2
3
4
5
6
7
8
9
10
1
1
12
13
14
15
O
F
F
O
N
O
F
F
O
F
F
O
N
O
N
O
F
F
O
F
F
O
F
F
O
F
F
O
N
O
F
F
O
N
O
F
F
O
N
O
F
F
O
F
F
O
N
O
N
O
N
O
F
F
O
N
O
N
O
N
O
F
F
O
F
F
O
F
F
O
F
F
O
N
O
N
O
N
O
F
F
O
F
F
O
F
F
O
N
O
F
F
O
N
O
N
O
N
O
F
F
O
N
O
F
F
O
F
F
O
N
O
N
O
F
F
O
N
O
N
O
N
O
F
F
O
N
O
N
O
N
O
N
O
N
O
N
O
N
RB0408
Relay board
FI1
FI2
FI3
FI4
RS485
NC5
NO5
NC6
NO6
NC7
NO7
NC8
NO8
RELAY1
RELAY2
RELAY3 RELAY4
RELAY5 RELAY6
RELAY7 RELAY8
GND
B
A
RS485
EX6P
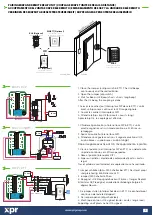
The proximity keypad EX6P can be connected to I/O board - RB0408
in order to expand the number of outputs to 10 relays.
All 10 relays can be controlled from the keypad and can be activated
using PIN Code OR/AND Card.
The connection between I/O Board RB0408 and the keypad EX6P is
RS485. For shorter distances(10-20m) you can use any cable, for longer
distances use twisted pair qualified RS485 cable.
To use the I/O board, enable it from the EX6P menu:
Press 000 + B; press 5 + 1 + A + B to confirm.
Note: The I/O board works on 12 VDC, whereas EX6P works on 12/24 VAC/DC. Do
not apply the same power supply to both units unless is 12 VDC.
R
ela
y 3
R
ela
y 4
R
ela
y 5
R
ela
y 6
R
ela
y 7
R
ela
y 8
R
ela
y 9
R
ela
y 10
R
ela
y 2
R
ela
y 1
ON
1
2
3
4
5
6
Le clavier de proximité EX6P peut être connecté à la carte I/O -
RB0408 afin d'augmenter le nombre de sorties à 10 relais.
Les 10 relais peuvent être contrôlés à partir du clavier et peuvent être
activés à l'aide du code PIN OU/ET de la Carte.
La connexion entre la carte I/O RB0408 et le clavier EX6P est de type
RS485. Pour des distances plus courtes (10 à 20 m), vous pouvez
utiliser n'importe quel câble. Pour des distances plus longues, utilisez
un câble de couplage torsadé RS485.
Pour utiliser la carte I/O, activez-la à partir du menu EX6P :
Appuyez sur 000 + B ; appuyez sur 5 + 1 + A + B pour confirmer
Remarque : La carte I/O fonctionne sur 12 V CC, tandis que l’EX6P fonctionne sur
12/24 VAC/CC. N'appliquez pas la même tension aux deux unités à moins qu’elle
soit de 12 V CC.
La tastiera di prossimità EX6P può essere collegata alla scheda I/O -
RB0408 per poter espandere il numero di uscite a 10 relè.
I 10 relè possono essere controllati dalla tastiera e attivati tramite un
codice PIN E/O con una scheda.
Il collegamento tra la scheda I/O RB0408 e la tastiera EX6P è RS485.
Per distanze più corte (10-20 m) è possibile utilizzare qualsiasi cavo, per
distanze maggiori utilizzare un cavo doppio intrecciato qualificato per
RS485.
Per utilizzare la scheda I/O, abilitarla dal menu EX6P:
Premere 000 + B; premere 5 + 1 + A + B per confermare
.
Nota: La scheda I/O funziona a 12 VDC, mentre la EX6P funziona a 12/24 VAC/DC.
Applicare ad entrambe le unità la stessa alimentazione di 12 VDC.
El teclado de proximidad EX6P se puede conectar a la placa de E/S
RB0408 para ampliar el número de salidas a 10 relés.
Los 10 relés se pueden controlar desde el teclado y se pueden activar
mediante código PIN O/Y tarjeta.
La conexión entre la tarjeta de E/S RB0408 y el teclado EX6P se realiza
mediante RS485. Para distancias cortas (10-20 m) puede utilizar
cualquier cable; para distancias más largas utilice un cable RS485 de
par trenzado homologado.
TPara utilizar la placa de E/S, actívela desde el menú de EX6P:
Pulse 000 + B; para confirmar, pulse 5 + 1 + A + B.
Nota: La placa de E/S funciona con 12 V CC, mientras que EX6P funciona con
12/24 V CA/CC. No conecte la misma fuente de alimentación a ambas unidades,
salvo que sea de 12 V CC.
Der RFID-Leser mit Tastatur EX6P kann mit einer RB0408 I/O-Karte
verbunden werden, um die Anzahl der Ausgänge auf bis zu 10 Relais zu
erhöhen.
Die 10 Relais werden über die Tastatur gesteuert und über PIN-Code
ODER/UND Karte aktiviert.
Die Verbindung zwischen der RB0408 I/O-Karte und dem Leser EX6P
erfolgt über RS-485. Für geringere Entfernungen (10-20 m) können alle
Arten von Kabel verwendet werden, bei größeren Entfernungen muss
ein verdrilltes, für RS-485 geeignetes Kabel, verwendet werden.
Bevor die I/O-Karte verwendet werden kann, muss sie über das EX6P
Menü aktiviert werden:
Dazu geben Sie 000 + B ein; und dann 5 + 1 + A + B zur Bestätigung.
Bitte beachten: Die I/O-Karte benötigt eine Spannungsversorgung von 12 VDC, der EX6P-Leser
jedoch 12/24 VAC/DC. Die beiden Geräte dürfen nur an dieselbe Spannungsversorgung
angeschlossen werden, wenn es sich um 12 VDC handelt.
Het toetsenbord EX6P van de nabijheidslezer kan worden aangesloten
op het I/O-paneel - RB0408 om het aantal uitgangen naar 10 relais uit
te breiden.
Alle 10 relais kunnen worden bestuurd met het toetsenbord en
geactiveerd door middel van een pincode EN/OF kaart.
De aansluiting tussen het I/O-paneel RB0408 en het toetsenbord EX6P
is RS485. Voor kortere afstanden(10-20m) kan een willekeurige kabel
worden gebruikt; gebruik voor langere afstanden een getwiste
goedgekeurde RS485-kabel.
Schakel het I/O-paneel in vanuit het menu EX6P om het te kunnen
gebruiken:
Druk op 000 + B; druk op 5 + 1 + A + B om te bevestigen.
Opmerking: Het I/O-paneel werkt op 12 V gelijkstroom, terwijl EX6P werkt op 12/24 V
wisselstroom/gelijkstroom. Pas niet dezelfde voeding toe op beide eenheden, met uitzondering
van 12 V gelijkstroom. same power supply to both units unless is 12 VDC.
Dipswitch settings: refer to RB0408 manual
Paramètres des dipswitch: consulter le manuel du RB0408
Impostazioni del dipswitch: consultare il manuale di RB0408
Ajustes de interruptores DIP: consultar el manual del RB0408
Dip-schalter-einstellungen: Siehe das RB0408 Handbuch
Instellingen dip-switch: raadpleeg de handleiding van RB0408


