background image

Installation Guide 

5

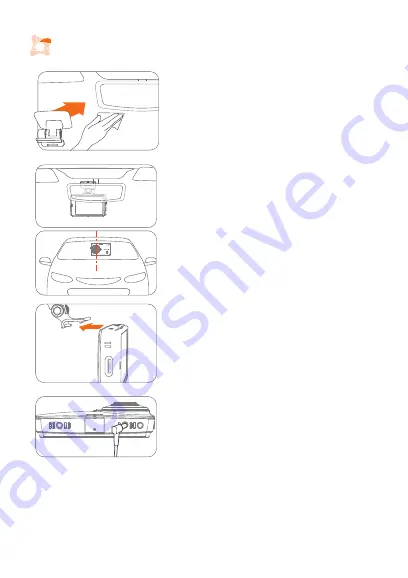
1. Install the mount

a. Clean the area on the windshield where the device will be 

installed.

b. Remove the film from the adhesive tab of the mount.
c. Attach the adhesive side of the mount to the windshield in 

an area that allows the device an unobstructed view of 

the road, but does not interfere with the driver’s view. 

2. Attach the device

a. Align the notch on the front of the device with the tab on 

the mount.

b. Tilt the device upward until it snaps into the mount.

3. Connect to power

a.  Connect  the  power  cable  to  the  DC-IN  socket  of  the 

device.

b. Plug the car charger adapter end of the power cable into 

the auxiliary power socket.

c. The device should be facing forward and be level with the 

vehicle and the road. Adjust angle by using the plastic 

roller screw. 

d. Hide the power cable by tucking it in the space between 

the windshield and headliner.

Tip 

The camera is located on the left side of the main unit 

so install the device slightly right of center behind the 

rearview mirror.

Содержание Quadblack

Страница 1: ...USER MANUAL...
Страница 2: ...cording in parking mode may result in vehicle battery drainage Switch the device off before extended parking This device is powered through the vehicle s auxiliary power socket or by hardwiring to the...

Страница 3: ...may result in an accident Do not disassemble repair or modify the device Contact the seller for repairs Any attempt to disassemble repair or modify the device will result in the cancellation of any w...

Страница 4: ...nal errors If an accident occurs turn the device off before ejecting the Micro SD Card Failure to turn off the device before ejecting the Micro SD Card may result in deleted or compromised data or rec...

Страница 5: ...le or car charger is included in each package What s Included and Optional Accessories In the Package Optional Accessories Main front camera device Rear camera device Hardwiring power cable Car charge...

Страница 6: ...ce with the tab on the mount b Tilt the device upward until it snaps into the mount 3 Connect to power a Connect the power cable to the DC IN socket of the device b Plug the car charger adapter end of...

Страница 7: ...bstructed view of the road but does not interfere with the driver s view d Attach the rear camera to the rear mount and adjust the camera angle so it is level with the vehicle and the road e Connect t...

Страница 8: ...Device Components Front lens Security LED Speaker Power LED Power switch Manual recording button GPS connection Power connection Rear camera connection Micro SD Card slot Touch screen LCD 7...

Страница 9: ...pon starting the vehicle s ignition the device s screen turns on and displays the number of motion detection and impact detection events that occurred during parking recording Auto Overwrite When memo...

Страница 10: ...cording Playback LED Location Front Security LED Rear Status Indication LED Color BLUE RED Recording signal Flashing slowly Every 2 Sec Event signal Flashing rapidly Every 1 4 Sec 9 File Folder Drivin...

Страница 11: ...oderecording System settings Select system settings Function Settings Select function settings System Settings Time Setting Set time Touch Calibration Set LCD screen calibration SD Card Format Delete...

Страница 12: ...otion detection sensitivity in parking mode Reset Reset to factory default settings LCD Screen Menu Parking mode Motion settings Set motion detection sensitivity Time lapse Turn ON OFF time lapse Low...

Страница 13: ...otionus com or www xmotion co kr 2 Click setup exe or run downloaded installation file 3 Click the shortcut icon on desktop to launch the viewer Playback 1 Click the button Select a drive or a folder...

Страница 14: ...on Manual display Minimize the window Full screen Close File list G Sensor graph Zoom in out Coordinates Latitude Longitude Select a recording mode or all G Sensor graph GPS connectivity status Unit o...

Страница 15: ...open Stop playing 1 Sec skip forward Move to the next file Playback speed x0 5 x2 Move to the previous file Default playback speed Mute Save screenshot as a jpeg file Switch display channels Audio vo...

Страница 16: ...PC viewer Micro SD Card may be infected with a virus Format the Micro SD card and try again Errors in folder or file names in PC The device must be turned off when ejecting the Micro SD Card Folder o...

Страница 17: ...264 high profile level4 1 FCWS FVSA Mic Speaker Voice Information System 3 Axis Acceleration Security 1 EA Status 1 EA 2 Button Power on off Manual REC S W Gray DC 12V 24V 10 60 98g Main Body Only 10...

Страница 18: ...n improperly disassembled or modified Device malfunction due to exposure to natural disasters such as fire earthquake flood etc Quality Assurance Malfunction caused by user Micro SD Card malfunction w...

Страница 19: ......

Страница 20: ......

Отзывы: