background image

4 Copying 

56

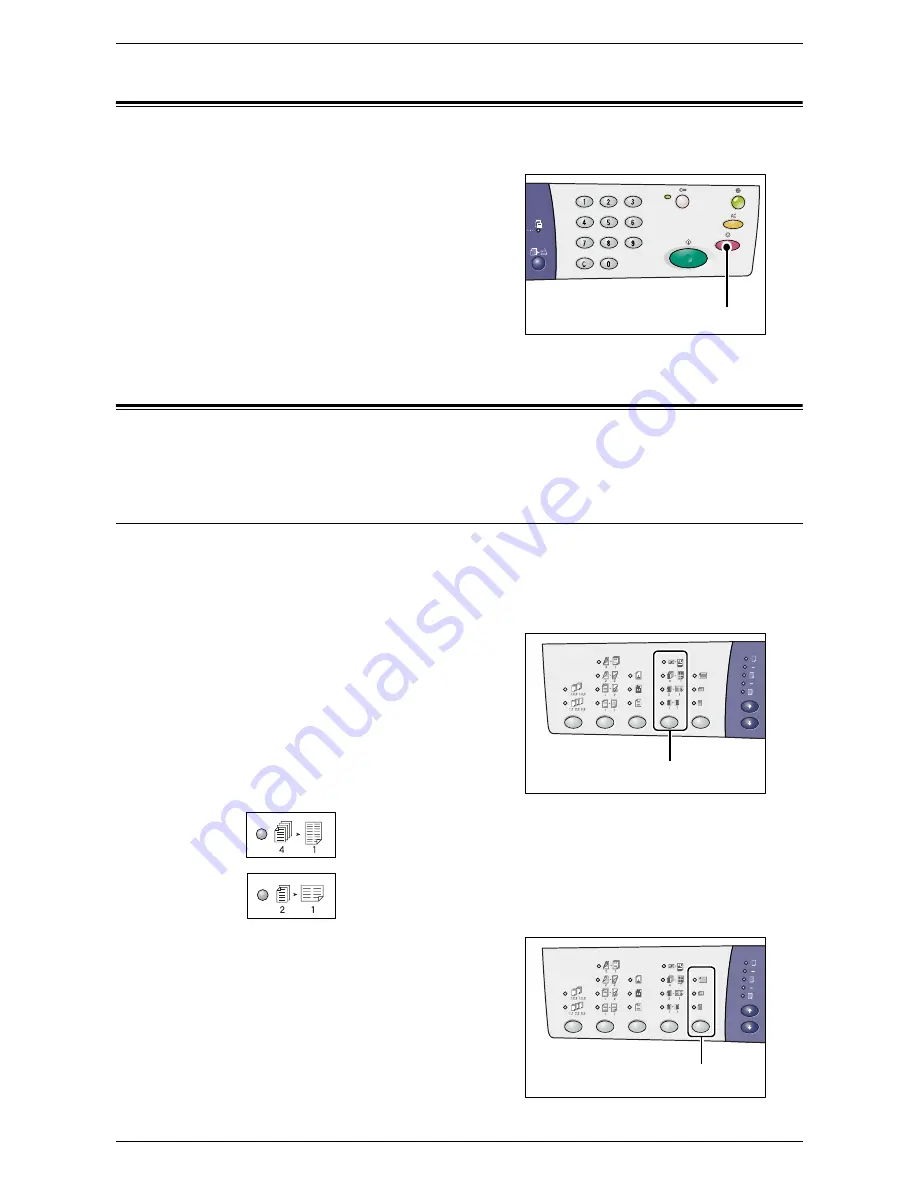
Canceling a Copy Job

The following procedure describes how to cancel a copy job. 

1.

Press the <Stop> button.

Making Special Copies

This section explains how to make copies using the N-up feature and the ID Card copy 
feature.

4-up/2-up Copies (Copying Multiple Pages onto a Single Sheet)

The following procedure describes how to copy multiple pages of documents onto one 
side of a single sheet of paper.

If using the Document Glass to scan documents

1.

Press the <N-up/ID Card Copy> button 
to select the N-up feature.

4-up

Copies four pages of the original documents onto one side of the 
sheet.

2-up

Copies two pages of the original documents onto one side of the 
sheet.

2.

Press the <Original Size> button to 
select the original document size, and 
load the document as shown in the 
charts in the following pages.

<Stop> button

<N-up/ID Card Copy>

button

<Original Size>

button

Содержание WorkCentre 5020DN

Страница 1: ...User Guide www xerox com support WorkCentre 5020 DN XE3026EN0 1...

Страница 2: ...rt Regulations An export of this product is strictly limited in accordance with Laws concerning Foreign Exchange and Foreign Trade of Japan and or the export control regulations of the United States Y...

Страница 3: ...ncy Emissions 12 Product Safety Certification 13 Regulatory Information 13 CE Mark 13 Environmental Compliance 14 USA 14 Illegal Copies 14 Battery Recycling and Disposal 15 Product Recycling and Dispo...

Страница 4: ...the Bypass Tray 43 Changing the Size and Orientation of Paper in the Trays 45 Changing the Size and Orientation of Paper in Tray 1 45 Changing the Size and Orientation of Paper in Tray 2 47 Specifyin...

Страница 5: ...N Compatible Application 77 Importing from Mailbox Viewer 3 78 Importing Using CentreWare Internet Services 79 Deleting Documents in a Mailbox 80 6 Printing 81 Print Driver Features 81 Major Features...

Страница 6: ...6...

Страница 7: ...t our experts at the Xerox Welcome Center A telephone number for the local representative may have been provided when the product was installed For convenience and future reference please record the t...

Страница 8: ...of images on the page When the image is upright the paper or other media can be either long edge feed or short edge feed LEF Long Edge Feed Loading documents and paper with one of the long edges to b...

Страница 9: ...ng instructions marked on or supplied with the product should be followed Electrical Supply This product shall be operated from the type of electrical supply indicated on the product s data plate labe...

Страница 10: ...nterlocks X Do not obstruct the ventilation openings X Never push objects of any kind into slots or openings on the equipment Z If any of the following conditions occur switch off the power to the mac...

Страница 11: ...fore cleaning Do Not Do These Never use a plug that lacks an earth connection terminal to connect the product to an electrical outlet Never attempt any maintenance procedures that are not specifically...

Страница 12: ...l the toner In case of any toner spills avoid contact with clothes skin eyes and mouth as well as inhalation If toner spills onto your skin or clothing wash it off with soap and water If you get toner...

Страница 13: ...conformity A full declaration of conformity defining the relevant directives and referenced standards can be obtained from your authorized local dealer WARNING In order to allow this equipment to oper...

Страница 14: ...rtner Xerox Corporation has determined that the basic configuration of this product meets the ENERGY STAR guidelines for energy efficiency The ENERGY STAR and ENERGY STAR MARK are registered United St...

Страница 15: ...whose disposal may be regulated due to environmental considerations The presence of these materials is fully consistent with global regulations applicable at the time that the product was placed on th...

Страница 16: ...ou must dispose of this equipment in compliance with agreed national procedures In accordance with European legislation end of life electrical and electronic equipment subject to disposal must be mana...

Страница 17: ...ponents This section describes machine components and their functions Front View No Component Function 1 Left Side Cover Open this cover when a paper jam occurs in the machine and when replacing consu...

Страница 18: ...tion on the Control Panel refer to Control Panel on page 22 8 Output Tray Copies and prints are delivered here face down 9 Front Cover Open this cover to replace the Drum Cartridge and to add toner 10...

Страница 19: ...ocument Glass 20 Document Glass Place a document here face down 21 Fuser Unit Fuses toner onto the paper by applying heat and pressure Do not touch this unit It may become extremely hot 22 Drum Cartri...

Страница 20: ...2 Product Overview 20 Rear View No Component Function 24 Data Label Contains the machine information...

Страница 21: ...Allows you to copy documents in various ways For example you can produce output which has been reduced or enlarged to a different size or copy two or four independent documents onto one sheet of paper...

Страница 22: ...he indicator lights up to show which is currently being displayed When the machine is in the Paper Setting Mode press this button to scroll through the paper sizes NOTE To enter the Paper Setting Mode...

Страница 23: ...f scanned data is stored in mailboxes NOTE If the machine is switched off all the scanned data stored in mailboxes will be deleted Online indicator This indicator blinks when the machine is receiving...

Страница 24: ...or four seconds The machine enters the System Setting Mode For more information on how to log in to the machine refer to Logging in to the Machine on page 68 For more information on the System Setting...

Страница 25: ...an job using the Document Glass The indicator next to the Scan Completed button blinks after the first page of the document is scanned The machine allows you to scan the next page while this button is...

Страница 26: ...2 Tray 1 Uses paper that is loaded in Tray 1 Tray 2 Uses paper that is loaded in Tray 2 NOTE This option is only available when Paper Tray 2 optional is fitted on the machine Bypass Tray Uses paper th...

Страница 27: ...or when the Document Feeder Cover is open Processor Jam The red indicator flashes when a paper jam occurs in the machine Check the error code that appears in the Display Toner The red indicator light...

Страница 28: ...splays to show the zoom ratio NOTE The paper size table can be switched between metric A B Series 8K 16K and inches Inch Series 8 5 x 13 Inch Series 8 5 x 13 4 Inch Series when the machine is in the S...

Страница 29: ...the paper size in the selected tray NOTE This option is selectable only when using the Document Feeder When the paper size table is metric 200 Enlarges a document by 200 A5 A3 141 Enlarges a document...

Страница 30: ...reases to the darkest level Original Size button When selecting the N up feature press this button to select the original document size For more information on the N up feature refer to 4 up 2 up Copi...

Страница 31: ...ect this option if the size and orientation of an original document is A4 LEF or B5 LEF N up ID Card Copy button Press this button to select the N up feature or ID Card Copy feature NOTE When the N up...

Страница 32: ...sided button Press this button to select whether to copy on one side or both sides of the sheet NOTE This button is also used to select whether to scan one side or both sides of a document for a scan...

Страница 33: ...t whether or not to collate the output copies PaperOrientation in the Tray Document Feeder Document Glass SEF LEF Document Glass Document Feeder How to Scan Document Feeder Document Glass Copied Outpu...

Страница 34: ...e specified number of copy sets in the same order as the original documents and copies are made on both sides of the sheets Uncollate When 1 sided is selected Delivers the copies in stacks based on th...

Страница 35: ...r Saver feature refer to Power Saver on page 36 Switching On The following procedure describes how to switch on the power to the machine 1 Press the Power Switch to the position NOTE 1 appears in the...

Страница 36: ...splay goes out and the Power Saver button is lit If scanned data is stored in mailboxes the Job in Memory indicator is also lit during this mode To exit the Low Power Mode to use the machine press the...

Страница 37: ...a print job or a scan job Recycled Paper The use of recycled paper in the machine benefits the environment with no degradation in performance Xerox recommends recycled paper with a 20 post consumer co...

Страница 38: ...2 Product Overview 38...

Страница 39: ...information on fading of printed images contact the Xerox Welcome Center Supported Paper Sizes The following table shows the size and weight of paper that each tray can accommodate together with the...

Страница 40: ...to prevent creasing or warping Loading paper into the trays Align the edges of the paper stack neatly before loading it in the trays Do not use paper that is folded creased curled or badly damaged Do...

Страница 41: ...he machine selects a tray based on the priority set under Tray Priority for Automatic Paper Selection menu number 22 in the system settings For information on how to configure the system settings refe...

Страница 42: ...guides correctly it may result in a paper jam NOTE If loading a relatively thin stack of paper in the tray when tightly adjusting the right paper guide up against the edge of the paper the stack of pa...

Страница 43: ...rectly it may result in a paper jam NOTE If loading a relatively thin stack of paper in the tray when tightly adjusting the right paper guide up against the edge of the paper the stack of paper can be...

Страница 44: ...he Trays on page 48 1 Open the Bypass Tray 2 Slide out the Extension Flap 3 Load paper with the side to be copied or printed facing down NOTE Do not load mixed types or mixed sizes of paper together i...

Страница 45: ...r and set the paper size to CUS on the Control Panel in advance For information on how to specify a custom paper size in the print driver refer to the PCL Print Driver CD ROM For information on how to...

Страница 46: ...with the appropriate paper size marking on the label NOTE If you do not adjust the paper guides correctly it may result in a paper jam NOTE If loading a relatively thin stack of paper in the tray whe...

Страница 47: ...a job do not pull out the tray in use 2 Remove the remaining paper 3 Slide the paper guides towards the front and back of the tray 4 Slide the paper guide to the right 5 Load a new stack of paper nea...

Страница 48: ...the paper size and orientation on the Control Panel For information on how to specify the paper size and paper orientation refer to Specifying the Size and Orientation of Paper Loaded in the Trays on...

Страница 49: ...ontrol Panel and then register the size of the custom paper in the print driver For information on how to specify a custom paper size in the print driver refer to the PCL Print Driver CD ROM If you do...

Страница 50: ...per The machine exits the Paper Setting Mode Sequence What appears in the Display Size Orientation Sequence What appears in the Display Size Orientation 1 A3 SEF 10 A5 SEF 2 A4 LEF 11 11 x 17 SEF 3 A4...

Страница 51: ...fer to the Accounting and Securities chapter in the System Administration Guide NOTE If the machine receives a print job while you are setting the copy options on the Control Panel the copy operation...

Страница 52: ...te a shadow and may appear to have an outline on the copied output 3 Close the Document Cover 3 Specify copy features as necessary Reduce Enlarge button Variable Ratio button Select the zoom ratio For...

Страница 53: ...Output button on page 33 4 Press the Paper Supply button to select a tray NOTE Press the Paper Supply button repeatedly until the desired tray is lit on the Machine Diagram mimic For information on t...

Страница 54: ...ass and in the Document Feeder Information is also given on the capacity and the supported document types for the Document Glass and the Document Feeder Document Glass The Document Glass supports a si...

Страница 55: ...he document sizes detectable by the Document Feeder refer to the Appendix in the System Administration Guide 1 Remove any paper clips and staples from the original document before loading 2 Place the...

Страница 56: ...copy multiple pages of documents onto one side of a single sheet of paper If using the Document Glass to scan documents 1 Press the N up ID Card Copy button to select the N up feature 4 up Copies fou...

Страница 57: ...orientation Inches 8 5 x 11 SEF Metric A4 SEF B5 SEF Select this when the document size is 8 5 x 11 A4 or B5 and when scanning documents in the SEF orientation Inches 8 5 x 11 LEF Metric A4 LEF B5 LE...

Страница 58: ...anging the Size and Orientation of Paper in the Trays on page 45 to change the orientation of paper 4 up Making 4 up copies Original Size button PaperOrientation in the Tray How to Scan LEF Top Left R...

Страница 59: ...and Orientation of Paper in the Trays on page 45 to change the orientation of paper Refer to Changing the Size and Orientation of Paper in the Trays on page 45 to change the orientation of paper 2 up...

Страница 60: ...EF A3 SEF B4 SEF 8K SEF 8 5 x 11 LEF 8 5 x 11 LEF 2 up 11 x 17 SEF 8 5 x 11 LEF 8 5 x 11 SEF 8 5 x 11 LEF A4 LEF B5 LEF 16K LEF 8 5 x 11 LEF 5 5 x 8 5 SEF 8 5 x 11 SEF 8 5 x 13 SEF 8 5 x 13 4 SEF 8 5...

Страница 61: ...nks 5 Load the next document on the Document Glass in the same orientation as the previously scanned document 6 Press the Start button to scan the loaded document NOTE After scanning the last document...

Страница 62: ...ocument Feeder change Switch the paper size table as necessary in the System Setting Mode menu number 21 For information about the document sizes detectable by the Document Feeder refer to the Appendi...

Страница 63: ...A5 LEF or 16K LEF Refer to Changing the Size and Orientation of Paper in the Trays on page 45 to change the orientation of paper 4 up Making 4 up copies PaperOrientation in the Tray How to Scan LEF T...

Страница 64: ...EF 5 5 x 8 5 SEF 5 5 x 8 5 SEF 8 5 x11 SEF 8 5 x 13 SEF 8 5 x 13 4 SEF 8 5 x 14 SEF 11 x 17 SEF A3 SEF B5 SEF A4 SEF B4 SEF 16K SEF 8K SEF 8 5 x 11 LEF 8 5 x 11 LEF 7 25 x 10 5 LEF 8 5 x11 LEF A4 LEF...

Страница 65: ...11 x 17 SEF B4 SEF B5 SEF A4 SEF A3 SEF A5 SEF 16K SEF 8K SEF A3 SEF A4 LEF B4 SEF A4 SEF B5 SEF A5 SEF B5 LEF A4 LEF 16K LEF 8 5 x 11 LEF A5 LEF A3 SEF A5 SEF 5 5 x 8 5 SEF B5 SEF A4 SEF B4 SEF 16K...

Страница 66: ...the ID Card Copy feature ID Card Copy Copies an ID card shaped document onto one side of a single sheet 2 Place an ID card shaped document on the Document Glass with the front side facing down as des...

Страница 67: ...e ID card shaped document and to start copying Both sides of the ID card shaped document are copied onto one side of a single sheet Orientation for an ID card shaped document The following chart shows...

Страница 68: ...A user ID is a three digit number The user ID that you have entered appears in the Display 2 Press the Start button to confirm the entered user ID If a passcode is not set for the user ID the machine...

Страница 69: ...ered passcode If the entered passcode is correct the machine enters the Copy Mode and 1 appears in the Display 5 The indicator next to the Log In Out button is lit while you are logged in to the machi...

Страница 70: ...opies made under the user ID Hold down the 7 button and while holding down the 7 button press the Stop button To view the print job limit set for the user ID Hold down the 8 button and while holding d...

Страница 71: ...rocedure confirm the mailbox number that you want to save the scanned data to NOTE If the machine is switched off data currently being processed may be lost and all the scanned data stored in mailboxe...

Страница 72: ...ation on how to set the scan options using CentreWare Internet Services refer to the Scanner Environment Settings chapter in the System Administration Guide If a passcode is not set for the mailbox b0...

Страница 73: ...the Document Cover When scanning a document from the Document Feeder 1 Place a document face up in the center of the Document Feeder 2 Adjust the document guides to just touch the edges of the loaded...

Страница 74: ...page after another to create a multi page set of data To add the next document Add Original must be set to 1 Enabled in the System Setting Mode menu number 201 For more information refer to the System...

Страница 75: ...t and then go back to Step 1 8 When all pages in the document have been scanned press the AC button The letter b appears blinking in the Display Stopping a Scan Job The following procedure describes h...

Страница 76: ...ration Guide You can check or select documents stored in a mailbox 1 Open your web browser and enter the machine s IP address in the Address box to access CentreWare Internet Services 2 Click the Scan...

Страница 77: ...tion or Mailbox Viewer 3 to import scanned data to your computer the stored documents will be deleted from the mailbox after they are retrieved If using CentreWare Internet Services the stored documen...

Страница 78: ...on on the PCL Print Driver CD ROM supplied with the machine For information on how to install Mailbox Viewer 3 refer to the PCL Print Driver CD ROM The following describes how to use Mailbox Viewer 3...

Страница 79: ...s chapter in the System Administration Guide 1 Open your web browser and enter the machine s IP address in the Address box to access CentreWare Internet Services 2 Click the Scan tab The Mailbox page...

Страница 80: ...r and enter the machine s IP address in the Address box to access CentreWare Internet Services 2 Click the Scan tab The Mailbox page is displayed 3 Click the Document List button of the mailbox that c...

Страница 81: ...automatically select the appropriate tray based on the machine s paper tray priority settings 2 Sided Print Makes double sided printing Both sides of the paper can be printed automatically You can se...

Страница 82: ...escribes how to change parameter values for PCL emulation to print documents 1 Open your web browser and enter the machine s IP address in the Address box to access CentreWare Internet Services 2 Clic...

Страница 83: ...Arial Arial Italic Arial Bold Arial Bold Italic Times New Times New Italic Times New Bold Times New Bold Italic Symbol Wingdings Line Printer Times Roman Times Italic Times Bold Times Bold Italic Helv...

Страница 84: ...he default value of Output Size Paper Size Bypass is A4 60 if the value for Output Size Paper Size Bypass is Letter 8 5 x 11 Treat LF as CR LF and FF as CR FF Enable or disable carriage return and lin...

Страница 85: ...idth within the range of 182 432 mm 7 2 17 0 inches Default 210 mm 8 3 inches The measurement unit will depend on the setting in Unit Settings on the Properties tab Custom Paper Size Length Y Specify...

Страница 86: ...6 Printing 86...

Страница 87: ...round Suppression This feature prevents the reproduction of unwanted background variations resulting from originals that have either a colored background or that are printed on very thin stock on whic...

Страница 88: ...A customer replaceable cartridge which contains an internal drum and toner A printed image is formed on a drum before being transferred to paper duplex Refers to a document that contains an image on b...

Страница 89: ...work that has an address and can send and or receive data to and from other devices on the network Also refers to a number that identifies an access point on a network It works like an address output...

Страница 90: ...converting the optical image of the document to an electronic image sharpness Sharpness adjusts the amount of edge definition on the output If the image appears slightly out of focus increasing the sh...

Страница 91: ...e specified number of copies for each page in a copy set is delivered in the order the documents were placed in the Document Feeder Example Two copies of a three page document would output as page1 co...

Страница 92: ...7 Glossary 92...

Страница 93: ...eric Keypad 23 Copy Auditron 24 51 68 Copy button 22 copy count 70 Copy features 2 sided button 32 53 Copy Output button 33 53 Lighten Darken button 30 52 N up ID Card Copy button 31 52 Original Size...

Страница 94: ...tton 26 Paper Supply Command 85 Paper Tray 2 18 Paper Types Bypass Tray 40 Duplex Module 40 Tray 1 40 Tray 2 40 passcode 68 69 72 PCL emulation 82 Power Cord Connector 18 Power Saver 36 Low Power Mode...

Страница 95: ...B Interface Connector 18 user ID 68 70 V Variable Ratio button 28 viewing count copy count 70 print count 70 viewing job limits copy job limit 70 print job limit 70 W warning markings 9 warnings 10 we...

Страница 96: ...Index 96...

Отзывы: