background image

Phaser 6180MFP Multifunction Printer Service Manual

4-73

General Troubleshooting

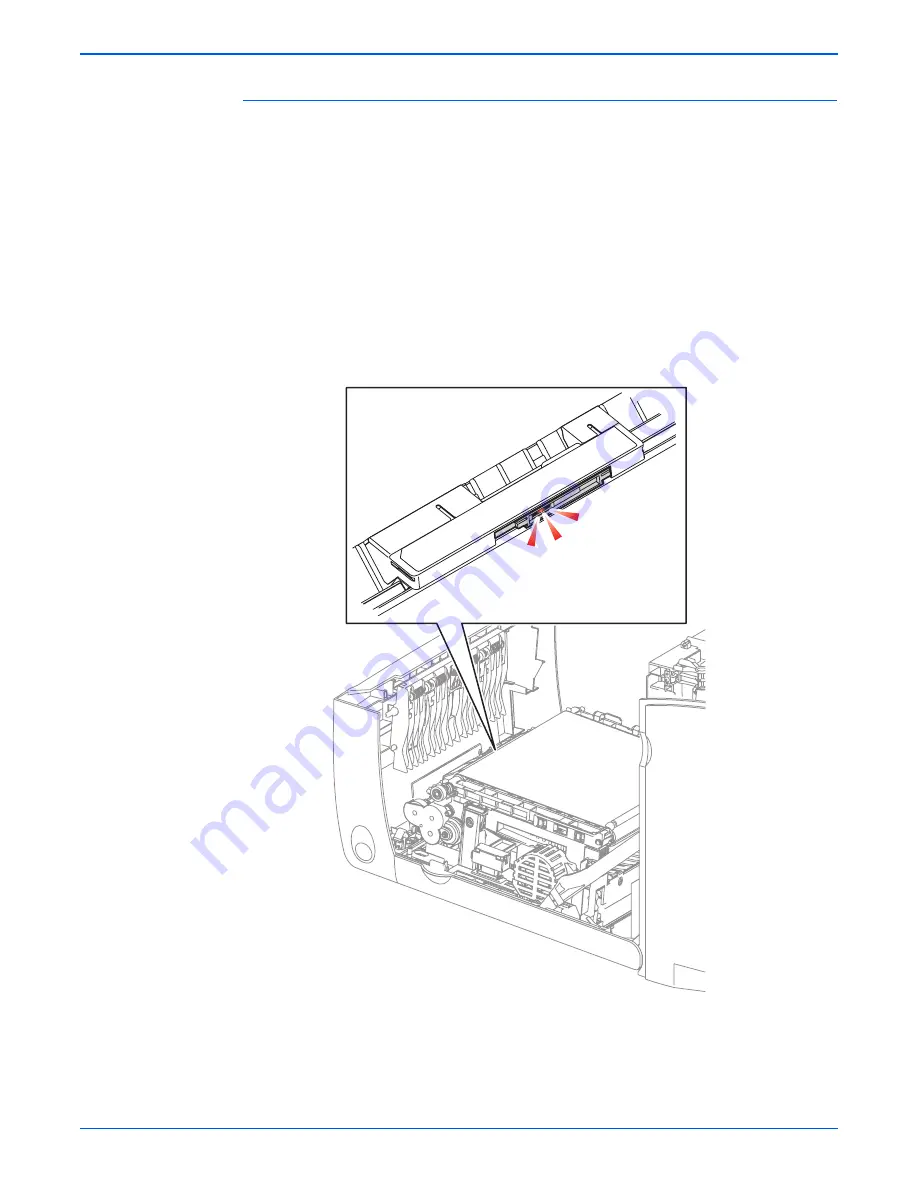
ADC (CTD) Sensor LED

Caution

When performing this procedure, remove and cover the Print Cartridges 
to avoid exposure to light if the Front Door will be opened for prolonged 
periods.

1.

Enter the Service Diagnostic menu (page 4-5).

2.

Open the Front Cover.

3.

Remove the Print Cartridges (page 8-11).

4.

Use a paper clip to secure the


Interlock Switch.

5.

Perform the ADC Sensor LED test: 

Printer Diag

 > 

Engine Diag

 > 

Motor 

Test

 > 

ADC (CTD) Sensor LED

.

6.

Verify that the LED is working (red light inside the Transfer Unit).

7.

Press the Stop button to stop the ADC Sensor LED test.

8.

Remove the paper clip from the Interlock Switch.

s6180mfp-400

Содержание Phaser 6180MFP

Страница 1: ...Service Manual Phaser 6180MFP 701P47020 Multifunction Printer ...

Страница 2: ......

Страница 3: ...following servicing instructions are for use by qualified service personnel only To avoid personal injury do not perform any servicing other than that contained in the operating instructions unless you are qualified to do so First Printing September 2007 ...

Страница 4: ...her countries Adobe and PostScript are trademarks of Adobe Systems Incorporated in the United States and or other countries Apple Bonjour ColorSync EtherTalk Macintosh and Mac OS are trademarks of Apple Computer Inc in the United States and or other countries PCL is a trademark of Hewlett Packard Corporation in the United States and or other countries Microsoft Vista Windows and Windows Server are...

Страница 5: ... accomplish a task A note can provide additional information related to a specific subject or add a comment on the results achieved through a previous action Caution A caution indicates an operating or maintenance procedure practice or condition that if not strictly observed results in damage to or destruction of equipment Warning A warning indicates an operating or maintenance procedure practice ...

Страница 6: ...n the printer Use caution to avoid personal injury Use caution or draws attention to a particular component Refer to the manual s for information It may take 30 minutes for the fuser to cool down Do not touch the item Do not expose the item to sunlight Do not expose the item to light Do not burn the Print Cartridge Do not expose the Print Cartridge to sunlight Recycle the item ...

Страница 7: ...ed outlet If the product loses its ground connection contact with conductive parts may cause an electrical shock A protective ground connection by way of the grounding conductor in the power cord is essential for safe operation Disconnecting Power Warning Turning the power Off using the power switch does not completely de energize the printer You must also disconnect the power cord from the printe...

Страница 8: ... before applying power to the unit under test to avoid potential shock After removing a static sensitive assembly from its anti static bag place it on a grounded conductive surface If the anti static bag is conductive you may ground the bag and use it as a conductive surface Do not use freon propelled chemicals These can generate electrical charges sufficient to damage some devices Do not remove a...

Страница 9: ... Warning Labels Read and obey all posted warning labels Throughout the printer warning labels are displayed on potentially dangerous components As you service the printer check to make certain that all warning labels remain in place Safety Interlocks Make sure all covers are in place and all Interlock Switches are functioning correctly after you have completed a printer service call If you bypass ...

Страница 10: ...you are instructed to do so by a service procedure Servicing Mechanical Components When servicing mechanical components within the printer manually rotate the Drive Assemblies Rollers and Gears Warning Do not try to manually rotate or manually stop the drive assemblies while any printer motor is running Servicing Fuser Components Warning This printer uses heat to fuse the toner image to paper The ...

Страница 11: ...However there is no guarantee that interference will not occur in a particular installation If this equipment does cause harmful interference to radio or television reception which can be determined by turning the equipment Off and On the user is encouraged to try to correct the interference by one or more of the following measures Reorient or relocate the receiver device being interfered with Inc...

Страница 12: ...ce with the user s instructions is neither dangerous for the consumer nor for the environment To ensure compliance with European Union regulations use shielded interface cables A signed copy of the Declaration of Conformity for this product can be obtained from Xerox January 1 1995 Low Voltage Directive 73 23 EEC as amended by 93 68 EEC January 1 1996 Electromagnetic Compatibility Directive 89 336...

Страница 13: ...e Induction papers that bear any of the following Registrant s information Earnings or Income Court Record Physical or mental condition Certificate of Indebtedness National Bank Currency Coupons from Bonds Federal Reserve Bank Notes Silver Certificates Gold Certificates United States Bonds Treasure Notes Federal Reserve Notes Fractional Notes Certificates of Deposit Paper Money Bonds and Obligatio...

Страница 14: ...f a province or the seal of a public body or authority in Canada or of a court of law 5 Proclamations orders regulations or appointments or notices thereof with intent to falsely cause same to purport to have been printed by the Queens Printer for Canada or the equivalent printer for a province 6 Marks brands seals wrappers or designs used by or on behalf of the Government of Canada or of a provin...

Страница 15: ...ilty of making such reproductions Currency notes Bank notes and cheques Bank and government bonds and securities Passports and identification cards Copyright material or trademarks without the consent of the owner Postage stamps and other negotiable instruments This list is not inclusive and no liability is assumed for either its completeness or accuracy In case doubts contact your legal counsel ...

Страница 16: ... jack used to connect this equipment to the premises wiring and telephone network must comply with the applicable FCC Part 68 rules and requirements adopted by the ACTA A compliant telephone cord and modular plug is provided with this product It is designed to be connected to a compatible modular jack that is also compliant See installation instructions for details You may safely connect the machi...

Страница 17: ...s performed the remainder of the warranty period is null and void The equipment must not be used on party lines Connection to party line service is subject to state tariffs Contact the state public utility commission public service commission or corporation commission for information If your office has specially wired alarm equipment connected to the telephone line make sure that the installation ...

Страница 18: ... been approved in accordance with the Council Decision 1999 5 EC for pan European single terminal connection to the public switched telephone network PSTN However due to differences between the individual PSTNs provided in different countries the approval does not of itself give an unconditional assurance of successful operation on every PSTN network terminal point In the event of a problem you sh...

Страница 19: ...sages and codes generated by resident diagnostics Section 4 General Troubleshooting This section contains the operation of Power On Self Test POST and Service Diagnostics In addition this section includes troubleshooting methods for situations where error indicator is not available Section 5 Print Quality Troubleshooting This section focuses on techniques to correct image quality problems associat...

Страница 20: ...xviii Phaser 6180MFP Multifunction Printer Service Manual ...

Страница 21: ...lex Unit 1 11 Multi Protocol Network Card 1 12 Optional 550 Sheet Feeder Tray 3 1 13 Maintenance Items 1 14 Consumables 1 16 Specifications 1 17 Printer Specifications 1 17 Scanning Specifications 1 18 Copy Specifications 1 20 Fax Specifications 1 21 Memory Specifications 1 22 Environment Specifications 1 22 Electrical Specifications 1 23 Print Speed 1 24 Operating Mode 1 25 Warm Up Time 1 28 Firs...

Страница 22: ... Print Cartridge 2 36 Main Drive 2 38 Electrical 2 40 Duplex Unit 2 48 Tray 3 Optional 550 Sheet Feeder 2 49 Printer Modes 2 55 Operational Modes 2 55 Printer Control 2 56 Paper Size Detection 2 56 Selective Control on Paper Tray 2 57 Laser Unit Light Quantity Control 2 57 Process Control 2 57 Color Registration Control 2 60 Fuser Control 2 61 Drive Transmission 2 62 Mechanical Components 2 62 Mai...

Страница 23: ...onsumable Routine Maintenance Errors 3 46 Insert Fuser 3 46 Fuser Error IOT Fuser Life Over 3 48 Fuser CRUM ID Error 3 49 Fuser Error 3 50 Check Print Cartridge Error Yellow Magenta Cyan Black 3 52 Remove Print Cartridge Tape Yellow Magenta Cyan Black 3 53 Replace Print Cartridge Yellow Magenta Cyan Black 3 55 Empty Print Cartridge Yellow Magenta Cyan Black 3 56 Print Cartridge CRUM Error Yellow M...

Страница 24: ...ror 3 116 MCU Firmware Error 3 117 Download Mode 3 118 MCU Communication Error 3 119 MCU NVRAM Error 3 120 Fan Motor Error Duplex Fan 3 122 Printer Too Hot 3 124 Main Motor Error 3 126 Sub Motor Error 3 128 Fan Motor Error Main Fan 3 130 Laser Error 3 132 Deve Motor Error 3 134 Motor Error Tray 2 3 136 Door A Open 3 138 ADC Sensor Error Error Code 01 3 139 ADC Sensor Error Error Code 02 3 141 Envi...

Страница 25: ...emory Full 3 187 Controller Error 3 188 NVM Error 3 190 Task Error 3 191 Fax Error 3 193 Report Error 3 195 Fax Communication Error 3 196 Target Fax Busy Error 3 198 Target Fax Busy Error 3 199 Fax Communication Error 3 200 Fax Communication Error 3 202 Fax Communication Error 3 203 Fax Codec Error 3 204 Fax Codec Error 3 205 Fax Codec Error 3 206 Incorrect Password 3 208 Fax Codec Error 3 209 Fax...

Страница 26: ...ter Troubleshooting 4 80 Engine Power Up Sequence 4 80 Printer Continually Displays Warming Up 4 80 Printer Continually Displays Insert Print Cartridge 4 81 AC Power Supply Troubleshooting 4 83 DC Power Supply Troubleshooting 4 84 LVPS Overcurrent Protection Circuit 4 84 LVPS Overvoltage Protection Circuit 4 84 LVPS 4 84 24 VDC Interlock Switch 4 86 Fax Troubleshooting 4 87 Fault Occurs 4 87 Trans...

Страница 27: ...17 Paper Condition 5 17 Printer Condition 5 17 Specifications 5 18 Print Quality Troubleshooting 5 22 Print Quality Defect Definitions 5 22 Repeating Defect Measurement 5 24 Light or Undertone Print 5 26 Blank Print No Print 5 28 Black Print 5 31 Vertical Blank Lines 5 34 Horizontal Band Voids or Streaks 5 36 Vertical Stripes 5 38 Horizontal Stripes 5 40 Faded or Missing Image 5 42 Random Spots 5 ...

Страница 28: ...s 7 5 Cleaning the ADF Roller 7 6 Maintenance 7 7 RIP Repair Inspect and Prevent Procedure 7 7 8 Service Parts Disassembly Overview 8 2 Standard Orientation of the Printer 8 3 Preparation 8 4 Notations in the Disassembly Text 8 5 Fastener Types 8 6 Disassembly Flow Charts 8 7 Printer Disassembly Flow Chart 8 7 Tray 1 MPT and Optional 550 Sheet Feeder Disassembly Flow Charts 8 8 Maintenance Items a...

Страница 29: ...Cyan Magenta Yellow PL5 2 2 8 58 Toner Dispenser Motor C M Y K PL5 2 10 8 59 BIAS Assembly PL5 2 11 8 61 LED Assembly PL5 2 13 8 63 HVPS PL5 2 15 8 64 Exit Chute 8 67 Exit Out Chute Assembly PL6 1 1 8 67 Duplex Gate Chute PL6 1 13 8 68 Frame 8 69 Star Wheel Spur Assembly PL7 1 1 8 69 Left Arm Assembly PL7 1 3 8 70 Right Arm Assembly PL7 1 13 8 72 Tray 2 Size Switch Assembly PL7 1 18 8 74 Drive 8 7...

Страница 30: ...rts List Serial Number Format 9 2 Using the Parts List 9 3 Print Engine Parts 9 4 Parts List 1 1 Covers 1 of 2 9 4 Parts List 1 2 Covers 2 of 2 9 6 Parts List 2 1 Tray 2 1 of 2 9 9 Parts List 2 2 Tray 2 2 of 2 9 11 Parts List 3 1 Paper Feeder 1 of 2 9 13 Parts List 3 2 Paper Feeder 2 of 2 9 15 Parts List 4 1 Transfer Unit 9 18 Parts List 5 1 Xerographics 1 of 2 9 19 Parts List 5 2 Xerographics 2 o...

Страница 31: ... 16 Print Engine Wiring Diagrams 10 20 Wiring Diagram Configurations 10 20 General Wiring Diagram 10 23 DC Power Supply 10 24 Tray 1 MPT and Registration 10 26 Main Drive 10 28 Feeder 10 30 Laser Unit 10 32 Xerographic 10 34 High Voltage 10 36 Developer 10 38 Fuser 10 40 Controller 10 42 Optional 550 Sheet Feeder Wiring Diagram 10 45 Duplex Wiring Diagram 10 48 Fax Controller Wiring Diagram 10 50 ...

Страница 32: ...xxx Phaser 6180MFP Multifunction Printer Service Manual ...

Страница 33: ...Chapter General Information In this chapter Printer Introduction and Overview Printer Configurations Parts of the Printer Printer Options Maintenance Items Consumables Specifications Controller Functions ...

Страница 34: ...n optional Tray 3 is 950 sheets The Output Tray holds 300 sheets facedown The printer options add memory media capacity and functionality Memory upgrades are available to increase the standard RAM from 384 MB up to 1 4 GB maximum A 550 Sheet Feeder is available as an option Automatic 2 sided printing is available and no tools are required to install the Duplex Unit The Multi Protocol Network Card ...

Страница 35: ... 600 x 600 x 1 bit 600 x 600 x 4 bit Adobe PostScript 3 Fonts Standard Standard PCL6 Fonts Standard Standard Job Pipelining Standard Standard USB 2 0 Hi Speed Support Standard Standard Parallel Port Standard Standard Ethernet Interface 10 100 Base TX 10 100 Base TX Tray 1 MPT 150 Sheet Standard Standard Tray 2 250 Sheet Standard Standard Tray 3 550 Sheet Feeder 550 Sheet Optional Optional Duplex U...

Страница 36: ...Service Manual General Information Parts of the Printer Front and Side Views 1 Front Door 2 Control Panel 3 Output Tray 4 Power Switch 5 Button A for opening the Front Cover 6 Tray 1 MPT 7 Tray 2 8 Tray 3 Optional s6180mfp 131 1 3 2 5 4 6 7 8 ...

Страница 37: ... Manual 1 5 General Information Rear View 1 Power Cord Connector 2 USB Port 3 Parallel Port 4 Telephone Line Connector 5 Fax Line Connector 6 Memory Slot Optional 7 Multi Protocol Network Card MPC 8 Network Connector s6180mfp 132 1 3 2 4 5 8 6 7 ...

Страница 38: ...r 6180MFP Multifunction Printer Service Manual General Information Internal View 1 Fuser 2 Print Cartridge 3 Transfer Unit 4 Button A for opening the Front Door 1 Duplex Unit s6180mfp 387 1 2 3 4 s6180mfp 388 1 ...

Страница 39: ...0MFP Multifunction Printer Service Manual 1 7 General Information Scanner 1 Automatic Document Feeder ADF Cover 2 Document Guides 3 Document Feed Tray 4 Document Glass 5 Scanner Lock Lever 1 3 2 s6180mfp 386 4 5 ...

Страница 40: ... Control Panel functions are segregated into three sections Control Panel Left Side The left side of the Control Panel contains One Touch Buttons 1 One Touch button Provides access to the first 10 entries in the Fax address book s6180mfp 133 Clear All Error Power Saver Stop Start 001 002 003 004 005 006 007 008 009 010 Copy Fax E mail Scan Color Mode B W Color OK Job in Memory Job Status ABC GHI P...

Страница 41: ...nd Walk Up printing jobs 5 4 Way Cursor buttons Up Arrow button Scrolls upward through the menus Down Arrow button Scrolls downward through the menus Back Arrow button Scrolls backward through the menus Forward Arrow button Scrolls forward through the menus 13 System button Switches the display to the Setup menu and back 6 Manual Dial button Use to enter fax numbers via the alphanumeric key pad 14...

Страница 42: ...o default when the button is pressed 3 Stop button Cancels the current Print Copy Scan or Fax job 4 Start button Starts the Copy Scan or Fax job 5 Error Red light indicates an error has occurred LED State Printer State Green Ready to Print or in Power Saver mode Flashing Green Processing print job Red Error occurs can be fixed by user Flashing Red Error occurs cannot be fixed by user Function Butt...

Страница 43: ... Memory The printer features one slot that accepts 256 or 512 MB or 1 GB of DDR2 DIMMs The standard 384 MB memory is soldered on board Memory modules must meet the following characteristics 200 Pin DDR2 DIMM 8 chip type Unbuffered Non parity The printer s Configuration page lists the amount of RAM installed in the printer Duplex Unit User can install the Duplex Unit without using any tools by simp...

Страница 44: ...nction Printer Service Manual General Information Multi Protocol Network Card The Multi Protocol Network Card provides additional protocols and security features including Netware IPP SMB WINS DDNS SSL HTTPS and IPv6 s6180mfp 136 ...

Страница 45: ...50 Sheet Feeder Tray 3 The Optional 550 Sheet Feeder increases the input capacity of the printer and can be attached to the printer underneath Tray 2 with 2 thumb screws The Optional 550 Sheet Feeder is customer installable Note Only one Optional 550 Sheet Feeder is supported s6180mfp 200 ...

Страница 46: ...rage per color on 24 lb paper The 100 000 life is not guaranteed and varies depending on usage habits Phaser 6180MFP Maintenance Items Item Print Life Transfer Unit Up to 100 000 pages Fuser Up to 100 000 pages Feed Retard Roller Up to 100 000 pages Fuser Transfer Unit Tray 2 Feed Rollers Tray 2 Retard Rollers 001 002 003 004 005 006 007 008 009 010 Copy Fax E mail Scan to Color Mode B W Color Exi...

Страница 47: ...Phaser 6180MFP Multifunction Printer Service Manual 1 15 General Information s6180mfp 141 Optional 550 Sheet Feeder Feed Roller Optional 550 Sheet Feeder Retard Roller ...

Страница 48: ...the amount of remaining toner When toner empty is detected Life End status will be sent to indicate toner empty CMY Toner will not be consumed when printing in Mono mode or when printing a Gray scale job only Internal counters track Consumables and Maintenance Items life usage Life ratings are based on A size sheets at 5 coverage Print Cartridge Print Life Color Mono Standard Capacity 2 000 pages ...

Страница 49: ...an 800 PV month Average 1 200 PV month Maximum 60 000 PV month For Duplex prints prints on the front and back sides of paper are counted as 2 PV Maximum PV is 2 000 PV day Maximum Duty Cycle 60 000 pages month Color Medium Cyan Magenta Yellow and Black Print Cartridges Resolution Addressability dpi Standard 600 x 600 x 1 Enhanced 600 x 600 x 4 Print Quality Mode 600 x 600 x 1bit Standard 600 x 600...

Страница 50: ... Direction 215 9 mm 8 5 in Slow Scan Direction 355 6 mm 14 0 in USB Scanning Resolution Up to 9600 dpi Scan Interface File Formats TWAIN WIA BMP JPG PDF TIFF Network Scanning Resolution Up to 600 dpi Color Mode Color Black White Original Type Text Photo Mixed File Format JPG PDF TIFF Lighter Darker 7 levels Sharpness 3 levels Contrast 3 levels Auto Exposure Off Normal Higher 1 2 Scan to Desktop vi...

Страница 51: ...tion TWAIN Document Glass 300 dpi 24 bit color letter size 8 sec 10 sec USB Scan to Computer via Express Scan Manager Document Glass 300 dpi 24 bit color letter size 12 sec 33 sec Network Scan to Computer via SMB Document Glass 150 dpi mixed letter size 9 sec 8 sec Network Scan to E mail Document Glass 150 dpi mixed letter size 9 sec 10 sec ...

Страница 52: ...ties 5 levels Auto Exposure Off Normal Higher 1 2 Number of Copies 1 99 Multiple Up N to 1 Off Auto ID Copy Manual Duplex Copy On Off Poster 2x2 3x3 4x4 Auto Fit On Off Cloning On Off Collate Color 19 B W 50 Copy Speeds from Document Glass Simplex Output Mode 1st Copy 1st Simplex Page sec 1st Copy Subsequent Simplex Pages ppm Subsequent Simplex Copies ppm Mono 11 N A 30 Color 20 N A 20 Copy Speeds...

Страница 53: ...eive Supported Delay Start Up to 24 hours Broadcast Sending Up to 200 destinations External Telephone Communication Supported Secure Receive Print for receiving data with password input Color Fax Resolution is fixed by 200 x 200 dpi Fax Address Book Up to 200 Speed Dial numbers and up to 6 Group Dial numbers stored in device memory The Group Dial Numbers may have up to 200 fax numbers associated w...

Страница 54: ...ked device Characteristic Specifications Memory Minimum 384 MB on board 256 MB Print 128 MB Scan Copy Fax Maximum 1 4 GB Supported RAM Supports up to 1 4 GB of DDR2 DIMM with one slot for 256 MB 512 MB 1 GB Characteristic Specifications Temperature Operating 0 to 35 C 32 to 95 F Standby 20 to 40 C 4 to 104 F Humidity RH Operating 15 to 80 RH Standby 5 to 85 RH Altitude Operating 0 to 3 100 meters ...

Страница 55: ...Continuous Color or Monochrome Printing Average 500 W or less 500 W or less In rush Current Maximum at 1st 2 5 msec 50 Amp Cold start 135 Amp Hot start Within 10 msec 80 Amp 110 V 220 V 240 V 85 Amp 100 V Leakage Current Power Current 100 V M C 1kVAC 3 5 mA UL 200 V M C 1 5kVAC 3 5 mA IEC Battery Equipped with a lithium primary battery to maintain contents of the system data and management informa...

Страница 56: ...0 31 13 14 21 9 A4 20 30 12 14 20 8 A5 20 31 13 14 22 9 Legal 18 27 11 13 19 8 Custom Size 17 25 10 12 18 7 Paper Type 105 162gsm Letter 20 26 13 14 17 9 A4 20 25 12 14 17 8 A5 B5 Executive 20 26 13 14 18 9 Legal 18 22 11 13 16 8 Custom Size 17 21 10 12 15 7 Paper Type 163 216gsm Letter A5 B5 Executive N A N A 13 N A N A N A A4 N A N A 12 N A N A N A Legal N A N A 11 N A N A N A Custom N A N A 10 ...

Страница 57: ...p mode to reduce power consumption when it has not received data for the specified time Note The transfer time from Ready mode to Sleep mode can be changed via the Control Panel menu Setting Range 1 to 60 minutes Deep Sleep Mode ENERGY STAR The Printer automatically enters into the Deep Sleep mode when Sleep mode has continued for the specified time Note The transfer time from the Sleep mode to De...

Страница 58: ...Recording The system is at Stop status Sleep Mode Scanner Lamp On Control Panel Back light Off LCD displays Ready Press any key to return to this state Scanner Controller Started condition Printer Controller Started condition Engine Ready The Fuser is Off Engine Fan In operation NOTE The Sleep mode is cancelled under the following conditions Any button on the Control Panel is pressed A print job i...

Страница 59: ...er Only for 3 3 V Engine Power is not supported except for Warm Up part Engine Fan Stopped NOTE The Deep Sleep mode is cancelled under the following conditions Any button on the Control Panel is pressed A print job is started A Fax job is started Operating Modes continued Mode Sub System State ...

Страница 60: ...engine waiting The printer is at Ready mode Laser Unit Motor Off Fuser Ready Paper is A size Short Edge Feed SEF Process control time is not included First Copy Output Time First Copy Output Time FCOT is defined as the time slot when the Start button is pressed until the trail edge of the first copied media passes the printer Exit Roller The following conditions are applied The Controller does not...

Страница 61: ... 14 0 in Print Area Maximum Print Area 210 9 mm 8 2 in x 351 6 mm 13 8 in Guaranteed Print Area 207 9 mm 8 2 in x 347 6 mm 13 7 in Skew 190 mm 7 5 in 1 2 mm 05 in Perpendicularity 114 5 mm 4 5 in 0 8 mm 03 in Parallelism Horizontal 180 mm 7 1 in 1 2 mm 05 in Vertical 234 mm 9 2 in 1 2 mm 05 in Linearity Horizontal 190 mm 7 5 in 0 5 mm 02 in Vertical 234 mm 9 2 in 0 5 mm 02 in Slant 269 mm 10 6 in ...

Страница 62: ...hen 100 3 6 mm 3 6 mm 2 7 mm 2 7 mm 0 9 mm 100 0 5 180 mm Magnification accuracy in the vertical direction 280 mm Applied when 100 4 2 mm 4 2 mm 2 8 mm 2 8 mm 1 4 mm 100 0 5 280 mm Magnification accuracy in the vertical direction 140 mm Applied when 50 2 1 mm 2 1 mm 1 4 mm 1 4 mm 0 7 mm converted from 280 mm Magnification accuracy in the vertical direction 200 mm Applied when 200 3 0 mm 3 0 mm 2 0...

Страница 63: ... 460 mm 18 1 in 460 mm 18 1 in Depth no cart letter size paper 520 mm 20 5 in 520 mm 20 5 in Depth with legal paper 570 mm 22 4 in 570 mm 22 4 in Weight base printer with standard fill print cartridges 40 0 kg 88 2 lb 41 0 kg 90 4 lb Optional 550 Sheet Feeder Height 435 mm 17 1 in Width 585 mm 23 0 in Depth 696 mm 27 4 in Weight 20 0 kg 44 0 lb 60 cm 23 6 in 10 cm 4 in 10 cm 4 in 10 cm 4 in 122 0 ...

Страница 64: ...nter used as a table top printer 1 In order to function properly the printer must be placed on a surface with the following minimum dimensions 2 Mounting surface flatness must be within the specified range 60 cm 23 6 in 60 cm 23 6 in 121 5 cm 47 7 in 10 cm 4 0 in 10 cm 4 0 in 10 cm 4 0 in s6180mfp 138 Right Hand Side s6180mfp 139 5 mm 2 0 in Max ...

Страница 65: ...pecifications will void all guarantees of print quality and or performance Known problems that can occur as a result of exceeding the mounting surface specifications are Color to Color mis registration primarily in the horizontal laser scan direction A smear or line of toner approximately 40 mm from the training edge of the print s6180mfp 140 10 or 7 mm 2 75 in 10 or 7 mm 2 75 in ...

Страница 66: ...upports a wider range of Custom size dimensions than trays 2 and 3 Supported Paper Types and Weights Paper Type Paper Weight Tray 1 MPT Tray 2 3 Plain Paper 65 120 g m2 17 32 lb Bond Yes Yes Letter Head 85 120 g m2 22 32 lb Bond Yes Yes Glossy Coated Paper 100 160 g m2 28 40 lb Bond 40 60 lb Cover Yes Yes Thick Coated Glossy Paper 160 220 g m2 40 60 lb Bond 60 80 lb Cover Yes Yes Pre Punched 65 90...

Страница 67: ...tion Supported Envelopes Type Dimension Tray 1 MPT Tray 2 3 10 Commercial Envelope 4 12 x 9 5 in Yes No Monarch Envelope 3 87 x 7 5 in Yes No C5 Envelope 162 x 229 mm Yes No DL Envelope 110 x 220 mm Yes No Note Do not use envelopes with hot melt glue windows or metal clasps ...

Страница 68: ...job processing IP Filter User can accept or reject print jobs up to five specified IP addresses IP filter is available only to LPD and Port9100 Job Recovery When a print job fails due to a paper jam the printer automatically restarts the job after the jammed paper is removed User does not have to reprint the entire job Job Time out When job transmission is interrupted for a certain period of time ...

Страница 69: ...d is an optional input and hidden from the user interface by displaying for each digit If a password is not specified the driver will accept it as a zero length string so that a password will not be required when requesting job output from the printer Document Name consists of a variable length from 0 to 24 characters 20H FFH that specifies the document name The data will not be printed until the ...

Страница 70: ... replaced IC can be transferred ID Print User can position and print the User Name on the upper right upper left lower right and lower left only for PCL6 of the page Non Genuine Mode When the Print Cartridge life has ended the printer stops accepting print request life of the Print Cartridge is counted by the counter in the CRUM This mode can be changed so the printer will not stop at the end of t...

Страница 71: ... Panel Display Print Cartridge Control Panel Display Functionality Normal Status Life Warning Error End of Life Error Xerox Xerox TM Print Cartridge Replace Soon Replace Print Cartridge Prints with full functionality Xerox refill Print Cartridge Xerox TM Print Cartridge Replace Soon Empty Prints with full functionality up to 40 of the Print Cartridge life Other OEM non Xerox printer manufacturer N...

Страница 72: ... or not it is turned On It is checked whether or not hardware ROM RAM ASIC etc operates properly 2 Manual Diagnostics Only qualified service personnel can perform manual diagnostics using the Service Mode in the Control Panel Information Pages Demo Page Demo Page provides sample print for the Phaser 6180MFP Multifunction Printer The Demo Page is printed in color from the selected paper tray ...

Страница 73: ...n Page from the Control Panel System Information Pages Configuration The Configuration Page is printed from the default tray which contains the following information Configuration Page Information General Description Detail Description Title Prints Title of the document Product Name Logo Prints organization s logo s6180mfp 383 ...

Страница 74: ... of Redial Interval of Redial Ans Select Auto Answer Fax Auto Answer TEL FAX Auto Answer Ans FAX Line Monitor Ring Tone Volume Line Type Dialing Type Junk Fax Filter Remote Receive Remote Rcv Tone Duplex Print Send Header Company Name Your Fax Number Device Name DRPD Pattern Forward Settings Fwd Settings Num Fwd Set Print Prefix Dial Prefix Dial Num Discard Size Color Fax Extel Hook Thresh Country...

Страница 75: ...ains No Fonts Escape Sequence Font ID Sample PCL Macro List User can print the PCL Macro List default on A paper size from default tray PostScript Fonts List User can print the PostScript Fonts List default on A size paper from default tray The PostScript Fonts List contains Print Fonts Fonts Sample Stored Documents List The Stored Documents report provides list of Secure Print and Proof Print job...

Страница 76: ...d using the Control Panel menu Various symbols in combinations with the arrow symbol represents the activity on communication status Signal Symbols Symbol Description Signal sent Normal Signal received Normal Time passed since the communication started Signal sent from this station Signal received from the other station Facsimile control field 8bit information that identifies each signal by type F...

Страница 77: ...and automatically prints a Job History Report when the number of the retained job logs reaches 22 User can also print the report any time The Job History Report contains Job sent data and time Input Port Port 9100 USB etc Host User Name Document Name File Name Default Color Paper Size Pages Sheets Result completed error etc s6180mfp 384 ...

Страница 78: ... and 42 Jam errors User can print the Error History Report default on A size paper from the default tray using the printer menu in the Control Panel The Error History Report contains the following information System Fail History Item No Total Print Count Chain Link Paper Jam History Item No Item No Total Print Count Paper Jam Type s6180mfp 378 ...

Страница 79: ...nd Group Dial The report can only be printed manually auto print is not available Address Book Report The Address Book report provides a list of the address book Server Address Report The Server Address report provides a list of servers connected to the printer Fax Pending Report The Fax Pending report provides a list of pending fax jobs that has been stored in the memory ...

Страница 80: ...Fax Activity report provides a list of fax communication results up to 50 jobs This report is automatically printed when sent received faxes exceeds 50 jobs The report can also be printed via the Control Panel menu Can monitor the status history or errors This can indicate send mode is OK s6180mfp 429 ...

Страница 81: ...Manual 1 49 General Information Print Meter Print Volume Report User can print the Print Meter page on A paper size from default tray The Print Meter page contains Date of Initialization Job Accounting User Name Pages Sheets Date Time s6180mfp 385 ...

Страница 82: ...1 50 Phaser 6180MFP Multifunction Printer Service Manual General Information ...

Страница 83: ...n this chapter Phaser 6180MFP Operational Overview Printing Process Paper Path of the Printer Major Assemblies and Functions Printer Modes Printer Control Drive Transmission Optional 550 Sheet Feeder Drive Scanner Assembly Fax System ...

Страница 84: ...ne AIO Controller Scanner Assembly The Scanner Assembly scans document for copying scanning and facsimile sending Automatic Document Feeder ADF is a standard feature Print Engine The Print Engine writes video data on paper for copying printing files received by facsimile and printing The Image Output Terminal IOT prints data in four colors CMYK The laser xerography system employs four color indepe...

Страница 85: ... For Fax sending the Scanner Controller sends data via the Network Control Unit NCU to the communication line For Fax receiving the Scanner Controller processes data sent from the communication line via the NCU and sends the data to the Printer Controller Automatic Document Feeder Scanner Assembly CCD Lamp Inverter Sensor Motor Print Engine Control Panel Scanner Controller Network Control Unit Las...

Страница 86: ...iagram The following block diagram provides the sequence of events for the xerographic process dashed lines and the paper flow solid lines into and out of the Phaser 6180MFP S MFP 0RINT ARTRIDGE 9 4RANSFER 5NIT 0APER HARGE XPOSURE EVELOPMENT 4RANSFER RUM TO 0APER LEANING EUTRALIZATION USING LEANING ...

Страница 87: ...finished toner image on the Drums is transferred onto the paper 5 Cleaning Print Cartridge Remaining toner on the drums is collected 6 Neutralization The Detack Saw neutralizes the charge on the paper via the Belt 7 Fusing The Fuser applies toner on to paper using heat and pressure 8 Cleaning Remaining toner on the Transfer Unit is collected s6180mfp 029 Laser Unit 2 Exposure Print Cartridge C M Y...

Страница 88: ...tates following the rotations of the Drum The BCR is a conductive roll which receives negative voltage from the High Voltage Power Supply HVPS and discharges a negative Direct Current DC voltage The Drum surface is uniformly and negatively charged with DC bias voltage The Drum surface is a photoreceptor which is an insulator in a dark area and a conductor when receiving light and the Drum inside i...

Страница 89: ...ion as the polygon mirror rotates which attaches the fixed mirror and lenses to the Scanner Motor of the Laser Unit Rear View Mirror Mirror Laser Diodes Laser Diode Board Lens Scanner Polygon Mirror Window SOS Sensor SOS Board Front s6180mfp 031 Laser Beam K Laser Beam C Laser Beam M Laser Beam Y Mirror Mirror Mirror Mirror Mirror Mirror Mirror Mirror Mirror Mirror Polygon Mirror Lens Lens Drum K ...

Страница 90: ...yan Magenta Yellow and Black colors The area on the surface where the voltage potential drops due to exposure to the laser beam becomes the electrostatic latent image Laser Unit Laser Beams Laser Beam Laser Beam Laser Beam Negative Electric Charge Positive Electric Charge Photoreceptor Photoreceptor Conductor Conductor Drum Electrostatic Latent Image Electrostatic Latent Image Potential on Drum Su...

Страница 91: ... is called Toner Dispensation which is controlled by two processes Pixel Count Dispense Control PCDC and Automatic Density Control ADC The toner fed into the Developer and the carrier in the Developer are agitated by the Auger and supplied to the Magnet Roll arranged in the drum surface area The toner and carrier are charged by friction due to agitation toner in negative carrier in positive and th...

Страница 92: ...ecrease potential is lower than the magnet roll while the potential is higher than the magnet roll at the area where the negative charge on the drum surface decreases The AC voltage shakes the Developer on the Magnet Roll surface causing the toner to transfer to the drum Thus the negatively charged toner is attracted only by the area where the negative charge has decreased on the drum surface from...

Страница 93: ...ce is transferred onto the surface of the paper The toner is transferred onto the paper in the order of Y M C and K s6180mfp 035 Drum Surface Black Toner Image Drum Surface Cyan Toner Image Drum Surface Magenta Toner Image Drum Surface Yellow Toner Image Paper Black Toner Image Cyan Toner Image Magenta Toner Image Yellow Toner Image ...

Страница 94: ...R After the negative charged toner image on the Drum surface is drawn by the positive charge on the belt it is transferred from the Drum to the paper The Transfer Unit feeds the paper toward the direction of the Fuser Electric Static Attachment ESA Roll The ESA Roll is a conductive roll which receives positive voltage from the HVPS and discharges to the paper to improve the toner transfer efficien...

Страница 95: ... off toner Cleaning Roll The Cleaning Roll contacts the surface of the BCR collecting the excess toner by scraping off toner Charge Cleaning When the Drum is charged by the BCR any excess charge hinders the Drum surface from being uniformly charged which may lead to print quality problems The excess charge on the surface of the Drum is eliminated by irradiating light of the Erase Lamp LED s6180mfp...

Страница 96: ... on the paper via the Belt The Detack Saw a metal sheet secured at the ground level is installed at several millimeters away from the back side of the belt s6180mfp 037 Negative Electric Charge Positive Electric Charge Paper Drum Drum Drum Drum Detack Saw Detack Saw Detack Saw Detack Saw K C M Y BTR BTR BTR BTR HVPS Transfer Unit ...

Страница 97: ... Toner is fused onto the paper by the combination of heat and pressure Cleaning A cleaning blade in the Print Cartridge scrapes off toner remaining on the drum surface after transfer has occurred Then the latent charge pattern remaining on the photoconductive drum is neutralized by the Erase Lamp to prepare the drum for the next Exposure cycle Warm Up Stand By Printing Main Heater Lamp On On Off O...

Страница 98: ...iple Sheet Feed Prevention Multiple Sheet Feed Prevention Multiple Sheet Feed Prevention 550 Sheet Feeder Tray 3 Motor Drive Solenoid MPT Roll Turn Roll Motor Drive Clutch Feed Roll Turn Roll 250 Sheet Standard Tray Tray 2 Motor Drive Clutch Feed Roll Lead Edge Registration Registration Motor Drive Clutch Regi Roll Transfer Unit Motor Drive Belt Fuser Motor Drive Heat Roll Pressure Belt Exit Roll ...

Страница 99: ...Gate Heat Roller Fuser Duplex Roller Duplex Module Duplex Roller Duplex Module Duplex Jam Sensor Duplex Module Belt Transfer Unit Regi Roller Metal Registration Regi Roller Rubber Registration Regi Sensor Registration No Paper Sensor 250 Sheet Feeder No Paper Sensor 550 Sheet Feeder Tray 1 MPT No Paper Sensor Tray 1 MPT Roller Tray 1 MPT Turn Roller Feed Roller 250 Sheet Feeder Tray 2 Retard Rolle...

Страница 100: ... printer configuration Tray 2 Paper Feeder Tray 1 MPT Registration Fuser Unit Transfer Unit Laser Unit Print Cartridge Main Drive Electrical Duplex Unit Tray 3 Optional 550 Sheet Feeder Tray 2 Tray 2 Left Right Side Guide The Side Guides move at a right angle toward the paper transfer direction to align the paper width s6180mfp 041 Bottom Plate Tray 2 End Guide Left Side Guide Right Side Guide Ret...

Страница 101: ...t Guide which pushes the Stopper b The Stopper unlocks the Bottom Lock Oneway Gear c When the tray is pushed until it stops the Bottom Lock Lever is pressed down by the Support Nudger in the Sheet Feeder d The Bottom Lock Lever actuates the Bottom Lock Lever Gear which pushes the Bottom Rack Lock toward the rear e The gear on the Bottom Rack Lock is disengaged from the Bottom Lock Oneway Gear whic...

Страница 102: ...ges which can cause a multiple feed or a jam The Nudger Roller feeds the sheets to a position between the Feed Roller and the Retard Roller Normally when only one sheet is fed both the Feed Roller and Retard Roller rotate to allow the sheet to pass s6180mfp 085 Feed Roller Takeaway Roller Feed Roller Nudger Roller Retard Roller Separator Retard Roller Separator Friction Clutch Single Feed ...

Страница 103: ...ue to extra force from feeding two sheets this process allows the upper sheet to pass by as the lower sheet is stopped by the friction with the Retard Roller at rest The Retard Roller is pushed toward the Feed Roller by spring pressure and controlled by the Friction Clutch with which it is coupled s6180mfp 042 Feed Roller Takeaway Roller Feed Roller Nudger Roller Retard Roller Separator Retard Rol...

Страница 104: ...oller The Feed Roller Takeaway Roller feeds the paper when the Feed Clutch operates Tray 2 Feed Clutch The Feed Clutch transmits drive energy from the Drive Assembly to the Feed Roller s6180mfp 143 No Paper Sensor Feed Roller Takeaway Roller Feed Roller Nudger Roller Feed Clutch Tray 2 Paper Size Switch ...

Страница 105: ...d Guide The paper size is detected at the End Guide position Note Refer to Paper Size Detection on page 2 56 for detailed information on paper size switches and paper size s6180mfp 045 Size Switch Size Switch Actuator Tray End Guide s6180mfp 044 Legal 13 SEF Executive SEF B5 SEF A5 SEF Letter SEF A4 SEF Legal 14 SEF Tray 2 End Guide All paper should be loaded SEF ...

Страница 106: ...Service Manual Theory of Operation Tray 2 No Paper Sensor The No Paper Sensor detects the presence of the paper in the tray based on the Tray 2 No Paper Actuator position s6180mfp 046 No Paper Sensor No Paper Actuator Actuator No Paper Position ...

Страница 107: ...to the Registration Chute Tray 1 MPT Registration Sensor The Registration Sensor detects paper when the paper leading edge reaches the Registration Chute When paper is fed from Tray 1 MPT the Registration Sensor measures the paper length The On time of the Registration Sensor is converted into the paper length Note On The paper activates the Actuator s6180mfp 144 Tray 1 MPT Feed Roller Tray 1 MPT ...

Страница 108: ...x path to the Print Cartridge direction The timing of sheets feeding from the Registration is adjusted by the duration of the Registration Clutch operation so that the toner image on the drum can be transferred to the appropriate position on the sheet Tray 1 MPT Feed Solenoid The Feed Solenoid controls drive energy from the Drive Assembly to the Tray 1 MPT Feed Roller s6180mfp 048 Tray 1 MPT Feed ...

Страница 109: ... The sheets loaded in Tray 1 MPT are occasionally stuck together at the edges which can cause a multiple sheet feed or a jam Normally when only one sheet is fed both the Feed Roller and Retard Roller rotate to allow the sheet to pass Tray 1 MPT No Paper Sensor No Paper Actuator s6180mfp 049 Tray 1 MPT No Paper Sensor Paper No Paper Actuator Single Feed s6180mfp 086 Tray 1 MPT Feed Roller Retard Ro...

Страница 110: ...om rotating due to the extra force from feeding two sheets this process allows the upper sheet to pass by as the lower sheet is stopped by the friction with the Retard Roller at rest The Retard Roller is pushed toward the Feed Roller by spring pressure and controlled by the Torque Limiter Friction Clutch Retard with which it is coupled Multiple Feed s6180mfp 050 Tray 1 MPT Feed Roller Retard Rolle...

Страница 111: ...sition needs to be aligned at the Registration rollers before the sheet is fed in front of the Transfer Unit Belt or in front of BTR s Before the Registration rollers are energized the paper is advanced from the tray to the rollers This process aligns the leading edge as shown below By pushing the edge of the sheet coming out of Tray 1 MPT against the Registration Roller that is not turning the le...

Страница 112: ...uators A and B Actuator A detects the sheet fed from Tray 1 Duplex Actuator B detects the sheet fed from the paper tray The movement of Actuator A does not affect Actuator B s6180mfp 053 Registration Sensor Actuator A Actuator B From Paper Tray Paper Normal Position Registration Sensor Registration Sensor Actuator A Actuator A Actuator B Actuator A Actuator B From Tray 1 MPT or Duplex Paper Regist...

Страница 113: ... Thermostat Temperature Sensor Pressure Belt Exit Roller and Exit Sensor Heat Roller The Heat Roller is a metal tube with coated surface and a Heater inside As the paper passes between the Heat Roller and Pressure Belt heat that is applied to the paper melts the toner and fuses it to the paper Temperature Sensor STS Temperature Sensor NCS Thermostat Heater Lamp Heat Roller Pressure Belt Rear View ...

Страница 114: ...e edge of the Heater Lamp and the Non Contact Sensor NCS is located at the center of the Fuser The sensors monitor temperature of each location to control lighting of the Heater Lamp The Sensors are mounted in contact with the surface of the Heat Roller Power to the Heater Lamp is turned On and Off using the signals from these sensors so that the surface temperature of the Heat Roller can be maint...

Страница 115: ...control the density of toner ADC Solenoid To activate the ADC Pad turn On the ADC Solenoid for a fixed time before the ADC Sensor starts reading the toner patches When turned On the ADC Solenoid activates the ADC Pad which cleans contamination on the ADC Sensor surface ESA Roller The ESA Roller discharges a positive voltage to the paper Toner transfer efficiency is raised by applying a positive ch...

Страница 116: ...tes laser beams to form electrostatic latent image on the drum surface The Laser Unit consists of the following components Laser Diode LD Scanner Start of Scan SOS Board Lenses Mirror and Window s6180mfp 145 Rear View Mirror Mirror Laser Diodes Laser Diode Board Lens Scanner Polygon Mirror Window SOS Sensor SOS Board Front Laser Unit ...

Страница 117: ...m the LD is irradiated onto the Polygon Mirror via the Mirror The Polygon Mirror provided with six reflecting mirror faces changes the reflection angle of the laser light as it rotates by the Scanner Motor thereby allowing the laser light to scan the drum along its axial direction Scanning is performed using one reflecting mirror face for each line Start of Scan SOS Board The SOS Sensor on the SOS...

Страница 118: ...y to the Agitator and Auger in the Print Cartridge and provides toner to the Developer part of the Print Cartridge Print Cartridge The printer contains four Print Cartridges Cyan Magenta Yellow and Black Print Life for the Print Cartridges are Standard Capacity 2 000 pages for color print and 3 000 pages for black white prints High Capacity 6 000 pages for color prints and 8 000 pages for black wh...

Страница 119: ...The light of the LED passes through the lens of the Print Cartridge illuminates the Drum and eliminates the charge on the Drum s6180mfp 147 CRU Sensor Actuator No Cartridge Position CRU Sensor Actuator Cartridge in Position Print Cartridge Sensor C M Y K Print Cartridge Sensor C M Y K Print Cartridge CRU Sensor s6180mfp 056 Erase Lamp Erase Lens LED Drum Print Cartridge ...

Страница 120: ... Motor provides drive energy for the Black Drum Transfer Unit and Fuser Sub Motor The Sub Motor provides drive energy for the Black Developer Cyan Magenta and Yellow Drums Developer Motor The Developer Motor provides drive energy for the Cyan Magenta and Yellow Developers Main Drive Exit Clutch Main Motor Sub Motor Developer Motor Tray 2 Motor Drive Assembly s6180mfp 148 ...

Страница 121: ...otor to the Exit Roller in the Fuser When Duplex mode is in use the Exit Clutch stops The Exit Roller is driven by the Duplex Motor Drive Assembly The Drive Assembly provides drive energy for Tray 1 MPT Tray 2 and Registration The Tray 2 Motor is part of the Drive Assembly Note Refer to Mechanical Components on page 2 62 for detailed diagrams ...

Страница 122: ... Service Manual Theory of Operation Electrical Switches Sensor and Boards Humidity Temperature Sensor Interlock Switch s6180mfp 150 s6180mfp 149 Power Switch EEPROM Board Interlock Switch Humidity Temperature Sensor Control Panel Main Fan HVPS ...

Страница 123: ...er copier fax LVPS s6180mfp 377 MCU Board Scanner Controller Board Fax Board IP Board Multi Protocol Network Card s6180mfp 133 Clear All Error Power Saver Stop Start 001 002 003 004 005 006 007 008 009 010 Copy Fax E mail Scan Color Mode B W Color OK Job in Memory Job Status ABC GHI PQRS Redial Pause Speed Dial _ TUV WXYZ JKL MNO 1 2 3 4 5 6 7 8 0 C 9 DEF System Manual Dial ...

Страница 124: ... Control Unit MCU Board Humidity Temperature Sensor The Humidity Temperature Sensor reads the humidity and temperature within the machine Interlock Switch The Interlock Switch is a switch that cuts the 24 VDC power supply to the HVPS or Motor upon the opening of the Front Cover Low Voltage Power Supply Two types of Low Voltage Power Supply LVPS are available 100 120V and 230V The LVPS supplies AC ...

Страница 125: ...n High Voltage Power Supply The High Voltage Power Supply HVPS provides high voltage power to the components in the Transfer Unit and Print Cartridge to perform charging development and primary transfer of the print process to the BCR BTR Developer and ESA Roller s6180mfp 152 ...

Страница 126: ...ne of the following available ports Parallel USB or Ethernet The received host data is buffered stored and sent to the print engine in a rasterized format 1 Standard Memory 384 MB on board RAM 2 Optional Memory DIMM should be swapped 3 Multi Protocol Network Card Connection 4 NVRAM 5 Ethernet Connection 6 PC Interface Connection Parallel 7 USB Connection When installing a new I P Board in the prin...

Страница 127: ...tion from the Sensors or Switches Major functions include 1 Communicates with the Image Processor Board 2 Receives information from the Sensors or Switches 3 Controls the Motors in the Main Drive and Drive Assembly 4 Distributes low voltage DC power generated from the LVPS to each component 5 Controls the Laser Unit Note When replacing an MCU Board be sure to transfer the NVRAM from the old MCU Bo...

Страница 128: ...head and then converted by the Scanner Controller Board into CMYK data CMYK data is then routed either to the MCU I P Board or Fax Modem for proper management Fax Board The Fax Board provides and interfaces between remote fax machines and the Scanner Controller Board Incoming fax data is received by the modem board and is passed directly to the Scanner Controller Board for further processing Outgo...

Страница 129: ... is shown in the following diagram Host Electric Signal I P Board Electric Signal Machine Control Unit Electric Signal Laser Unit Laser Beams Electrostatic Latent On Drum Invisible Image Toner Image On Drum Toner Image On Paper Print Image On Paper s6180mfp 057 Computer I P Board MCU Board Laser Unit Print Cartridges 4x Print Cartridges 4x Transfer Unit Fuser ...

Страница 130: ... the Clutch operates the Exit Roller rotates in the reverse direction Duplex Motor The Duplex Motor provides drive energy to the Lower Roller Duplex 2 Roller Upper Roller Duplex 1 Roller and Exit Roller on the Fuser Duplex Board The Duplex Board controls the Motor Sensor and Clutch Duplex Fan The Duplex Fan removes heat from inside of the printer to prevent overheating s6180mfp 058 Upper Duplex Ro...

Страница 131: ...direction to align the paper width Tray 3 End Guide The End Guide moves toward the paper direction to determine the paper size The On Off of the Size Switches adjust according to the Tray 3 End Guide position to detect the paper size Tray 3 Retard Roller The Retard Roller and the Feed Roller Pick Up Unit pinch the paper to feed s6180mfp 155 Bottom Plate Tray 3 End Guide Right Side Guide Left Side ...

Страница 132: ...e Support Nudger in the Feeder d The Bottom Lock Lever actuates the Bottom Lock Lever Gear which pushes the Bottom Rack Lock toward the rear e The gear on the Bottom Rack Lock is disengaged from the Bottom Lock Oneway Gear which allows the Bottom Plate to raise up by the Bottom Up Springs a b c d e Bottom Lock Oneway Gear Stopper Stopper Lock Part Tray Housing Bottom Lock Lever Support Nudger Bott...

Страница 133: ...erates the Feed Roller rotates and feeds the paper Tray 3 Turn Clutch The Turn Clutch transmits drive energy from the Optional 550 Sheet Feeder Drive through the Turn Clutch to feed the paper from the paper tray to the printer Optional 550 Sheet Feeder Drive The Optional 550 Sheet Feeder Drive drives the rollers of the Optional Feeder Optional 550 Sheet Feeder Board The Optional 550 Sheet Feeder B...

Страница 134: ... 3 End Guide Paper is detected at the Tray 3 End Guide Note Refer to Paper Size Detection on page 2 56 for detailed information on paper size switches and paper size s6180mfp 045 Size Switch Size Switch Actuator Tray End Guide s6180mfp 156 Legal 13 SEF Executive SEF B5 SEF A5 SEF Letter SEF A4 SEF Legal 14 SEF Tray 3 End Guide All paper should be loaded SEF ...

Страница 135: ...which can cause a multiple sheet feed or a jam The Nudger Roller feeds the sheets to a position between the Feed Roller and the Retard Roller Normally when only one sheet is fed both the Feed Roller and Retard Roller rotate to allow the sheet to pass s6180mfp 085 Feed Roller Takeaway Roller Feed Roller Nudger Roller Retard Roller Separator Retard Roller Separator Friction Clutch Single Feed ...

Страница 136: ... due to extra force from feeding two sheets this process allows the upper sheet to pass by as the lower sheet is stopped by the friction with the Retard Roller at rest The Retard Roller is pushed toward Feed Roller by spring pressure and controlled by the Friction Clutch with which it is coupled s6180mfp 042 Feed Roller Takeaway Roller Feed Roller Nudger Roller Retard Roller Separator Retard Rolle...

Страница 137: ...ode An error is detected in the printer Initializing Mode The printer is initializing with a new Developer Unit new parts have been installed into the printer Checking Unit Mode The printer is checking consumable units s6180mfp 061 Init CRU Initializing Checking Unit Wait Ready Printing Wait Printing Error Printing Wait Error Printing Error Power On CRU Check Cleaning Process Control Door Close Mo...

Страница 138: ...urn sets the plastic fingers on the side of the paper tray to a specific position that activates the correct switch combination for the selected paper size Note On The Actuator is pushing the Size Switch Paper Size Switches Indicated as SW1 SW2 and SW3 Paper Size Paper Size Switch SW1 SW2 SW3 Letter SEF Off Off On A4 SEF Off On On A5 Off On Off B5 SEF On Off Off Legal 13 SEF On On On Legal 14 SEF ...

Страница 139: ...djusted for each color Process Control For stable printing the parameters related to the image development must be corrected as necessary The process control is performed in two methods after every 25 cumulative prints or during a continuous run Potential Control Toner Density Control The following controls supplement the above controls High Area Coverage Mode Admix Mode Potential Control To attai...

Страница 140: ...nsor measures this density and the measured value is compared with reference value If the toner density is low the toner dispense quantity is increased at the next printing or if the toner density is higher the toner dispense quantity is reduced at the next printing The toner dispense quantity is calculated by the toner dispense time This calculation is made for each color High Area Coverage Mode ...

Страница 141: ... on the Belt as an objective The reflected light intensity varies depending on the Belt surface condition or dirty condition of the ADC Sensor surface The light intensity emitted from the LED is controlled so that the reflected light intensity satisfies the specified value This control is made in two ways one to set the light intensity so that the reflected light quantity satisfies the specified v...

Страница 142: ...made from a change in inside temperature and the print count at the execution of the process control This control is outlined as follows 1 With no toner on the Transfer Belt the output value of the ADC Sensor is measured to determine the threshold value 2 The patches for color registration control are generated on the Belt These patches are composed of 10 mm lines of K C K M K and Y in this order ...

Страница 143: ...perature will be changed based on the interior temperature detected by the Humidity Sensor the difference of the temperature between the center and edge areas of the Heat Roll Printing Mode or the Input Power Voltage Cool Down As printing continues the distribution of temperature in the Heat Roll becomes uneven in both the paper feed and non paper feed areas Cooling Down process is to provide a ce...

Страница 144: ...ecomes an electromagnetic by transferring electric current through the coil inside the case and attracts the armature and gear to the rotating rotor which rotates the Gear When the Coil lost its power electromagnetic force is lost and the armature comes off the rotor and the Gear stops rotating The Clutch makes very soft noise When verifying the Clutch operation ensure to stay close to the compone...

Страница 145: ... original position by spring action which allows the shutter to operate or the Gear to move to the predefined position Unlike a Clutch a Solenoid generates a loud noise Sensor A transmissive type sensor is composed of the light emitting side and the light receiving side that are placed opposite to each other allowing the light to pass from the former to the latter On the basis of whether or not th...

Страница 146: ...a button which is pushed down under the leaf spring that is held down by the Actuator of the cover or door that is being closed When the door or cover is opened the leaf spring returns to its original position and the button is pushed up by the spring in the Switch allowing the internal contacts to open Actuator Button Blade Contact ...

Страница 147: ...ack and White Mode Process s6180mfp 065 Black and White Mode Name of Moving Parts Main Drive Main Motor Sub Motor Drive Gear Belt Transfer Unit Drum Gear K Drum Gear C Drum Gear Y Drum Gear M Drum K Drum C Drum M Drum Y Print Cartridge C Print Cartridge K Print Cartridge M Print Cartridge Y Magnet Roller Gear K Developer Idler Gear K Auger Gear K Auger Gear K Magnet Roller K Supply Auger K Admix A...

Страница 148: ...mfp 066 Black and White Mode Drive Gear Belt Drum Gear K Drum K Drum Gear C Drum C Drum Gear M Drum M Drum Gear Y Drum Y Main Motor Main Drive Magnet Roller Gear K Magnet Roller K Name of Moving Parts Developer Idler Gear K Auger Gear K Supply Auger K Auger Gear K Admix Auger K Sub Motor Front ...

Страница 149: ...ridge M Print Cartridge Y Print Cartridge Y Name of Moving Parts Magnet Roller Gear K Magnet Roller Gear C Magnet Roller Gear M Magnet Roller Gear Y Magnet Roller K Magnet Roller C Magnet Roller M Magnet Roller Y Developer Idler Gear K Developer Idler Gear C Developer Idler Gear M Developer Idler Gear Y Auger Gear K Auger Gear C Auger Gear C Auger Gear M Auger Gear M Auger Gear Y Auger Gear Y Auge...

Страница 150: ...gnet Roller Gear K Magnet Roller K Developer Idler Gear K Auger Gear K Supply Auger K Auger Gear K Admix Auger K Magnet Roller Gear C Magnet Roller C Developer Idler Gear C Auger Gear C Supply Auger C Auger Gear C Admix Auger C Magnet Roller Gear M Magnet Roller M Developer Idler Gear M Auger Gear M Admix Auger M Auger Gear M Supply Auger M Magnet Roller Gear Y Magnet Roller Y Developer Idler Gear...

Страница 151: ... Exit Clutch Exit Idler Gear 6 Exit Idler Gear 6 Exit Idler Gear 5 Exit Idler Gear 4 Exit Idler Gear 3 Exit Idler Gear 2 Heat Roller Idler Gear Duplex Idler Gear 1 Duplex Idler Gear 2 Exit Gear Heat Roller Gear Exit Roller Fuser Heat Roller Name of Moving Parts Duplex Gear 25Z Duplex Gear 21Z 25Z Duplex Idler Gear 21Z Duplex Clutch Duplex Module ...

Страница 152: ...ex Idler Gear 21Z Duplex Gear 21Z 25Z Duplex Gear 25Z Duplex Idler Gear 2 Duplex Idler Gear 1 Exit Idler Gear 6 Exit Idler Gear 6 Exit Idler Gear 5 Exit Idler Gear 4 Exit Idler Gear 3 Exit Idler Gear 2 Fuser Paper Exit Gear Exit Roller Heat Roller Idler Gear Main Drive Exit Clutch Main Motor Heat Roller Gear Heat Roller Name of Moving Parts Front ...

Страница 153: ... the Dispensers C M Y and K Customer Replaceable Unit Process s6180mfp 071 Dispenser C M Y K Dispenser Input Gear Cleaning Paddle Gear Cleaning Paddle Agitator Gear 2 Agitator Gear 2 Front Agitator Rear Agitator Dispenser Idler Gear 1 Main Developer Agitator Gear Main Developer Agitator Gear Rear Main Agitator Front Main Agitator Dispenser Idler Gear 1 Dispenser Gear Dispenser Auger Name of Moving...

Страница 154: ... Agitator Gear 2 Front Agitator Name of Moving Parts Dispenser C M Y K Cleaning Paddle Gear Cleaning Paddle Front Dispenser Input Gear Dispenser Idler Gear 1 Print Cartridge C M Y K Dispenser Gear Dispenser Auger Main Developer Agitator Gear Front Main Agitator Main Developer Agitator Gear Rear Main Agitator Dispenser Idler Gear 1 ...

Страница 155: ...rocess s6180mfp 073 Name of Moving Parts Drive Assembly Tray 2 Motor Tray 1 MPT Feed Solenoid Tray 1 MPT Gear Tray 1 MPT Roller Tray 1 MPT Turn Clutch Registration Clutch Turn Roller Rubber Registration Roller Rubber Registration Gear Metal Registration Gear Metal Registration Roller Feeder Feed Clutch Oneway Nudger Clutch Feed Roller Feed Roller Nudger Idler Gear Nudger Roller Gear ...

Страница 156: ...stration Clutch Rubber Registration Roller Rubber Registration Gear Metal Registration Gear Metal Registration Roller Feed Clutch Tray 2 Motor Nudger Roller Gear Feed Roller Nudger Idler Gear Oneway Nudger Clutch Feed Roller Drive Assembly Front Tray 1 MPT Gear Tray 1 MPT Roller Tray 1 MPT Feed Solenoid Turn Clutch Turn Roller ...

Страница 157: ...Duplex Mode Duplex Module Duplex Drive Duplex Gear 40Z Duplex Roller 2 Duplex Belt Duplex Roller 1 Duplex Clutch Duplex Idler Gear 21Z Duplex Idler Gear 2 Duplex Idler Gear 1 Duplex Gear 21Z 25Z Duplex Gear 25Z Fuser Exit Idler Gear 6 Exit Idler Gear 6 Exit Idler Gear 5 Exit Idler Gear 4 Exit Idler Gear 3 Exit Idler Gear 2 Exit Gear Exit Roller Name of Moving Parts Exit Clutch Main Drive ...

Страница 158: ... Duplex Belt Duplex Module Duplex Clutch Duplex Roller 1 Duplex Idler Gear 21Z Duplex Idler Gear 1 Duplex Idler Gear 2 Duplex Gear 21Z 25Z Duplex Gear 25Z Duplex Mode Name of Moving Parts Exit Idler Gear 6 Exit Idler Gear 5 Exit Idler Gear 6 Exit Idler Gear 4 Exit Idler Gear 3 Exit Idler Gear 2 Fuser Paper Exit Gear Exit Roller Main Drive Exit Clutch ...

Страница 159: ...the Optional 550 Sheet Feeder Drive Optional 550 Sheet Feeder Process 6180mfp 077 Optional 550 Sheet Feeder Drive Optional Turn Clutch Turn Roller Name of Moving Parts Optional Feeder Clutch Oneway Nudger Clutch Optional 550 Sheet Feeder Tray Feed Roller Optional 550 Sheet Feeder Tray Feed Roller Nudger Idler Gear Nudger Roller Gear Optional 550 Sheet Feeder ...

Страница 160: ...ory of Operation Front View s6180mfp 078 Optional Feeder Drive Optional Turn Clutch Turn Roller Name of Moving Parts Feed Clutch Front Nudger Roller Gear Optional 550 Sheet Feeder Tray Feed Roller Oneway Nudger Clutch Optional 550 Sheet Feeder Nudger Idler Gear ...

Страница 161: ...pled Device CCD image sensor via the light path Scanning on Document Glass The Scanner Assembly travels to read the document The following components are installed on the Scanner Assembly Exposure Lamp that illuminates light onto the document CCD Image Sensor that reads light reflected from the document and Lenses and mirrors comprising the light path for the optical image CVT Position Home Positi...

Страница 162: ...oves to place the ADF Document Sensor in the unshielded unblocked state indicating media detection Preparation for Feed The media in the paper tray starts feeding when the Start button is pressed The Nudger Roller moves down and presses onto the media in the paper tray to enable media feed The Nudger Roller moves down with normal rotation of the ADF Motor Upon completion of media feed the ADF Moto...

Страница 163: ...the ADF Motor rotates to drive the Nudger Roller and Feed Roller The Nudger Roller feeds the top media in the document tray to the Feed Roller The Feed Roller nipped by the ADF Separator Pad feeds the media coming from the Nudger Roller one by one When the Feed Sensor detects the media the printer recognizes that first media feeding is complete s6180mfp 090 Nudger Roller ADF Separator Pad Feed Rol...

Страница 164: ...e Takeaway Roller which then feeds the media to the Registration Roller When the Registration Sensor detects the media the ADF Motor rotates to drive the Registration Roller and Exit Roller The Registration Roller feeds the media fed from the Takeaway Roller to the scan feed reference position Scan Control Scanning of the image illuminated with the Exposure Lamp of the Scanner Assembly is controll...

Страница 165: ...ed corresponding to the selected magnification and the image on it is scanned with the Exposure Lamp at the CVT position 4 As the image is scanned the media is fed and ejected by the Exit Roller that is driven by the ADF Motor Image Data Flow The image data from the media set on the Scanner or ADF goes through the following components before it is printed at the Engine section s6180mfp 092 Registr...

Страница 166: ... of the ADF Motor is transferred to each Document Feeding Roller as show in the following diagram s6180mfp 098 ADF Motor Gear A Gear B Gear C Takeaway Roller Feed Roller Friction Clutch Gear I Gear H Oneway Clutch Gear G Gear D Jam Clear Rotor Gear E Gear F Belt Exit Roller Regi Roller Gear J Gear K Gear L Nudger Roller ...

Страница 167: ...n Gear Layout s6180mfp 093 Registration Roller Exit Roller Nudger Roller ADF Feed Roller ADF Motor Gear D Gear A Gear C Gear B Gear F Gear E Gear G Oneway Clutch Gear J Gear H Gear I Gear L Gear K Friction Clutch Jam Clear Rotor Belt Feed Roller ADF Feed Roller Takeaway Roller ...

Страница 168: ...osition Sensor is a part of the rear section of the Scanner Assembly frame that functions as an Actuator which shields the Scanner Home Position Sensor thus detecting the Registration position Cold Cathode Fluorescent Lamp Exposure Lamp The Cold Cathode Fluorescent Lamp exposes the document Charged Coupled Device Board The Charged Coupled Device CCD Board Image Sensor converts optical images into ...

Страница 169: ...e Feed Sensor is located downstream from the Feed Roller to detect completion of document feed Document Present Shielded blocked Document Absent Unshielded unblocked Registration Sensor The Registration Sensor detects the preceding media is about to leave the Registration Roller thereby determining the next document feed can be started Document Present Shielded blocked Document Absent Unshielded u...

Страница 170: ...nt During AGC the Scanner Assembly is moved to the position of the white reference plate and the Exposure Lamp is illuminated The light reflected from the white reference plate is read by the CCD Image Sensor as the white reference value which is used to adjust the CCD Image Sensor output 2 AOC Auto Offset Control AOC is performed by turning Off the Exposure Lamp after AGC This state is read by th...

Страница 171: ... line for B W black and white s6180mfp 097 Status Printer Status Command Printer Fax Board Scanner Controller Board Drive Signal Image Signal Message Signal Drive Signal Drive Signal CCD Clock Image Signal Sensor Signal Sensor Signal Switch Signal Switch Signal Telephone Line ADF Sensor Board Motor Control Panel Switch Display LED Scanner CCD Board Motor Sensor Lamp Controller R G B Y M C K Image ...

Страница 172: ... at the other end of the string transmits them back to the air so that they again become audible sound waves A telephone is a device that replaces the vibrations transmitted by string with electrical signals The two paper cups correspond to microphone speaker and the string to the telephone line Because electrical signals travel over the telephone line at a high speed with minimal attenuation the ...

Страница 173: ...brate the coil which in turn vibrate the air to reproduce the voice These electrical signals are analog signals that fluctuate in response to the volume of the voice s6180mfp 099 N S N S String Telephone Telephone Hello Hello Hello Vibration Electromagnetic Induction a b Hello Electrical Current Diaphragm Speaker Microphone Diaphragm Magnet N Polarity Magnet S Polarity a The coil in the magnetic f...

Страница 174: ...e For example when sampling is by time the rate is once a second millisecond etc Because the sampling reduces the amount of data along the time axis the converted signal is compressed and smaller in data size Thus once digitized the signal information is spread out compared to the original analog signal Moreover digital signal transmission is performed by dividing a continuously changing electrica...

Страница 175: ...isions 12 47253 g 35 1864 g etc A digital instrument however can only display results to the minimum necessary decimal place 12 5 g 35 0 g etc Conversion of an analog signal to digital signal is called AD conversion DA conversion is the conversion of digital signal to analog signal Image data read by a Fax is a digital signal in which 0s and 1s are assigned according to whether or not there is bla...

Страница 176: ...s components such as metallic and optical cables The entire transmission path between the two telephones is called an analog telephone network An analog telephone network comprises of four parts Telephone Set Switch Subscriber Line and Transmission Route s6180mfp 101 Analog Telephone Network Configuration Telephone set Telephone set Switch Switch Subscriber line Transmission route Subscriber line ...

Страница 177: ...t is interrupted dividing the signal into pulses the number of times corresponding to the number dialed The switch derives the number from the number of pulses When the pulse repetition rate is ten pulses per second it is referred to as 10PPS Pulses Per Second when twenty 20PPS The other type is known as Tone Dialing TD formally called Dual Tone Multi Frequency DTMF Each button on a push button ph...

Страница 178: ... that receives the ringing signal emits its orienting At the same time the called party s local switch sends a ring back tone RBT to the calling party s telephone to indicate that a connection to the called party has been established 5 When the called party s handset is lifted activating the hook switch the local switch on the called party side receives a response signal and stops sending tones to...

Страница 179: ...modulation by the control circuit to enable transmission over an analog telephone line After conversion the data is sent as an analog signal The sound audible during transmission is image data that has become an analog signal that is an audio signal The analog signal arriving over the telephone line is then subjected to AD conversion demodulation by the control circuit of the receiving Fax machine...

Страница 180: ...e horizontal direction and 3 85 divisions per millimeter in the vertical direction This means that the 200 dpi in line CCD unit is shifted approximately four times per millimeter in the vertical direction For an A4 original the data amounts to approximately two million pixels In the high quality mode G3 Fine scanning resolution is 8 divisions per millimeter in the horizontal direction and 7 7 divi...

Страница 181: ...s an audible sound 2 After image scanning the telephone number a previously stored number number entered by pressing phone buttons etc is automatically dialed and transmitted to the local switch 3 The switch connects lines according to the transmitted number 4 When a connection between local switches is established the local switch of the called party sends a ringing signal to the telephone of the...

Страница 182: ... a Fax transmission b The receiving Fax indicates that it is ready to receive and also its communications capacity c The sending Fax then sends data in accordance with the receiving Fax s communications capacity Once the preparation is completed image data sending and receiving is started Image data is modulated into an analog signal by the A D converter at the sending Fax then sent from its NCU I...

Страница 183: ... Recommendation T 30 page 2 105 All G3 fax machines conform to this protocol when exchanging signal to establish communication The G3 fax session consists of five phases from Phase A to Phase E Phase A Call Establishment Phase B Capability Negotiations Phase C Image Data Transfer Phase D Post transfer Procedure Phase E Call Release The following flow chart provides a typical G3 fax session of a on...

Страница 184: ...n to Receive CFR which indicates that the receiving side is ready for receiving image data In the event of an abnormal TCF reception the receiving side responds with Failure to Train FTT which requests retransmission of NSS TSI DCS and TCF signals Phase C Image Data Transfer The sending side transmits the image data based on the parameters agreed upon in Phase B Also carried out are the signaling ...

Страница 185: ...side responds with Procedural Interrupt Negative PIN When retransmission is required in Error Correction Mode ECM the receiving side responds with Partial Page Request PPR ECM A transmission method that manages the encoded data by dividing it in units called frames and by numbering them In the event of image corruption due to noise etc image quality can be corrected by retransmitting only the corr...

Страница 186: ...x session Sending side From the detection of incoming CED signal to the transmission of DCN signal Receiving side From the transmission of CED signal to the detection of incoming DCN signal The following example provides a Protocol Monitor report sample with the descriptions of signals handled by Protocol Monitor Time passed since the communication started Signal sent from this station Signal rece...

Страница 187: ...d Year Issued Minimum Transmission Time for Single Page A4 Document Maximum Resolution Maximum Transmission Speed Features Group 1 G1 1968 Approx 6 min 100 x 100 dpi Analog First standard Analog transmission No band compression technology Group 2 G2 1976 Approx 3 min 100 x 100 dpi Analog Analog transmission Band compression technology adopted Group 3 G3 1980 Approx 1 min 200 x 200 dpi 14 4kbps Sup...

Страница 188: ...2 106 Phaser 6180MFP Multifunction Printer Service Manual Theory of Operation ...

Страница 189: ...ntroduction Servicing Instructions Messages Chain Link Codes and Procedures Jam Errors Consumable Routine Maintenance Errors Tray and Paper Errors Options Errors Configuration Memory and Firmware Errors E Mail Errors Scanner and Copier Errors Fax Errors ...

Страница 190: ...this section include Error messages and Chain Link codes display on the Control Panel Engine fatal and Jam Error logs display on the Control Panel or listed on the Error History Report Accessing Error History Report 1 From the Control Panel press the System button 2 Information Pages is displayed Press the OK button 3 Press the Up or Down arrow button to find Error History Press the OK button 4 Th...

Страница 191: ...s The Error History page contains two types of history information System Fail History System Fail History contains Item Number Total Print Count and Chain Link code Paper Jam History Paper Jam History contains Item No Total Print Count and Paper Jam Type information s6180mfp 378 ...

Страница 192: ...protect them from light 5 Remove the Transfer Unit 6 Inspect the printer interior and remove any foreign matter such as paper clips staples pieces of paper dust or loose toner 7 Do not use solvents or chemical cleaners to clean the printer interior 8 Do not use any type of oil or lubricant on printer parts 9 Use only an approved toner vacuum 10 Clean all rubber rollers with a lint free cloth dampe...

Страница 193: ...e to limited display space some error messages include abbreviations The most common abbreviations used throughout this chapter are listed here Term Definition ADC Automatic Density Control ASIC Application Specific Integrated Circuit BLK Black COMM Communication CRT Cartridge CRUM Customer Replaceable Unit ER ERR Error ENV Environment FUNC Function MACaddress Media Access Control Address MCU Mach...

Страница 194: ...0MFP Chain Link Definition for Printer Chain Fail Group Link Definition 010 310 Fuser 016 500 Controller ESS 018 310 Network Connect 024 310 910 Controller IOT 041 310 IOT 042 310 700 IOT Fan Motor 061 310 IOT ROS 071 100 Tray 2 072 100 Tray 3 075 100 Tray 1 MPT 077 210 900 Undefined Tray 092 600 IOT Sensor 093 310 910 IOT Developer Print Cartridge CRUM 094 310 910 IOT Transfer Unit 116 310 910 Co...

Страница 195: ... Job Fail 700 Fax Module 062 Sub System Fail 310 700 Scanner 102 System Fail 310 Controller UI Panel 123 System Fail 310 Panel Error Message and Chain Link Code Display Chain Link Code Control Panel Message Go to Page Jam Errors page 3 19 N A Jam at Tray 2 Illegal Settings page 3 19 005 110 Jam at Scanner Pickup Jam page 3 22 005 121 Jam at Scanner ADF Jam page 3 22 071 100 Jam at Tray 2 IOT Feede...

Страница 196: ...Print Cartridge CRUM Error Y M C page 3 57 093 960 093 961 093 962 Non Xerox Print Cartridge Y M K IOT CRUM ID page 3 59 093 970 093 971 093 972 093 973 Insert Print Cartridge Y M C K page 3 60 094 330 Transfer CRUM Error IOT CRUM ID Error page 3 67 094 422 Ready Transfer Unit Life IOT DTB Life Pre Warning page 3 68 094 910 Insert Transfer Unit IOT DTB Detached page 3 65 094 911 Replace Transfer U...

Страница 197: ...se Flash Error Download Write Error page 3 96 016 502 Verify Flash Error Download Verify Error page 3 96 016 610 Control Panel Language Set Unsupported page 3 97 016 611 Engine Model Mismatch page 3 98 016 718 Out of Memory page 3 99 016 720 PDL Error page 3 100 016 737 Format Error Download Format Error page 3 101 016 738 MPC Error Download Initial Error page 3 102 016 739 Reseat MPC Download Ins...

Страница 198: ...AM Error page 3 120 042 313 Fan Motor Error Duplex Fan IOT Fan Motor Failure page 3 122 042 325 Main Motor Error IOT Motor Failure page 3 126 042 326 Sub Motor Error IOT Motor Failure page 3 128 042 358 Fan Motor Error Main Fan IOT Fan Motor Failure page 3 130 042 700 Printer Too Hot IOT Over Heat Stop page 3 124 061 370 Laser Error IOT ROS Failure page 3 132 077 300 Door A Open IOT Front Cover Op...

Страница 199: ...page 3 116 116 352 Network Error On Board Network Internal Loopback Error page 3 116 116 355 Network Error On Board Network Fatal Error page 3 116 116 367 Parallel Port Error IEEE1284 Data Error page 3 153 116 390 NVRAM Error NVRAM1 Size and ID Check Fail page 3 150 116 392 MACPHY Chip Test Error Diag Mode page 3 154 116 393 MACPHY Int Loop Test Error Diag Mode page 3 155 116 394 MACPHY Ext Loop T...

Страница 200: ... Open ADF Cover Open page 3 167 016 783 Network Scan Error Invalid SMB FTP Server Error Server path List Error page 3 168 016 784 Network Scan Error Directory Not Found Error File Write Access Error page 3 168 016 786 Network Scan Error Communication Time Out Error Data Communication Time Out page 3 168 016 787 Network Scan Error Directory Not Found Error Make Directory Error page 3 168 016 788 Ne...

Страница 201: ...FlashROM Resume Error page 3 188 017 975 Controller Error File Handle Over page 3 188 017 976 Controller Error File Table Over page 3 188 017 977 Controller Error File Count Over page 3 188 017 978 Controller Error File Page Over page 3 188 017 979 Controller Error Double File Open page 3 188 017 980 Report Error Report File Open Close Error page 3 195 017 983 Controller Initialized NVM EEPROM R W...

Страница 202: ...Error Control Channel OFF Time Out page 3 200 033 761 Fax Communication Error Primary Channel OFF Time Out page 3 200 033 762 Fax Communication Error DM Prevention Function Receive Refuse page 3 202 033 763 Fax Communication Error Manual Transmission Read Manuscript Not Do page 3 204 033 764 Fax Communication Error Draw Data Create Not Do page 3 196 033 765 Fax Codec Error File Pointer Error page ...

Страница 203: ... DCS Illegal Command Receive page 3 215 034 799 Fax Number Error No Dial Data page 3 216 035 701 Target Fax No Answer Send T1 Time Out page 3 217 035 702 Fax Communication Error Receive DCN page 3 218 035 704 Fax Communication Error Not Send Ability page 3 218 035 705 Fax Communication Error DCS NSS Resend Over page 3 218 035 706 Fax Communication Error Fall Back Error page 3 200 035 708 Fax Commu...

Страница 204: ... page 3 188 117 312 Controller Error Download Program Sum Error page 3 188 117 314 Report Error Report Program Error page 3 195 117 315 EEPROM Error page 3 223 117 322 Task Error SYSMGR Task Error page 3 191 117 328 Task Error MSCAN Task Error page 3 191 117 335 Task Error DFAX Task Error page 3 191 117 336 Task Error PULL Task Error page 3 191 117 337 Task Error IITTX Task Error page 3 191 117 34...

Страница 205: ...93 133 254 Fax Error Mem Full page 3 193 133 259 Fax Error OS Call Error page 3 193 133 260 Fax Error File Open Error page 3 193 133 261 Fax Error File Close Error page 3 193 133 269 Fax Error File Close Error page 3 193 133 271 Fax Error Memory Pool Get Error page 3 193 133 272 Fax Error Message Send Error page 3 193 133 273 Fax Error Memory Pool Release Error page 3 193 133 274 Fax Error Message...

Страница 206: ...or Messages and Codes 133 288 Fax Error File Close Error page 3 193 133 289 Fax Error File Erase Error page 3 193 133 290 Fax Error Print Decode Error page 3 193 Error Message and Chain Link Code Display continued Chain Link Code Control Panel Message Go to Page ...

Страница 207: ...ces Feed Clutch Assy PL3 1 20 Registration Sensor PL3 2 30 Regi Sensor Harness Assembly PL3 2 37 Feed Drive Assy PL8 1 7 MCU Board PL9 2 13 Right Side Harness Assy PL10 1 12 Map 1 Electrical and Drive on page 10 10 Map 2 Laser Unit and Feeder on page 10 11 Map 4 LVPS and MCU Board on page 10 13 Tray 1 MPT and Registration on page 10 26 Feeder on page 10 30 Troubleshooting Procedure Table Step Acti...

Страница 208: ...ed Clutch test page 4 68 Service Mode Printer Diag Engine Diag Motor Test Tray 2 Feed Clutch 2 Does the Feed Clutch operate properly Replace the MCU Board page 8 88 Go to step 13 9 1 Check the wiring harness connectors P J23 P J232 and P J2322 between the MCU Board and the Registration Sensor 2 Are the connectors securely connected Go to step 10 Reconnect the connectors 10 Check the Registration S...

Страница 209: ...continuity between P J23 P J235 Go to step 15 Replace the Right Side Harness 15 Check the Feed Clutch Assembly signal 1 Disconnect P J23 from the MCU Board 2 Is there 24 V across ground J23 15 pin on the MCU Board in the Interlock Switch is activated Replace the Feed Clutch Assembly page 8 46 Replace the MCU Board page 8 88 16 1 Check the wiring harness connectors between the MCU Board and the Fee...

Страница 210: ...ssor Board and Dispenser Motors on page 10 12 Automatic Document Feeder Wiring Diagram on page 10 53 Troubleshooting Procedure Table Step Actions and Questions Yes No 1 1 Check the original document 2 Does the document meet the ADF specifications Go to step 2 Use the document glass mode or change the paper type 2 1 Check the ADF 2 Is the ADF completely closed Go to step 3 Close the ADF 3 1 Check t...

Страница 211: ... Scanner Controller Board Reseat the connectors 2 Does the error still occur when copying Replace the ADF Scanner Assembly page 8 103 Complete 7 1 Replace the ADF Scanner Assembly page 8 103 2 Does the error still occur whe copying Replace the Scanner Controller Board page 8 99 Complete Troubleshooting Procedure Table continued Step Actions and Questions Yes No ...

Страница 212: ...17 Tray 2 Feeder Assembly PL3 2 1 Registration Sensor PL3 2 30 Regi Sensor Harness Assembly PL3 2 37 Tray 2 Feed Roller PL3 2 53 MCU Board PL9 2 13 Right Side Harness Assy PL10 1 12 Map 2 Laser Unit and Feeder on page 10 11 Map 4 LVPS and MCU Board on page 10 13 Tray 1 MPT and Registration on page 10 26 Troubleshooting Procedure Table Step Actions and Questions Yes No 1 1 Check the jam paper locat...

Страница 213: ... 8 Check the Registration Sensor Harness for continuity 1 Disconnect P J2322 from the Registration Sensor 2 Disconnect P J232 from the Right Side Harness 3 Check continuity between P J232 P J2322 Go to step 9 Replace the Registration Sensor Harness 9 Check the Right Side Harness for continuity 1 Disconnect P J23 from the MCU Board 2 Disconnect P J232 from the Registration Sensor Harness 3 Check co...

Страница 214: ...ler PL13 2 10 Optional Feeder Board PL13 3 6 Optional Feeder Drive PL13 3 10 Optional 550 Sheet Feeder PL13 4 1 Retard Roller PL13 4 10 Map 2 Laser Unit and Feeder on page 10 11 Map 4 LVPS and MCU Board on page 10 13 Map 6 Optional 550 Sheet Feeder on page 10 15 Main Drive on page 10 28 Optional 550 Sheet Feeder Wiring Diagram on page 10 45 Troubleshooting Procedure Table Step Actions and Question...

Страница 215: ...ch 2 Does the Tray 3 Feed Clutch operate properly Go to step 8 Go to step 14 8 1 Perform the Tray 3 Turn Clutch test page 4 59 Service Mode Printer Diag Engine Diag Motor Test Tray 3 Turn Clutch 2 Does the Tray 3 Turn Clutch operate properly Go to step 9 Go to step 11 9 1 Check the Retard Rollers and Feed Roller for operation 2 Are the rollers correctly installed Go to step 10 Are the rollers cont...

Страница 216: ... between the Optional Feeder Board and the MCU Board 2 Are the connectors securely connected Go to step 16 Reconnect the connectors 16 Check the Right Side Harness for continuity 1 Disconnect P J273 from the Optional Feeder Harness 2 Disconnect P J27 from the MCU Board 3 Check continuity between P J273 P J27 Go to step 17 Replace the Right Side Harness 17 Check the Optional Feeder Board signal 1 D...

Страница 217: ...U Board 2 Are the connectors securely connected Go to step 21 Reconnect the connectors 21 Check the Right Side Harness for continuity 1 Disconnect P J273 from the Optional Feeder Harness 2 Disconnect P J27 from the MCU Board 3 Check continuity between P J273 P J27 Go to step 22 Replace the Right Side Harness 22 Check the Optional Feeder Board signal 1 Disconnect P J27 from the MCU Board 2 Is there...

Страница 218: ...t PL2 1 3 Separator Roll PL2 1 7 Tray 1 Feed Solenoid PL3 1 3 MPT Feed Roll PL3 1 10 Feeder Unit PL3 2 1 Turn Roll PL3 2 32 Registration Sensor Harness PL3 2 37 Feed Drive Assembly PL8 1 7 MCU Board PL9 2 13 Right Side Harness PL10 1 12 Map 2 Laser Unit and Feeder on page 10 11 Map 4 LVPS and MCU Board on page 10 13 Tray 1 MPT and Registration on page 10 26 Feeder on page 10 30 Troubleshooting Pro...

Страница 219: ...m the Tray 1 MPT Turn Clutch test page 4 66 Service Mode Printer Diag Engine Diag Motor Test Tray 1 MPT Turn Clutch 2 Does the Clutch operate properly Go to step 8 Go to step 18 8 1 Perform the Tray 2 Motor test page 4 56 Service Mode Printer Diag Engine Diag Motor Test Tray 2 Motor 2 Does the Motor operate properly Go to step 9 Go to step 21 9 1 Check the following for evidence of fault or damage...

Страница 220: ...rd 2 Is there 3 3 V across ground J23 8 pin on the MCU Board Go to step 14 Replace the MCU Board page 8 88 14 Check the Registration Sensor signal 1 Measure the voltage across ground J23 10 pin on the MCU Board 2 Does the voltage change when the Actuator of the Registration Sensor is activated Replace the MCU Board page 8 88 Replace the Feeder Unit page 8 47 15 1 Check the wiring harness connector...

Страница 221: ...the Turn Clutch signal 1 Disconnect P J23 from the MCU Board 2 Is there 24 V across ground J23 13 pin when the Interlock Switch is activated Replace the Feeder Unit page 8 47 Replace the MCU Board page 8 88 21 1 Check the wiring harness connectors P J25 and P J251 between the MCU Board and the Feed Drive Assembly 2 Are the connectors securely connected Go to step 22 Reconnect the connectors 22 Che...

Страница 222: ...ring and Plug Jack Map Reference Tray 1 MPT Retard Holder Kit PL2 1 3 Feeder Unit PL3 2 1 Feed Roll PL3 2 53 MCU Board PL9 2 13 Map 2 Laser Unit and Feeder on page 10 11 Map 4 LVPS and MCU Board on page 10 13 Tray 1 MPT and Registration on page 10 26 Feeder on page 10 30 Troubleshooting Procedure Table Step Actions and Questions Yes No 1 1 Perform the Registration Sensor test page 4 43 Service Mod...

Страница 223: ...eplace the paper 2 Check the paper feed 3 Does multiple feed occur Replace the damaged part s Retard Holder page 8 38 Tray 2 Feed Roller page 8 14 Feeder Unit page 8 47 Replace the MCU Board page 8 88 Go to step 4 Troubleshooting Procedure Table continued Step Actions and Questions Yes No ...

Страница 224: ... list determine if this is contributing to the problem Recycled multi purpose or copier paper tends to contaminate the paper path Constant use of special papers such labels or business cards can also contribute to jamming Ensure the correct tray loading and setup procedures are followed securing the guides selecting the correct paper type fanning the paper etc Make sure the printer is plugged dire...

Страница 225: ...bleshooting Procedure Table Step Actions and Questions Yes No 1 1 Check the paper condition 2 Is the paper damaged Replace the paper Go to step 2 Go to step 2 2 1 Open and close the Front Cover to check the latches 2 Does the error still occur when printing Go to step 3 Complete 3 1 Reseat the Fuser page 8 12 2 Does the error still occur when printing Go to step 4 Complete 4 1 Perform the Exit Sen...

Страница 226: ...1 10 1 Check the Fuser 2 Are there any remaining paper or debris in the Fuser Remove the debris Go to step 11 11 1 Check the Regi Rubber Roll and Regi Metal Roll for damages and correct installation 2 Are the rollers correctly installed 3 Are there any damages on the rollers Go to step 12 Replace the Feeder Unit page 8 47 12 1 Check the Transfer Unit for correct installation Reseat the Transfer Un...

Страница 227: ...sconnect P J2322 from the Registration Sensor 2 Disconnect P J232 from the Right Side Harness 3 Check continuity between P J232 P J2322 Go to step 19 Replace the Registration Sensor Harness 19 Check the Right Side Harness for continuity 1 Disconnect P J23 from the MCU Board 2 Disconnect P J232 from the Registration Sensor Harness 3 Check continuity between P J23 P J232 Go to step 20 Replace the Ri...

Страница 228: ... the wiring harness connectors P J22 and P J221 between the MCU Board and the Main Drive Assembly 2 Are the connectors securely connected Go to step 26 Reconnect the connectors 26 Check the Right Side Harness for continuity 1 Disconnect P J22 from the MCU Board 2 Disconnect P J221 from the Main Drive Assembly 3 Check continuity between P J22 P J221 Go to step 27 Replace the Right Side Harness 27 C...

Страница 229: ... Board page 8 88 31 1 Check the wiring harness connectors P J23 and P J233 between the MCU Board and the Registration Clutch 2 Are the connectors securely connected Go to step 32 Reconnect the connectors 32 Check the Right Side Harness continuity 1 Disconnect P J23 from the MCU Board 2 Disconnect P J233 from the Registration Clutch 3 Check continuity between P J23 P J233 Go to step 33 Replace the ...

Страница 230: ...L3 2 25 Registration Sensor Harness PL3 2 37 Exit Out Chute PL6 1 1 Fuser Harness PL6 1 11 Duplex Gate Chute PL6 1 13 Main Drive PL8 1 2 Drive Assembly PL8 1 7 MCU Board PL9 2 13 Right Side Harness PL10 1 12 Duplex Unit PL12 1 1 Duplex Unit Board PL12 1 5 Duplex Harness PL12 1 18 Map 1 Electrical and Drive on page 10 10 Map 2 Laser Unit and Feeder on page 10 11 Map 4 LVPS and MCU Board on page 10 ...

Страница 231: ...h test page 4 71 Service Mode Printer Diag Engine Diag Motor Test Duplex Clutch 2 Does the Clutch operate properly Go to step 7 Go to step 16 7 1 Perform the Duplex Motor test page 4 58 Service Mode Printer Diag Engine Diag Motor Test Duplex Motor 2 Does the Motor operate properly Go to step 8 Go to step 16 8 1 Perform the Tray 1 MPT Turn Clutch test page 4 66 Service Mode Printer Diag Engine Diag...

Страница 232: ...rs 14 Check the Right Side Harness for continuity 1 Disconnect P J25 and P J251 2 Check continuity between P J25 P J251 Go to step 15 Replace the Right Side Harness 15 Check the Feed Drive Assembly signal 1 Disconnect P J25 from the MCU Board 2 Is there 24 V across ground J25 1 J25 2 pin when the Interlock Switch is activated Replace the Feed Drive Assembly page 8 78 Replace the MCU Board page 8 8...

Страница 233: ... Disconnect P J272 from the Right Side Harness 2 Disconnect P J27 from the MCU Board 3 Check continuity between P J272 P J27 Go to step 20 Replace the Right Side Harness 20 Check the Duplex Unit Board signal 1 Disconnect P J27 from the MCU Board 2 Is there 3 3 V across ground J27 A15 pin on the MCU Board when the Interlock Switch is activated Go to step 21 Replace the MCU Board page 8 88 21 Does t...

Страница 234: ...the procedure below Troubleshooting Reference Table Applicable Parts Wiring and Plug Jack Map Reference Fuser PL6 1 10 MCU Board PL9 2 13 LVPS PL9 2 14 LVPS Harness PL10 1 3 Fuser Harness PL10 1 5 Map 1 Electrical and Drive on page 10 10 Map 4 LVPS and MCU Board on page 10 13 Fuser on page 10 40 Troubleshooting Procedure Table Step Actions and Questions Yes No 1 1 Check the Fuser for correct insta...

Страница 235: ...lace the Fuser Harness 5 Check the LVPS Harness for continuity 1 Disconnect P J501 from the LVPS 2 Disconnect P J14 from the MCU Board 3 Check continuity between P J501 P J14 Go to step 6 Replace the LVPS Harness 6 1 Replace the Fuser page 8 12 2 Does the error still occur Go to step 7 Complete 7 1 Replace the LVPS page 8 83 2 Does the error still occur when the printer is turned On Replace the MC...

Страница 236: ...If problem persists follow the procedure below Troubleshooting Reference Table Applicable Parts Wiring and Plug Jack Map References Fuser PL6 1 10 MCU Board PL9 2 13 Map 1 Electrical and Drive on page 10 10 Map 4 LVPS and MCU Board on page 10 13 Fuser on page 10 40 Troubleshooting Procedure Table Step Actions and Questions Yes No 1 1 Check the Fuser life using CentreWare IS 2 Does the Level show 0...

Страница 237: ...ack Map References Fuser PL6 1 10 MCU Board PL9 2 13 Fuser Harness PL10 1 5 Map 1 Electrical and Drive on page 10 10 Map 4 LVPS and MCU Board on page 10 13 Fuser on page 10 40 Troubleshooting Procedure Step Actions and Questions Yes No 1 1 Check the Fuser for correct installation Reseat the Fuser page 8 12 2 Does the error still occur when the printer is turned On Go to step 2 Complete 2 1 Check t...

Страница 238: ...ubleshooting References Applicable Parts Wiring and Plug Jack Map References Fuser PL6 1 10 MCU Board PL9 2 13 LVPS PL9 2 14 LVPS Harness PL10 1 3 Fuser Harness PL10 1 5 Map 1 Electrical and Drive on page 10 10 Map 4 LVPS and MCU Board on page 10 13 Fuser on page 10 40 Troubleshooting Procedure Step Actions and Questions Yes No 1 1 Check the Fuser for correct installation 2 Is the Fuser correctly ...

Страница 239: ...Replace the Fuser Harness 5 Check the LVPS Harness for continuity 1 Disconnect P J501 from the LVPS 2 Disconnect P J14 from the MCU Board 3 Check continuity between P J501 P J14 Go to step 6 Replace the LVPS Harness 6 1 Replace the Fuser page 8 12 2 Does the error still occur Go to step 7 Complete 7 1 Replace the LVPS page 8 83 2 Does the error still occur when the printer is turned On Replace the...

Страница 240: ... Initial Actions Check the Print Cartridge life using CentreWare IS Cycle printer power If problem persists follow the procedure below Troubleshooting Reference Table Applicable Parts Wiring and Plug Jack Map References Print Cartridge Y M C K PL5 1 17 20 MCU Board PL9 2 13 Troubleshooting Procedure Table Step Actions and Questions Yes No 1 1 Check the Print Cartridge for correct installation 2 Is...

Страница 241: ...ge life using CentreWare IS Cycle printer power If problem persists follow the procedure below Troubleshooting Reference Table Applicable Parts Wiring and Plug Jack Map References Print Cartridge Y M C K PL5 1 17 20 Dispenser PL5 2 10 MCU Board PL9 2 13 Top LV Harness PL10 1 3 Map 3 Image Processor Board and Dispenser Motors on page 10 12 Map 4 LVPS and MCU Board on page 10 13 Developer on page 10...

Страница 242: ...nected Go to step 6 Reconnect the connectors Go to step 6 6 Does the error still occur Go to step 7 Complete 7 Check the Top LV Harness for continuity 1 Disconnect P J Harnesses Yellow P J18 and P J181 Magenta P J18 and P J182 Black P J18 and P J183 Cyan P J18 and P J184 2 Check continuity between P J connectors Yellow P J18 P J181 Magenta P J18 P J182 Black P J18 P J183 Cyan P J18 P J184 Go to st...

Страница 243: ...e Initial Actions Check the Print Cartridge life using CentreWare IS Cycle printer power If problem persists follow the procedure below Troubleshooting Reference Table Applicable Parts Wiring and Plug Jack Map References Print Cartridge Y M C K PL5 1 17 20 MCU Board PL9 2 13 Troubleshooting Procedure Table Step Actions and Questions Yes No 1 1 Check the Print Cartridge for correct installation 2 I...

Страница 244: ...ns Check the Print Cartridge life using CentreWare IS Cycle printer power If problem persists follow the procedure below Troubleshooting Reference Table Applicable Parts Wiring and Plug Jack Map References Print Cartridge Y M C K PL5 1 17 20 MCU Board PL9 2 13 Troubleshooting Procedure Table Step Actions and Questions Yes No 1 1 Check the Print Cartridge for correct installation 2 Is the Print Car...

Страница 245: ...iring and Plug Jack Map References Print Cartridge Y M C K PL5 1 17 20 CRUM Connector PL5 2 1 MCU Board PL9 2 13 CRUM Harness PL10 1 9 Map 2 Laser Unit and Feeder on page 10 11 Map 4 LVPS and MCU Board on page 10 13 Developer on page 10 38 Troubleshooting Procedure Table Step Actions and Questions Yes No 1 1 Check the Print Cartridge s for correct installation 2 Is the Print Cartridge s correctly ...

Страница 246: ... P J31 and P J311 Magenta P J31 and P J312 Cyan P J31 and P J313 Black P J31 and P J314 2 Check continuity between P J connectors Yellow P J31 P J311 Magenta P J31 P J312 Cyan P J31 P J313 Black P J31 P J314 Go to step 7 Replace the CRUM Harness 7 Check the CRUM Connector for damages Is the CRUM Connector damaged Replace the CRUM Connector page 8 56 Go to step 8 8 1 Replace the CRUM Connector page...

Страница 247: ...ctions Check the Print Cartridge life using CentreWare IS Cycle printer power If problem persists follow the procedure below Troubleshooting Reference Table Applicable Parts Wiring and Plug Jack Map References Print Cartridge Y M C K PL5 1 17 20 MCU Board PL9 2 13 Troubleshooting Procedure Table Step Actions and Questions Yes No 1 1 Check the Print Cartridge for correct installation 2 Is the Print...

Страница 248: ...e life using CentreWare IS Cycle printer power If problem persists follow the procedure below Troubleshooting Reference Table Applicable Parts Wiring and Plug Jack Map References Print Cartridge Sensor PL5 1 6 Print Cartridge Y M C K PL5 1 17 20 MCU Board PL9 2 13 Toner Sensor Harness PL10 1 7 Developer on page 10 38 Troubleshooting Procedure Table Step Actions and Questions Yes No 1 1 Check the P...

Страница 249: ...onnected Go to step 6 Reconnect the connectors Go to step 6 6 Does the error still occur Go to step 7 Complete 7 Check the Toner Sensor Harness for continuity 1 Disconnect P J Harnesses from the MCU Board and the Print Cartridge Sensor Yellow P J19 and P J191 Magenta P J19 and P J192 Black P J19 and P J193 Cyan P J19 and P J194 2 Check continuity between P J connectors Yellow P J19 P J191 Magenta ...

Страница 250: ...P J19 3 pin Yellow Ground P J19 6 pin Magenta Ground P J19 9 pin Black Ground P J19 12 pin Cyan 2 Does the voltage change when the paper is inserted into the sensor detecting point Replace the MCU Board page 8 88 Replace the Print Cartridge Sensor Black page 8 57 Yellow Magenta Cyan page 8 58 Troubleshooting Procedure Table continued Step Actions and Questions Yes No ...

Страница 251: ... Applicable Parts Wiring and Plug Jack References Print Cartridge Y M C K PL5 1 17 20 MCU Board PL9 2 13 CRUM Harness PL10 1 9 Troubleshooting Procedure Table Step Actions and Questions Yes No 1 1 Check the Print Cartridge s for correct installation 2 Is the Print Cartridge s correctly installed Go to step 3 Reseat the Print Cartridge s page 8 11 Go to step 2 2 Does the error still occur when the ...

Страница 252: ... P J31 and P J311 Magenta P J31 and P J312 Cyan P J31 and P J313 Black P J31 and P J314 2 Check continuity between P J connectors Yellow P J31 P J311 Magenta P J31 P J312 Cyan P J31 P J313 Black P J31 P J314 Go to step 7 Replace the CRUM Harness 7 Check the CRUM Connector for damages Is the CRUM Connector damaged Replace the CRUM Connector page 8 56 Go to step 8 8 1 Replace the CRUM Connector page...

Страница 253: ...ss PL1 2 11 Right Side Harness PL10 1 15 Map 1 Electrical and Drive on page 10 10 Map 4 LVPS and MCU Board on page 10 13 Xerographic on page 10 34 Troubleshooting Procedure Table Step Actions and Questions Yes No 1 Is the Transfer Unit installed correctly Go to step 2 Reseat the Transfer Unit page 8 9 2 Does the error still occur Go to step 3 Complete 3 1 Check the wiring harness connectors P J27 ...

Страница 254: ...ght Side Harness 2 Disconnect P J2721 from the Transfer Unit 3 Check continuity between P J272 P J2721 Go to step 6 Replace the Front Cover Harness 6 1 Replace the Transfer Unit page 8 9 2 Does the error still occur when the printer is turned On Replace the MCU Board page 8 88 Complete Troubleshooting Procedure Table continued Step Actions and Questions Yes No ...

Страница 255: ...e Table Applicable Parts Wiring and Plug Jack Map References Transfer Unit PL4 1 1 MCU Board PL9 2 13 Map 1 Electrical and Drive on page 10 10 Map 4 LVPS and MCU Board on page 10 13 Xerographic on page 10 34 Troubleshooting Procedure Table Step Actions and Questions Yes No 1 1 Check the Transfer Unit for correct installation 2 Is the Transfer Unit correctly installed Go to step 3 Reseat the Transf...

Страница 256: ... printer power If problem persists follow the procedure below Troubleshooting Reference Table Applicable Parts Wiring and Plug Jack Map Reference Transfer Unit PL4 1 1 MCU Board PL9 2 13 Map 1 Electrical and Drive on page 10 10 Map 4 LVPS and MCU Board on page 10 13 Xerographic on page 10 34 Troubleshooting Procedure Table Step Actions and Questions Yes No 1 1 Check the Transfer Unit life using Ce...

Страница 257: ...ower If problem persists follow the procedure below Troubleshooting Reference Table Applicable Parts Wiring and Plug Jack Map References Transfer Unit PL4 1 1 MCU Board PL9 2 13 Map 1 Electrical and Drive on page 10 10 Map 4 LVPS and MCU Board on page 10 13 Xerographic on page 10 34 Troubleshooting Procedure Table Step Actions and Questions Yes No 1 1 Check the Transfer Unit life using CentreWare ...

Страница 258: ...ap Reference Tray 1 MPT Feed Roll PL3 1 10 Feeder Unit PL3 2 1 Registration Sensor PL3 2 30 Registration Sensor Harness PL3 2 37 Size Switch PL7 1 18 MCU Board PL9 2 13 Right Side Harness PL10 1 12 Map 1 Electrical and Drive on page 10 10 Map 2 Laser Unit and Feeder on page 10 11 Map 4 LVPS and MCU Board on page 10 13 Main Drive on page 10 28 Feeder on page 10 30 Troubleshooting Procedure Table St...

Страница 259: ...J2322 from the Registration Sensor 3 Check continuity between P J232 P J2322 Go to step 7 Replace the Registration Sensor Harness 7 Check the Right Side Harness for continuity 1 Disconnect P J23 from the MCU Board 2 Disconnect P J232 from the Registration Sensor Harness 3 Check continuity between P J23 P J232 Go to step 8 Replace the Right Side Harness 8 Check the Registration Sensor for continuit...

Страница 260: ...pplicable Parts Wiring and Plug Jack Map Reference Tray 2 PL2 1 1 Tray 2 Retard Roll PL2 2 17 Tray 2 Size Switch PL7 1 18 MCU Board PL9 2 13 Troubleshooting Procedure Table Step Actions and Questions Yes No 1 1 Check the paper size 2 Does the paper size meet the specifications Go to step 2 Replace the paper with the correct specifications 2 1 Check the paper size setting 2 Does the paper match wit...

Страница 261: ...ag Engine Diag Sensor Test Tray 2 Paper Size 2 Does Size Switch operate properly Go to step 7 Replace the Tray 2 Size Switch Assembly page 8 74 7 1 Check the Rollers for operation 2 Do the Rollers rotate smoothly Replace the MCU Board page 8 88 Replace the Retard Roller page 8 15 Troubleshooting Procedure Table continued Step Actions and Questions Yes No ...

Страница 262: ...cable Parts Wiring and Plug Jack Map References MCU Board PL9 2 13 Tray 3 Size Switch PL13 3 5 Tray 3 PL13 4 1 Tray 3 Retard Roll PL13 4 10 Troubleshooting Procedure Table Step Actions and Questions Yes No 1 1 Check the paper size 2 Does the paper size meet the specifications Go to step 2 Replace the paper with the correct specifications 2 1 Check the paper size setting 2 Does the paper match with...

Страница 263: ...g Engine Diag Sensor Test Tray 3 Paper Size 2 Does Size Switch operate properly Go to step 7 Replace the Tray 3 Size Switch Assembly page 8 129 7 1 Check the Rollers for operation 2 Do the Rollers rotate smoothly Replace the MCU Board page 8 88 Replace the Retard Roller page 8 17 Troubleshooting Procedure Table continued Step Actions and Questions Yes No ...

Страница 264: ...ersists follow the procedure below Troubleshooting Reference Table Applicable Parts Wiring and Plug Jack Map References Tray 2 Size Switch PL7 1 18 MCU Board PL9 2 13 Right Side Harness PL10 1 12 Map 2 Laser Unit and Feeder on page 10 11 Map 4 LVPS and MCU Board on page 10 13 Feeder on page 10 30 Troubleshooting Procedure Table Step Actions and Questions Yes No 1 1 Check the tray for correct insta...

Страница 265: ... Board 2 Disconnect P J231 from the Size Switch Assembly 3 Check continuity between P J23 P J231 Go to step 5 Replace the Right Side Harness 5 1 Replace the Tray 2 Size Switch page 8 74 2 Does the error still occur when the printer is turned On Replace the MCU Board page 8 88 Complete Troubleshooting Procedure Table continued Step Actions and Questions Yes No ...

Страница 266: ...he procedure below Troubleshooting Reference Table Applicable Parts Wiring and Plug Jack Map References MCU Board PL9 2 13 550 Sheet Feeder PL13 1 1 Tray 3 Size Switch PL13 3 5 C2 Chute Harness PL13 3 7 Map 6 Optional 550 Sheet Feeder on page 10 15 Optional 550 Sheet Feeder Wiring Diagram on page 10 45 Troubleshooting Procedure Table Step Actions and Questions Yes No 1 1 Check the tray for correct...

Страница 267: ...al Feeder Board 2 Disconnect P J4211 from the Optional Size Switch Assembly 3 Check continuity between P J421 P J4211 Go to step 5 Replace the 550 Sheet Feeder page 8 116 5 1 Replace the Tray 3 Size Switch page 8 129 2 Does the error still occur Replace the MCU Board page 8 88 Complete Troubleshooting Procedure Table continued Step Actions and Questions Yes No ...

Страница 268: ...eed Roll PL3 1 10 Feeder Unit PL3 2 1 MCU Board PL9 2 13 Right Side Harness PL10 1 12 Map 1 Electrical and Drive on page 10 10 Map 4 LVPS and MCU Board on page 10 13 Tray 1 MPT and Registration on page 10 26 Main Drive on page 10 28 Feeder on page 10 30 Troubleshooting Procedure Table Step Actions and Questions Yes No 1 1 Check the paper size 2 Does the paper size meet specifications Go to step 2 ...

Страница 269: ... and the MCU Board 2 Are the connectors securely connected Go to step 6 Reconnect the connectors Go to step 6 7 Check the Right Side Harness for continuity 1 Disconnect P J27 and P J275 2 Check continuity between P J27 P J275 Go to step 7 Replace the Right Side Harness 8 Check the Tray 1 MPT NPP Harness for continuity 1 Disconnect P J275 and P J2751 2 Check continuity between P J275 P J2751 Go to ...

Страница 270: ...Sensor Harness PL3 2 37 No Paper Actuator PL3 2 49 MCU Board PL9 2 13 Right Side Harness PL10 1 12 Map 1 Electrical and Drive on page 10 10 Map 2 Laser Unit and Feeder on page 10 11 Map 4 LVPS and MCU Board on page 10 13 Feeder on page 10 30 Tray 1 MPT and Registration on page 10 26 Troubleshooting Procedure Table Step Actions and Questions Yes No 1 1 Check the paper size 2 Does the paper size mee...

Страница 271: ...de Harness for continuity 1 Disconnect P J23 from the MCU Board 2 Disconnect P J232 from the Registration Sensor Harness 3 Check continuity between P J23 P J232 Go to step 9 Replace the Right Side Harness 9 Check the Registration Sensor Harness for continuity 1 Disconnect P J232 from the Right Side Harness 2 Disconnect P J2321 from the No Paper Sensor 3 Check continuity between P J232 P J2321 Go t...

Страница 272: ...ion Sensor PL3 2 30 Registration Sensor Harness PL3 2 37 No Paper Actuator PL3 2 49 MCU Board PL9 2 13 Right Side Harness PL10 1 12 550 Sheet Feeder PL13 1 1 Tray 3 Feeder PL13 2 8 Tray 3 Feeder Harness PL13 3 3 Tray 3 PL13 4 1 Map 1 Electrical and Drive on page 10 10 Map 2 Laser Unit and Feeder on page 10 11 Map 4 LVPS and MCU Board on page 10 13 Feeder on page 10 30 Tray 1 MPT and Registration o...

Страница 273: ...ctivated Replace the MCU Board page 8 88 Go to step 7 7 1 Check the wiring harness connectors P J421 P J4212 and P J42121 between the No Paper Sensor and the Tray 3 Feeder Board 2 Are the connectors securely connected Go to step 8 Reconnect the connectors 8 Check the No Paper Sensor signal 1 Disconnect P J421 from the Optional Feeder Board 2 Is there 3 3 V across ground J421 3 pin Go to step 9 Go ...

Страница 274: ...ct P J27 from the MCU Board 3 Check continuity between P J273 P J27 Go to step 12 Replace the Right Side Harness 12 Check the Optional Feeder Board signal 1 Disconnect P J27 from the MCU Board 2 Is there 3 3 V across ground J27 B7 pin on the MCU Board Replace the 550 Sheet Feeder page 8 116 Replace the MCU Board page 8 88 Troubleshooting Procedure Table continued Step Actions and Questions Yes No ...

Страница 275: ...able Parts Wiring and Plug Jack Map References Retard Roll Separator PL2 2 7 MPT Feed Roll PL3 1 10 Feeder Unit PL3 2 1 Metal Regi Roll PL3 2 6 Rubber Regi Roll PL3 2 7 Turn Roll PL3 2 32 Feed Roll PL3 2 53 Retard Roll PL13 2 10 Retard Roll Nudger PL13 4 10 Troubleshooting Procedure Table Step Actions and Questions Yes No 1 1 Check the paper feeding 2 Does multiple feed occur Go to step 2 Go to st...

Страница 276: ...e Manual Error Messages and Codes 3 1 Check the paper Replace the paper 2 Does multiple feed still occur Replace the Feeder Unit Tray 1 2 page 8 47 Tray 3 page 8 127 Complete Troubleshooting Procedure Table continued Step Actions and Questions Yes No ...

Страница 277: ...r Board PL13 3 6 Map 2 Laser Unit and Feeder on page 10 11 Map 4 LVPS and MCU Board on page 10 13 Map 6 Optional 550 Sheet Feeder on page 10 15 Optional 550 Sheet Feeder Wiring Diagram on page 10 45 Troubleshooting Procedure Table Step Actions and Questions Yes No 1 1 Check the Optional 550 Sheet Feeder for correct installation 2 Is the Optional 550 Sheet Feeder correctly installed Go to step 3 Re...

Страница 278: ...6 Replace the Feeder Unit Harness 6 Check the Right Side Harness for continuity 1 Disconnect P J27 from the MCU Board 2 Disconnect P J273 from the Feeder Unit Harness 3 Check continuity between P J27 P J273 To go step 7 Replace the Right Side Harness 7 1 Replace the Optional 550 Sheet Feeder page 8 116 2 Does the error still occur when the printer is turned On Replace the MCU Board page 8 88 Compl...

Страница 279: ... Retard Roll PL13 4 10 Map 2 Laser Unit and Feeder on page 10 11 Map 4 LVPS and MCU Board on page 10 13 Map 6 Optional 550 Sheet Feeder on page 10 15 Optional 550 Sheet Feeder Wiring Diagram on page 10 45 Troubleshooting Procedure Table Step Actions and Questions Yes No 1 1 Check the paper tray for correct installation 2 Is the tray correctly installed Go to step 3 Reseat the paper tray Go to step...

Страница 280: ...d and the Optional Feeder Drive Assembly 2 Are the connectors securely connected Go to step 9 Reconnect the connectors Go to step 9 9 1 Check the wiring harness connectors P J419 P J273 and P J27 between the Optional Feeder Board and the MCU Board 2 Are the connectors securely connected Go to step 10 Reconnect the connectors Go to step 10 10 Check the Right Side Harness for continuity 1 Disconnect...

Страница 281: ...rical and Drive on page 10 10 Map 2 Laser Unit and Feeder on page 10 11 Map 4 LVPS and MCU Board on page 10 13 Map 5 Duplex Unit on page 10 14 Duplex Wiring Diagram on page 10 48 Troubleshooting Procedure Table Step Actions and Questions Yes No 1 1 Check the Duplex Unit for correct installation 2 Is the Duplex correctly installed Go to step 3 Reseat the Duplex Unit page 8 115 Go to step 2 2 Does t...

Страница 282: ... Right Side Harness 2 Disconnect P J2720 from the Duplex Unit Harness 3 Check continuity between P J272 P J2720 Go to step 7 Replace the Front Cover Harness 7 Check the Right Side Harness for continuity 1 Disconnect P J272 from the Front Cover Harness 2 Disconnect P J27 from the MCU Board 3 Check continuity between P J272 P J27 Go to step 8 Replace the Right Side Harness 8 1 Replace the Duplex Uni...

Страница 283: ...e procedure below Note Be sure to move the NVRAM chip from the old I P Board to the new I P Board Carefully check the correct orientation of the NVRAM ROM when installing the NVRAM ROM Troubleshooting Reference Table Applicable Parts Wiring and Plug Jack Map References Image Processor Board PL9 1 20 Troubleshooting Procedure Table Step Actions and Questions Yes No 1 1 Check the password 2 Did the ...

Страница 284: ...k 016 502 Write Flash Error Download Verify Error Initial Actions Cycle printer power If the problem persists follow the procedure below Troubleshooting Reference Table Applicable Parts Wiring and Plug Jack Map References Image Processor Board PL9 1 20 Troubleshooting Procedure Table Step Actions and Questions Yes No 1 1 Check the Image Processor Board for correct installation Reseat the Image Pro...

Страница 285: ...icable Chain Link Chain Link 016 610 Panel Language Set unsupported Initial Actions Cycle printer power If the problem persists follow the procedure below Troubleshooting Reference Table Applicable Parts Wiring and Plug Jack Map References MCU Board PL9 2 13 Troubleshooting Procedure Table Step Actions and Questions Yes No 1 1 Turn the printer power Off and back On 2 Does the error still occur Rep...

Страница 286: ... Link 016 611 Print Engine Model Mismatch IOT Model Mismatch Initial Actions Cycle printer power If the problem persists follow the procedure below Troubleshooting Reference Table Applicable Parts Wiring and Plug Jack Map References MCU Board PL9 2 13 Troubleshooting Procedure Table Step Actions and Questions Yes No 1 1 Turn the printer power Off and back On 2 Does the error still occur Replace th...

Страница 287: ...s Image Processor Board PL9 1 20 Memory Card Option PL9 1 22 Troubleshooting Procedure Table Step Actions and Questions Yes No 1 1 Check the required memory for the print job 2 Print a small size file example as a Windows test print 3 Does the error still occur Go to step 2 Add memory card or separate the print job 2 1 Reseat the memory card page 8 94 2 Does the error still occur Go to step 3 Comp...

Страница 288: ...em persists follow the procedure below Troubleshooting Reference Table Applicable Parts Wiring and Plug Jack Map References Image Processor Board PL9 1 20 Troubleshooting Procedure Table Step Actions and Questions Yes No 1 Check the print job 1 Print a small print job example as a Windows test print 2 Does the error still occur Go to step 2 Complete 2 1 Reseat the Image Processor Board page 8 90 2...

Страница 289: ... the procedure below Troubleshooting Reference Table Applicable Parts Wiring and Plug Jack Map References Image Processor Board PL9 1 20 Troubleshooting Procedure Table Step Actions and Questions Yes No 1 1 Check the printer firmware 2 Does the firmware have the correct version Go to step 2 Update the firmware Firmware Update on page A 3 2 1 Check the Image Processor Board for correct installation...

Страница 290: ...oubleshooting Procedure Table Step Actions and Questions Yes No 1 1 Check the Multi Protocol Network Card MPC for correct installation 2 Is the MPC installed on the Image Processor Board Go to step 2 Install the MPC page 8 95 Go to step 2 2 1 Check the firmware for the MPC 2 Does the firmware have the correct version Go to step 3 Update the firmware Firmware Update on page A 3 3 1 Check the MPC fo...

Страница 291: ...al 3 103 Error Messages and Codes 5 1 Replace the MPC page 8 95 2 Does the error still occur when the printer is turned On Replace the Image ProcessorBoard page 8 90 Complete Troubleshooting Procedure Table continued Step Actions and Questions Yes No ...

Страница 292: ...L9 1 23 Troubleshooting Procedure Table Step Actions and Questions Yes No 1 1 Check the Multi Protocol Network Card MPC for correct installation 2 Is the MPC installed on the Image Processor Board Go to step 2 Install the MPC page 8 95 Go to step 2 2 1 Check the firmware for the MPC 2 Does the firmware have the correct version Go to step 3 Update the firmware Firmware Update on page A 3 3 1 Check ...

Страница 293: ...al 3 105 Error Messages and Codes 5 1 Replace the MPC page 8 95 2 Does the error still occur when the printer is turned On Replace the Image ProcessorBoard page 8 90 Complete Troubleshooting Procedure Table continued Step Actions and Questions Yes No ...

Страница 294: ...twork Card Option PL9 1 23 Troubleshooting Procedure Table Step Actions and Questions Yes No 1 1 Check the Multi Protocol Network Card MPC for correct installation 2 Is the MPC installed on the Image Processor Board Go to step 2 Install the MPC page 8 95 Go to step 2 2 1 Check the printer firmware 2 Does the firmware have the correct version Go to step 3 Update the firmware Firmware Update on page...

Страница 295: ...al 3 107 Error Messages and Codes 5 1 Replace the MPC page 8 95 2 Does the error still occur when the printer is turned On Replace the Image ProcessorBoard page 8 90 Complete Troubleshooting Procedure Table continued Step Actions and Questions Yes No ...

Страница 296: ...If the problem persists follow the procedure below Troubleshooting Reference Table Applicable Parts Wiring and Plug Jack Map References Image Processor Board PL9 1 20 Troubleshooting Procedure Table Step Actions and Questions Yes No 1 1 Check the printer firmware 2 Does the firmware have the correct version Go to step 2 Update the firmware Firmware Update on page A 3 2 1 Check the Image Processor ...

Страница 297: ...s follow the procedure below Troubleshooting Reference Table Applicable Parts Wiring and Plug Jack Map References Image Processor Board PL9 1 20 Troubleshooting Procedure Table Step Actions and Questions Yes No 1 1 Check the printer firmware 2 Does the firmware have the correct version Go to step 2 Update the firmware Firmware Update on page A 3 2 1 Check the Image Processor Board for correct inst...

Страница 298: ...rsists follow the procedure below Troubleshooting Reference Table Applicable Parts Wiring and Plug Jack Map References Image Processor Board PL9 1 20 Troubleshooting Procedure Table Step Actions and Questions Yes No 1 1 Check the printer firmware 2 Does the firmware have the correct version Go to step 2 Update the firmware refer to Firmware Update on page A 3 2 1 Check the Image Processor Board fo...

Страница 299: ...the procedure below Troubleshooting Reference Table Applicable Parts Wiring and Plug Jack Map References Image Processor Board PL9 1 20 Troubleshooting Procedure Table Step Actions and Questions Yes No 1 1 Check the printer firmware 2 Does the firmware have the correct version Go to step 2 Update the firmware refer to Firmware Update on page A 3 2 1 Check the Image Processor Board for correct inst...

Страница 300: ...llow the procedure below Troubleshooting Reference Table Applicable Parts Wiring and Plug Jack Map References Image Processor Board PL9 1 20 Troubleshooting Procedure Table Step Actions and Questions Yes No 1 1 Check the printer firmware 2 Does the firmware have the correct version Go to step 2 Update the firmware refer to Firmware Update on page A 3 2 1 Check the Image Processor Board for correct...

Страница 301: ...le Applicable Parts Wiring and Plug Jack Map References Image Processor Board PL9 1 20 Troubleshooting Procedure Table Step Actions and Questions Yes No 1 1 Check the paper size 2 Does the paper meet the specifications Go to step 2 Replace the paper 2 1 Check the paper size setup on the Control Panel System Tray Settings Tray 1 Tray 2 Paper Size 2 Does the paper size in use match the settings on t...

Страница 302: ...MPC Error NIC MAC Address Checksum Error Checksum error occurred in the MPC MAC Address Chain Link 018 315 MPC Error NIC Ethernet BIST Parity RAM R W Error The MPC Ethernet BIST parity RAM R W has detected an error Chain Link 018 316 MPC Error NIC Internal Loopback Error The Loopback test has detected an error Chain Link 018 317 MPC Error NIC Fatal Error MPC check has detected an error Chain Link ...

Страница 303: ...the Multi Protocol Network Card MPC for correct installation 2 Is the MPC correctly installed Go to step 2 Reseat the MPC page 8 95 Go to step 2 2 Does the error still occur when the printer is turned On Go to step 3 Complete 3 1 Replace the Multi Protocol Network Card page 8 95 2 Does the error still occur Replace the Image ProcessorBoard page 8 90 Complete ...

Страница 304: ...al Loopback Error Chain Link 116 355 Network Error On Board Network Fatal Error Initial Actions Cycle printer power If the problem persists follow the procedure below Troubleshooting Reference Table Applicable Parts Wiring and Plug Jack Map References Image Processor Board PL9 1 20 Troubleshooting Procedure Table Step Actions and Questions Yes No 1 1 Check the Image Processor Board for correct ins...

Страница 305: ...erence Table Applicable Parts Wiring and Plug Jack Map References MCU Board PL9 2 13 General Wiring Diagram on page 10 23 Troubleshooting Procedure Table Step Actions and Questions Yes No 1 1 Turn the printer power Off and back On 2 Does the error still occur Go to step 2 Complete 2 1 Check the firmware version System Information Pages Configuration 2 Does the firmware have the correct version Go ...

Страница 306: ...roblem persists follow the procedure below Troubleshooting Reference Table Applicable Parts Wiring and Plug Jack Map References MCU Board PL9 2 13 Troubleshooting Procedure Table Step Actions and Questions Yes No 1 1 Check the firmware version System Information Pages Configuration 2 Does the firmware have the correct version Go to step 2 Update the firmware Firmware Update on page A 3 2 1 Check t...

Страница 307: ...ter power If the problem persists follow the procedure below Troubleshooting Reference Table Applicable Parts Wiring and Plug Jack Map References Image Processor Board PL9 1 20 MCU Board PL9 2 13 General Wiring Diagram on page 10 23 Troubleshooting Procedure Table Step Actions and Questions Yes No 1 1 Reseat the Image Processor Board page 8 90 and the MCU Board page 8 88 2 Does the error still occ...

Страница 308: ...and Drive on page 10 10 Map 4 LVPS and MCU Board on page 10 13 High Voltage on page 10 36 Xerographic on page 10 34 Troubleshooting Procedure Table Step Actions and Questions Yes No 1 1 Check the error on the Control Menu display 2 Is the ADDR 38 error displayed Go to step 2 Go to step 3 2 1 Reseat the EEPROM Board page 8 81 2 Does the error still occur when the printer is turned On Replace the EE...

Страница 309: ...ck the error on the Control Menu display 2 Is the ADDR 31 error displayed Go to step 8 Complete 8 1 Reseat the HVPS page 8 64 2 Does the error still occur after the printer is turned On Replace the HVPS page 8 64 Complete 9 1 Reseat the MCU Board page 8 88 2 Does the error still occur after the printer is turned On Replace the MCU Board page 8 88 Complete Troubleshooting Procedure Table continued ...

Страница 310: ...rness PL12 1 18 Map 1 Electrical and Drive on page 10 10 Map 4 LVPS and MCU Board on page 10 13 Map 5 Duplex Unit on page 10 14 DC Power Supply on page 10 24 Duplex Wiring Diagram on page 10 48 Troubleshooting Procedure Table Step Actions and Questions Yes No 1 1 Perform the Duplex Fan test page 4 77 Service Mode Printer Diag Engine Diag Motor Test Duplex Fan 2 Does the Motor operate properly Repl...

Страница 311: ...uity between P J2720 P J272 Go to step 8 Replace the Front Cover Harness 6 Check the Right Side Harness for continuity 1 Disconnect P J272 from the Front Cover Harness 2 Disconnect P J27 from the MCU Board 3 Check continuity between P J27 and P J272 Go to step 7 Replace the Right Side Harness 7 1 Replace the Duplex Unit page 8 115 2 Does the error still occur Replace the MCU Board page 8 88 Comple...

Страница 312: ...ty Harness PL10 1 15 Map 2 Laser Unit and Feeder on page 10 11 Map 4 LVPS and MCU Board on page 10 13 Xerographic on page 10 34 Troubleshooting Procedure Table Step Actions and Questions Yes No 1 1 Check the room temperature 2 Is the room temperature over 32 C Adjust the room temperature to less than 32 C Go to step 2 2 Did the user print large print jobs Go to step 6 Go to step 3 3 1 Check the MC...

Страница 313: ...the MCU Board page 8 88 2 Does the error still occur when printing Replace the Feeder Assembly page 8 47 Complete 6 Does the error still occur after the printer has cooled down for about five minutes Go to step 3 Complete Troubleshooting Procedure Table continued Step Actions and Questions Yes No ...

Страница 314: ...ess PL10 1 12 Map 1 Electrical and Drive on page 10 10 Map 4 LVPS and MCU Board on page 10 13 Main Drive on page 10 28 Troubleshooting Procedure Table Step Actions and Questions Yes No 1 1 Check the Transfer Unit Fuser and Black Print Cartridge for correct installation 2 Are the parts correctly installed Go to step 3 Reseat the Transfer Unit page 8 9 Fuser page 8 12 and Black Print Cartridge page ...

Страница 315: ...n Drive Assembly page 8 75 Go to step 7 7 Does the error still occur when the printer is turned On Go to step 8 Complete 8 Check the Right Side Harness for continuity 1 Disconnect P J21 from the MCU Board 2 Disconnect P J211 from the Main Drive Assembly 3 Check continuity between P J21 P J211 Go to step 9 Replace the Right Side Harness 9 Check the Main Drive signal 1 Disconnect P J21 on the MCU Bo...

Страница 316: ... Map 4 LVPS and MCU Board on page 10 13 Main Drive on page 10 28 Troubleshooting Procedure Table Step Actions and Questions Yes No 1 1 Check the Print Cartridges for correct installation 2 Are the Print Cartridges correctly installed Go to step 3 Reseat the Print Cartridges Go to step 2 2 Does the error still occur when the printer is turned On Go to step 3 Complete 3 1 Check the wiring harness co...

Страница 317: ...te 7 Check the Right Side Harness for continuity 1 Disconnect P J22 from the MCU Board 2 Disconnect P J221 from the Drive Assembly 3 Check continuity between P J22 P J221 Go to step 8 Replace the Right Side Harness 8 Check the Main Drive signal 1 Disconnect P J22 from the MCU Board 2 Is there 24 V across ground J22 A2 J22 A4 pin when the Interlock Switch is activated Replace the Main Drive page 8 ...

Страница 318: ... 10 Map 4 LVPS and MCU Board on page 10 13 DC Power Supply on page 10 24 Troubleshooting Procedure Table Step Actions and Questions Yes No 1 1 Perform the Main Fan test page 4 77 Service Mode Printer Diag Engine Diag Motor Test Fan 2 Does the Motor operate properly Replace the MCU Board page 8 88 Go to step 2 2 1 Check the Main Fan for correct installation Reseat the Main Fan page 8 84 2 Does the ...

Страница 319: ... Manual 3 131 Error Messages and Codes 5 1 Replace the MCU Board page 8 88 2 Does the error still occur when the printer is turned On Replace the LVPS page 8 83 Complete Troubleshooting Procedure Table continued Step Actions and Questions Yes No ...

Страница 320: ... on page 10 32 Troubleshooting Procedure Table Step Actions and Questions Yes No 1 1 Check the Laser Unit for correct installation 2 Is the Laser Unit correctly installed Go to step 3 Reinstall the Laser Unit page 8 52 Go to step 2 2 Does the error still occur when the printer is turned On Go to step 3 Complete 3 1 Check the wiring harness connector P J12 on the MCU Board 2 Is the connector secure...

Страница 321: ...nual 3 133 Error Messages and Codes 7 1 Replace the Laser Unit page 8 52 2 Does the error still occur when the printer is turned On Replace the MCU Board page 8 88 Complete Troubleshooting Procedure Table continued Step Actions and Questions Yes No ...

Страница 322: ...d MCU Board on page 10 13 Main Drive on page 10 28 Troubleshooting Procedure Table Step Actions and Questions Yes No 1 1 Check the Print Cartridges for correct installation 2 Are the Print Cartridges correctly installed Go to step 3 Reseat the Print Cartridges page 8 11 Go to step 2 2 Does the error still occur when the printer is turned On Go to step 3 Complete 3 1 Check the wiring harness connec...

Страница 323: ...ive Assembly 2 Are the connectors securely connected Go to step 8 Reconnect the connectors 8 Check the Right Side Harness for continuity 1 Disconnect P J22 from the MCU Board 2 Disconnect P J222 from the Main Drive Assembly 3 Check continuity between P J22 P J252 Go to step 9 Replace the Right Side Harness 9 Check the Main Drive Assembly signal 1 Disconnect P J22 from the MCU Board 2 Is there 24 V...

Страница 324: ...y 1 MPT and Registration on page 10 26 Troubleshooting Procedure Table Step Actions and Questions Yes No 1 1 Check the Rubber Registration Roller for rotation 2 Does the Roller rotate smoothly Go to step 2 Replace the Feeder Unit page 8 47 2 1 Check the wiring harness connectors P J25 and P J251 between the MCU Board and the Drive Assembly 2 Are the connectors securely connected Go to step 3 Recon...

Страница 325: ...isconnect P J251 from the Feed Drive Assembly 3 Check continuity between P J25 P J251 Go to step 7 Replace the Right Side Harness 7 Check the Drive Assembly signal 1 Disconnect P J25 from the MCU Board 2 Is there 24 V across ground J25 1 J25 2 pin on the MCU Board when the Interlock Switch is activated Replace the Feed Drive Assembly page 8 78 Replace the MCU Board page 8 88 Troubleshooting Proced...

Страница 326: ...ver PL1 2 1 Interlock Harness PL9 2 3 MCU Board PL9 2 13 Troubleshooting Procedure Table Step Actions and Questions Yes No 1 1 Check the Front Cover for damages 2 Are there any damages on the Front Cover Replace the Front Cover page 8 28 Go to step 2 2 Check the Interlock Switch for operation 1 Perform the Interlock Switch test page 4 44 Service Mode Printer Diag Engine Diag Sensor Test Interlock ...

Страница 327: ...ess PL1 2 13 Transfer Unit PL4 1 1 Print Cartridge C M Y K PL5 1 17 20 MCU Board PL9 2 13 Right Side Harness PL10 1 12 Map 1 Electrical and Drive on page 10 10 Map 4 LVPS and MCU Board on page 10 13 Xerographic on page 10 34 Troubleshooting Procedure Table Step Actions and Questions Yes No 1 1 Check the Transfer Unit for correct installation 2 Is the Transfer Unit correctly installed Go to step 3 ...

Страница 328: ...he connectors securely connected Go to step 6 Reconnect the connectors Go to step 10 6 Check the Front Cover Harness for continuity 1 Disconnect P J2721 from the Transfer Unit 2 Disconnect P J272 from the Right Side Harness 3 Check continuity between P J2721 P J272 Go to step 7 Replace the Front Cover Harness 7 Check the Right Side Harness for continuity 1 Disconnect P J27 from the MCU Board 2 Dis...

Страница 329: ...Transfer Unit PL4 1 1 Laser Unit PL5 1 12 Print Cartridge C M Y K PL5 1 17 20 MCU Board PL9 2 13 Right Side Harness PL10 1 12 Map 1 Electrical and Drive on page 10 10 Map 4 LVPS and MCU Board on page 10 13 Xerographic on page 10 34 Troubleshooting Procedure Table Step Actions and Questions Yes No 1 1 Check the Transfer Unit for correct installation 2 Is the Transfer Unit correctly installed Go to ...

Страница 330: ...1 Check the wiring harness connectors P J27 P J272 and P J2721 between the MCU Board and the Transfer Unit 2 Are the connectors securely connected Go to step 8 Reconnect the connectors Go to step 10 8 Check the Front Cover Harness for continuity 1 Disconnect P J2721 from the Transfer Unit 2 Disconnect P J272 from the Right Side Harness 3 Check continuity between P J2721 P J272 Go to step 9 Replace...

Страница 331: ... the test 2 Does the Deve Motor function normally Go to step 13 Go to step 12 12 1 Replace the Main Drive Assembly page 8 75 2 Does the error still occur when the printer is turned On Replace the MCU Board page 8 88 Complete 13 1 Replace the corresponding Print Cartridge page 8 11 2 Does the error still occur when the printer is turned On Replace the Laser Unit page 8 52 Complete Troubleshooting P...

Страница 332: ...g Jack Map References Humidity Temperature Sensor PL9 2 11 MCU Board PL9 2 13 Humidity Harness PL10 1 15 Map 4 LVPS and MCU Board on page 10 13 Xerographic on page 10 34 Troubleshooting Procedure Table Step Actions and Questions Yes No 1 1 Check the Humidity Temperature Sensor for correct installation 2 Is the Humidity Temperature Sensor correctly installed Go to step 2 Reseat the Humidity Tempera...

Страница 333: ...ty Temperature Sensor 3 Check continuity between P J26 P J261 Go to step 5 Replace the Humidity Harness 5 Check the Humidity Temperature Sensor signal 1 Disconnect P J26 from the MCU Board 2 Is there 5 V across ground J26 4 pin on the MCU Board Replace the Humidity Temperature Sensor page 8 87 Replace the MCU Board page 8 88 Troubleshooting Procedure Table continued Step Actions and Questions Yes ...

Страница 334: ...Initial Actions Cycle printer power If the problem persists follow the procedure below Troubleshooting Reference Table Applicable Parts Wiring and Plug Jack Map References Image Processor Board PL9 1 20 Troubleshooting Procedure Table Step Actions and Questions Yes No 1 1 Check the Image Processor Board for correct installation 2 Is the Image Processor Board correctly installed Go to step 2 Reseat...

Страница 335: ...le printer power If the problem persists follow the procedure below Troubleshooting Reference Table Applicable Parts Wiring and Plug Jack Map References Image Processor Board PL9 1 20 Troubleshooting Procedure Table Step Actions and Questions Yes No 1 1 Check the Image Processor Board for correct installation 2 Is the Image Processor Board correctly installed Go to step 2 Reseat the Image Processo...

Страница 336: ...er If the problem persists follow the procedure below Troubleshooting Reference Table Applicable Parts Wiring and Plug Jack Map References Image Processor Board PL9 1 20 Troubleshooting Procedure Table Step Actions and Questions Yes No 1 1 Check the Image Processor Board for correct installation 2 Is the Image Processor Board correctly installed Go to step 2 Reseat the Image Processor Board page 8...

Страница 337: ...ce Table Applicable Parts Wiring and Plug Jack Map References Image Processor Board PL9 1 20 Memory Card Option PL9 1 22 Troubleshooting Procedure Table Step Actions and Questions Yes No 1 1 Verify the Memory Card is compatible with the printer If the Memory Card was recently installed it may not be compatible 2 Is the Memory Card compatible Go to step 2 Replace the Memory Card 2 1 Check the Memor...

Страница 338: ...1 Size and ID Check Fail Initial Actions Cycle printer power If the problem persists follow the procedure below Troubleshooting Reference Table Applicable Parts Wiring and Plug Jack Map References Image Processor Board PL9 1 20 Troubleshooting Procedure Table Step Actions and Questions Yes No 1 1 Check the Image Processor Board for correct installation 2 Is the Image Processor Board correctly inst...

Страница 339: ...Chain Link 116 328 Controller Error Data Cache Error Initial Actions Cycle printer power If the problem persists follow the procedure below Troubleshooting Reference Table Applicable Parts Wiring and Plug Jack Map References Image Processor Board PL9 1 20 Troubleshooting Procedure Table Step Actions and Questions Yes No 1 1 Check the Image Processor Board for correct installation 2 Is the Image Pr...

Страница 340: ...problem persists follow the procedure below Troubleshooting Reference Table Applicable Parts Wiring and Plug Jack Map References Image Processor Board PL9 1 20 Troubleshooting Procedure Table Step Actions and Questions Yes No 1 1 Check the Image Processor Board for correct installation 2 Is the Image Processor Board correctly installed Go to step 2 Reseat the Image Processor Board page 8 90 2 Does...

Страница 341: ...he problem persists follow the procedure below Troubleshooting Reference Table Applicable Parts Wiring and Plug Jack Map References Image Processor Board PL9 1 20 Parallel Cable Troubleshooting Procedure Table Step Actions and Questions Yes No 1 1 Check the Parallel cable connection 2 Is the cable securely connected Go to step 2 Reconnect the cable Go to step 2 2 Does the error still occur Replace...

Страница 342: ...Diag Mode Initial Actions Cycle printer power If the problem persists follow the procedure below Troubleshooting Reference Table Applicable Parts Wiring and Plug Jack Map References Image Processor Board PL9 1 27 Troubleshooting Procedure Table Step Actions and Questions Yes No 1 1 Reboot the printer 2 Does the error still occur Go to step 2 Complete 2 1 Reseat the Image Processor Board 2 Does the...

Страница 343: ...Test Error Diag Mode Initial Actions Cycle printer power If the problem persists follow the procedure below Troubleshooting Reference Table Applicable Parts Wiring and Plug Jack Map References Image Processor Board PL9 1 27 Troubleshooting Procedure Table Step Actions and Questions Yes No 1 1 Reboot the printer 2 Does the error still occur Go to step 2 Complete 2 1 Reseat the Image Processor Board...

Страница 344: ...Test Error Diag Mode Initial Actions Cycle printer power If the problem persists follow the procedure below Troubleshooting Reference Table Applicable Parts Wiring and Plug Jack Map References Image Processor Board PL9 1 27 Troubleshooting Procedure Table Step Actions and Questions Yes No 1 1 Reboot the printer 2 Does the error still occur Go to step 2 Complete 2 1 Reseat the Image Processor Board...

Страница 345: ...licable Parts Wiring and Plug Jack Map References Scanner Controller Board PL9 1 1 Image Processor Board PL9 1 20 AIO ESS Harness Assembly PL10 1 14 Map 3 Image Processor Board and Dispenser Motors on page 10 12 Fax Controller Wiring Diagram on page 10 50 Troubleshooting Procedure Table Step Actions and Questions Yes No 1 1 Turn the printer Off wait for five seconds and turn the printer back On 2 ...

Страница 346: ...ler Board 2 Disconnect P J480 from the Image Processor Board 3 Check continuity between P J48 P J480 Go to step 5 Replace the AIO ESS Harness Assembly 5 1 Replace the Scanner Controller Board page 8 99 2 Does the error still occur when copying Replace the Image ProcessorBoard page 8 90 Complete Troubleshooting Procedure Table continued Step Actions and Questions Yes No ...

Страница 347: ...able Parts Wiring and Plug Jack Map References Scanner Controller Board PL9 1 1 Image Processor Board PL9 1 20 AIO ESS Harness Assembly PL10 1 14 Map 3 Image Processor Board and Dispenser Motors on page 10 12 Fax Controller Wiring Diagram on page 10 50 Troubleshooting Procedure Table Step Actions and Questions Yes No 1 1 Turn the printer Off wait for five seconds and turn the printer back On 2 Doe...

Страница 348: ...ler Board 2 Disconnect P J480 from the Image Processor Board 3 Check continuity between P J48 P J480 Go to step 5 Replace the AIO ESS Harness Assembly 5 1 Replace the Scanner Controller Board page 8 99 2 Does the error still occur when copying Replace the Image ProcessorBoard page 8 90 Complete Troubleshooting Procedure Table continued Step Actions and Questions Yes No ...

Страница 349: ...sts follow the procedure below Troubleshooting Reference Table Applicable Parts Wiring and Plug Jack Map References Scanner Controller Board PL9 1 1 Image Processor Board PL9 1 20 Multi Protocol Card PL9 1 23 Troubleshooting Procedure Table Step Actions and Questions Yes No 1 1 Check the network connection using ping command 2 Does the printer connect to the network Go to step 2 Go to step 5 2 1 C...

Страница 350: ...stalled go to step 7 Complete 6 1 Check the MPC Card for correct installation Reseat the MPC Card page 8 95 2 Does the error still occur when connecting to the server Go to step 7 Complete 7 1 Check the network setting System Admin Menu Network Settings 2 Is the printer network setting correct Go to step 8 Change the Network Setting information 8 1 Check the Image Processor Board for correct insta...

Страница 351: ...ter power If the problem persists follow the procedure below Troubleshooting Reference Table Applicable Parts Wiring and Plug Jack Map References Scanner Controller Board PL9 1 1 Image Processor Board PL9 1 20 Multi Protocol Card PL9 1 23 Troubleshooting Procedure Table Step Actions and Questions Yes No 1 1 Check the network connection using ping command 2 Does the printer connect to the network G...

Страница 352: ...stalled go to step 7 Complete 6 1 Check the MPC Card for correct installation Reseat the MPC Card page 8 95 2 Does the error still occur when connecting to the server Go to step 7 Complete 7 1 Check the network setting System Admin Menu Network Settings 2 Is the printer network setting correct Go to step 8 Change the Network Setting information 8 1 Check the Image Processor Board for correct insta...

Страница 353: ...ocessor Board PL9 1 20 Multi Protocol Card PL9 1 23 Troubleshooting Procedure Table Step Actions and Questions Yes No 1 1 Check the network connection using ping command 2 Does the printer connect to the network Go to step 2 Go to step 5 2 1 Check the Address Book setting System Admin Menu Address Book Speed Dial Group Dial 2 Is the Address Book setting correct Go to step 3 Set the correct Address...

Страница 354: ...es the error still occur when connecting to the server Go to step 7 Complete 7 1 Check the network setting System Admin Menu Network Settings 2 Is the printer network setting correct Go to step 8 Change the Network Setting information 8 1 Check the Image Processor Board for correct installation Reseat the Image Processor Board page 8 90 2 Does the error still occur when connecting to the server Re...

Страница 355: ...k Map References Scanner Controller Board PL9 1 1 ADF Scanner Assembly PL11 1 1 Map 3 Image Processor Board and Dispenser Motors on page 10 12 Automatic Document Feeder Wiring Diagram on page 10 53 Troubleshooting Procedure Table Step Actions and Questions Yes No 1 Is the ADF Cover closed Go to step 2 Close the ADF Cover 2 1 Check the wiring harness connector P J60 on the Scanner Controller Board ...

Страница 356: ...Found Make Directory Error Chain Link 016 788 Network Scan Error File Name Exists Error SMB FTP Same File Name Detection Error Chain Link 016 789 Network Scan Error Post Operation Error Chain Link Network Scan Error Connection Time Out Chain Link Network Scan Error SMTP Connection Failed Initial Actions Cycle printer power If the problem persists follow the procedure below Troubleshooting Referenc...

Страница 357: ...r Board page 8 99 Complete 5 1 Check the network connection Reseat the network connector 2 Does the error still occur Go to step 6 If an MPC Card is not installed go to step 7 Complete 6 1 Check the MPC Card for correct installation Reseat the MPC Card page 8 95 2 Does the error still occur when connecting to the server Go to step 7 Complete 7 1 Check the network setting System Admin Menu Network ...

Страница 358: ...o 1 1 Check the network connection using ping command 2 Does the printer connect to the network Go to step 2 Go to step 5 2 1 Check the Address Book setting System Admin Menu Address Book Speed Dial Group Dial 2 Is the Address Book setting correct Go to step 3 Set the correct Address Book information 3 1 Check the printer specification 2 Does the printer specification meet the server specification...

Страница 359: ...1 Check the network setting System Admin Menu Network Settings 2 Is the printer network setting correct Go to step 8 Change the Network Setting information 8 1 Check the Image Processor Board for correct installation Reseat the Image Processor Board page 8 90 2 Does the error still occur when connecting to the server Replace the Image ProcessorBoard page 8 90 Complete Troubleshooting Procedure Tab...

Страница 360: ...or Board PL9 1 20 Troubleshooting Procedure Table Step Actions and Questions Yes No 1 1 Check the network setting using a PC 2 Is the setting correct Go to step 2 Set the correct network information 2 1 Check the network setting System Admin Menu Network Settings 2 Is the printer network setting correct Go to step 3 Set the correct network settings 3 1 Check the Protocol setting System Admin Menu ...

Страница 361: ...and Plug Jack Map References Scanner Controller Board PL9 1 1 Troubleshooting Procedure Table Step Actions and Questions Yes No 1 1 Turn the printer power Off and back On 2 Does the error still occur Go to step 2 Complete 2 1 Check the Country setting information on the Control Panel System Admin Menu Fax Settings Country 2 Is the Country setting correct Go to step 3 Change the Country Setting to ...

Страница 362: ...ns Yes No 1 1 Check the user operation 2 Does the user operate the scanner correctly Go to step 2 Complete 2 1 Check the USB cable connection Reconnect the PC and the printer 2 Does the error still occur when scanning Go to step 3 Complete 3 1 Enable Windows Image Acquisition on the computer Start Settings Control Panel Administrative Tools Services Window Image Acquisition WIA 2 Check the Scanner...

Страница 363: ...Highlight and right click on Phaser6180MFP Scanner to open the Properties window 3 Click the Events tab 4 Verify that the Select an event option is correctly selected 5 Verify the software program to be used with the scanner Is Phaser 6180MFP Express Scan Manager selected Actions Start this program Phaser 6180MFP Express Scan Manager Retry the scanning job If the message Select the program to laun...

Страница 364: ... Scanner Controller Board PL9 1 1 Troubleshooting Procedure Table Step Actions and Questions Yes No 1 1 Turn the printer power Off and back On 2 Does the error still occur Go to step 2 Complete 2 1 Check the Country setting information on the Control Panel System Admin Menu Fax Settings Country 2 Is the Country setting correct Go to step 3 Change the Country Setting to the correct country 3 1 Chec...

Страница 365: ... Plug Jack Map References Scanner Controller Board PL9 1 1 ADF Scanner Assembly PL11 1 1 Automatic Document Feeder Wiring Diagram on page 10 53 Troubleshooting Procedure Table Step Actions and Questions Yes No 1 Check the Scanner Lock Is the Scanner Lock at the Unlock position Go to step 2 Set the Scanner Lock to the Unlock position 2 1 Check the wiring harness connectors P J60 P J62 P J63 P J64 a...

Страница 366: ...erence Table Applicable Parts Wiring and Plug Jack Map References Scanner Controller Board PL9 1 1 ADF Scanner Assembly PL11 1 1 Automatic Document Feeder Wiring Diagram on page 10 53 Troubleshooting Procedure Table Step Actions and Questions Yes No 1 1 Check the wiring harness connectors P J60 P J62 P J63 P J64 and P J65 on the Scanner Controller Board Reseat the connectors 2 Does the error still...

Страница 367: ... persists follow the procedure below Troubleshooting Reference Table Applicable Parts Wiring and Plug Jack Map References Scanner Controller Board PL9 1 1 ADF Scanner Assembly PL11 1 1 Automatic Document Feeder Wiring Diagram on page 10 53 Troubleshooting Procedure Table Step Actions and Questions Yes No 1 1 Turn the printer Off and back On 2 Does the error still occur Go to step 2 Complete 2 1 Re...

Страница 368: ...ions and Questions Yes No 1 1 Check the error 2 Does the error message disappear within 70 seconds automatically or disappear after pressing the OK button Go to step 2 Go to step 4 2 1 Check the error 2 Does the error still occur when copying or scanning Go to step 3 To to step 4 3 1 Print a Configuration page System Information Pages Configuration 2 Does the error still occur when copying or scan...

Страница 369: ... Wiring and Plug Jack Map References Scanner Controller Board PL9 1 1 Troubleshooting Procedure Table Step Actions and Questions Yes No 1 1 Turn the printer power Off and back On 2 Does the error still occur Go to step 2 Complete 2 1 Check the Country setting information on the Control Panel System Admin Menu Fax Settings Country 2 Is the Country setting correct Go to step 3 Change the Country Set...

Страница 370: ...s Scanner Controller Board PL9 1 1 ADF Scanner Assembly PL11 1 1 Automatic Document Feeder Wiring Diagram on page 10 53 Troubleshooting Procedure Table Step Actions and Questions Yes No 1 Check the Scanner Lock Is the Scanner Lock at the Unlock position Go to step 2 Set the Scanner Lock to the Unlock position 2 1 Check the wiring harness connectors P J60 P J62 P J63 P J64 and P J65 on the Scanner ...

Страница 371: ...page 10 10 Automatic Document Feeder Wiring Diagram on page 10 53 Troubleshooting Procedure Table Step Actions and Questions Yes No 1 1 Wait for 5 seconds and turn the printer Off and back On 2 Does the error still occur when the printer is turned On Go to step 2 Complete 2 1 Check the Scanner Controller Board for correct installation Reseat the Scanner Controller Board page 8 99 2 Does the error ...

Страница 372: ... procedure below Troubleshooting Reference Table Applicable Parts Wiring and Plug Jack Map References Scanner Controller Board PL9 1 1 ADF Scanner Assembly PL11 1 1 Troubleshooting Procedure Table Step Actions and Questions Yes No 1 1 Turn the printer power Off and back On 2 Does the error still occur when receiving fax Go to step 2 Complete 2 1 Check the stored data on the printer System Informat...

Страница 373: ...x Settings Interval Timer 2 Is the Interval Timer Value long Default Value 8 Decrease the Interval Timer Value Go to step 4 4 1 Replace the Scanner Controller Board page 8 99 2 Does the error still occur when receiving fax Replace the ADF Scanner Assembly page 8 103 Complete Troubleshooting Procedure Table continued Step Actions and Questions Yes No ...

Страница 374: ...Procedure Table Step Actions and Questions Yes No 1 1 Turn the printer power Off and back On 2 Does the error still occur when faxing after turning the printer back On Go to step 2 Complete 2 1 Check the Fax Parameter setting Service Mode Fax Scanner Diag Parameter 2 Enter Chain Link 825 662 3 Does the value Hex show number 2 MMR refer to Chain Link for Fax Parameter Setting on page A 9 for detail...

Страница 375: ... Parts Wiring and Plug Jack Map References Scanner Controller Board PL9 1 1 Troubleshooting Procedure Table Step Actions and Questions Yes No 1 1 Turn the printer power Off and back On 2 Does the error still occur Go to step 2 Complete 2 1 Check the Country setting information on the Control Panel System Admin Menu Fax Settings Country 2 Is the Country setting correct Go to step 3 Change the Count...

Страница 376: ... Error Double File Open Chain Link 017 983 Controller Initialized NVM EEPROM R W Error Chain Link 017 986 Controller Error Create 0 Byte File Chain Link 017 987 Controller Error File Read Error Chain Link 017 989 Controller Error File Write Error Chain Link 117 310 Controller Error Main Program Sum Error Chain Link 117 311 Controller Error Parameter Sum Error Chain Link 117 312 Controller Error Do...

Страница 377: ...o 1 1 Turn the printer power Off and back On 2 Does the error still occur Go to step 2 Complete 2 1 Check the Country setting information on the Control Panel System Admin Menu Fax Settings Country 2 Is the Country setting correct Go to step 3 Change the Country Setting to the correct country 3 1 Check the Scanner Controller Board for correct installation Reseat the Scanner Controller Board page 8...

Страница 378: ...lug Jack Map References Scanner Controller Board PL9 1 1 Troubleshooting Procedure Table Step Actions and Questions Yes No 1 1 Turn the printer power Off and back On 2 Does the error still occur Go to step 2 Complete 2 1 Check the Country setting information on the Control Panel System Admin Menu Fax Settings Country 2 Is the Country setting correct Go to step 3 Change the Country Setting to the c...

Страница 379: ...ILE Task Error Chain Link 117 348 Error IITRX Task Error Chain Link 117 349 Error SCANMGR Task Error Initial Actions Cycle printer power If the problem persists follow the procedure below Troubleshooting Reference Table Applicable Parts Wiring and Plug Jack Map References Scanner Controller Board PL9 1 1 Troubleshooting Procedure Table Step Actions and Questions Yes No 1 1 Turn the printer power O...

Страница 380: ...k the Scanner Controller Board for correct installation Reseat the Scanner Controller Board page 8 99 2 Does the error still occur when the printer is turned On Replace the Scanner Controller Board page 8 99 Complete Troubleshooting Procedure Table continued Step Actions and Questions Yes No ...

Страница 381: ...or Chain Link 133 246 Fax Error Memory Pool Get Error Chain Link 133 247 Fax Error Message Send Error Chain Link 133 248 Fax Error Memory Pool Reverse Error Chain Link 133 249 Fax Error Message Receive Error Chain Link 133 251 Fax Error File Open Error Chain Link 133 252 Fax Error File Close Error Chain Link 133 253 Fax Error File Erase Error Chain Link 133 254 Fax Error Mem Full Chain Link 133 25...

Страница 382: ... Cycle printer power If the problem persists follow the procedure below Troubleshooting Reference Table Applicable Parts Wiring and Plug Jack Map References Scanner Controller Board PL9 1 1 Troubleshooting Procedure Table Step Actions and Questions Yes No 1 1 Turn the printer power Off and back On 2 Does the error still occur Go to step 2 Complete 2 1 Check the Country setting information on the C...

Страница 383: ...ing Reference Table Applicable Parts Wiring and Plug Jack Map References Scanner Controller Board PL9 1 1 Troubleshooting Procedure Table Step Actions and Questions Yes No 1 1 Turn the printer power Off and back On 2 Does the error still occur Go to step 2 Complete 2 1 Check the Country setting information on the Control Panel System Admin Menu Fax Settings Country 2 Is the Country setting correct...

Страница 384: ...Communication Error RS Request CS NOT ON Chain Link 035 779 Fax Communication Error FAX FWD Document Change Error Chain Link 133 231 Fax Communication Error T_FAXCOM Data Receive I F Error Initial Actions Cycle printer power If the problem persists follow the procedure below Troubleshooting Reference Table Applicable Parts Wiring and Plug Jack Map References Scanner Controller Board PL9 1 1 Troubl...

Страница 385: ...k the Scanner Controller Board for correct installation Reseat the Scanner Controller Board page 8 99 2 Does the error still occur when the printer is turned On Replace the Scanner Controller Board page 8 99 Complete Troubleshooting Procedure Table continued Step Actions and Questions Yes No ...

Страница 386: ... PL9 1 1 Troubleshooting Procedure Table Step Actions and Questions Yes No 1 Is the dial number correct Go to step 2 Set the correct dial number 2 Is the telephone line busy Wait for ten minutes and re dial Go to step 3 3 1 Check the Fax Parameter setting Service Mode Fax Scanner Diag Parameter 2 Enter Chain Link 825 662 3 Does the value Hex show number 2 MMR refer to Chain Link for Fax Parameter ...

Страница 387: ...p References Scanner Controller Board PL9 1 1 Fax Board PL9 1 3 Troubleshooting Procedure Table Step Actions and Questions Yes No 1 Is the dial number correct Go to step 2 Set the correct dial number 2 1 Check the telephone line connection Reconnect the telephone line connector on the Scanner Controller Board 2 Does the error still occur when faxing Go to step 3 Complete 3 1 Check the Fax Board in...

Страница 388: ...zation Error Chain Link 033 758 Fax Communication Error Control Channel Synchronization Error Chain Link 033 759 Fax Communication Error Control Channel Retrain Error Chain Link 033 760 Fax Communication Error Control Channel Off Time Out Chain Link 033 761 Fax Communication Error Primary Channel Off Time Out Chain Link 035 706 Fax Communication Error Fall Back Error Initial Actions Cycle printer ...

Страница 389: ...faxing Go to step 3 Complete 3 1 Check the Fax Board installation Reseat the Fax Board page 8 98 2 Does the error still occur when faxing Go to step 4 Complete 4 1 Check the Scanner Controller Board installation Reseat the Scanner Controller Board page 8 99 2 Does the error still occur when faxing Replace the Scanner Controller Board page 8 99 Complete Troubleshooting Procedure Table continued Ste...

Страница 390: ...power If the problem persists follow the procedure below Troubleshooting Reference Table Applicable Parts Wiring and Plug Jack Map References Scanner Controller Board PL9 1 1 Troubleshooting Procedure Table Step Actions and Questions Yes No 1 1 Check the Fax setting System Admin Menu Fax Settings Junk Fax Filter 2 Is Junk Fax Filter On Complete Go to step 2 2 1 Check the Scanner Controller Board f...

Страница 391: ...Actions Cycle printer power If the problem persists follow the procedure below Troubleshooting Reference Table Applicable Parts Wiring and Plug Jack Map References Scanner Controller Board PL9 1 1 ADF Scanner Assembly PL11 1 1 Troubleshooting Procedure Table Step Actions and Questions Yes No 1 1 Turn the printer power Off and back On 2 Does the error still occur when faxing Go to step 2 Complete 2...

Страница 392: ...ap References Scanner Controller Board PL9 1 1 Troubleshooting Procedure Table Step Actions and Questions Yes No 1 Is the dial number correct Go to step 2 Set the correct dial number 2 1 Check the telephone line connection Reconnect the telephone line connector on the Scanner Controller Board 2 Does the error still occur when faxing Go to step 3 Complete 3 1 Check the Fax Board installation Reseat...

Страница 393: ...e dial number correct Go to step 2 Set the correct dial number 2 1 Check the Parameter setting Service Mode Fax Scanner Diag Parameter 2 Does Chain Link value 825 662 show on the Control Panel menu Go to step 3 Set the Chain Link value to 825 662 3 1 Check the country setting System Admin Menu Fax Settings Country 2 Is the country setting correct Go to step 4 Set the country setting to the correct...

Страница 394: ...Chain Link 033 782 Fax Codec Error NSS DCS Function Disagreement Chain Link 033 784 Fax Codec Error Chain Link 033 799 Fax Codec Error Maximum Reception Lines Over Initial Actions Cycle printer power If the problem persists follow the procedure below Troubleshooting Reference Table Applicable Parts Wiring and Plug Jack Map References Scanner Controller Board PL9 1 1 Troubleshooting Procedure Table...

Страница 395: ...country setting correct Go to step 4 Set the country setting to the correct country 4 1 Check Scanner Controller Board for correct installation Reseat the Scanner Controller Board page 8 99 2 Does the error still occur when faxing Replace the Scanner Controller Board page 8 99 Complete Troubleshooting Procedure Table continued Step Actions and Questions Yes No ...

Страница 396: ...follow the procedure below Troubleshooting Reference Table Applicable Parts Wiring and Plug Jack Map References Scanner Controller Board PL9 1 1 Troubleshooting Procedure Table Step Actions and Questions Yes No 1 1 Check the password setting System Admin Menu Secure Settings Scan Fax Lock 2 Is the password correct Go to step 2 Set the password 2 1 Check the Scanner Controller Board for correct ins...

Страница 397: ...embly PL11 1 1 Map 3 Image Processor Board and Dispenser Motors on page 10 12 General Wiring Diagram on page 10 23 Troubleshooting Procedure Table Step Actions and Questions Yes No 1 1 Check the user operation 2 Does the user operate the Fax machine correctly Go to step 2 Retry the Fax operation 2 1 Check the wiring harness connectors P J60 P J62 P J63 P J64 and P J65 on the Scanner Controller Boa...

Страница 398: ...code Output Buffer Over Chain Link 033 776 Fax Codec Error SCAN Encode Output Buffer Over Chain Link 033 786 Fax Codec Error Chain Link 133 237 Fax Codec Error MHR Input Buffer Error Chain Link 133 238 Fax Codec Error MHR Output Buffer Error Initial Actions Cycle printer power If the problem persists follow the procedure below Troubleshooting Reference Table Applicable Parts Wiring and Plug Jack M...

Страница 399: ...k the Scanner Controller Board for correct installation Reseat the Scanner Controller Board page 8 99 2 Does the error still occur when the printer is turned On Replace the Scanner Controller Board page 8 99 Complete Troubleshooting Procedure Table continued Step Actions and Questions Yes No ...

Страница 400: ...g Reference Table Applicable Parts Wiring and Plug Jack Map References Scanner Controller Board PL9 1 1 Troubleshooting Procedure Table Step Actions and Questions Yes No 1 1 Turn the printer power Off and back On 2 Does the error still occur Go to step 2 Complete 2 1 Check the Country setting System Admin Menu Fax Settings Country 2 Is the Country setting correct Go to step 3 Change the Country Se...

Страница 401: ...cable Parts Wiring and Plug Jack Map References Scanner Controller Board PL9 1 1 Troubleshooting Procedure Table Step Actions and Questions Yes No 1 1 Check the original documents 2 Are the documents 100 sheets or more Go to step 2 To go step 3 2 1 Separate the original documents into small sections to be faxed 2 Does the error still occur when faxing Go to step 3 Complete 3 1 Check the Scanner Co...

Страница 402: ...sts follow the procedure below Troubleshooting Reference Table Applicable Parts Wiring and Plug Jack Map References Scanner Controller Board PL9 1 1 ADF Scanner Assembly PL11 1 1 Automatic Document Feeder Wiring Diagram on page 10 53 Troubleshooting Procedure Table Step Actions and Questions Yes No 1 1 Turn the printer power Off and back On 2 Does the error still occur Go to step 2 Complete 2 1 Re...

Страница 403: ...ap References Scanner Controller Board PL9 1 1 ADF Scanner Assembly PL11 1 1 Map 3 Image Processor Board and Dispenser Motors on page 10 12 General Wiring Diagram on page 10 23 Troubleshooting Procedure Table Step Actions and Questions Yes No 1 1 Check the user operation 2 Does the user operate the Fax machine correctly Go to step 2 Retry the Fax operation 2 1 Check the wiring harness connectors P...

Страница 404: ...ce Table Applicable Parts Wiring and Plug Jack Map References Scanner Controller Board PL9 1 1 Troubleshooting Procedure Table Step Actions and Questions Yes No 1 Is the dial number correct Go to step 2 Set the correct dial number 2 1 Check the country setting System Admin Menu Fax Settings Country 2 Is the country setting correct Go to step 3 Set the correct country setting 3 1 Check the Scanner ...

Страница 405: ...k the fax number 2 Is the fax number correct Go to step 2 Enter the correct fax number 2 1 Check the telephone line connection Reseat the telephone line connector on the Scanner Controller Board 2 Does the error still occur when faxing Go to step 3 Complete 3 1 Check the country setting System Admin Menu Fax Settings Country 2 Is the country setting correct Go to step 4 Set the correct country set...

Страница 406: ...nk 035 710 Fax Communication Error Receive PIN Chain Link 035 716 Fax Communication Error T2 Time Out Chain Link 035 717 Fax Communication Error G3 Receive RTN Send Chain Link 035 728 Fax Communication Error G3 EOL Not Receive Chain Link 035 729 Fax Communication Error Career Cut Chain Link 035 737 Fax Communication Error CTC EOR Resend Over Chain Link 035 739 Fax Communication Error T5 Time Out C...

Страница 407: ...e 2 1 Check the fax protocol System Information Pages Protocol Monitor 2 Does the sending fax meet the specifications Go to step 3 Change the sending fax side setting 3 1 Check the country setting System Admin Menu Fax Settings Country 2 Is the country setting correct Go to step 4 Set the correct country setting 4 1 Check Scanner Controller Board for correct installation Reseat the Scanner Control...

Страница 408: ...ons Yes No 1 1 Check the telephone line connection Reconnect the telephone line connector on the Scanner Controller Board 2 Does the error still occur when faxing Go to step 2 Complete 2 1 Check the sending fax side protocol on the Configuration page System Information Pages 2 Does the Protocol Monitor meet the specifications Go to step 3 Change the sending fax side setting 3 1 Check the printer s...

Страница 409: ... PL9 1 1 Troubleshooting Procedure Table Step Actions and Questions Yes No 1 1 Check the Fax specifications 2 Does the receiving Fax meet specification Go to step 2 Change the receiving Fax setting or send to a different Fax location 2 1 Check the country setting System Admin Menu Fax Settings Country 2 Is the country setting correct Go to step 3 Set the correct country setting 3 1 Check the Scann...

Страница 410: ...ference Table Applicable Parts Wiring and Plug Jack Map References Scanner Controller Board PL9 1 1 Troubleshooting Procedure Table Step Actions and Questions Yes No 1 Is the dial number correct Go to step 2 Set the correct dial number 2 1 Check the country setting System Admin Menu Fax Settings Country 2 Is the country setting correct Go to step 3 Set the correct country setting 3 1 Check the Sca...

Страница 411: ...ble Applicable Parts Wiring and Plug Jack Map References Scanner Controller Board PL9 1 1 Troubleshooting Procedure Table Step Actions and Questions Yes No 1 1 Turn the printer power Off and back On 2 Does the error still occur Go to step 2 Complete 2 1 Check the Country setting System Admin Menu Fax Settings Country 2 Is the Country setting correct Go to step 3 Set the correct country setting 3 1...

Страница 412: ...3 224 Phaser 6180MFP Multifunction Printer Service Manual Error Messages and Codes ...

Страница 413: ...e Diagnostics Menu Map Printer Components Duplex Components Service Diagnostics Tests Control Panel Troubleshooting Inoperable Printer Troubleshooting AC Power Supply Troubleshooting DC Power Supply Troubleshooting 24 VDC Interlock Switch Fax Troubleshooting Abnormal and Electrical Noise Operating System and Application Problems ...

Страница 414: ...is sequence A typical startup from a cold start contains the following steps 1 When the power switch is turned On the Health LED on the Image Processor Board turns On immediately 2 The Boot Loader checks for RAM present and functional If an error is detected RAM ERROR is displayed and the Health LEDs alternately blink at 1 2 second intervals 3 The Boot Loader then loads and performs POST diagnosti...

Страница 415: ...ONT block does not match Chain Link 116 317 is displayed if another block does not match 5 Initializes the Panel driver No additional message is displayed 6 Initializes Memory Manager 7 Initializes EEPROM driver Chain Link 116 323 is displayed if the error is found in EEPROM0 Chain Link 116 326 is displayed if the error is found in EEPROM1 8 Starts the Operating System process a Initializes the Op...

Страница 416: ...t writes reads verifies on the diagnostic area of the EEPROM 116 323 Error is detected in EEPROM0 during initialization 116 326 Error is detected in EEPROM1 during initialization DRAM This test checks OPEN SHORT of the address line of the DRAM This test also writes reads verifies on the entire DRAM 116 315 Error is detected if included RAM is different 116 316 Error is detected if extended RAM is ...

Страница 417: ...trolled from the Control Panel and are described in detail in Service Diagnostics on page 4 5 Entering Service Diagnostics 1 Turn the printer power Off 2 Press and hold the Up and Down Arrow buttons simultaneously and turn the printer power On 3 Please wait message is displayed 4 Continue to hold the buttons until the Service Mode message is displayed on the Control Panel and release the buttons 5...

Страница 418: ...nu Displays printer menu Up Moves from one item to another Down Moves from one item to another Left Moves the cursor to the left Right Moves the cursor to the right OK Confirms settings or executes a task Exit Resets a diagnostic item cancels a task or exit the menu System Exit out of the current menu Wake Up Function not available in Diagnostics mode ...

Страница 419: ...idually DP10 Individually DP20 Individually Auto Adjust FB Auto Adjust ADF Index Hex 00 Value Hex FB 0x00000000 ADF 0x00000000 Counter Clear FB Counter Clear ADF RTC Test EEPROM Test SDRAM Test Code ROM Test Image ROM Test SRAM Test Main Param Boot Dload IIT Panel Relay Test Hook Test Single Tone Send DTMF Send Dial Pulse Send Ring Back Tone Data Send Line Voltage Line Current 1st FPGA I F Test 2n...

Страница 420: ...ray3 Paper Size Main Motor FULL2 Main Motor FULL1 Main Motor HALF Main Motor LOW Sub Motor FULL2 Sub Motor FULL1 Sub Motor HALF Sub Motor LOW Tray 2 Motor FULL2 Tray 2 Motor FULL1 Tray 2 Motor HALF Tray 2 Motor LOW Deve Motor FULL2 Deve Motor FULL1 Deve Motor HALF Duplex Motor HIGH Duplex Motor FULL2 Duplex Motor FULL1 Duplex Motor HALF Duplex Motor LOW Tray 3 Feed Motor FULL2 Tray 3 Feed Motor FU...

Страница 421: ...h2 Dip Switch3 Type Type Type Type Print Service Copy Service Fax Service Scan Service FullColor Color 1 Color 2 B W Total FullColor Backup Color 1 Backup Color 2 Backup B W Backup Total Backup FullColor Error Color 1 Error Color 2 Error B W Error FullColor Color 2 B W Total FullColor Backup Color 2 Backup B W Backup Total Backup FullColor Error Color 2 Error B W Error Color B W Total Color Backup...

Страница 422: ...ife Printer Life DTB2 Life DTB3 Life YWasteToner Life MWasteToner Life CWasteToner Life KWasteToner Life Developer Y Life Developer M Life Developer C Life Developer K Life Y Drum Life M Drum Life C Drum Life K Drum Life MPT Feed Life Tray2 Feed Life Tray3 Feed Life Duplex Feed Print Life Y Toner nnnn Life YWaste Toner nnnn Life MWaste Toner nnnn Life CWaste Toner nnnn Life KWaste Toner nnnn Life ...

Страница 423: ...otor Black Toner Motor Yellow Toner Motor Magenta Toner Motor Cyan Toner Motor Black Erase Lamp Yellow Magenta Cyan Erase Lamp Tray 2 Feed Clutch Regi Clutch MPT Turn Clutch MPT Feed Solenoid Exit Clutch Tray 3 Turn Clutch Fan ADC Sensor Solenoid ADC Sensor LED Sub Motor Deve Motor Tray 2 Motor Tray 3 Feed Clutch Tray 3 Feed Motor s6180mfp 157 ...

Страница 424: ... Black Toner Cartridge Sensor Cyan Toner Cartridge Sensor Magenta Toner Cartridge Sensor Yellow Toner Cartridge Sensor Tray 2 Paper Size Switch Tray 2 No Paper Sensor Tray 1 MPT No Paper Sensor Tray 3 No Paper Sensor Tray 3 Paper Size Switch Exit Sensor Registration Sensor Front Cover Interlock Switch ...

Страница 425: ...Phaser 6180MFP Multifunction Printer Service Manual 4 13 General Troubleshooting Duplex Components Clutch Fan Motor Sensor s6180mfp 159 Duplex Fan Duplex Clutch Duplex Motor Duplex Jam Sensor ...

Страница 426: ...ROM Test Start Processing Check OK FontROM ERROR S xxxx V yyyy Calculates the Font ROM checksum chip by chip and compares it with the value stored in the FontROM itself beforehand When the checksum is identical to the stored value this test determines the chip is normal Note Run this test when errors 116 310 and 116 311 occur EEPROM Test EEPROM Test Start Processing Check OK EEPROM ID ERROR 1 2 Pe...

Страница 427: ...Performs function checks on the components whether they operate normally or not Note During Engine Diag test other Service Diagnostics functions cannot be performed simultaneously Sensor Test Tests the sensors and switches of the printer When a paper jam is occurred or an error message or code is displayed run this test to locate the damage components Note The Low High values can be 0 to 99 and th...

Страница 428: ...F L 0 H 0 Tests the Black Print Cartridge Sensor CRU Sensor C CRU Sensor C OFF L 0 H 0 Tests the Cyan Print Cartridge Sensor Tray 3 Low Paper Do not use Tray 3 Low Paper OFF L 0 H 0 Tests the Tray 3 Low Paper Sensor Tray 3 No Paper Tray 3 No Paper OFF L 0 H 0 Tests the Tray 3 No Paper Sensor Duplex Fan Alarm Do not use Duplex Fan Alarm OFF L 0 H 0 Tests Duplex Fan Alarm Tray 3 Feed Motor Alarm Do ...

Страница 429: ...F L 0 H 0 Tests Tray 2 Motor Alarm Deve Motor Alarm Do not use DEVE Motor Alarm OFF L 0 H 0 Tests Developer Motor Alarm Tray 2 Paper Size Tray2 Paper Size OFF L 0 H 0 Paper Size Letter 8 5x11 Tests the Tray 2 Paper Size Switch Tray 3 Paper Size Tray3 Paper Size OFF L 0 H 0 Paper Size Legal 8 5x14 Tests the Tray 3 Paper Size Switch Motor Test Press the Up or Down button to move from one item to ano...

Страница 430: ...r LOW Ready EXEC Tray 2 Motor Full2 Tray 2 Motor FULL2 Ready EXEC Tests the Tray 2 Motor Tray 2 Motor Full1 Tray 2 Motor FULL1 Ready EXEC Tray 2 Motor Half Tray 2 Motor HALF Ready EXEC Tray 2 Motor Low Tray 2 Motor LOW Ready EXEC Deve Motor Full2 Deve Motor FULL2 Ready EXEC Tests the Developer Motor Deve Motor Full1 Deve Motor FULL1 Ready EXEC Deve Motor Half Deve Motor HALF Ready EXEC Duplex Moto...

Страница 431: ... Tray 3 Feed Motor Full1 Tray 3 Feed Motor FULL1 Ready EXEC Tray 3 Feed Motor Half Tray 3 Feed Motor HALF Ready EXEC Tray 3 Feed Motor Low Tray 3 Feed Motor LOW Ready EXEC Fan High Fan HIGH Ready EXEC Tests the printer Fan Fan Low Fan LOW Ready EXEC Yellow Toner Motor Yellow Toner Motor Ready EXEC Tests the yellow Toner Motor Magenta Toner Motor Magenta Toner Motor Ready EXEC Tests the magenta Ton...

Страница 432: ...EXEC Tests the Tray 3 Feed Clutch Tray 3 Turn Clutch Tray 3 Turn Clutch Ready EXEC Tests the Tray 3 Turn Clutch Duplex Clutch Duplex Clutch Ready EXEC Tests the Duplex Clutch ADC TCD Sensor Solenoid ADC TCD Sensor Solenoid Ready EXEC Tests the ADC Sensor Solenoid ADC TCD Sensor LED ADC TCD Sensor LED Ready EXEC Tests the ADC Sensor LED OHP Sensor LED Do not use OHP Sensor LED Ready EXEC Tests the ...

Страница 433: ...on to change the value at the cursor Press the OK button to save the value in Engine NVM Press the Exit button to move one level up the menu Displays the current NVRAM value Use this function to edit NVRAM information Save NVM to ESS SaveNVM to ESS SaveNVM to ESS OK Processing Saved Please wait Press the OK button to save the value in the Controller NVM Press the Exit button to move one level up t...

Страница 434: ...ot use Initialize Slave Initialize Slave OK Processing Initialized Please wait Press the OK button to run Slave Initialization Press the Exit button to move one level up the menu Initializes Slave Print NVM Info Print NVM Info Processing Please wait Press the Set button to run the test Press the Cancel button to move one level up the menu Prints NVRAM information saved in the Controller Print Info...

Страница 435: ...nt Installation Provides printer installation information Serial No SerialNo GNXxxxxxx or GPXxxxxxx Displays the 6 digit Serial Number Note This information is not initialized with any key action Tone Correction Tone Correction ON OFF Press the Up or Down button to switch Tone Correction On Off Press the OK button to save the setting and move one level up the menu Press the Exit button to move one...

Страница 436: ...mation and sets mode On Off Note This information is initialized by Clear All NVM Note When the Counter Type has been changed an is displayed next to the text Pixel Counter Pixel Counter Y nn n C nn n M nn n K nn n Press the OK or Exit button to move one level up the menu Displays the ratio used of the number of pixel per C M Y K counted by the Controller to A4 size area except 4 mm area from the ...

Страница 437: ...pe4 Press the Up or Down button to change counter type Press the OK button to save the setting Press the Exit button to move one level up the menu Sets counter type from 1 4 Note When the Counter Type has been changed an is displayed next to the text Printer Diag Test Table continued Test Control Panel Display Test Description ...

Страница 438: ...o move one two level s up the menu Press the OK button to run the test Print Counter Print Service Full Color n Color 1 n Color 2 n B W n Total n FullColor Backup n Color 1 Backup n Color 2 Backup n B W Backup n Total Backup n FullColor Error n Color 1 Error n Color 2 Error n B W Error n Operates the print counter Printer Diag Test Table continued Test Control Panel Display Test Description ...

Страница 439: ...or 2 n B W n Total n FullColor Backup n Color 2 Backup n B W Backup n Total Backup n FullColor Error n Color 2 Error n B W Error n Print Counter Fax Service Color n B W n Total n Color Backup n B W Backup n Total Backup n Color Error n B W Error n Printer Diag Test Table continued Test Control Panel Display Test Description ...

Страница 440: ...he first 128 Byte PV counter master Printer counter master Copy Counter BtoM CopyCounter BtoM OK Processing Copied Press the Exit button to move one level up the menu Press the OK button to run the test Copies the values from Backup NVRAM to Master NVRAM Device specific information called Personal info in the first 128 Byte PV counter backup Printer counter backup Clear All NVM Clear All NVM OK Pr...

Страница 441: ...for troubleshooting the printer Menu Buttons Press the Up or Down button to switch from one item to another Press the Exit button to move one two level s up the menu Press the OK button to run the test No Image IOT No Image IOT Ready Processing Prints a blank page Pattern IOT Pattern IOT Ready Processing Prints the printer built in Test Pattern 600 DPI This test checks the print function of the pr...

Страница 442: ... the Exit button to move to one two level s up the menu without saving the value Press the OK button to run the test or the value in NVM and move one level up the menu Note After the setting has been changed the at the right end disappears Sets registration in the paper feeding direction Note When the value is minimum or maximum pressing the Up or Down button does not change the value Slow Scan Kt...

Страница 443: ... Duplex Unit Fast Scan KtoY Fast Scan KtoY 30 30 Fast Scan KtoC Fast Scan KtoC 30 30 Fast Scan Tray 1 MPT Fast Scan MPT 30 30 Fast Scan Tray 2 Fast Scan Tray 2 30 30 Fast Scan Tray 3 Fast Scan Tray 3 30 30 Fast Scan Duplex Fast Scan Duplex 30 30 Fast Scan 2 KtoM Fast Scan 2 KtoM 1 2 Fast Scan 2 KtoY Fast Scan 2 KtoY 1 2 Fast Scan 2 KtoC Fast Scan 2 KtoC 1 2 Printer Diag Test Table continued Test C...

Страница 444: ...r nnnn Reads life counter of the yellow Waste Toner Life M Waste Toner Life MWaste Toner nnnn Reads life counter of the magenta Waste Toner Life C Waste Toner Life CWaste Toner nnnn Reads life counter of the cyan Waste Toner Life K Waste Toner Life KWaste Toner nnnn Reads life counter of the black Waste Toner Life Developer Y Life Developer Y nnnn Reads life counter of the yellow Developer Life De...

Страница 445: ... current parameters Exit Mode Exits the Printer Diag menu Menu Buttons Press the Exit button to move one two level s up the menu Press the OK button to move to the Execution level or reboot the printer Complete Exit Complete Exit Exit Exits the Service Diagnostic menu Fax Scanner Diag Test Control Panel Display Test Description Board Test Tests memory devices on the Board All Test All Test Ready N...

Страница 446: ... 117 362 or 117 363 SDRAM Test SDRAM Test 2nd Ready Now checking Check OK Check NG Performs write read verification on the SDRAM in the following areas Standard Whole work area Speed Up Specified address of work Run this test when error occurs 017 970 033 503 117 311 117 363 or 133 254 Code ROM Test Code ROM Test 2nd Ready Now checking Check OK Check NG Performs write read verification on the Code...

Страница 447: ...est Relay Test Relay Test Press the Left or Right button to move the cursor Press the Up or Down button to change the value at the cursor Press the OK button to save the value in Engine NVM Press the Exit button to move one level up the menu Switches the relay circuit between the Fax and telephone Relay Toggle Test Relay Toggle Test Time 10ms 0000 Now Switching This test switches the relay circuit...

Страница 448: ...z 500Hz 600Hz 900Hz 1000Hz Now Sending Signal Complete Checks the tone output for each single tone for tone dialing DTMF Send DTMF Send Note Unplug phone line before performing this test to prevent a call connection DTMF Continuous DTMF Continuous DTMF 0 1 2 3 4 5 6 7 8 9 A B C D Now Sending Signal Complete This test checks the tone output for all touch tones for tone dialing DTMF Individually DTM...

Страница 449: ...gnal is transmitted the signal stops but OFF HOOK status continues Ring Back Tone Ring Back Tone Now Sending Signal Checks the tone output signals for the ring back tone at 400Hz 16Hz Data Send Data Send V 34 33600bps V 34 31200bps V 34 28800bps V 34 26400bps V 34 24000bps V 34 21600bps V 34 19200bps V 34 16800bps V 34 14400bps V 34 12000bps V 34 9600bps V 34 7200bps V 34 4800bps V 34 2400bps V 29...

Страница 450: ...are version Main Main program version Param Parameter version Boo Boo program version Dload Down load program version IIT Scanner and ADF control program versions Panel Control panel program version Scanner Maintenance White Balance White Balance Enables automatic calibration of the correction value for document glass scanning FB and ADF scanning Auto Adjust FB Auto Adjust FB Ready Now Adjusting A...

Страница 451: ...to move the cursor This functions reads and writes the parameter stored on the Scanner Controller Board Run this test to configure the registration adjustment value and C2 correction value manually Note Refer to the Chain Link for Fax Parameter Setting on page A 9 in the Reference chapter BackUp Data NOTE The system data initialization does not initialize data on EEPROM except dial types and count...

Страница 452: ...ocument data address information communication management data and history Initializes system data System Data Init System Data Init provides a list of country Initializes system data in accordance with the country specified in Data1 Document Clear Document Clear Ready Processing Complete Clears all stored data including calling table substitute queue Complete Exits the Fax Scanner Diag menu Compl...

Страница 453: ...gnostic menu page 4 5 2 Open the Front Cover 3 Remove the Transfer Unit page 8 9 4 Remove the Print Cartridges page 8 11 5 Perform the Duplex Jam Sensor test Printer Diag Engine Diag Sensor Test Duplex JamSensor OK 6 Move the Actuator back and forth and check the information on the Control Panel display The Low and High values change from 0 up to 99 7 Press the Stop button to stop the Duplex Jam S...

Страница 454: ...menu page 4 5 2 Open the Front Cover 3 Remove the Transfer Unit page 8 9 4 Perform the Exit Sensor test Printer Diag Engine Diag Sensor Test Exit Sensor OK 5 Move the Sensor up and down and check the information on the Control Panel display The Low and High values change from 0 up to 99 6 Press the Stop button to stop the Exit Sensor test s6180mfp 161 Control Panel Normal Exit Sensor L 0 Exit Sens...

Страница 455: ...ine Diag Sensor Test Regi Sensor OK 4 Insert one sheet of paper in between the Registration Chute and the Turn Clutch until the paper stops 5 Slowly pull out the sheet of paper while checking the information on the Control Panel display The Low and High values change from 0 up to 99 6 Press the Stop button to stop the Regi Sensor test s6180mfp 162 Regi Sensor L 0 Regi Sensor H 0 Control Panel Norm...

Страница 456: ...ostic menu page 4 5 2 Open the Front Cover 3 Remove the Transfer Unit page 8 9 4 Remove the Print Cartridges page 8 11 5 Perform the Interlock Switch test Printer Diag Engine Diag Sensor Test Interlock Switch OK 6 Open and close the Front Door while checking the information on the Control Panel display The Low and High values change from 0 up to 99 7 Press the Stop button to stop the Interlock Swi...

Страница 457: ... Service Diagnostic menu page 4 5 2 Open the Front Cover 3 Remove the Transfer Unit page 8 9 4 Remove the Print Cartridges page 8 11 5 Perform the CRU Sensor Y test Printer Diag Engine Diag Sensor Test CRU Sensor Y OK 6 Install and remove the Yellow Print Cartridge while checking the information on the Control Panel display The Low and High values change from 0 up to 99 7 Press the Stop button to ...

Страница 458: ...e Service Diagnostic menu page 4 5 2 Open the Front Cover 3 Remove the Transfer Unit page 8 9 4 Remove the Print Cartridges page 8 11 5 Perform the CRU Sensor M test Printer Diag Engine Diag Sensor Test CRU Sensor M OK 6 Install and remove the Magenta Print Cartridge while checking the information on the Control Panel display The Low and High values change from 0 up to 99 7 Press the Stop button t...

Страница 459: ...e Service Diagnostic menu page 4 5 2 Open the Front Cover 3 Remove the Transfer Unit page 8 9 4 Remove the Print Cartridges page 8 11 5 Perform the CRU Sensor K test Printer Diag Engine Diag Sensor Test CRU Sensor K OK 6 Install and remove the Black Print Cartridge while checking the information on the Control Panel display The Low and High values change from 0 up to 99 7 Press the Stop button to ...

Страница 460: ...e Service Diagnostic menu page 4 5 2 Open the Front Cover 3 Remove the Transfer Unit page 8 9 4 Remove the Print Cartridges page 8 11 5 Perform the CRU Sensor C test Printer Diag Engine Diag Sensor Test CRU Sensor C OK 6 Install and remove the Cyan Print Cartridge while checking the information on the Control Panel display The Low and High values change from 0 up to 99 7 Press the Stop button to s...

Страница 461: ...u page 4 5 2 Perform the Tray 3 No Paper test Printer Diag Engine Diag Sensor Test Tray 3 No Paper OK 3 Remove Tray 3 4 Move the Tray 3 Low Paper sensor up and down while checking the information on the Control Panel display The Low and High values change from 0 up to 99 5 Press the Stop button to stop the Tray 3 No Paper test s6180mfp 168 Control Panel Actuator Normal Tray 3 NoPaper L 0 Tray 3 No...

Страница 462: ...gnostic menu page 4 5 2 Perform the MPT No Paper test Printer Diag Engine Diag Sensor Test MPT No Paper OK 3 Open Tray 1 MPT 4 Move the Actuator back and forth while checking the information on the Control Panel display The Low and High values change from 0 up to 99 5 Press the Stop button to stop the Tray 1 No Paper test s6180mfp 169 Actuator Control Panel Normal MPT No Paper L 0 MPT No Paper H 0...

Страница 463: ...No Paper test Printer Diag Engine Diag Sensor Test Tray 2 No Paper OK 3 Remove Tray 2 4 Move the Actuator up and down while checking the information on the Control Panel display The Low and High values change from 0 up to 99 5 Press the Stop button to stop the Tray 2 No Paper test s6180mfp 170 Control Panel Actuator Normal Tray 2 No Paper L 0 Tray 2 No Paper H 0 ...

Страница 464: ...sor Test Tray 2 Paper Size OK 3 The paper size information is displayed on the Control Panel 4 Remove Tray 2 5 Verify that the displayed paper size information on the Control Panel matches with the paper size settings located inside of Tray 2 6 Press the Stop button to stop the Tray 2 Paper Size test s6180mfp 171 Control Panel Normal Tray2 Paper Size Displays Paper Type and Size Tray2 Paper Size N...

Страница 465: ...sor Test Tray 3 Paper Size OK 3 The paper size information is displayed on the Control Panel 4 Remove Tray 3 5 Verify that the displayed paper size information on the Control Panel matches with the paper size settings located inside of Tray 3 6 Press the Stop button to stop the Tray 3 Paper Size test s6180mfp 172 Control Panel Normal Tray3 Paper Size Displays Paper Type and Size Tray3 Paper Size N...

Страница 466: ...llows LOW HALF FULL2 FULL1 1 Enter the Service Diagnostic menu page 4 5 2 Open the Front Cover 3 Remove the Transfer Unit page 8 9 4 Remove the Print Cartridges page 8 11 5 Use a paper clip to secure the Interlock Switch 6 Perform the Main Motor FULL2 FULL1 HALF LOW test Printer Diag Engine Diag Motor Test Main Motor FULL2 FULL1 HALF LOW 7 Verify that the Main Motor is running and the gear is rota...

Страница 467: ...LOW HALF FULL2 FULL1 1 Enter the Service Diagnostic menu page 4 5 2 Open the Front Cover 3 Remove the Transfer Unit page 8 9 4 Remove the Print Cartridges page 8 11 5 Use a paper clip to secure the Interlock Switch 6 Perform the Sub Motor FULL2 FULL1 HALF LOW test Printer Diag Engine Diag Motor Test Sub Motor FULL2 FULL1 HALF LOW 7 Verify that the Sub Motor is running and the three gears are rotat...

Страница 468: ...he Tray 2 Motor is as follows LOW HALF FULL2 FULL1 1 Enter the Service Diagnostic menu page 4 5 2 Open the Front Cover 3 Remove the Transfer Unit page 8 9 4 Remove the Print Cartridges page 8 11 5 Use a paper clip to secure the Interlock Switch 6 Perform the Tray 2 Motor FULL2 FULL1 HALF LOW test Printer Diag Engine Diag Motor Test Tray 2 Motor FULL2 FULL1 HALF LOW 7 Verify that the Tray 2 Motor i...

Страница 469: ...f the Deve Motor is as follows HALF FULL1 FULL2 1 Enter the Service Diagnostic menu page 4 5 2 Open the Front Cover 3 Remove the Transfer Unit page 8 9 4 Remove the Print Cartridges page 8 11 5 Use a paper clip to secure the Interlock Switch 6 Perform the Deve Motor FULL2 FULL1 HALF test Printer Diag Engine Diag Motor Test Deve Motor FULL2 FULL1 HALF 7 Verify that the Deve Motor is running and the...

Страница 470: ...s follows LOW HALF FULL1 FULL2 HIGH 1 Enter the Service Diagnostic menu page 4 5 2 Open the Front Cover 3 Remove the Transfer Unit page 8 9 4 Remove the Print Cartridges page 8 11 5 Use a paper clip to secure the Interlock Switch 6 Perform the Duplex Motor HIGH FULL2 FULL1 HALF LOW test Printer Diag Engine Diag Motor Test Duplex Motor HIGH FULL2 FULL1 HALF LOW 7 Verify that the Duplex Motor is run...

Страница 471: ...FULL2 FULL1 1 Enter the Service Diagnostic menu page 4 5 2 Remove Tray 3 3 Remove the Tray 3 Left Cover page 8 117 4 Perform the Tray 3 Feed Motor FULL2 FULL1 HALF LOW test Printer Diag Engine Diag Motor Test Tray 3 Feed Motor FULL2 FULL1 HALF LOW 5 Verify that the Tray 3 Feed Motor is running 6 Press the Stop button to stop the Tray 3 Feed Motor test s6180mfp 178 Tray 3 Feed Motor ...

Страница 472: ...HIGH LOW Note The rotational speed of the Motor is as follows LOW HIGH 1 Enter the Service Diagnostic menu page 4 5 2 Perform the Fan HIGH LOW test Printer Diag Engine Diag Motor Test Fan HIGH LOW 3 Verify that the fan is running 4 Press the Stop button to stop the Fan test s6180mfp 179 ...

Страница 473: ...rvice Diagnostic menu page 4 5 2 Open the Front Cover 3 Remove the Transfer Unit page 8 9 4 Remove the Yellow Print Cartridge page 8 11 5 Use a paper clip to secure the Interlock switch 6 Perform the Yellow Toner Motor test Printer Diag Engine Diag Motor Test Yellow Toner Motor 7 Verify that the Yellow Toner Motor is running and the gear is rotating 8 Press the Stop button to stop the Yellow Toner...

Страница 474: ...ice Diagnostic menu page 4 5 2 Open the Front Cover 3 Remove the Transfer Unit page 8 9 4 Remove the Magenta Print Cartridge page 8 11 5 Use a paper clip to secure the Interlock Switch 6 Perform the Magenta Toner Motor test Printer Diag Engine Diag Motor Test Magenta Toner Motor 7 Verify that the Magenta Toner Motor is running and the gear is rotating 8 Press the Stop button to stop the Magenta To...

Страница 475: ...e Service Diagnostic menu page 4 5 2 Open the Front Cover 3 Remove the Transfer Unit page 8 9 4 Remove the Cyan Print Cartridge page 8 11 5 Use a paper clip to secure the Interlock Switch 6 Perform the Cyan Toner Motor test Printer Diag Engine Diag Motor Test Cyan Toner Motor 7 Verify that the Cyan Toner Motor is running and the gear is rotating 8 Press the Stop button to stop the Cyan Toner Motor...

Страница 476: ...Service Diagnostic menu page 4 5 2 Open the Front Cover 3 Remove the Transfer Unit page 8 9 4 Remove the Black Print Cartridge page 8 11 5 Use a paper clip to secure the Interlock Switch 6 Perform the Black Toner Motor test Printer Diag Engine Diag Motor Test Black Toner Motor 7 Verify that the Black Toner Motor is running and the gear is rotating 8 Press the Stop button to stop the Black Toner Mo...

Страница 477: ...he Tray 2 Motor FULL2 test Printer Diag Engine Diag Motor Test Tray 2 Motor FULL2 7 While the Tray 2 Motor is running press the Up Arrow button to find Regi Clutch Press the OK button to run the Regi Clutch test Note The Registration Rollers rotate when the Tray 2 Motor FULL2 and the Registration Clutch tests are executed 8 Verify that the Tray 2 Motor is running and the Registration Rollers are r...

Страница 478: ...Up Arrow button to find Tray 1 MPT Turn Clutch Press the OK button to run the Tray 1 MPT Turn Clutch test Note The Tray 1 MPT Turn Rollers rotate when the Tray 2 Motor FULL2 and the Tray 1 MPT Turn Clutch tests are executed 5 Verify that the Tray 2 Motor is running and the Turn Rollers are rotating 6 Press the Stop button to stop the Tray 1 Turn Clutch test 7 Press the Down Arrow button to find Tr...

Страница 479: ...ow button to find Tray 1 MPT Feed Solenoid Press the OK button to run the Tray 1 MPT Feed Solenoid test Note The Tray 1 MPT Feed Roller rotates when the Tray 2 Motor FULL2 and the Tray 1 MPT Feed Solenoid tests are executed 5 Verify that the Tray 2 Motor is working and the Tray 1 Feed Roller is rotating 6 Press the Stop button to stop the Tray 1 Feed Solenoid test 7 Press the Down Arrow button to ...

Страница 480: ...s the Up Arrow button to find Tray 2 Feed Clutch Press the OK button to run the Tray 2 Feed Clutch test Note The Tray 2 Feed Rollers rotate when the Tray 2 Motor FULL2 and the Tray 2 Feed Clutch tests are executed 5 Verify that the Tray 2 Motor is working and the Tray 2 Feed Rollers are rotating 6 Press the Stop button to stop the Tray 2 Feed Clutch test 7 Press the Down Arrow button to find Tray ...

Страница 481: ... Up Arrow button to find Tray 3 Feed Clutch Press the OK button to run the Tray 3 Feed Clutch test Note The Tray 3 Feed Rollers rotate when the Tray 3 Feed Motor FULL2 and the Tray 3 Feed Clutch tests are executed 5 Verify that the Tray 3 Feed Motor is working and the Tray 3 Feed Rollers are rotating 6 Press the Stop button to stop the Tray 3 Feed Clutch test 7 Press the Down Arrow button to find ...

Страница 482: ...ss the Up Arrow button to find Tray 3 Turn Clutch Press the OK button to run the Tray 3 Turn Clutch test Note The Tray 3 Turn Roll rotates when the Tray 3 Feed Motor FULL2 and the Tray 3 Turn Clutch tests are executed 5 Verify that the Tray 3 Feed Motor is working and the Turn Roller is rotating 6 Press the Stop button to stop the Tray 3 Turn Clutch test 7 Press the Down Arrow button to find Tray ...

Страница 483: ...er clip to secure the Interlock Switch 6 Perform the Duplex Motor HIGH test Printer Diag Engine Diag Motor Test Duplex Motor HIGH 7 While the Duplex Motor is running press the Up Arrow button to find Duplex Clutch Press the OK button to run the Duplex Clutch test Note The Duplex Gear rotates when the Duplex Motor HIGH and the Duplex Clutch tests are executed 8 Verify that the Duplex Motor is worki...

Страница 484: ...Diagnostic menu page 4 5 2 Open the Front Cover 3 Remove the Print Cartridges page 8 11 4 Use a paper clip to secure the Interlock Switch 5 Perform the ADC Sensor Solenoid test Printer Diag Engine Diag Motor Test ADC CTD Sensor Solenoid 6 Verify that there is a clicking sound when the Solenoid is operating The ADC Sensor LED turns off inside the Transfer Unit 7 Press the Stop button to stop the AD...

Страница 485: ...onged periods 1 Enter the Service Diagnostic menu page 4 5 2 Open the Front Cover 3 Remove the Print Cartridges page 8 11 4 Use a paper clip to secure the Interlock Switch 5 Perform the ADC Sensor LED test Printer Diag Engine Diag Motor Test ADC CTD Sensor LED 6 Verify that the LED is working red light inside the Transfer Unit 7 Press the Stop button to stop the ADC Sensor LED test 8 Remove the pa...

Страница 486: ...prolonged periods 1 Enter the Service Diagnostic menu page 4 5 2 Open the Front Cover 3 Remove the Print Cartridges page 8 11 4 Use a paper clip to secure the Interlock Switch 5 Perform the Drum Erase Lamp K test Printer Diag Engine Diag Motor Test Drum Erase Lamp K 6 Verify that the Lamp is operating 7 Press the Stop button to stop the Drum Erase Lamp K test 8 Remove the paper clip from the Inter...

Страница 487: ...Enter the Service Diagnostic menu page 4 5 2 Open the Front Cover 3 Remove the Print Cartridges page 8 11 4 Use a paper clip to secure the Interlock Switch 5 Perform the Drum Erase Lamp YMC test Printer Diag Engine Diag Motor Test Drum Erase Lamp YMC 6 Verify that the Lamps are operating 7 Press the Stop button to stop the Drum Erase Lamp YMC test 8 Remove the paper clip from the Interlock Switch ...

Страница 488: ... Perform the Main Motor FULL2 test Printer Diag Engine Diag Motor Test Main Motor FULL2 3 While the Main Motor is running press the Up Arrow button to find Exit Clutch Press the OK button to run the Exit Clutch test Note The Exit Roller rotates when the Main Motor FULL2 and the Exit Clutch tests are executed 4 Verify that the Main Motor is working and the Exit Roller is rotating 5 Press the Stop b...

Страница 489: ...ed periods 1 Enter the Service Diagnostic menu page 4 5 2 Open the Front Cover 3 Remove the Transfer Unit page 8 9 4 Remove the Print Cartridges page 8 11 5 Use a paper clip to secure the Interlock Switch 6 Perform the Duplex Fan test Printer Diag Engine Diag Motor Test Duplex Fan 7 Verify that the Fan is operating 8 Press the Stop button to stop the Duplex Fan test 9 Remove the paper clip from th...

Страница 490: ...e 8 90 2 Refer to DC Power Supply Troubleshooting on page 4 84 3 Replace the Control Panel page 8 30 4 Replace the Control Panel wiring harness page 8 30 Control Panel LED is On Control Panel Display is Blank 1 Remove and reseat the Image Processor Board page 8 90 2 Replace the Control Panel page 8 30 3 Replace the Control Panel wiring harness page 8 30 4 Replace the Image Processor Board page 8 9...

Страница 491: ...icable Parts Wiring and Plug Jack Map References Image Processor Board PL9 1 20 MCU Board PL9 2 13 Troubleshooting Procedure Table Step Actions and Questions Yes No 1 Remove the Image Processor Board page 8 90 2 Turn the printer power On the Control Panel will be blank 3 Short the two pins on the MCU Board 4 Did the printer print the Pattern IOT page Replace the Image Processor Board page 8 90 Rep...

Страница 492: ...or CRUM ID Life Over 3 Fuser Missing NVRAM CRUM Error Life Over 4 Transfer Unit Missing Life Over 5 ADC Sensor Error 6 All paper Sensor Jam 7 Door Open 8 Environmental Humidity Temperature Sensor Error 9 NVRAM NVRAM Error 10 Image Processor Board POST Diagnostic check Printer Continually Displays Warming Up 1 Verify the correct Fuser 110 V vs 220 V is installed in the printer 2 Refer to the Engine...

Страница 493: ...tep 3 Reseat the Print Cartridge page 8 11 2 Does the error still occur Go to step 3 Complete 3 1 Perform the CRU Sensor test Service Mode Printer Diag Engine Diag Sensor Test CRU Sensor Yellow CRU Sensor page 4 45 Magenta CRU Sensor page 4 46 Black CRU Sensor page 4 47 Cyan CRU Sensor page 4 48 2 Does the number on the Control Panel increase by 1 when the Print Cartridge is reseated Replace the M...

Страница 494: ...tridge Sensor signal 1 Disconnect the wiring harness connector P J19 from the MCU Board 2 Is there 3 3 V across the Toner Sensor Harness Yellow J19 1 J19 2 Magenta J19 4 J19 5 Black J19 7 J19 8 Cyan J19 10 J19 11 Go to step 9 Replacethe MCU Board page 8 88 9 Check the Print Cartridge Sensor for operation 1 Measure the voltage across Ground P J19 3 Yellow Ground P J19 6 Magenta Ground P J19 9 Black...

Страница 495: ...ocedure Table Step Actions and Questions Yes No 1 1 Check the voltage at the AC wall outlet 2 Is there approximately 110 VAC or 220 VAC if the printer is a 220 V configuration at the AC wall outlet Go to step 2 Notify the customer of improper AC output from the outlet 2 1 Check the power cord for defects or loose connection 2 Is the power cord loose or defective Replace or reconnect the power cord...

Страница 496: ...n the power is turned Off and then On again after a certain time LVPS Troubleshooting Reference Table Applicable Parts Wiring and Plug Jack Map References LVPS PL9 2 13 LVPS Harness PL10 1 3 Map 4 LVPS and MCU Board on page 10 13 DC Power Supply on page 10 24 Troubleshooting Procedure Table Step Actions and Questions Yes No 1 1 Perform the AC power supply troubleshooting procedure page 4 83 2 Does...

Страница 497: ...ring harness connector J501 to the LVPS then turn the AC power switch Off 3 Check continuity between P501 1 P501 2 4 Is there 5 V present Go to step 10 Go to step 8 8 1 Check the LVPS Harness for fault or damage 2 Is the LVPS Harness damaged Replace if damaged Go to step 9 Go to step 10 9 Does the error still occur Go to step 10 Complete 10 1 Turn the AC power switch Off 2 Connect the wiring harne...

Страница 498: ...DC Power Supply on page 10 24 Troubleshooting Procedure Table Step Actions and Questions Yes No 1 Check the Interlock Harness for continuity 1 Disconnect P J44 2 Check continuity between P J44 1 P J44 3 3 Is there voltage present when the Interlock is activated Go to step 2 Replace the Interlock Switch page 8 82 2 1 Disconnect the wiring harness connectors P J501 and P J14 2 Check continuity betwe...

Страница 499: ...e connection is caused by noise etc or a fault in receiving Fax s printer Corrective Action Determine whether fault is in the telephone or at receiving Fax by trying copy function at receiving Fax Note If the telephone line degraded white horizontal lines missing rows and or cut off top bottom may occur Branch connections or incoming call call waiting may also caused image corruption b If copy fun...

Страница 500: ...der and select the correct pattern for fax e Cannot detect Calling Tone CNG signal Cause Communication fails in TEL FAX mode or Ans FAX mode Corrective Action Ground the printer properly f Cannot detect off hook Cause Communication fails in TEL FAX mode or Ans FAX mode Corrective Action Set Extel Hook Thresh to Higher System Admin Menu Fax Settings Extel Hook Thresh A detection of an off hook can ...

Страница 501: ... digital transmission method using existing telephone lines Because the line is used for both voice and data transmission various problems may occur such as noise during spoken conversation low sound volume and mis dialing Replacing the splitter may improve the situation The Digital Subscriber Line cannot be directly connected to a fax machine the line must be connected via a filter There are seve...

Страница 502: ...s equipped with motors are located near a Fax noise from the electronic equipment may degrade the line condition Also a telephone line acting as an antenna may absorb electric waves generated from wireless or broadcasting equipment Because Fax data is audio data the line quality affects the quality stability of image data as well as that of conversation ...

Страница 503: ... with RJ 11 and can be used with no problems On the other hand since these four conductor cables are also used for ISDN systems the number of elements is not the key for identification of the type of line service Troubleshooting Reference Table Applicable Parts Wiring and Plug Jack Map References Scanner Controller Board PL9 1 1 Troubleshooting Procedure Table Step Actions and Questions Yes No 1 1...

Страница 504: ...the hook Does the cable have 2 conductors Manually dial any local phone numberusing touch tone Go to step 5 5 Is the line a PBX Go to step 8 Request the telephone company for a line repair 6 1 Update Fax Setting information for a new fax job 2 Send a fax to another fax machine 3 Did the fax transmit Go to step 10 Note Error 035 781 occurs when the receiving line is busy If the receiving line is no...

Страница 505: ...s such as external telephoneand answering machine 1 Check the Secure settings System Admin Menu Secure Settings Secure Receive 2 Is Secure Rcv Set Disable the default setting is Disable 11 1 Check the Fax setting System Admin Menu Fax Settings Ans Select 2 Is the Ans Select setting correct Go to step 12 Correct the setting Refer to Fax Configuration Settings on page 4 99 for detailed information 1...

Страница 506: ...hooting Procedure Table Step Actions and Questions Yes No 1 1 Check the error message on the Control Panel 2 Is there an error code Chain Link Refer to the appropriate error code procedure Error Messages and Codes on page 3 1 Go to step 2 2 Has the Fax machine been relocated Refer to Fax Failure After Installation Relocation on page 4 91 Go to step 3 3 Do all calls fail Go to step 4 Go to step 11 ...

Страница 507: ...anner Controller Board page 8 99 Request for a line repair 11 Does the error occur only when sending Go to step 12 Go to step 18 12 1 Check the Delayed Start setting System Default Settings Fax Defaults Delayed Start 2 Is the Delayed Start On Go to step 13 Go to step 15 13 Is the Delayed Start on a specified time Complete Go to step 14 14 Is the Local Time setting correct Replace the Scanner Contr...

Страница 508: ...omplete 20 Is a calling tone present Go to step 21 Replace the Scanner Controller Board page 8 99 21 Is a modem sound present at transmission Go to step 22 Replace the Scanner Controller Board page 8 99 22 1 Check the Junk Fax Filter setting System Admin Menu Fax Settings Junk Fax Filter 2 Is the Junk Fax Filter On Go to step 23 Analyze the Protocol Monitor Report 23 Is the number of sending fax r...

Страница 509: ... no retransmission when an error occurs during Color fax transmission Color Fax cannot be used by Direct Fax The data of Color Fax cannot be transferred to other parties Initial Actions Cycle printer power If the problem persists follow the procedure below Troubleshooting Reference Table Applicable Parts Wiring and Plug Jack Map References Scanner Controller Board PL9 1 1 Troubleshooting Procedure...

Страница 510: ...eshooting 4 1 Check the original document 2 Is the customer using a color document Go to step 5 Complete 5 Did the user select Color Fax mode Replace the Scanner Controller Board page 8 99 Complete Troubleshooting Procedure Table continued Step Actions and Questions Yes No ...

Страница 511: ...ax manually FAX Mode The multifunction printer receives a fax automatically TEL FAX Mode The multifunction printer automatically switches between an external telephone and the fax reception mode Ans FAX Mode The multifunction printer automatically switches between an external answering machine and the fax reception mode DRPD Mode Available when DRPD service is provided with your telephone line Cou...

Страница 512: ...vironment Specific Settings Printer Menu Menu Content Note Default item is Bold DRPD Pattern DRPD settings for fax detection to be configured when the Ans Select menu is set to DRPD Disable Disable DRPD Pattern 1 to 5 Register one of the DRPD patterns provided by your telephone company ...

Страница 513: ...m the Main Motor test page 4 54 Service Mode Printer Diag Engine Diag Motor Test Main Motor 2 Does the noise come from the printer Go to step 2 Go to step 9 2 1 Remove the Fuser page 8 12 2 Perform the Main Motor test page 4 54 Service Mode Printer Diag Engine Diag Motor Test Main Motor 3 Does the noise come from the printer Go to step 3 Complete 3 1 Reseat the Fuser page 8 12 2 Perform the Main M...

Страница 514: ...the noise come from the printer Go to step 8 Complete 8 1 Check the Main Drive Assembly for correct installation Reseat the Main Drive Assembly page 8 75 2 Perform the Main Motor test page 4 54 Service Mode Printer Diag Engine Diag Motor Test Main Motor Remove the following parts one after another when performing the Main Motor test Fuser page 8 12 Black Print Cartridge page 8 11 Transfer Unit pag...

Страница 515: ...r Test Deve Motor 2 Does the noise come from the printer Go to step 14 Go to step 17 14 1 Remove the Print Cartridges page 8 11 2 Perform the Deve Motor test page 4 57 Service Mode Printer Diag Engine Diag Motor Test Deve Motor 3 Does the noise come from the printer Go to step 15 Complete 15 1 Check the Print Cartridges for correct installation Reseat the Print Cartridges page 8 11 2 Perform the D...

Страница 516: ...g Engine Diag Motor Test Tray 2 Motor 3 Does the noise come from the printer Go to step 18 Complete If the Optional 550 Sheet Feeder is installed go to step 18 18 1 Perform the Option Feeder Motor test page 4 59 Service Mode Printer Diag Engine Diag Motor Test Tray 3 Feed Motor 2 Does the noise come from the printer Replace the Optional 550 Sheet Feeder page 8 116 Complete Troubleshooting Procedur...

Страница 517: ...eder PL13 1 1 Troubleshooting Procedure Table Step Actions and Questions Yes No 1 1 Check Tray 1 MPT 2 Does the noise come from Tray 1 when paper is fed from Tray 1 Go to step 2 Go to step 3 2 1 Remove the paper from Tray 1 2 Does the noise still occur Go to step 3 Go to step 4 3 1 Check the paper condition 2 Replace the paper 3 Does the noise still occur Replace the Tray 1 MPT RetardHolder Kit pa...

Страница 518: ...e 12 1 Check the ADF Feed Roller and ADF Separator Pad 2 Are the parts damaged or are there any contaminations on the parts Clean the parts Replace the ADF Feed Roller page 8 110 13 1 Check the Fuser for correct installation Reseat the Fuser page 8 12 2 Does the noise still occur Go to step 14 Complete 14 1 Check the Transfer Unit for correct installation Reseat the Transfer Unit page 8 9 2 Does t...

Страница 519: ...rm the Sub Motor test page 4 55 Service Mode Printer Diag Engine Diag Motor Test Sub Motor 2 Does the noise come from the motor Replace the Main Drive Assembly page 8 75 Go to step 21 21 1 Perform the Tray 2 Motor test page 4 56 Service Mode Printer Diag Engine Diag Motor Test Tray 2 Motor 2 Does the noise come from the motor Replace the Feed Drive Assembly page 8 78 Complete If Tray 3 is installe...

Страница 520: ...p Actions and Questions Yes No 1 Check external noise 1 Are there other electrical appliances within 3 meters from the printer 2 Turn the electrical appliances Off or relocate the printer at least 6 meters away from other electrical appliances 3 Does the error still occur Go to step 2 Complete 2 1 Check the AC ground 2 Is the AC power supply outlet wired and grounded appropriately Go to step 3 Req...

Страница 521: ... On Is the printer working Complete Go to step 3 3 1 Check the MCU Board for correct installation Reseat the MCU Board page 8 88 2 Is the printer working Complete Replace the MCU Board page 8 88 4 1 Connect the printer power cord to another electrical outlet 2 Turn the printer power On Is the printer working Complete Go to step 5 5 1 Turn the printer power Off 2 Check the power cord connection Rec...

Страница 522: ...rify that the LPR and Port 9100 AppSocket settings are set as desired 2 Verify that the client is logged on to the network and printing to the correct print queue The user should also have access to the Phaser printer queue Verify Driver Installation 1 From the desktop right click My Network Places and select Properties 2 Right click Local Area Connection and select Properties 3 Click the General ...

Страница 523: ...job prints no further system troubleshooting is necessary If there are print quality problems refer to the User Guide at www xerox com office 6180MFPsupport Macintosh Troubleshooting OS 10 2 Step by Step Perform these steps only for Mac OS 10 2 and higher 1 Open the Network Utility and click the Ping tab 2 Enter the printer s IP address 3 Click Ping If you do not get a response verify that your TC...

Страница 524: ...s From the Printer To set up the printer 1 Verify that both TCP IP protocol and the proper connector are enabled 2 On the Control Panel select one of these IP address options Allow the printer to set up a DHCP address Enter the IP address manually 3 Print the Configuration page and keep it for reference From Your Computer To install the CentreWare for Unix driver 1 Go to www xerox com office 6180M...

Страница 525: ... Unix access the Xerox web site for the latest CUPS ppd package at www xerox com office 6180MFPdrivers To download printer drivers 1 Find your printer Click the Drivers Downloads link Select the platform you are running UNIX and the files you would like to download Drivers 2 Click the Go button 3 Click the CUPSPrinterPackage 4 Untar the printer package and select the ppd for the printer you want t...

Страница 526: ...4 114 Phaser 6180MFP Multifunction Printer Service Manual General Troubleshooting ...

Страница 527: ...Chapter Print Quality Troubleshooting In this chapter Print Quality Problems Overview Checklist Before Troubleshooting Print Quality Test Prints Print Quality Specifications Print Quality Troubleshooting ...

Страница 528: ...o the Environment Specifications on page 1 22 Extreme temperature and humidity can adversely affect the xerographic and fusing characteristics of the printer When analyzing a print quality defect first determine if the defect occurs in all colors or only one color and if it is repeating or random occurrence Continuous defects in the process direction such as Voids and Lines are the most difficult ...

Страница 529: ...2 Fuser Horizontal Stripes page 5 40 Repeating Bands Lines Marks or Spots page 5 48 Vertical Stripes page 5 52 Unfused Image page 5 60 Print Cartridge Light or Undertone Print page 5 26 Blank Print No Print page 5 28 Black Print page 5 31 Vertical Blank Lines page 5 34 Horizontal Band Voids or Streaks page 5 36 Vertical Stripes page 5 38 Horizontal Stripes page 5 40 Faded or Missing Image page 5 4...

Страница 530: ...rinter Service Manual Print Quality Troubleshooting ADF Lines or Streaks from ADF page 5 66 Spots from ADF page 5 67 Scanner Repeating Bands Lines Marks or Spots page 5 48 Spots from ADF page 5 67 Pattern in the Halftone Moire page 5 68 ...

Страница 531: ...ternet Services IS to check the supplies status To access the CentreWare IS 1 Open your web browser 2 In the Address field enter the printer s IP address 3 Click the Status button 4 Click the Supplies button 5 The Supplies Status is displayed If the toner is low you can extend the Print Cartridge life by removing the Cartridge page 8 11 from the printer and gently shaking the Print Cartridge from ...

Страница 532: ...p to resolve the problems without troubleshooting the printer 1 Color is out of alignment Note After installing a new black Print Cartridge ensure to clean the Laser lens a Clean the Laser Unit lenses using a Q tip or a dry lint free cloth to wipe the lenses b Check the Transfer Unit for damage c Perform Color Registration Adjustment page 6 3 Color Registration Lenses s6180mfp 397 ...

Страница 533: ...ing on an uneven print surface change the paper type settings in the Tray Settings menu d Verify that the correct type of paper is used e The Print Cartridge may need to be replaced Replace the Print Cartridge 3 Toner smears or print comes off page a If you are printing on a thick or an uneven media change the Media Type settings in the Tray Settings menu to a heavier type b Verify that the paper ...

Страница 534: ...Change the Print Cartridge s 5 Entire page is white or one color is missing from color image a Ensure the packaging material is removed from the Print Cartridge b Check the Print Cartridge to make sure that it is installed correctly c The toner may be low Change the Print Cartridge 6 Streaks appear on the page a The toner may be low Change the Print Cartridge s Random Spots Blank Print Horizontal ...

Страница 535: ...ded fonts verify that the fonts are supported by the printer the host computer and the software application b From the Start menu go to Settings Printers and Faxes c Select Phaser 6180MFP N DN PCL Right click on the printer icon and select Printing Preferences d Click the Image Options tab Under Image Quality select Standard Click OK Fuzzy Text Chrysanthemum x morifolium nthemumx nthemum x nthemum...

Страница 536: ...o make sure they are installed correctly 9 The job prints but the top and side margins are incorrect a Ensure the Media Size settings in the Tray Settings are correct b Ensure the margins are set correctly in your software application c Perform internal test prints i e printer s Demo Page service diagnostics Test Prints etc and evaluate the prints Partial Band Image Not Centered ...

Страница 537: ...roubleshooting 10 Printing on both ends of the transparencies is faded This occurs when the printer is operating at a location where relative humidity reaches 85 or more a Adjust the humidity or relocate the printer to an appropriate environment Light Print on Transparency ...

Страница 538: ...to assist in troubleshooting the problems No Image IOT page 5 12 Pattern IOT page 5 13 Grid 2 ESS page 5 13 Cyan 20 ESS page 5 14 Magenta 20 ESS page 5 14 Yellow 20 ESS page 5 15 Black 20 ESS page 5 15 CMY 20 ESS page 5 16 Gradation ESS page 5 16 No Image IOT This test print provides a sample of blank page This test is used to identify problems with the printer function Fail Check the printer func...

Страница 539: ...ontally Compare the print with the following chart to determine the problem Fail Check the printer controller or the MCU Board Pass Check the Image Processor Board Grid 2 ESS This test print provides the Controller built in grid pattern sample This test is used to identify problems with the printer function Compare the print with following chart to determine the problem Fail Check the printer func...

Страница 540: ...e print with the following chart to determine the problem Fail Check the cyan Print Cartridge Pass Check another Print Cartridge Magenta 20 ESS This test print provides 20 magenta density on the whole page This test is used to identify problems with magenta toner or another color toner Compare the print with the following chart to determine the problem Fail Check the magenta Print Cartridge Pass C...

Страница 541: ...are the print with the following chart to determine the problem Fail Check the yellow Print Cartridge Pass Check another Print Cartridge Black 20 ESS This test print provides 20 black density on the whole page This test is used to identify problems with black toner or another color toner Compare the print with the following chart to determine the problem Fail Check the black Print Cartridge Pass C...

Страница 542: ... print with the following chart to determine the problem Fail Check the cyan magenta or yellow Print Cartridge Pass Check the black Print Cartridge Gradation ESS This test print provides 2 100 density for cyan magenta yellow or black on the whole page This test is used to identify problems with the printer function or the Image Processor Board Compare the print with the following chart to determin...

Страница 543: ...ter is turned On in a critical environment such as 85 at 10 C 50 F Quality Paper The print quality is best when quality paper is fed from the tray The print quality is evaluated on the maximum size of each standard paper Color Print Quality Xerox brand X Pression paper Black and White Quality Xerox brand 4200 paper Paper Condition Paper should be fresh and stored in the operating environment for 1...

Страница 544: ...or Skew Parallelism Linearity Perpendicularity Magnification Error Image to Page Registration and Maximum Print Areas Skew 190 mm 7 5 in 1 2 mm 05 in Measuring Skew Measure the margin of the paper at the leading edge of each corner and then take the difference between them Lead Edge A C Skew b a within 1 2 mm a b 190 mm Skew Skew 3 B A Image Area ...

Страница 545: ...arity Horizontal 190 0 mm 7 5 in 0 5 mm 02 in Vertical 234 0 mm 9 2 in 0 5 mm 02 in Slant 269 0 mm 10 6 in 1 2 mm 05 in Parallelism 234 mm 179 8 mm I K C Parallelism within 1 2 mm B E G J H D 190 mm 234 mm 269 mm Linearity of Vertical Line mm within 0 5 mm Linearity of Horizontal Line within 0 5 mm Linearity of Slant within 1 2 mm Assumed Perfect Line Printed Real Line Linearity ...

Страница 546: ...Horizontal Simplex 190 0 mm 7 5 in 0 5 Horizontal Duplex 190 0 mm 7 5 in 0 8 Vertical Simplex 234 0 mm 9 2 in 0 5 Vertical Duplex 234 0 mm 9 2 in 0 8 Lead Edge Assumed Perfect Line Perpendicularity B b within 0 8 mm A B C 90 114 5 mm F b Perpendicularity B J E G Magnification Measured Length Nominal within 0 5 Nominal 234 mm Nominal 190 mm Magnification ...

Страница 547: ... Print Areas Maximum Print Area 210 9 mm 8 3 in x 351 6 mm 13 8 in Guaranteed Print Area 207 9 mm 8 2 in x 347 6 mm 13 7 in Registration Measured Length Nominal Lead Edge Nominal 10 0 mm within 2 mm Nominal 8 5 mm within 2 5 mm Left Edge B F Registration Guaranteed and Maximum Area 4 mm 4 mm 4 mm 4 mm 355 6 mm 14 inch 215 9 mm 8 5 inch 351 6 mm 347 6 mm 210 9 mm Guaranteed printing area 207 9 mm ...

Страница 548: ...nes running parallel with the leading edge of the print page 5 40 Faded or Missing Image There are areas of the image that are extremely light or are missing in a limited area page 5 42 Random Spots There are spots of toner randomly scattered across the page page 5 44 Defects in One Color C M Y or K Only one color Cyan Magenta Yellow or Black is too light on the printed image page 5 46 Repeating B...

Страница 549: ...fication when copying with the ADF feeding page 5 65 Lines or Streaks from ADF There are lines or streaks on copies from the ADF page 5 66 Spots from ADF There are spots on copies from the ADF page 5 67 Pattern in the Halftone Moire There are patterns on the image when copying in Standard mode page 5 68 Defect Definition Page ...

Страница 550: ...7 20 BCR 9 0 mm 35 in 28 8 mm 1 13 in Print Cartridge C M Y K PL5 1 17 20 BCR Cleaner Roll 8 0 mm 31 in 25 9 mm 1 02 in Print Cartridge C M Y K PL5 1 17 20 Sleeve K 16 0 mm 63 in 25 2 mm 99 in Print Cartridge K PL5 1 17 Sleeve Y M C 16 0 mm 63 in 22 3 mm 88 in Print Cartridge Y M C PL5 1 18 20 1st BTR 12 0 mm 47 in 37 7 mm 1 45 in Transfer Unit PL4 1 1 ESA Roll 9 0 mm 35 in 28 3 mm 1 11 in Transfe...

Страница 551: ...ubleshooting s6180mfp 082 Transfer Unit Laser Unit Fuser Drum BCR BCR Cleaner Roller Magnet Roller BTR ESA Roller Drive Roller Heat Roller Fuser Belt Pinch Roller Exit Roller Exit Pinch Roller BTR BTR BTR Print Cartridge C Print Cartridge K Print Cartridge M Print Cartridge Y ...

Страница 552: ...roller Board PL9 1 1 Image Processor Board PL9 1 20 MCU Board PL9 2 13 ADF Scanner Assembly PL11 1 1 Troubleshooting Procedure Table Step Actions and Questions Yes No 1 1 Perform Test Print Cyan 20 Magenta 20 Yellow 20 and Black 20 Service Mode Printer Diag Test Print 2 Does the error still occur when printing Go to step 5 Go to step 2 2 1 Perform a copy job 2 Does the error still occur when copyi...

Страница 553: ... 8 8 1 Check the laser beam path 2 Are there any debris between the Laser Unit and Transfer Unit Remove the debris Go to step 9 9 1 PerformYellow Magenta Cyan Black Toner Motor test Yellow page 4 61 Magenta page 4 62 Cyan page 4 63 Black page 4 64 Service Mode Printer Diag Engine Diag Motor Test Toner Motor 2 Does the Toner Dispenser Motor rotate Go to step 10 Replace the following parts 1 MCU Boa...

Страница 554: ...ADF Scanner Assembly PL11 1 1 Troubleshooting Procedure Table Step Actions and Questions Yes No 1 1 Perform Test Print Cyan 20 Magenta 20 Yellow 20 and Black 20 Service Mode Printer Diag Test Print 2 Does the error still occur when printing Go to step 6 Go to step 2 2 1 Perform a copy job 2 Does the error still occur when copying Go to step 3 Complete 3 Does the document on the ADF or document gla...

Страница 555: ...51 between the Laser Unit and the MCU Board 2 Are the connectors securely connected Go to step 11 Reconnect the connectors Go to step 11 11 1 PerformYellow Magenta Cyan Black Toner Motor test Yellow page 4 61 Magenta page 4 62 Cyan page 4 63 Black page 4 64 Service Mode Printer Diag Engine Diag Motor Test Toner Motor 2 Does the Toner Dispenser Motor rotate properly Go to step 12 Replace the MCU Bo...

Страница 556: ... for correct installation Reseat the Scanner Controller Board page 8 99 2 Does the image quality improve Complete Go to step 16 16 1 Replace the Laser Unit page 8 52 2 Does the image quality improve Complete Replace the Image Processor Board page 8 90 Troubleshooting Procedure Table continued Step Actions and Questions Yes No ...

Страница 557: ...oard PL9 1 1 Image Processor Board PL9 1 20 MCU Board PL9 2 13 Troubleshooting Procedure Table Step Actions and Questions Yes No 1 1 Perform Test Print Cyan 20 Magenta 20 Yellow 20 and Black 20 Service Mode Printer Diag Test Print 2 Does the error still occur when printing Go to step 5 Go to step 2 2 1 Perform a copy job 2 Does the error still occur when copying Go to step 3 Complete 3 1 Check the...

Страница 558: ... the MCU Board 2 Are the connectors securely connected Complete Reconnect the connectors Go to step 9 9 1 Check the Image Processor Board for correct installation Reseat the Image Processor Board page 8 90 2 Does the image quality improve Complete Go to step 10 10 1 Check the Scanner Control Board for correct installation Reseat the Scanner Controller Board page 8 99 2 Does the image quality impro...

Страница 559: ...ce Manual 5 33 Print Quality Troubleshooting 14 1 Replace the Laser Unit page 8 52 2 Does the image quality improve Complete Replace the Image Processor Board page 8 90 Troubleshooting Procedure Table continued Step Actions and Questions Yes No ...

Страница 560: ...nt Cartridge C M Y K PL5 1 17 20 Scanner Controller Board PL9 1 1 Troubleshooting Procedure Table Step Actions and Questions Yes No 1 1 Perform Test Print Cyan 20 Magenta 20 Yellow 20 and Black 20 Service Mode Printer Diag Test Print 2 Does the error still occur when printing Go to step 5 Go to step 2 2 1 Perform a copy job 2 Does the error still occur when copying Go to step 3 Complete 3 Is the o...

Страница 561: ...ended type and loaded in the correct position Go to step 9 Replace the paper 9 1 Check the Transfer Unit 2 Are there any damages on the Transfer Unit surface Replace the Transfer Unit page 8 9 Go to step 10 10 1 Check the Transfer Unit for correct installation Reseat the Transfer Unit page 8 9 2 Does the image quality improve Complete Go to step 11 11 1 Check for debris in the laser beam path betw...

Страница 562: ...xample Print Transfer Unit PL4 1 1 Laser Unit PL5 1 12 Print Cartridge C M Y K PL5 1 17 20 Scanner Controller Board PL9 1 1 Troubleshooting Procedure Table Step Actions and Questions Yes No 1 1 Perform Test Print Cyan 20 Magenta 20 Yellow 20 and Black 20 Service Mode Printer Diag Test Print 2 Does the error still occur when printing Go to step 6 Go to step 2 2 1 Perform a copy job 2 Does the error...

Страница 563: ... to step 8 8 1 Check the paper condition 2 Is the paper dry recommended type and loaded in the correct position Go to step 9 Replace the paper 9 1 Check the Transfer Unit 2 Are there any damages on the Transfer Unit surface Replace the Transfer Unit page 8 9 Go to step 10 10 1 Check the Transfer Unit for correct installation Reseat the Transfer Unit page 8 9 2 Does the image quality improve Comple...

Страница 564: ...dure Troubleshooting Reference Table Applicable Parts Example Print Transfer Unit PL4 1 1 Print Cartridge C M Y K PL5 1 17 20 Fuser PL6 1 10 Scanner Controller Board PL9 1 1 Troubleshooting Procedure Table Step Actions and Questions Yes No 1 1 Perform Test Print Cyan 20 Magenta 20 Yellow 20 and Black 20 Service Mode Printer Diag Test Print 2 Does the error still occur when printing Go to step 6 Go...

Страница 565: ...1 Go to step 7 7 1 Check the Transfer Unit 2 Are there any damages on the Transfer Unit surface Replace the Transfer Unit page 8 9 Go to step 8 8 1 Check the Transfer Unit for correct installation Reseat the Transfer Unit page 8 9 2 Does the image quality improve Complete Go to step 9 9 1 Verify the media type selection System Tray Settings Tray1 MPT Tray 2 Tray 3 Paper Type 2 Does the media selec...

Страница 566: ...rocedure Troubleshooting Reference Table Applicable Parts Example Print Transfer Unit PL4 1 1 Print Cartridge C M Y K PL5 1 17 20 Fuser PL6 1 10 Scanner Controller Board PL9 1 1 Troubleshooting Procedure Table Step Actions and Questions Yes No 1 1 Perform Test Print Cyan 20 Magenta 20 Yellow 20 and Black 20 Service Mode Printer Diag Test Print 2 Does the error still occur when printing Go to step ...

Страница 567: ...ed Replace the Print Cartridge page 8 11 Go to step 7 7 1 Check the Transfer Unit 2 Are there any damages on the Transfer Unit surface Replace the Transfer Unit page 8 9 Go to step 8 8 1 Check the Transfer Unit for correct installation Reseat the Transfer Unit page 8 9 2 Does the image quality improve Complete Go to step 9 9 1 Check the paper path 2 Are there any toner contaminations on the paper ...

Страница 568: ... Applicable Parts Example Print Transfer Unit PL4 1 1 Print Cartridge C M Y K PL5 1 17 20 Scanner Controller Board PL9 1 1 Troubleshooting Procedure Table Step Actions and Questions Yes No 1 1 Perform Test Print Cyan 20 Magenta 20 Yellow 20 and Black 20 Service Mode Printer Diag Test Print 2 Does the error still occur when printing Go to step 5 Go to step 2 2 1 Perform a copy job 2 Does the error ...

Страница 569: ...aper condition 2 Is the paper dry recommended type and loaded in the correct position Go to step 7 Replace the paper 7 1 Check the Print Cartridge C M Y K for damages 2 Is the Print Cartridge damaged Replace the Print Cartridge page 8 11 Go to step 8 8 1 Check the Transfer Unit 2 Are there any damages on the Transfer Unit surface Replace the Transfer Unit page 8 9 Go to step 9 9 1 Check the Transf...

Страница 570: ...ce Table Applicable Parts Example Print Transfer Unit PL4 1 1 Print Cartridge C M Y K PL5 1 17 20 Fuser PL6 1 10 Scanner Controller Board PL9 1 1 Troubleshooting Procedure Table Step Actions and Questions Yes No 1 1 Perform Test Print Cyan 20 Magenta 20 Yellow 20 and Black 20 Service Mode Printer Diag Test Print 2 Does the error still occur when printing Go to step 6 Go to step 2 2 1 Perform a cop...

Страница 571: ...tridge C M Y K for damages 2 Is the Print Cartridge damaged Replace the Print Cartridge page 8 11 Go to step 8 8 1 Check the Transfer Unit 2 Are there any damages on the Transfer Unit surface Replace the Transfer Unit page 8 9 Go to step 9 9 1 Check the Transfer Unit for correct installation Reseat the Transfer Unit page 8 9 2 Does the image quality improve Complete Go to step 10 10 1 Check the pa...

Страница 572: ... Print Laser Unit PL5 1 12 Print Cartridge C M Y K PL5 1 17 20 HVPS PL5 2 15 Troubleshooting Procedure Table Step Actions and Questions Yes No 1 1 Perform Test Print Cyan 20 Magenta 20 Yellow 20 or Black 20 Service Mode Printer Diag Test Print 2 Does the error still occur when printing Go to step 2 Complete 2 1 Check the Print Cartridge C M Y K 2 Is there a faint toner Go to step 3 Complete 3 1 Ch...

Страница 573: ...d in the correct position Go to step 5 Replace the paper 5 1 Check the laser beam path 2 Are there any debris between the Laser Unit and Transfer Unit Remove the debris Go to step 6 6 1 Replace the Laser Unit page 8 52 2 Does the image quality improve Complete Replace the HVPS page 8 64 Troubleshooting Procedure Table continued Step Actions and Questions Yes No ...

Страница 574: ... Transfer Unit PL4 1 1 Laser Unit PL5 1 12 Print Cartridge C M Y K PL5 1 17 20 Scanner Controller Board PL9 1 1 Troubleshooting Procedure Table Step Actions and Questions Yes No 1 1 Perform Test Print Cyan 20 Magenta 20 Yellow 20 or Black 20 Service Mode Printer Diag Test Print 2 Does the error still occur when printing Go to step 6 Complete 2 1 Perform a copy job 2 Does the error still occur Go t...

Страница 575: ...e 8 11 Go to step 8 8 1 Check the paper condition 2 Is the paper dry recommended type and loaded in the correct position Go to step 9 Replace the paper 9 1 Check the Transfer Unit 2 Are there any damages on the Transfer Unit surface Replace the Transfer Unit page 8 9 Go to step 10 10 1 Check the Transfer Unit for correct installation Reseat the Transfer Unit page 8 9 2 Does the image quality impro...

Страница 576: ...1 34 Warning Ensure to wait for the Fuser to cool down before starting the procedure Troubleshooting Reference Table Applicable Parts Example Print Transfer Unit PL4 1 1 Print Cartridge C M Y K PL5 1 17 20 Fuser PL6 1 10 Image Processor Board PL9 1 20 Troubleshooting Procedure Table Step Actions and Questions Yes No 1 1 Check the printing usage 2 Did the user print the same image at a large volume...

Страница 577: ...9 2 Does the image quality improve Complete Go to step 5 5 1 Check the Print Cartridge C M Y K for correct installation Reseat the Print Cartridge page 8 11 2 Does the image quality improve Complete Go to step 6 6 1 Replace the Fuser page 8 12 2 Does the image quality improve Complete Go to step 7 7 1 Replace the Print Cartridge page 8 11 2 Does the image quality improve Complete Replace the Image...

Страница 578: ...7 20 HVPS PL5 2 15 Scanner Controller Board PL9 1 1 Troubleshooting Procedure Table Step Actions and Questions Yes No 1 1 Perform Test Print Cyan 20 Magenta 20 Yellow 20 or Black 20 Service Mode Printer Diag Test Print 2 Does the error still occur when printing Go to step 6 Go to step 2 2 1 Perform a copy job 2 Does the error still occur when copying Go to step 3 Complete 3 Is the original documen...

Страница 579: ...e any damages on the Transfer Unit surface Replace the Transfer Unit page 8 9 Go to step 7 7 1 Check the Transfer Unit for correct installation Reseat the Transfer Unit page 8 9 2 Does the image quality improve Complete Go to step 8 8 1 Check the HVPS for correct installation Reseat the HVPS page 8 64 2 Does the image quality improve Complete Replace the Printer Cartridge page 8 11 Troubleshooting...

Страница 580: ...t PL4 1 1 Scanner Controller Board PL9 1 1 ADF Scanner Assembly PL11 1 1 ADF Roller Pad PL11 1 16 Duplex Unit PL12 1 1 Tray 3 Feed Roll PL13 2 10 Tray 3 Retard Roll PL13 4 10 Troubleshooting Procedure Table Step Action and Questions Yes No 1 1 Perform Test Print Cyan 20 Magenta 20 Yellow 20 or Black 20 Service Mode Printer Diag Test Print 2 Does the error still occur when printing Go to step 9 Go ...

Страница 581: ...aper dry recommended type and loaded in the correct position Go to step 10 Replace the paper 10 1 Check the Front Cover Latch Open and close the Front Cover 2 Does the error still occur Go to step 11 Complete 11 1 Check the Transfer Unit for correct installation Reseat the Transfer Unit page 8 9 2 Does the error still occur Go to step 12 Complete 12 1 Check the Print Cartridge C M Y K for correct ...

Страница 582: ... path Remove the debris Replace the Duplex Unit page 8 103 21 1 Check the paper tray for correct installation Reseat the tray 2 Does the error still occur Go to step 22 Complete 22 1 Check the paper for correct placement Reseat the paper in the tray 2 Does the error still occur Go to step 23 Complete 23 1 Check the paper tray Side Guides Reset the Side Guides 2 Does the error still occur Go to ste...

Страница 583: ... 2 17 Tray 1 MPT Feed Roll PL3 1 10 Feed Roll PL3 2 53 Transfer Unit PL4 1 1 Fuser PL6 1 10 ADF Scanner Assembly PL11 1 1 ADF Roller Pad PL11 1 16 Duplex Unit PL12 1 1 Tray 3 Feed Roll PL13 2 10 Tray 3 Retard Roll PL13 4 10 Troubleshooting Procedure Table Step Actions and Questions Yes No 1 Does the error occur when printing Go to step 6 Go to step 2 2 1 Check the error 2 Does the document meet th...

Страница 584: ...ed paper feed from Tray 1 MPT Go to step 11 Go to step 15 11 1 Check the paper for correct placement Reseat the paper in Tray 1 MPT 2 Does the error still occur Go to step 12 Complete 12 1 Check the Tray 1 MPT Side Guides Reseat the Side Guides 2 Does the error still occur Go to step 13 Complete 13 1 Check the paper path 2 Are there any debris on the paper path Remove the debris Go to step 14 14 1...

Страница 585: ...ll occur Go to step 20 Complete 20 1 Check the paper tray Paper Guides Reseat the tray Paper Guides 2 Does the error still occur Go to step 21 Complete 21 1 Check the paper path 2 Are there any debris on the paper path Remove the debris Go to step 22 22 1 Replace the Feed Roller Tray 2 page 8 14 Tray 3 page 8 16 2 Does the error still occur Replace the Retard Roller Tray 2 page 8 15 Tray 3 page 8 ...

Страница 586: ...ference Table Applicable Parts Example Print Print Cartridge C M Y K PL5 1 17 20 Fuser PL6 1 10 Troubleshooting Procedure Table Step Actions and Questions Yes No 1 1 Verify the media type selection System Tray Settings Tray1 MPT Tray 2 Tray 3 Paper Type Go to step 2 Set the correct media type 2 1 Check the paper condition 2 Is the paper dry recommended type and loaded in the correct position Go to...

Страница 587: ... 5 61 Print Quality Troubleshooting 4 1 Check the Fuser for correct installation Reseat the Fuser page 8 12 2 Does the image quality improve Complete Replace the Fuser page 8 12 Troubleshooting Procedure Table continued Step Actions and Questions Yes No ...

Страница 588: ...der Unit PL3 2 1 Transfer Unit PL4 1 1 Print Cartridge C M Y K PL5 1 17 20 MCU Board PL9 2 13 Troubleshooting Procedure Table Step Actions and Questions Yes No 1 1 Perform Auto Color Registration System Admin Menu Maintenance Adjust ColorRegi Auto Correct 2 Does the error still occur Go to step 2 Complete 2 1 Turn the printer power Off and back On 2 Does the image quality improve Complete Go to st...

Страница 589: ...oes the image quality improve Complete Go to step 7 7 1 Check the Transfer Unit for correct installation Reseat the Transfer Unit page 8 9 2 Does the image quality improve Complete Go to step 8 8 1 Check the Print Cartridge C M Y K for correct installation Reseat the Print Cartridge page 8 11 2 Does the image quality improve Complete Go to step 9 9 1 Perform the Regi Clutch test page 4 65 Service ...

Страница 590: ... Troubleshooting Reference Table Applicable Parts Example Print ADF Scanner Assembly PL11 1 1 Troubleshooting Procedure Table Step Actions and Questions Yes No 1 1 Check the paper condition 2 Is the paper dry recommended loaded in the correct position and meet the ADF specifications Go to step 2 Replace the paper or use the document glass mode 2 Is the ADF closed against the document glass complet...

Страница 591: ...canner Assembly PL11 1 1 Troubleshooting Procedure Table Step Actions and Questions Yes No 1 1 Check the paper condition 2 Is the paper dry recommended loaded in the correct position and meet the ADF specifications Go to step 2 Replace the paper or use the platen mode 2 Is the ADF closed against the document glass completely Go to step 3 Close the ADF 3 1 Perform Scanner Calibration procedure Scan...

Страница 592: ...s Example Print ADF Scanner Assembly PL11 1 1 Troubleshooting Procedure Table Step Actions and Questions Yes No 1 1 Check the output document 2 Are there lines or streaks on the document Replace the original document Go to step 2 2 Are there debris on the document glass Clean the document glass using a lint free cloth Go to step 3 3 Does the image quality improve Complete Go to step 4 4 Are there ...

Страница 593: ...Print ADF Scanner Assembly PL11 1 1 Troubleshooting Procedure Table Step Actions and Questions Yes No 1 1 Check the output document 2 Are there spots on the output document Replace the original document Go to step 2 2 1 Check for any debris on the document glass and the CVT window 2 Are there any debris Remove the debris and clean the document glass using a lint free cloth Go to step 3 3 Does the ...

Страница 594: ...eshooting Pattern in the Halftone Moire There are patterns on the image when copying in Standard mode Initial Actions Check the document glass Ensure there are no debris on the document glass Troubleshooting Reference Table Example Print Standard Mode Enhanced Mode s6180mfp 396 ...

Страница 595: ...there patterns in the image Replace the original document Go to step 3 3 Adjust the Copy Mode 1 Press the Copy button 2 Use the Up or Down Arrow button to find and select Output Quality 3 Press the OK button 4 Select Enhanced and press the OK button 5 Verity the Ready Copy menu displays Output Quality Enhanced 6 Press the Start button to begin scanning NOTE Enhanced mode copies may take a couple o...

Страница 596: ...5 70 Phaser 6180MFP Multifunction Printer Service Manual Print Quality Troubleshooting ...

Страница 597: ...6 Chapter Adjustments and Calibrations In this chapter Adjustments Calibrations Parameter Setting ...

Страница 598: ...ference 1 From the Control Panel press the System button 2 Press the Up Arrow or Down Arrow button to find Admin Menu Press the OK button 3 Press the Up Arrow or Down Arrow button to find Maintenance Press the OK button 4 Press the Up Arrow or Down Arrow button find Adjust ColorRegi Press the OK button 5 Select Color Regi Chart and press the OK button two times The Color Registration Chart is prin...

Страница 599: ... Auto Registration On Off Adjusting Color Registration Color Registration can be automatically or manually adjusted Determining the Values From the lines to the right of the Y yellow M magenta and C cyan pattern find the values of the straightest lines When 0 is the value nearest the straightest line you do not need to adjust the color registration When the value is not 0 refer to Manual Adjustmen...

Страница 600: ...rRegi Press the OK button 5 Press the Up Arrow or Down Arrow button to find Color Regi Press the OK button 6 Select Yellow Magenta or Cyan and press the OK button 7 Use the Up Arrow or Down Arrow button to enter the values and press the OK button to save the data 8 Repeat steps 6 and 7 to continue adjusting the Color Registration 9 Press the Exit button to access the Color Regi Chart menu Select C...

Страница 601: ...el press the System button 2 Press the Up Arrow or Down Arrow button to find Admin Menu Press the OK button 3 Press the Up Arrow or Down Arrow button to find Maintenance Press the OK button 4 Press the Up Arrow or Down Arrow button to find Reset Fuser Press the OK button 5 Are You Sure message is displayed Select Yes and press the OK button to start the process 6 The Maintenance Reset Fuser menu i...

Страница 602: ... Off After executing this function and restarting the printer all the menu parameters are reset to their default values There are two options available User Section and System Section User Section User NVM Unique user information stored in NVM which includes Address Book e mails computer FTP and Fax System Section System NVM System information stored in NVM which includes default settings and some...

Страница 603: ...ssage is displayed Press the OK button Loading NVM NVRAM This process loads the NVM settings stored in the Image Processor Board 1 Access the Service Diagnostics menu by pressing and holding the Up and Down Arrow buttons simultaneously and turn the printer power On 2 The Service Mode is displayed Select Printer Diag and press the OK button 3 Press the Up Arrow or Down Arrow button to find Engine D...

Страница 604: ...only Each scanner has its own calibration information 1 Turn the printer power Off 2 Access the Service Diagnostics menu by pressing and holding the Up and Down Arrow buttons simultaneously and turn the printer power On 3 The Service Mode is displayed Select Fax Scanner Diag and press the OK button 4 Press the Up Arrow or Down Arrow button to find Scanner Maintenance Press the OK button 5 Press th...

Страница 605: ...ation and press the OK button b The Value is displayed with an which should match the provided value from the table Ensure to confirm that there is an in front of the Value number This represents the value has been updated and saved Examples Index Hex 04 Value Hex 52 c Press the Exit button to return to the Parameter screen Continue to enter the Index and Value information using the provided scann...

Страница 606: ...urn on the printer 3 The Service Mode menu is displayed 4 Select Fax Scanner Diag and press the OK button 5 Press the Up Arrow or Down Arrow button to find Parameter Press the OK button Note Use the Left or Right Arrow button to move the cursor Use the Up or Down Arrow button to change the value 6 Enter the Chain Link number and press the OK button 7 The value of the parameter is displayed with an...

Страница 607: ... 4 Select Printer Diag and press the OK button 5 Press the Up Arrow or Down Arrow button to find Parameter Press the OK button 6 Press the Up Arrow or Down Arrow button to find the appropriate item to change i e Slow Scan KtoP Press the OK button 7 Enter the appropriate range using the Up Arrow or Down Arrow button Press the OK button to save the value 8 The new value is displayed The Parameter me...

Страница 608: ...nning direction Life Counter Reads the life counter and the printer Shifts the print area in this direction by reducing the value Shifts the print area in this direction by reducing the value Shifts the print area in this direction by increasing the value Shifts the print area in this direction by increasing the value Slow Scan K to P Slow Scan 600 M Y C Slow Scan 1200 M Y C Fast Scan K to M Y C F...

Страница 609: ...nt 600 and 1200 dpi 60 to 60 Slow Scan 1200 M Y C shifts 0 021 mm 1 count Fast Scan Reg K to M Y or C shifts 0 042 mm 1 count Color registration adjustment Calculation of adjustment is shown below exp Yellow Value of Fast Scan Reg K to Y Value of Fast Scan Reg2 K to Y 4 30 to 30 Fast Scan Reg2 K to M C or Y shifts 0 01 mm 1 count 1 to 2 Fast Scan Reg Tray 1 MPT Tray 2 or Tray 3 shifts 0 17 mm 1 co...

Страница 610: ...count 200 000 Life DTB Transfer Unit 3 Cycle count 14 000 000 Life Y Waste Toner Waste Toner cleaning count 18 000 Life M Waste Toner Waste Toner cleaning count 18 000 Life C Waste Toner Waste Toner cleaning count 18 000 Life K Waste Toner Waste Toner cleaning count 18 000 Life Y Developer Cycle count 2 500 000 Life M Developer Cycle count 2 500 000 Life C Developer Cycle count 2 500 000 Life K De...

Страница 611: ...7 Chapter Cleaning and Maintenance In this chapter Service Maintenance Procedure Cleaning Maintenance ...

Страница 612: ...printer s operating environment Caution Never apply alcohol or other chemicals to any parts of the printer Never use a damp cloth to clean up toner If you remove the Print Cartridges place them in a light protective bag or otherwise protect them as exposure to light can quickly degrade performance and result in early failure 1 Record number of sheets printed 2 Print several sheets of paper to chec...

Страница 613: ...e Print Cartridge 1 Open the Front Cover 2 Using a flash light inspect the gaps between the Print Cartridges Remove the Print Cartridge if necessary Using tweezers remove any paper debris from the area 3 Check for any debris around the Print Cartridge gear areas Gaps s6180mfp 198 s6180mfp 199 ...

Страница 614: ...ser Unit 1 Open the Front Cover Caution When performing this procedure remove and cover the Print Cartridges to avoid exposure to light 1 Remove the Print Cartridges page 8 11 2 Insert the Q Tip between the gap on the Laser Unit and move the Q Tip side to side to clean the len Lenses s6180mfp 397 ...

Страница 615: ...cument Glass Note Use only a moistened lint free cloth to clean the document glass Do not use any kind of cleaning agent to clean the glass 1 Open the Scanner Cover 2 Wipe the document glass using a moistened lint free cloth Ensure there are no scratches on the document glass surface s6180mfp 389 ...

Страница 616: ... 6 Phaser 6180MFP Multifunction Printer Service Manual Cleaning and Maintenance Cleaning the ADF Roller 1 Open the ADF Cover 2 Wipe the Roller using a moistened lint free cloth s6180mfp 390 s6180mfp 391 ...

Страница 617: ...t a Configuration and Error History pages diagnose and repair any problems as indicated Check the printer engine and image processor firmware fans if necessary clean dust or vacuum these areas Check cleanliness of the interior and exterior including fans if necessary clean dust or vacuum these areas Review proper printer operation using a customer file if possible Check with the customer regarding...

Страница 618: ...7 8 Phaser 6180MFP Multifunction Printer Service Manual Cleaning and Maintenance ...

Страница 619: ...vice Parts Disassembly In this chapter Overview Maintenance Items and Consumables Covers Paper Tray Paper Feeder Xerographics Exit Chute Frame Drive Electrical Automatic Document Feeder and Scanner Assembly Options ...

Страница 620: ...crew can damage tapped holes Do not use excessive force to remove or install either a screw or a printer part The procedures are organized by the consumer replacement parts and functions of the printer Maintenance Items and Consumables Transfer Unit page 8 9 Print Cartridge C M Y K page 8 11 Fuser page 8 12 Tray 1 MPT Feed Roller page 8 13 Tray 2 Feed Roller page 8 14 Tray 2 Retard Roller page 8 1...

Страница 621: ...ssembly Standard Orientation of the Printer When needed the orientation of the printer is called out in the procedure as an aid for locating the printer parts The following figure identifies the Front Rear Left and Right sides of the printer s6180mfp 117 Left Front Right Rear ...

Страница 622: ...e 8 11 Caution Do not expose the Print Cartridges to light for more than 5 minutes After removal cover the Print Cartridges to minimize the amount of light striking the Print Cartridges Prolonged exposure to light significantly reduces Print Cartridges performance c Fuser page 8 12 Warning The Fuser may be hot Turn the printer power Off and allow at least 5 minutes for the Fuser to cool before rem...

Страница 623: ... tabs DO NOT over flex or force these parts DO NOT over torque the screws threaded into plastic parts Warning Unplug the AC power cord from the wall outlet before removing any printer part Notations in the Disassembly Text The notation item X points to a numbered callout in the illustration corresponding to the disassembly procedure being performed The notation PLX X X indicates that this componen...

Страница 624: ...wrong screw can damage tapped holes Do not use excessive force to remove or install either a screw or a printer part Posi Drive Screw Types used in the Printer Type Application Shape Characteristics Self tapping plastic 1 Silver colored 2 Screw thread is coarse compared to metal screw 3 Screw tip is thin Self tapping plastic with flange 1 Black colored 2 Screw thread is coarse compared to metal sc...

Страница 625: ...ize Switch Assembly Rear Cover Bottom Cover Left Pole Inner Cover Left Pole Cover Left Pole Inner Cover Left Pole Cover Left Cover Right Pole Inner Cover Right Pole Cover Right Cover Front Cover Toner Dispenser Motor LED Assembly Left Cover Controller Shield Box Assembly Fax Shield Box Assembly Humidity Temperature Sensor MCU Board Top Cover Controller Shield Box Assembly Fax Shield Box Assembly S...

Страница 626: ...over Rear Cover Right Pole Cover Power Switch Fax Shield Box Assembly Fax Board Fax Board Controller Fax Board Printer Rear Pole Side Removal Flow Printer MPT Roller Feed Roller Removal Flow Image Processor Board LVPS Multi Protocol Network Card Memory Card Removing Tray 2 Tray 1 MPT Feed Roller Tray 2 Feed Roller Tray 2 Retard Roller Tray 1 MPT Retard Holder Kit Removing Tray 3 Tray 3 Retard Roll...

Страница 627: ...ble items include the Transfer Unit Fuser and Feed Retard Rollers Consumables consist of the four print cartridges Transfer Unit PL4 1 1 Caution Do not touch the Transfer Unit belt area 1 Open the Front Cover PL13 2 1 2 Release the levers on the left and right sides of the Transfer Unit and lift the Transfer Unit at a 90 angle s6180mfp 124 ...

Страница 628: ...t up toward the left side to move the notch out of the U shape groove and slide the notch on the left side away from the hole Replacement Note Replacement Note If there is a Duplex Unit installed be sure to align the arrows on the bottom of the Transfer Unit with the arrows on top of the Duplex Unit s6180mfp 125 s6180mfp 205 ...

Страница 629: ... Print Cartridge C M Y K PL5 1 17 20 Caution Do not expose the Print Cartridges to light for more than 5 minutes Cover the Print Cartridges to avoid damage 1 Open the Front Cover 2 Hold the levers on the left and right sides of the Print Cartridge and slowly pull it out s6180mfp 127 ...

Страница 630: ... and allow at least 5 minutes for the Fuser to cool before removing the Fuser 1 Open the Front Cover 2 Open the Duplex Gate Chute PL6 1 13 3 Release the levers on the left and right sides of the Fuser to unlock the Fuser from the printer 4 Lift the green latches push the Fuser toward the front and lift the Fuser up to remove it s6180mfp 129 Duplex Gate Chute ...

Страница 631: ...lease the MPT Core Roll hook PL3 1 9 on the right side of the MPT Feed Roller and slide the MPT Core Roll to the right 3 Slide the MPT Roller to the right to release the groove on the MPT Roller from the vertical pin mounted on the MPT Shaft PL3 1 12 4 Rotate the Tray 1 MPT Feed Roller 180 and remove it from the Shaft s6180mfp 206 180 ...

Страница 632: ...53 1 Remove Tray 2 2 Release the hooks on the Tray 2 Feed Rollers and remove the Feed Rollers from the Shafts Replacement Note Replacement Note Be sure to align the convex section of the Tray 2 Feed Roll with the concave section of the Nudger Roll Gear PL3 2 46 and the Oneway Feed Clutch PL3 2 52 s6180mfp 207 ...

Страница 633: ...etard Roller PL2 2 17 1 Remove Tray 2 2 Release the hooks on the left and right sides of the Retard Tray Cover PL2 2 13 and open the Retard Tray Cover 3 Release the hooks on the left and right sides of the Retard Roller and remove the Retard Roller from the Retard Shaft PL2 2 15 s6180mfp 208 ...

Страница 634: ...n Printer Service Manual Service Parts Disassembly Tray 3 Feed Roller PL13 2 10 1 Remove Tray 3 from the Optional 550 Sheet Feeder PL13 1 1 2 Release the Tray 3 Feed Roller hooks and remove the Feed Roller from the Shafts s6180mfp 209 ...

Страница 635: ...13 4 10 1 Remove Tray 3 from the Optional 550 Sheet Feeder PL13 1 1 2 Release the hooks on the left and right sides of the Retard Tray Cover PL13 4 6 and open the Retard Tray Cover 3 Release the hooks of the Tray 3 Retard Roller and remove the Tray 3 Retard Roller from the Retard Shaft PL13 4 8 s6180mfp 210 ...

Страница 636: ...release the 5 hooks on the back side of the Rear Cover 3 Release the rim on the upper section of the Rear Cover from the inside of the Top Cover PL1 1 1 and remove the Rear Cover Replacement Note Replacement Note Be sure to hold down the metal clips on the Parallel connector while inserting the Rear Cover to prevent bending the clips s6180mfp 211 1 2 Rear Cover Hook Frame Hook Frame ...

Страница 637: ...Bottom Cover PL1 1 5 1 Remove the 2 rubber Caps PL1 1 12 from the Bottom Cover 2 Remove 2 screws 6 mm securing the Bottom Cover 3 Push the Bottom Cover from the front while sliding the Bottom Cover back to release the 5 latches and remove the Bottom Cover from the printer s6180mfp 215 ...

Страница 638: ...haser 6180MFP Multifunction Printer Service Manual Service Parts Disassembly Replacement Note Replacement Note Be sure to align the 3 front tabs with the holes to seat the Bottom Cover correctly s6180mfp 373 ...

Страница 639: ...emove the Bottom Cover page 8 19 2 Tilt the Right Pole Inner Cover inward to release the hook on the rear side of the Right Pole Inner Cover 3 Release the 2 hooks on the bottom side of the Right Pole Inner Cover from the holes on the Top Cover PL1 1 1 and remove the Right Pole Inner Cover from the printer s6180mfp 217 ...

Страница 640: ...ver page 8 21 4 Remove 4 screws 6 mm securing the Right Pole Cover 5 Release the notch on the screw mounting position on the front section of the Right Pole Cover from the printer 6 Slide the rear section of the Right Pole Cover outward 7 Release the rims on the front section of the Right Pole Cover from the Top Cover and from the inside of the Right Cover PL1 1 9 and remove the Right Pole Cover s...

Страница 641: ... top and rear sides of the printer frame 9 Slide the rear of the Right Cover slightly outward to release the 1 hook on the Right Cover and slide the Right Cover outward 10 Release the 2 hooks on the front section of the Right Cover and slide the Cover backward to remove it Replacement Note Replacement Note Insert the top and bottom tabs of the Right Side Cover at an angle in order to fit the Right...

Страница 642: ... PL1 1 3 1 Remove the Bottom Cover page 8 19 2 Tilt the Left Pole Inner Cover inward to release the 2 hooks on the rear side of the Left Pole Inner Cover 3 Release the 2 hooks on the bottom side of the Left Pole Inner Cover from the holes of the Top Cover and remove the Left Pole Inner Cover s6180mfp 242 ...

Страница 643: ...Inner Cover page 8 24 4 Remove 4 screws 6 mm securing the Left Pole Cover 5 Release the notches on the screw mounting positions on the front section of the Left Pole Cover 6 Slide the rear section of the Left Pole Cover outward 7 Release the rim on the front section of the Left Pole Cover from the Top Cover PL1 1 1 and from the inside of the Left Cover PL1 1 10 Remove the Left Pole Cover s6180mfp ...

Страница 644: ...screws 10 mm and 2 screws 6 mm securing the Left Cover 8 Release the Left Cover from the rear side while releasing the Cover from the tab from the top front notch 9 Slide the Left Cover outward and backward to remove it Replacement Note Replacement Note Insert the top and bottom tabs of the Left Side Cover at an angle in order to fit the Left Side Cover in the correct position Be sure the notch on...

Страница 645: ...age 8 22 7 Remove the Right Cover page 8 23 8 Remove the Left Pole Inner Cover page 8 24 9 Remove the Left Pole Cover page 8 25 10 Remove the Left Cover page 8 26 11 Remove 3 screws 6 mm 1 screw 8 mm and 1 screw 10 mm securing the Top Cover 12 Lift the Top Cover to release the tabs on the front center and the front left of the Top Cover from the hook and hole on the printer 13 Slightly rotate the ...

Страница 646: ... page 8 21 6 Remove the Right Pole Cover page 8 22 7 Remove the Right Cover page 8 23 8 Remove 1 screw 6 mm securing the Ground Wire on the printer Note When performing the following steps leave the junction connector on the printer side cable 9 Disconnect the Front Cover connector P J272 and the A OP OPP Harness Control Panel connector P J5301 PL1 2 24 10 Release the Ground Wire and the wiring ha...

Страница 647: ... 1 3 and Right Links PL 7 1 13 13 Release the hooks of the Tray 1 MPT Shaft Pivot PL1 2 33 securing the Front Cover and the MPT Cover to the printer and pull out the MPT Shaft Pivot 14 Remove the Front Cover together with the Tray 1 MPT Cover Replacement Note Replacement Note Be sure to tilt the Front Cover accordingly when mounting the Front Cover Push the Shaft Pivot in all the way to secure the...

Страница 648: ...er Service Manual Service Parts Disassembly Control Panel PL1 2 2 1 Open the Front Cover 2 Remove the Transfer Unit page 8 9 3 Remove the Exit Out Chute page 8 67 4 Remove 2 screws 10 mm securing the Control Panel to the printer s6180mfp 367 ...

Страница 649: ...emove it Caution DO NOT move the Control Panel too far because the Control Panel is secured to the Control Panel wiring harness 6 Release the hooks securing the Control Panel to the Front Cover 2 on the top 1 on the left and 1 on the right Use a flat tip screwdriver to release the hidden hook on the right s6180mfp 250 s6180mfp 368 ...

Страница 650: ... Multifunction Printer Service Manual Service Parts Disassembly 7 Release the Control Panel forward away from the Front Cover Disconnect the Control Panel connector P J220 and remove the Control Panel s6180mfp 249 P J220 ...

Страница 651: ... Parts Disassembly Tray 2 Rear Cover PL1 1 7 1 Pull the Tray 2 Rear Cover all the way out until it stops 2 Press the center part of the Tray 2 Rear Cover to release the hooks on the left and right sides and remove the Tray 2 Rear Cover from the printer s6180mfp 119 ...

Страница 652: ...o release the hooks securing the Link on the left and right sides of the Tray 1 MPT Cover Remove the left and right Pivot Pins 3 Use a small flat tip screwdriver to press on the lip of the Shaft Pivots to release the Shaft Pivots PL1 2 33 securing the left and right sides of the Tray 1 MPT Cover and remove the Shaft Pivots 4 Remove the Tray 1 MPT Cover s6180mfp 252 ...

Страница 653: ...Phaser 6180MFP Multifunction Printer Service Manual 8 35 Service Parts Disassembly Replacement Note Replacement Note Be sure to place the Tray 1 MPT Lever on top of Tray 1 MPT s6180mfp 253 ...

Страница 654: ...the Rear Cover page 8 18 4 Remove the Bottom Cover page 8 19 5 Remove the Right Pole Inner Cover page 8 21 6 Remove the Right Pole Cover page 8 22 7 Remove the Right Cover page 8 23 8 Remove the Control Panel page 8 30 9 Disconnect the Control Panel PL1 2 2 wiring harness connector P J5301 10 Release the A OP OPP Wiring Harness from the Drive Duct PL8 1 8 s6180mfp 410 P J5301 ...

Страница 655: ...uring the Harness Cover PL1 2 7 to the Front Cover 12 Remove the Harness Cover from the Front Cover 13 Remove the A OP OPP Wiring Harness from the Front Cover s6180mfp 411 12 12 Harness Assembly A OP OPP Front Cover Harness Assembly Front Cover Harness Assembly Harness Assy A OP OPP Harness Cover Pivot Bracket ...

Страница 656: ... Service Manual Service Parts Disassembly Paper Tray Tray 1 MPT Retard Holder Kit PL2 1 3 1 Remove Tray 2 PL2 1 1 2 Press the left and right tabs of the Retard Holder toward the inside to release and remove the Holder from Tray 2 s6180mfp 254 ...

Страница 657: ...tuator to release the hooks Remove the Actuator from the Tray Handle PL2 1 23 3 Remove the No Paper Spring hooks PL2 1 28 from the Actuator Holder PL2 1 25 4 Expand the left and right Actuator Holder mounting sections and remove the Shaft Remove the No Paper Actuator together with the No Paper Spring 5 Remove the No Paper Spring from the No Paper Actuator s6180mfp 259 ...

Страница 658: ...e Fuser page 8 12 3 Remove the Rear Cover page 8 18 4 Remove the Bottom Cover page 8 19 5 Remove the Right Pole Inner Cover page 8 21 6 Remove the Right Pole Cover page 8 22 7 Remove the Right Cover page 8 23 8 Remove the MPT Feed Spring PL3 1 4 9 Release the hook and remove the MPT Gear PL3 1 5 from the MPT Shaft PL3 1 12 s6180mfp 266 Printer Side MPT Gear Side ...

Страница 659: ...sconnect the Tray 1 MPT Feed Solenoid connector P J256 11 Release the Feed Solenoid wiring harness from the Solenoid Duct PL3 1 2 and the Drive Duct PL8 1 8 12 Remove 1 screw 8 mm securing the Feed Solenoid to the printer 13 Remove the Tray 1 MPT Feed Solenoid s6180mfp 265 P J256 10mm 8mm ...

Страница 660: ...2 3 Remove the Rear Cover page 8 18 4 Remove the Bottom Cover page 8 19 5 Remove the Right Pole Inner Cover page 8 21 6 Remove the Right Pole Cover page 8 22 7 Remove the Right Cover page 8 23 8 Remove the MPT Feed Spring PL3 1 4 9 Release the hook of the MPT Gear PL3 1 5 and remove the Gear from the MPT Shaft PL3 1 12 s6180mfp 266 Printer Side MPT Gear Side ...

Страница 661: ...y 1 MPT Roll out toward the lower left side to remove it Caution Be careful not to drop and lose the Earth Bearing black and the Bearing white 12 Remove the Earth Bearing from the Tray 1 MPT Roll Replacement Note Replacement Note Pay attention to the orientation of the Bearings The right side of the Earth Bearing PL3 1 6 is Black the left side of the Bearing PL3 1 13 is White Be sure the D cut sur...

Страница 662: ... page 8 9 4 Release the Cover Sensor hook PL3 1 16 5 Push the Cover Sensor backward while pressing on the lower side of the Sensor to remove the latch on the upper right side of the Cover Sensor from the MPT Chute PL3 1 14 6 Release the hooks and remove the Tray 1 MPT No Paper Sensor from the MPT Chute 7 Disconnect the Tray 1 MPT No Paper Sensor connector P J2751 s6180mfp 268 P J2751 ...

Страница 663: ...ht Cover page 8 23 8 Remove the Drive Assembly page 8 78 9 Disconnect connector P J233 10 Release the Gray Registration Clutch wiring harness from the clamp and hook on the printer frame and the clamp of the Feeder PL3 2 1 11 Remove the E ring securing the Registration Clutch to the Feeder 12 Remove the Registration Clutch from the Feeder Replacement Note Replacement Note Be sure to match the colo...

Страница 664: ...er page 8 22 7 Remove the Right Cover page 8 23 8 Remove the Drive Assembly page 8 78 9 Disconnect P J235 10 Release the Yellow Feeder Clutch wiring harness from the clamp and hook on the printer frame 11 Remove the E ring securing the Feeder Clutch to the Feeder Unit PL3 2 1 12 Remove the Feeder Clutch from the Feeder Replacement Note Replacement Note Be sure to match the color of the Clutch Harn...

Страница 665: ...Cover page 8 21 7 Remove the Right Pole Cover page 8 22 8 Remove the Right Cover page 8 23 9 Remove the Drive Assembly page 8 78 10 Remove the Registration Clutch page 8 45 11 Remove the Feed Clutch page 8 46 12 Remove the Tray 1 MPT Roll page 8 42 Note It is not necessary to remove the Tray 1 MPT No Paper Sensor PL3 1 15 and the Cover Sensor PL3 1 16 13 Remove 2 screws 10 mm securing the MPT Chut...

Страница 666: ...Service Manual Service Parts Disassembly 15 Disconnect the Feeder connectors P J232 and P J241 16 Disconnect the Turn Clutch PL3 2 25 connector P J234 17 Release the wiring harnesses from the clamp and the hook s6180mfp 370 P J241 P J232 P J234 ...

Страница 667: ...aution Be careful not to drop the Earth Spring on the right side of the Feeder Unit 19 Move the Feeder down and forward to release the notch on the left side of the Feeder out of the hole on the printer Slightly shift the Feeder Unit toward the rear left side to remove the notches 1 on the Earth Spring and 1 on the right side of the Feeder Unit out of the holes on the printer 20 Pull the Shaft sec...

Страница 668: ...Route the wiring harnesses to the hooks on the printer frame and secure them with the clamps Caution Be sure to match the color of the wiring harness The Turn Clutch wiring harness is blue 7 Connect the Turn Clutch connector P J234 8 Connect connectors P J232 and P J241 9 Align the notch on the Chute with the printer and attach the Chute 10 Secure the Chute with 2 screws 10 mm 11 Install the Tray ...

Страница 669: ...al 8 51 Service Parts Disassembly Turn Clutch PL3 2 25 1 Remove the Feeder Unit page 8 47 2 Release the Turn Clutch wiring harness from the Clamps 3 Remove the E ring securing the Turn Clutch 4 Remove the Turn Clutch from the Feeder Unit s6180mfp 274 ...

Страница 670: ...e 8 24 9 Remove the Left Pole Cover page 8 25 10 Remove the Left Cover page 8 26 11 Remove the Top Cover page 8 27 12 Remove the Controller Shield Box Assembly AIO PRT Box Assembly page 8 92 13 Remove the Fax Shield Box Assembly page 8 96 14 Release the Fuser wiring harness PL10 1 5 from the 3 clamps on the Earth Frame Assembly PL5 1 2 15 Remove 4 screws 6 mm securing the Earth Frame Assembly to t...

Страница 671: ...ing harness from the Earth Frame Assembly 18 Disconnect the Laser Unit connector P J12 from the MCU Board PL9 2 13 and remove the Ferrite Core PL5 1 13 from the harness 19 Release the Laser Unit wiring harness from the 3 clamps and pull the wiring harness from the hole of the printer s6180mfp 286 P J12 Ferrite Clamps Clamp ...

Страница 672: ...anual Service Parts Disassembly 20 Remove 4 screws 10 mm securing the 2 Laser Unit springs PL5 1 11 to the left and right sides of the printer and remove the Springs 21 Slowly pull up the Laser Unit from the printer using the handle s6180mfp 287 Handle ...

Страница 673: ...Multifunction Printer Service Manual 8 55 Service Parts Disassembly Replacement Note Replacement Note Be sure the Earth Frame Assembly is under the Earth Plate when securing the Laser Unit to the printer s6180mfp 412 ...

Страница 674: ...e the Bottom Cover page 8 19 5 Remove Right Pole Inner Cover page 8 21 6 Remove the Right Pole Cover page 8 22 7 Remove the Right Cover page 8 23 8 Remove the Print Cartridge Assembly Black page 8 57 Cyan Magenta Yellow page 8 58 9 Shift the CRUM Connector to the right and remove the groove of the CRUM Connector from the printer 10 Disconnect and remove the CRUM Connector s6180mfp 428 P J311 P J31...

Страница 675: ...e Cover page 8 22 7 Remove the Right Cover page 8 23 8 Remove the Left Pole Inner Cover page 8 24 9 Remove the Left Pole Cover page 8 25 10 Remove the Left Cover page 8 26 11 Remove the Top Cover page 8 27 12 Remove the Interlock Switch page 8 82 13 Remove the Main Drive page 8 75 14 Remove 1 screw 10 mm securing the Black Print Cartridge Sensor Assembly to the printer 15 Remove the Black Print Ca...

Страница 676: ...ttom Cover page 8 19 5 Remove the Right Pole Inner Cover page 8 21 6 Remove the Right Pole Cover page 8 22 7 Remove the Right Cover page 8 23 8 Remove 1 screw 10 mm securing the Print Cartridge Sensor Assembly to the printer 9 Remove the Print Cartridge Sensor Assembly 10 Disconnect the Print Cartridge Sensor Assembly connectors s6180mfp 289 Print Cartridge Sensor Assembly C Print Cartridge Sensor...

Страница 677: ...e Inner Cover page 8 24 6 Remove the Left Pole Cover page 8 25 7 Remove the Left Cover page 8 26 8 Disconnect the 4 Toner Dispenser Motor wiring harnesses from the Motor Harness Duct PL5 2 14 9 Release the 2 hooks securing the Motor Harness Duct to the printer 10 Slightly shift the Motor Harness Duct upward and release the convex sections of the Duct from the printer Pass the 4 connectors through ...

Страница 678: ...Dispenser Motor toward the front release the convex sections and remove the Toner Dispenser Motor Replacement Note Replacement Note Be sure to align the convex sections of the Toner Dispenser Motor with the holes on the printer and shift the Motor toward the rear s6180mfp 292 Toner Dispenser Motor K Toner Dispenser Motor C Toner Dispenser Motor M Toner Dispenser Motor Y ...

Страница 679: ...e the Left Pole Cover page 8 25 10 Remove the Left Cover page 8 26 11 Remove the Top Cover page 8 27 12 Remove the LED page 8 63 Note It is not necessary to disconnect the connector on the MCU Board for the following steps 13 Remove the HVPS page 8 64 14 Disconnect the Dispenser Motor connectors and release the wiring harnesses from the Motor Harness Duct 15 Release the 2 hooks securing the Motor ...

Страница 680: ...function Printer Service Manual Service Parts Disassembly 17 Remove 1 screw 10 mm securing the ESA Roll Spring PL5 2 12 and remove the ESA Roll Spring 18 Remove 3 screws 10 mm securing the Bias and remove the BIAS s6180mfp 293 ...

Страница 681: ...Bottom Cover page 8 19 5 Remove the Left Pole Inner Cover page 8 24 6 Remove the Left Pole Cover page 8 25 7 Remove the Left Cover page 8 26 8 Remove 2 screws 8 mm securing the Left Side Duct PL7 1 23 and remove the Duct 9 Remove 1 screw 10 mm securing the LED Assembly 10 Release the 2 hooks securing the LED Assembly and remove the LED Assembly 11 Disconnect the LED connector P J141 s6180mfp 294 P...

Страница 682: ...he Right Pole Cover page 8 22 7 Remove the Right Cover page 8 23 8 Remove the Left Pole Inner Cover page 8 24 9 Remove the Left Pole Cover page 8 25 10 Remove Left Cover page 8 26 11 Remove the Top Cover page 8 27 12 Remove the Controller Shield Box Assembly AIO PRT Box Assembly page 8 92 13 Remove the Fax Shield Box Assembly page 8 96 Note When performing the following step it is not necessary to...

Страница 683: ...flat tip screwdriver to release the 2 hooks on the inside of the Lower Duct PL9 2 8 and slide the Upper Duct backward to remove it 16 Remove 1 screw 6 mm securing the Lower Duct to the printer 17 Release the 2 Lower Duct hooks from the hole of the printer and remove the Lower Duct s6180mfp 295 ...

Страница 684: ...L9 2 13 19 Remove 2 screws 6 mm with washer securing the HVPS wiring harnesses 20 Remove 5 screws 10 mm and 3 screws 6 mm securing the HVPS to the printer 21 Release the upper part of the HVPS from the 2 tabs on printer pull out the connector through the hole of the printer and remove the HVPS s6180mfp 296 Clamp P J16 s6180mfp 298 P J16 ...

Страница 685: ...t Chute Exit Out Chute Assembly PL6 1 1 1 Open the Front Cover 2 Remove 2 screws silver 10 mm flanged securing the Exit Out Chute to the Front Cover 3 Remove the Exit Out Chute Replacement Note Replacement Note When installing the Exit Out Chute DO NOT overtighten the screws s6180mfp 247 ...

Страница 686: ...arallel with the U shaped notch Pull out the right side pivot of the Duplex Gate from the U shaped notch toward the rear side of the printer 3 Detach the left side pivot of the Duplex Gate Chute from the hole of the printer and remove the Chute Replacement Note Replacement Note Be sure to open the Duplex Gate Chute at approximately 45 angle and align the cuter surface of the shaft on the right sid...

Страница 687: ...rvice Manual 8 69 Service Parts Disassembly Frame Star Wheel Spur Assembly PL7 1 1 1 Open the Front Cover 2 Remove the Fuser page 8 12 3 Remove 1 screw 8 mm flanged securing the Star Wheel to the printer 4 Remove the Star Wheel s6180mfp 300 ...

Страница 688: ...emove the Left Pole Cover page 8 25 7 Remove the Left Cover page 8 26 8 Release the hook of the Shaft Pivot PL1 2 10 securing the Left Link to the Front Cover 9 Remove the Shaft Pivot and the Left Link 10 Remove 3 screws 8 mm securing the Left Link Support PL7 1 2 to the printer 11 Remove the Left Link Support Caution The Support Spring may come loose when removing the Left Link Support Cover the ...

Страница 689: ...3 Remove the Left Link from the printer 14 Remove the Support Spring PL7 1 8 15 Remove the Damper Holder PL7 1 6 together with the Oil Damper PL7 1 7 Replacement Note Replacement Note Be sure the orientation of the Damper Holder is correct Push the cylinder of the Release Lever toward the Damper Holder side s6180mfp 302 ...

Страница 690: ...ove the Right Pole Cover page 8 22 7 Remove the Right Cover page 8 23 8 Release the hook of the Shaft Pivot PL1 2 10 securing the Right Link to the Front Cover 9 Remove the Shaft Pivot and the Right Link 10 Remove 3 screws 8 mm securing the Right Link Support PL7 1 12 to the printer 11 Remove the Right Link Support Caution The Support Spring may come loose when removing the Right Link Support Cove...

Страница 691: ...3 Remove the Right Link from the printer 14 Remove the Support Spring PL7 1 8 15 Remove the Damper Holder PL7 1 6 together with the Oil Damper PL7 1 7 Replacement Note Replacement Note Be sure the orientation of the Damper Holder is correct Push the cylinder of the Release Lever toward the Damper Holder side s6180mfp 304 ...

Страница 692: ... Bottom Cover page 8 19 5 Remove the Right Pole Inner Cover page 8 21 6 Remove the Right Pole Cover page 8 22 7 Remove the Right Cover page 8 23 8 Disconnect the Size Switch connector P J231 9 Remove 1 screw 10 mm securing the Size Switch to the printer 10 Release the 2 notches of the Size Switch and the notch located on the bottom from the holes of the printer and remove the Size Switch s6180mfp ...

Страница 693: ...ote When performing the following step it is not necessary to disconnect the Interlock Switch 12 Remove the Interlock Switch page 8 82 13 Remove 2 screws 10 mm securing the Fuser Bracket PL6 1 12 to the printer Caution DO NOT separate the Fuser Bracket and the printer too far apart because they are connected by a wiring harness 14 Remove the Fuser Bracket 15 Release the Main Drive wiring harness f...

Страница 694: ...8 76 Phaser 6180MFP Multifunction Printer Service Manual Service Parts Disassembly 19 Remove the wiring harness together with the Clamp s6180mfp 306 P J211 P J2761 P J221 P J222 ...

Страница 695: ...Disassembly 20 Remove 6 screws 10 mm securing the Main Drive to the printer 21 Remove the Main Drive Replacement Note Replacement Note Be sure to place the wiring harness connecting the Developer Motor through the back of the hook on the Drive Assembly PL8 1 7 s6180mfp 307 ...

Страница 696: ... 12 3 Remove the Rear Cover page 8 18 4 Remove the Bottom Cover page 8 19 5 Remove the Right Pole Inner Cover page 8 21 6 Remove the Right Pole Cover page 8 22 7 Remove the Right Cover page 8 23 8 Remove the MPT Feed Spring PL3 1 4 9 Release the hook on the MPT Gear PL3 1 5 to remove the Gear from the MPT Shaft PL3 1 12 s6180mfp 130 Printer Side MPT Gear Side ...

Страница 697: ...e wiring harnesses and release the wiring harnesses from the Drive Duct PL8 1 8 11 Release the hook of the Drive Duct from the Feed Drive Assembly Shift the Drive Duct toward the rear side of the printer and remove it from the Feed Drive Assembly s6180mfp 423 P J5301 P J272 P J275 P J236 s6180mfp 308 ...

Страница 698: ...the wiring harness 13 Remove the Feed Drive Assembly 14 Disconnect the Feed Drive Assembly connector P J251 Replacement Note Replacement Note Be sure to place the wiring harness connecting the Developer Motor of the Main Drive PL8 1 2 through the back of the hook on top of the Feed Drive Assembly Pay attention to the direction of the MPT Feed Spring Attach the hyperelliptic side of the Tray 1 MPT ...

Страница 699: ...page 8 12 3 Remove the Rear Cover page 8 18 4 Remove the Bottom Cover page 8 19 5 Remove the Right Pole Inner Cover page 8 21 6 Remove the Right Pole Cover page 8 22 7 Remove the Right Cover page 8 23 8 Disconnect the EEPROM Board connector P J144 9 Remove 1 screw 10 mm securing the EEPROM Board to the printer 10 Remove the EEPROM Board P J144 s6180mfp 310 ...

Страница 700: ...ge 8 24 9 Remove the Left Pole Cover page 8 25 10 Remove the Left Cover page 8 26 11 Remove the Top Cover page 8 27 12 Remove the Controller Shield PRT AIO Box Assembly page 8 92 13 Remove the Fax Shield Assembly page 8 96 14 Disconnect the Interlock Switch connector P J44 on the LVPS PL9 2 14 15 Release the Interlock Switch wiring harness from the clamp and pass it through the hole on the printer...

Страница 701: ... Left Pole Inner Cover page 8 24 4 Remove the Left Pole Cover page 8 25 5 Remove the Left Cover page 8 26 6 Remove the Controller Shield PRT AIO Box Assembly page 8 92 7 Remove the Fax Shield Assembly page 8 96 8 Disconnect all the LVPS connectors 9 Remove the 7 screws 6 mm securing the LVPS to the printer 10 Remove the LVPS s6180mfp 312 P44 P502 P501 P504 P503 P40a P40b P47 P48 ...

Страница 702: ...age 8 24 9 Remove the Left Pole Cover page 8 25 10 Remove the Left Cover page 8 26 11 Remove the Top Cover page 8 27 12 Remove the Controller Shield Box Assembly page 8 92 13 Remove the Fax Shield Box Assembly page 8 96 14 Disconnect the Fan connector P J503 from the LVPS PL9 2 14 15 Release the Fan wiring harness from the 4 Clamps and pull it out of the hole on the printer 16 Remove 2 screws 8 mm...

Страница 703: ...ser 6180MFP Multifunction Printer Service Manual 8 85 Service Parts Disassembly 19 Remove 1 screw 32 mm securing the Duct Plate to the Fan 20 Remove the Fan from the Duct Plate s6180mfp 314 Notch Lug Label ...

Страница 704: ...r Cover page 8 18 2 Remove the Bottom Cover page 8 19 3 Remove the Right Pole Inner Cover page 8 21 4 Remove the Right Pole Cover page 8 22 5 Disconnect the Power Switch connector P J481 6 Remove 2 screws 6 mm securing the SW Main Bracket PL9 2 5 to the printer 7 Remove the SW Main Bracket together with the Power Switch 8 Release the hooks on the Power Switch from the SW Main Bracket and remove th...

Страница 705: ...age 8 26 8 Remove the Controller Shield Box Assembly page 8 92 9 Remove the Fax Shield Box Assembly page 8 96 10 Remove 1 screw 10 mm securing the Humidity Temperature Sensor to the printer 11 Slide the Humidity Temperature Sensor Bracket upward to release the hooks and remove the Humidity Temperature Sensor Bracket together with the Humidity Temperature Sensor 12 Disconnect the Humidity Temperatu...

Страница 706: ...age 6 7 for detailed procedures 1 Open the Front Cover 2 Remove the Fuser page 8 12 3 Remove the Rear Cover page 8 18 4 Remove the Bottom Cover page 8 19 5 Remove the Left Pole Inner Cover page 8 24 6 Remove the Left Pole Cover page 8 25 7 Remove the Left Cover page 8 26 8 Remove the Controller Shield Box Assembly page 8 92 9 Remove the Fax Shield Box Assembly page 8 96 10 Remove the Humidity Temp...

Страница 707: ...Board is exchanged simply move the NVRAM chip from the old MCU Board to the new MCU Board Load the data from the I P Board Enter Service Diagnostics menu Service Mode Printer Diag Engine Diag NVM Settings Load NVM from ESS Refer to Loading NVM NVRAM on page 6 7 for detailed procedures s6180mfp 317 P J17 P J14 P J16 P J12 P J11 P J10 P J31 P J24 P J23 P J19 P101 P J18 P J15 P J22 P J21 P J25 P J27 ...

Страница 708: ...Left Pole Inner Cover page 8 24 4 Remove the Left Pole Cover page 8 25 5 Remove the Controller Shield PRT AIO Box Assembly page 8 92 6 Remove 3 screws 6 mm securing the Image Processor Board connector connections to the Controller Shield PRT AIO Box Assembly PL9 1 13 7 Remove 5 screws 6 mm securing the Image Processor Board to the Controller Shield 8 Remove the Image Processor Board s6180mfp 318 ...

Страница 709: ...NVRAM ROM from the new I P Board DO NOT apply pressure on the I P Board when removing the NVRAM ROM Make sure to move the NVRAM ROM from the old I P Board to the new I P Board Carefully check the correct orientation of the NVRAM ROM when installing the NVRAM ROM Old Image Processor Board New Image Processor Board Notch s6180mfp 319 ...

Страница 710: ... the Left Pole Inner Cover page 8 24 4 Remove the Left Pole Cover page 8 25 5 Loosen the Knurling screw PL9 1 12 and open the Controller Shield Window Plate PL9 1 10 6 Loosen 9 screws securing the Controller Shield Window Assembly PL9 1 7 to the printer 7 Slightly slide the Controller Shield Window Plate upward until the U shaped grooves on the Controller Shield Window Plate are disengaged from th...

Страница 711: ...ll out the Controller Shield forward and release the 3 wiring harnesses on the right side from the LES 1017 Saddle Clamp PL9 1 19 11 Disconnect the Controller AIO ESS wiring harness PL10 1 14 from the Image Processor Board 12 Release the wiring harness clip to remove the wiring harnesses from the Controller Shield Box Assembly Remove the Controller Shield together with the Image Processor Board s6...

Страница 712: ... 1 22 Caution Be sure to wear proper ESD protection to prevent from damaging the Memory Card 1 Loosen the Knurling Screw PL9 1 12 and open the Controller Shield Window Plate PL9 1 10 2 Gently release both tabs on the memory socket until the Memory Card releases 3 Remove the Memory Card s6180mfp 321 ...

Страница 713: ...o wear proper ESD protection to prevent from damaging the Multi Protocol Card MPC 1 Loosen 1 Knurling Screw PL9 1 12 and open the Controller Shield Window Plate PL9 1 10 2 Remove 2 Knurling Screws PL9 1 12 securing the Multi Protocol Card to the printer 3 Remove the Multi Protocol Card from the Image Processor Board PL9 1 20 s6180mfp 322 ...

Страница 714: ...e Cover page 8 25 5 Remove the Controller Shield Box Assembly page 8 92 6 Disconnect all the Scanner Controller Board PL9 1 1 connectors 6 connectors P J50 P J52 P J60 P J61 P J62 P J63 2 flat cables P J64 P J65 7 Remove 1 screw 6 mm securing the ground wire of the ADF Scanner Assembly PL11 1 1 to the Fax Shield Box Assembly 8 Release the wiring harnesses from the Clamps s6180mfp 323 Clamps P J52 ...

Страница 715: ...assembly 9 Remove 3 screws securing the Controller Shield to the printer 10 Remove the Fax Shield Box Assembly together with the Scanner Controller Board and the Fax Board PL9 1 3 while passing the wiring harnesses through the hole on the Fax Shield Box Assembly s6180mfp 324 ...

Страница 716: ...ove the Left Pole Inner Cover page 8 24 4 Remove the Left Pole Cover page 8 25 5 Remove the Left Cover page 8 26 6 Remove the Controller Shield Box Assembly page 8 92 7 Remove 2 screws 6 mm securing the Fax Board to the Fax Shield Box Assembly PL9 1 4 8 Release the hooks on the Fax Support PL9 1 2 and remove the Fax Board form the Scanner Controller Board PL9 1 1 s6180mfp 325 ...

Страница 717: ...ole Inner Cover page 8 24 4 Remove the Left Pole Cover page 8 25 5 Remove the Left Cover page 8 26 6 Remove the Controller Shield Box Assembly page 8 92 7 Remove the Fax Shield Box Assembly page 8 96 8 Remove the Fax Board page 8 98 9 Remove 5 screws 6 mm securing the Scanner Controller Board to the Fax Shield Box Assembly PL9 1 4 10 Remove the Scanner Controller Board from the Fax Shield Box Asse...

Страница 718: ...when installing the NVM ROM 3 Install the NVM ROM that was removed from the old Scanner Controller Board on the IC socket of the new Scanner Controller Board with its notch aligned with the notch in the IC socket 4 After reinstall all the components turn On the printer 5 Press the System button to access the Control Panel menu Press the Up Arrow or Down Arrow to find Admin menu Press the OK button...

Страница 719: ...ate country and press the OK button 9 Restart System Are You Sure menu is displayed Select Yes and press the OK button to start system initialization 10 Restart System menu with Print Initialize NVM Initializing messages are displayed 11 When the process is completed the Please wait Ready messages are displayed on the printer s Control Panel ...

Страница 720: ...Remove the Left Pole Inner Cover page 8 24 9 Remove the Left Pole Cover page 8 25 10 Remove the Left Cover page 8 26 11 Remove the Top Cover page 8 27 12 Remove the Controller Shield Box Assembly page 8 92 13 Disconnect the Speaker Assembly connector P J52 from the Scanner Controller Board PL9 1 1 14 Release the Speaker Assembly wiring harness from the 2 clamps and pull them out of the hole on the...

Страница 721: ...e front to the locking position 1 Open the Front Cover 2 Remove the Fuser page 8 12 3 Remove the Rear Cover page 8 18 4 Remove the Bottom Cover page 8 19 5 Remove the Right Pole Inner Cover page 8 21 6 Remove the Right Pole Cover page 8 22 7 Remove the Right Cover page 8 23 8 Remove the Left Pole Inner Cover page 8 24 9 Remove the Left Pole Cover page 8 25 10 Remove the Left Cover page 8 26 11 Rem...

Страница 722: ... Parts Disassembly Note When performing the following step it is not necessary to remove the Fan connector and wiring harness 13 Remove 4 screws securing the Main Fan to the printer Move the Main Fan to the left side and sit the Fan on the printer frame s6180mfp 355 ...

Страница 723: ...P J52 P J60 P J61 P J62 P J63 2 flat cables P J64 P J65 15 Remove 1 screw 6 mm securing the ADF Scanner Assembly ground wire to the Fax Shield Box Assembly PL9 1 4 16 Remove the FCR27 12 1 3 Core PL11 1 14 and the FCR27 Core PL11 1 13 from the 2 flat cables 17 Remove the two SC 18 Core Assemblies PL11 1 15 on the connectors J62 and J63 s6180mfp 356 P J64 P J65 P J61 P J60 P J63 P J62 Core Assembli...

Страница 724: ...river to release the 2 hooks from the inside of the Lower Duct PL9 2 8 and slide the Upper Duct back and upward to remove it 19 Remove 1 screw 6 mm securing the Lower Duct to the printer 20 Release the 2 hooks on the bottom of the Lower Duct from the holes of the printer and remove the Lower Duct s6180mfp 295 ...

Страница 725: ...m the 6 Clamps and pull it out of the slot on the Fax Plate Assembly PL9 1 5 22 Release the 2 hooks on the SFT 25SN Core PL11 1 12 and remove the Core from the wiring harness 23 Release the 2 flat cables from underneath the Film 24 Release the 2 flat cables from the FFC Spacer Assembly PL5 1 14 Clamp Clamp Clamps Clamps s6180mfp 357 Film ...

Страница 726: ...ring the ADF Scanner Assembly to the printer 26 Remove 2 screws securing the Sub Plate PL11 1 8 to the ADF Scanner Assembly Caution When performing the following step be sure that wiring harness of the ADF Scanner Assembly is not caught inside the printer 27 Slowly lift the ADF Scanner Assembly to remove it s6180mfp 358 ...

Страница 727: ...ock Lever is in the Locking position the printer can be damaged when it is turned On When replacing the ADF Scanner Assembly be sure to perform calibration for the new ADF Scanner Assembly using Diagnostics procedures Scanner Calibration on page 6 8 Note the ADF Scanner correction values under the ADF Scanner Assembly prior to installing the ADF Scanner Assembly to the printer s6180mfp 427 s6180mf...

Страница 728: ... 1 3 ADF Separator Pad PL11 1 5 ADF Separator Spring PL11 1 6 1 Open the ADF Assembly Cover 2 Release the front shaft of the ADF Feed Roller PL11 1 3 from the ADF Assembly 3 Release the rear shaft of the ADF Feed Roller from the ADF Assembly to remove the ADF Feed Roller s6180mfp 360 s6180mfp 361 Front Rear ...

Страница 729: ...ly 4 Release the hook securing the ADF Separator Pad PL11 1 5 to the ADF Assembly 5 Slide the ADF Separator Pad backward until the front shaft of the ADF Separator Pad is released from the hole on the ADF Assembly Release the rear shaft and remove the ADF Separator Pad s6180mfp 362 ...

Страница 730: ...ter Service Manual Service Parts Disassembly 6 Remove the ADF Separator Spring PL11 1 6 from the notch on the ADF Assembly Replacement Note Replacement Note 1 Be sure the ADF Separator Spring PL11 1 6 sits correctly s6180mfp 363 s6180mfp 364 ...

Страница 731: ...n Printer Service Manual 8 113 Service Parts Disassembly 2 Be sure the ADF Feed Roller flaps black sit on top of the ADF Assembly Cover flaps white 3 Remove the ADF Feed Roller Cover from the Feed Roller s6180mfp 365 s6180mfp 372 ...

Страница 732: ...ssembly Cover 2 Press the rear side mounting section of the Main Tray Kit toward the inside to release the notch of the Main Tray Kit from the hole of the ADF Assembly PL11 1 2 3 Release the front side notch of the Main Tray Kit from the hole of the ADF Assembly and remove the Main Tray Kit s6180mfp 366 Front Side Rear Side ...

Страница 733: ...e Duplex Unit lever to release the lock 4 Release the notches on the bottom of the Duplex Unit out from the holes of the Front Cover and remove the Duplex Unit Replacement Note Replacement Note Be sure to remove the plastic Connector Cover from the Duplex Unit connector location if installed The cover is only installed if the printer never had a Duplex Unit installed s6180mfp 126 ...

Страница 734: ...eeder PL13 1 1 1 Remove Tray 2 2 Remove 2 Joint screws PL13 1 2 securing the Optional 550 Sheet Feeder to the printer Caution Lifting the printer requires two people Use care when removing the printer from the Optional 550 Sheet Feeder 3 Lift the printer up from the Optional 550 Sheet Feeder s6180mfp 142 ...

Страница 735: ...eder Assembly PL13 2 8 1 Remove the Optional 550 Sheet Feeder page 8 116 2 Remove the Tray 3 Rear Cover page 8 118 3 Remove 2 Joint screws securing the Optional Feeder Assembly to the Cart Assembly PL13 1 5 4 Lift up the Optional Feeder Assembly to separate it from the Cart Assembly s6180mfp 415 ...

Страница 736: ... 1 Remove the Tray 2 Rear Cover page 8 33 2 Remove Tray 3 from the Optional 550 Sheet Feeder 3 Pull the Tray 3 Cover backward until it stops 4 Press the center part of the Tray 3 Cover to release the 2 hooks on the left and right sides and remove the Tray 3 Cover from the Optional 550 Sheet Feeder s6180mfp 335 ...

Страница 737: ...ional 550 Sheet Feeder page 8 116 2 Remove the Tray 3 Rear Cover page 8 118 3 Remove the Optional Feeder Assembly page 8 117 4 Remove 2 screws 6 mm securing the Front Left Cover to the Optional Feeder Assembly 5 Release the Front Left Cover hooks and remove the Front Left Cover from the Optional Feeder Assembly PL13 2 8 s6180mfp 416 ...

Страница 738: ... Remove the Tray 3 Rear Cover page 8 118 3 Remove the Optional Feeder Assembly page 8 117 4 Remove the Tray 3 Front Left Cover page 8 119 5 Rotate the Optional Feeder Assembly 90 from left to right 6 Remove 6 screws 6 mm securing the Tray 3 Left Cover to the Optional Frame Assembly PL13 3 1 7 Remove the Tray 3 Left Cover from the Optional Frame Assembly s6180mfp 417 ...

Страница 739: ...L13 2 7 1 Remove the Optional 550 Sheet Feeder page 8 116 2 Remove the Tray 3 Rear Cover page 8 118 3 Remove the Optional Feeder Assembly page 8 117 4 Remove 4 screws 6 mm securing the Front Right Cover to the Optional Feeder Assembly 5 Remove the Front Right Cover from the Optional Feeder Assembly s6180mfp 418 ...

Страница 740: ...Remove the Tray 3 Rear Cover page 8 118 3 Remove the Optional Feeder Assembly page 8 117 4 Remove the Tray 3 Front Right Cover page 8 121 5 Rotate the Optional Feeder Assembly 90 from right to left 6 Remove 6 screws 6 mm securing the Tray 3 Right Cover to the Optional Frame Assembly PL13 3 1 7 Remove the Tray 3 Right Cover from the Optional Frame Assembly s6180mfp 419 ...

Страница 741: ... Optional Feeder Assembly page 8 117 4 Remove the Front Right Cover page 8 121 5 Remove the Tray 3 OPF Right Cover page 8 122 6 Disconnect the Tray 3 Turn Clutch connector P J4201 7 Release the 2 Clamps securing the Tray 3 Turn Clutch wiring harness and remove the harness 8 Remove the KL ring securing the Tray 3 Turn Clutch to the Turn Roller 9 Remove the Tray 3 Turn Clutch from the Turn Roller s6...

Страница 742: ...Right Cover page 8 121 5 Remove the Tray 3 OPF Right Cover page 8 122 Note When performing the following step leave the junction connector on the Optional Frame Assembly 6 Disconnect the Tray 3 Feed Clutch connector P J4213 7 Release the Clamp securing the Tray 3 Feed Clutch wiring harness to the Feed Shaft 8 Remove the KL ring securing the Optional Feed Clutch to the Optional Feed Shaft 9 Remove ...

Страница 743: ...e the Tray 3 OPF Right Cover page 8 122 6 Remove the Tray 3 Size Switch page 8 129 7 Remove 1 screw 8 mm securing the Tray 3 Tray Guide to the Optional Frame Assembly PL13 3 1 8 Use a small screwdriver to release the notch on the Tray 3 Right Guide Shift the Tray 3 Right Guide toward the front to release the 12 hooks on the Tray 3 Right Guide from the Optional Frame Assembly 9 Tilt the Tray 3 Righ...

Страница 744: ...t Left Cover page 8 119 5 Remove the Tray 3 OPF Left Cover page 8 120 6 Remove 1 screw 8 mm securing the Tray 3 Left Guide to the Optional Frame Assembly PL13 3 1 7 Use a screwdriver to release the notch on the Tray 3 Left Guide Shift the Tray 3 Left Guide toward to release the 9 hooks on the Tray 3 Left Guide from the holes of the Optional Frame Assembly 8 Tilt the Tray 3 Left Guide toward the in...

Страница 745: ...h page 8 123 9 Remove the Tray 3 Feed Clutch page 8 124 10 Remove the Tray 3 Size Switch page 8 129 11 Remove the Tray 3 Right Tray Guide page 8 125 12 Remove the Tray 3 Left Tray Guide page 8 126 Note When performing the following step leave the junction connector on the Optional Frame Assembly side cable 13 Disconnect the Tray 3 Feeder connector P J4212 and slide the connector out of the hole of...

Страница 746: ...inter Service Manual Service Parts Disassembly 16 Release the convex parts on the left and right sides of the Tray 3 Feeder from the flange on the left and right sides of the Optional Frame Assembly to remove the Tray 3 Feeder s6180mfp 339 ...

Страница 747: ...117 4 Remove the Tray 3 Front Right Cover page 8 121 5 Remove the Tray 3 OPF Right Cover page 8 122 6 Disconnect the Tray 3 Size Switch connector P J4211 7 Release the Clamp securing the Tray 3 Size Switch wiring harness 8 Remove 1 screw 8 mm securing the Tray 3 Size Switch to the Tray 3 Right Guide PL13 3 11 9 Release the tabs on the Tray 3 Size Switch from the holes of the Tray 3 Right Guide and...

Страница 748: ...8 130 Phaser 6180MFP Multifunction Printer Service Manual Service Parts Disassembly ...

Страница 749: ...9 Chapter Parts List In this chapter Serial Number Format Using the Parts List Print Engine Parts Options Xerox Supplies and Accessories Service Kits ...

Страница 750: ...nfiguration N or D 110V printer 1 Revision Level 30001 Serial Number for 6180MFP_N The nine digit serial number has the following format PPPRSSSSS PPP Three digit alphanumeric product code R Single digit numeric revision digit 0 9 To be rolled when a major product change occurs and initiated with a change request Product Code Product GNX 6180MFP 110 V Engine GPX 6180MFP V 220 V Engine Mass Product...

Страница 751: ...in parentheses The notation with X Y following a part name indicates an assembly that is made up of components X through Y For example 1 with 2 4 means part 1 consists of part 2 part 3 and part 4 An asterisk following a part name indicates the page contains a note about this part The notation NS next to a part indicates that particular part is not spared but contained in a kit or major assembly Th...

Страница 752: ...9 4 Phaser 6180MFP Multifunction Printer Service Manual Parts List Print Engine Parts Parts List 1 1 Covers 1 of 2 s6180mfp 218 9 10 5 3 4 8 11 12 12 1 2 6 7 Front ...

Страница 753: ...Description Part Number 1 Cover Assy Top with 2 848K08750 2 Cover Top Stopper 3 Cover Pole In Left 4 Cover Pole In Right 5 Cover Bottom 6 Cover Rear 848E06720 7 Cover CST 848E07990 8 Cover Pole Right 848E06700 9 Cover Right Assy 848E03080 10 Cover Left Assy 848E03070 11 Cover Pole Left 848E06690 12 Cap Screw ...

Страница 754: ...nual Parts List Parts List 1 2 Covers 2 of 2 s6180mfp 219 1 with 3 12 17 23 26 34 36 26 with 27 32 5 6 4 7 8 10 9 10 3 13 14 15 25 12 24 2 39 17 17 21 22 20 27 28 29 32 33 31 11 31 33 30 19 18 23 4 J272 P2720 J202 J53 J5301 P5301 P2721 34 36 37 38 Front ...

Страница 755: ...2 T43221 Harness Kit 604K44680 14 Harness Assy Drawer Earth T4321 T43210 15 Harness Assy Front Cover Earth 1 T4321 T43210 16 17 Pin Pivot PMT Pin Kit 675K47432 18 Shaft Lever 19 Plate Pivot 20 Lever MPT 1 21 Spring Lever MPT 22 Spring Lever Link 23 Lever MPT 2 24 Harness Assy A OP OPP J202 J5301 Harness Kit 604K44680 25 Harness Assy A OP ESS J53 P5301 Harness Kit 604K44680 26 Cover Assy MPT with 2...

Страница 756: ... Service Manual Parts List 39 Label Overlay French World Kit 650K29130 Label Overlay Spanish World Kit 650K29130 Label Overlay Brazilian Portuguese World Kit 650K29130 Parts List 1 2 Covers 2 of 2 continued ID No Name Description Part Number ...

Страница 757: ...inter Service Manual 9 9 Parts List Parts List 2 1 Tray 2 1 of 2 Front Ref PL2 2 1 1 with 2 28 PL2 2 1 2 with 3 12 24 24 with 25 28 4 5 8 9 9 10 11 12 12 13 13 14 15 16 17 17 18 19 20 21 22 23 25 26 6 7 27 28 s6180mfp 231 3 with 4 11 ...

Страница 758: ...ing Chute 6 Bearing Separator Left 7 Roll Assy Separator N 8 Bearing Separator Right 9 Spring Separator 200 10 Holder Separator MPT 11 Plate Assy Separator 12 Roll Pinch Turn 13 Spring Pinch Turn 14 Follower Left 15 Follower Right 16 Arm Left 17 Spring NF MPT 18 Arm Right 19 Housing Base FR 250 20 Plate Assy Bottom 21 Holder MPT Left 22 Cover Front MPT 23 Handle CST Tray Handle 24 Actuator Assy MP...

Страница 759: ...P Multifunction Printer Service Manual 9 11 Parts List Parts List 2 2 Tray 2 2 of 2 1 with 2 33 12 with 13 18 2 8 9 10 13 15 18 19 21 23 22 24 26 27 21 28 29 30 31 32 33 25 14 16 17 8 11 3 4 6 7 5 s6180mfp 232 Front ...

Страница 760: ...lder Assy Separator with 13 18 019K08510 13 Cover Retard CST Tray Retard Cover 14 Holder Separator 15 Shaft Separator 16 Clutch Friction Retard 17 Kit Roll Assy Feed Retard Periodic Replacement Part per 100K prints consists of 3 pcs and tech sheet 675K47671 18 Spring Separator 19 Switch Size Set 20 21 Plate Gear Lock 250 22 Guide Assy Tray End 250 23 Actuator Size 24 Housing Base RE 250 25 Actuato...

Страница 761: ...n Printer Service Manual 9 13 Parts List Parts List 3 1 Paper Feeder 1 of 2 Front Ref PL3 2 1 2 3 4 5 6 7 9 10 12 14 15 16 17 13 11 11 9 18 8 with 7 9 12 18 s6180mfp 233 J236 J275 P2751 J2751 MPT No Paper Sensor 19 20 J233 J235 1 ...

Страница 762: ...d MPT 5 Gear MPT 6 Bearing Earth 7 CAM MPT Right 8 Roll Assy MPT with 7 9 12 18 059K43961 9 Roll Core MPT 10 Kit Roll Assy Feed MPT with tech sheet 675K47380 11 Pin Dowel 12 Shaft MPT 13 Bearing 14 Chute MPT 15 Sensor Photo Tray 1 No Paper Sensor 930W00113 16 Cover Sensor 802E89292 17 Harness Assy MPT NPP J275 J2751 Harness Kit 604K44690 18 CAM MPT Left 19 Clutch Assy PH Regi 121K37160 20 Clutch A...

Страница 763: ...th 3 21 60 28 with 29 30 59 with 44 50 33 with 30 34 36 3 3 4 5 6 7 12 13 14 15 16 17 18 19 27 8 11 9 11 11 10 8 20 21 21 21 25 29 30 34 35 36 32 26 53 52 51 26 60 30 36 36 37 42 44 45 46 53 47 48 49 50 s6180mfp 399 Tray 2 No Paper Sensor Regi Sensor P2322 P2321 J2321 J2322 J232 J2411 P2411 J241 J2412 P2412 J234 56 57 55 54 58 J24 P241 ...

Страница 764: ...i Rubber 11 Bearing Regi 12 Chute Regi 13 Actuator A 14 Spring Regi Sensor A 15 Actuator B 16 Spring Regi Sensor B 17 Cover Actuator 18 Chute Separator BTM 19 Clamp Mini Saddle 20 Clamp 21 Bearing Regi E 22 23 24 25 Clutch Assy PH Turn 26 Bearing Nudger 27 Spring Earth 28 Chute Assy Regi Upper with 29 30 29 Chute Regi Upper 30 Sensor Photo Regi Sensor Tray No Paper Sensor 31 32 Roll Assy Turn 33 C...

Страница 765: ... A4 51 Clutch Oneway Nudger 52 Clutch Oneway Feed 53 Roll Assy Feed Periodic Replacement Part per 100K prints consist of 3 pcs and tech sheet 675K47670 54 PWBA OHP LED Not used on 6180MFP 55 Cover OHP Sensor 56 PWBA OHP Sensor Not used on 6180MFP 57 Harness Assy OHP Sensor J241 J2411 J2412 58 Harness Assy OHP J24 P241 59 Nudger Assy with 44 50 068K29482 60 Guide Film Parts List 3 2 Paper Feeder 2 ...

Страница 766: ...nter Service Manual Parts List Parts List 4 1 Transfer Unit Parts List 4 1 Transfer ID No Name Description Part Number 1 Kit Belt CRU Transfer Unit Periodic Replacement Part per 100K prints 675K47085 Front 1 s6180mfp 234 J2721 Ref PL1 2 3 ...

Страница 767: ...ultifunction Printer Service Manual 9 19 Parts List Parts List 5 1 Xerographics 1 of 2 16 15 s6180mfp 220 11 1 1 1 2 13 14 17 11 12 J12 18 19 20 Front 4 4 4 6 1 5 5 5 5 7 7 5 4 4 5 8 9 9 5 4 4 1 1 4 1 4 4 5 5 4 4 10 4 ...

Страница 768: ...rtridge K Periodic Replacement Part Metered Print 113R00734 18 Cartridge Assy Print Cartridge C Periodic Replacement Part per 6K prints 113R00723 Cartridge Assy Print Cartridge C Periodic Replacement Part per 2K prints 113R00719 Cartridge Assy Print Cartridge C Periodic Replacement Part Metered Print 113R00731 19 Cartridge Assy Print Cartridge M Periodic Replacement Part per 6K prints 113R00724 Ca...

Страница 769: ...List Parts List 5 2 Xerographics 2 of 2 Front 1 2 1 1 1 2 2 2 7 8 3 4 5 6 2 with 3 6 8 8 8 9 10 7 7 9 9 9 10 10 10 11 12 13 14 15 s6180mfp 409 P314 J183 J16 P161 P313 P312 P311 P193 K P194 C P192 M P191 Y CRUM Sensor Toner Cartridge Sensor J184 P141 J182 J181 16 16 ...

Страница 770: ...Connector CRUM 2 Sensor Assy CRU with 3 6 130K69871 3 Actuator Sensor CRU 4 Spring CRU 5 Bracket Sensor CRU 6 Sensor Photo Print Cartridge Sensor 7 Stopper Spring 8 Spring CRU Right 9 Spring CRU Left 10 Dispenser Assy 094K91880 11 Bias Assy 12 Spring ESA Roll 13 LED Assy 122K93900 14 Duct Harness Motor 15 HVPS 105K22441 16 Spacer ROS Shaft ...

Страница 771: ...on Printer Service Manual 9 23 Parts List Parts List 6 1 Fuser Exit Front 16 17 Ref PL1 2 9 2 2 3 3 3 4 5 6 3 2 2 7 8 9 10 11 12 13 14 8 1 with 2 9 16 17 15 s6180mfp 236 P171 J171 J47 J17 110V Black and White 230V Blue and Brown ...

Страница 772: ... 7 Eliminator Exit 1 8 Spring Chute Out 9 Chute Exit Out 20 10 Fuser Assy KMY 115V Periodic Replacement Part per 100K prints 675K47094 Fuser Assy KMY 230V Periodic Replacement Part per 100K prints 675K47105 11 Harness Assy Fuser AIO 100V P171 J17 J47 Harness Kit Black White 604K44690 Harness Assy Fuser AIO 200V P171 J17 J47 Harness Kit Blue Brown 604K44690 12 Bracket Fuser 13 Chute Dup Gate 675K53...

Страница 773: ...0MFP Multifunction Printer Service Manual 9 25 Parts List Parts List 7 1 Frame 1 2 3 8 6 7 12 13 14 14 15 18 17 20 22 24 23 14 14 8 7 1 19 with 20 22 99 with 4 6 8 12 13 98 with 2 8 s6180mfp 237 JP231 4 6 4 Front ...

Страница 774: ...older Damper H Kits 7 Damper Oil H Kits 8 Spring Support 9 10 11 12 Link Assy Right Kits 13 Link Right 14 Kit Foot Assy 4 pcs 675K35450 15 Clamp WS 2W V0 16 17 Guide Tray Right 250 18 Switch Assy Size 110K12820 19 Guide Tray Assy Left 250 with 20 22 20 Guide Tray Left 250 21 22 Spring Tray Lock 23 Duct Side Left 24 Stopper Frame Left 98 Kit Link Assy Left with 2 8 675K35434 99 Kit Link Assy Right ...

Страница 775: ...Phaser 6180MFP Multifunction Printer Service Manual 9 27 Parts List Parts List 8 1 Drive Front 1 2 7 8 s6180mfp 238 9 J2761 P211 P221 P222 P251 ...

Страница 776: ...P Multifunction Printer Service Manual Parts List Parts List 8 1 Drive ID No Name Description Part Number 1 Bracket Gear T1 2 Drive Assy Main 675K45142 3 4 5 6 7 Drive Assy PH 675K47390 8 Duct Drive PH 9 Duct Drive Main ...

Страница 777: ...r Service Manual 9 29 Parts List Parts List 9 1 Electrical 1 of 2 s6180mfp 221 4 with 5 6 27 7 with 8 12 20 with 21 13 with 11 12 15 17 19 28 29 1 with 2 26 5 6 27 2 2 26 3 6 8 8 9 10 11 12 22 23 12 12 12 17 18 28 29 19 21 15 11 21 Front ...

Страница 778: ...Window with 8 12 8 Hinge Assy Window 9 Plate Assy ESS Sub 10 Plate Window ESS 11 Washer 12 Screw Knurling 13 Box Assy PRT AIO with 11 12 15 17 19 28 29 14 15 Plate Asst PRT AIO 16 17 Plate Optional 18 Box ESS PRT 19 Clamp Saddle LES 1017 20 PWBA ESS with 21 960K31113 21 NVM ROM 22 512 MB DDR2 Memory Card 1x 512 MB Option 604K48400 256 MB DDR2 Memory Card 1x 256 MB Option 604K48180 23 Multi Protoco...

Страница 779: ...Phaser 6180MFP Multifunction Printer Service Manual 9 31 Parts List Parts List 9 2 Electrical 2 of 2 s6180mfp 222 3 4 2 1 2 5 6 7 8 9 10 11 12 13 14 15 17 16 P144 P261 J481 J48 J52 J503 J44 ...

Страница 780: ... Upper 8 Duct Lower 9 Plate Duct 10 Fan Main 127E84800 11 Sensor Humidity Temperature Sensor 130E87990 12 Bracket Sensor Humidity Sensor Temperature Sensor 13 PWBA MCU 960K36440 14 LVPS AIO 100V K 105K23100 LVPS AIO 200V K 105K23110 15 Power Cord 110V North American NEMA 5 15 125V 13A 117E35170 Power Cord Cable Assy UK 240V 117E29510 Power Cord Cable Assy EUR 240V 117E29500 16 Harness Assy Inlet A...

Страница 781: ...6180mfp 223 7 9 12 13 J31 J311 J312 J313 J314 J19 J194 J193 J192 J191 P273 J231 J251 J232 J274 J222 J221 P233 P234 P235 P275 J211 P272 P236 J22 J21 J25 J23 J27 J10 J101 J504 J5041 J40A J401 P276 5 P171 J47 J17 4 3 J15 J14 J502 14 J48 J11 T1000 J480 J111 T1001 J501 6 J18 P181 11 19 J40B J50 J141 15 16 17 18 J276 J26 J261 P2761 20 ...

Страница 782: ...J19 J191 J192 J193 J194 Harness Kit 604K44710 8 9 Harness Assy CRU AIO J31 J311 J312 J313 J314 Harness Kit 604K44710 10 11 Harness Assy ESS Power AIO J40 6N J401 6N Harness Kit 604K44710 12 Harness Assy Right Side AIO J21 J22 J23 J25 J27 J211 J221 J222 J231 J232 P233 P234 P235 P236 J251 P272 P273 J274 P275 P276 962K45460 13 Harness Assy IF AIO J10 J40A J504 J101 J111 J401 J5041 604K44710 14 Harnes...

Страница 783: ...er 6180MFP Multifunction Printer Service Manual 9 35 Parts List Parts List 11 1 Scanner Assembly s6180mfp 224 3 1 with 2 7 9 2 with 3 6 10 11 4 5 6 10 15 14 13 12 15 7 8 9 9 P65 P64 J61 J63 J60 J62 11 Front ...

Страница 784: ...Scanner Assy with 2 7 9 675K56481 2 ADF Assy with 3 6 10 11 3 ADF Feed Roller 4 ADF Feed Roller Holder 5 ADF Separator Pad 6 ADF Separator Spring 7 Scanner Assy 8 Plate Sub 9 Screw 10 Kit Tray Main 604K43720 11 Tray Extension 12 Core SFT 25SN 13 Core Assy FRC27 14 Core FRC27 12 1 3 15 Core Assy SC 18 16 Kit ADF Roll Pad with 3 4 5 6 604K44130 ...

Страница 785: ...rts List Options Parts List 12 1 Duplex Duplex Jam Sensor Front 1 with 2 7 9 20 22 26 2 3 4 2 5 5 6 9 10 12 13 14 14 15 16 17 18 19 11 7 5 6 7 6 7 22 26 23 5 6 7 5 6 7 5 6 7 20 20 s6180mp 239 P430 P427 J427 J430 P4301 J4301 P431 P428 J428 J2711 P429 P1 24 25 27 ...

Страница 786: ...hute Duplex 7 Bracket Holder Duplex 8 9 Actuator Duplex 10 Spring Sensor Duplex 11 Holder Sensor Duplex 12 Sensor Photo Duplex Jam Sensor 13 Harness Assy Duplex Sensor J430 J4301 14 Clamp Mini 15 PWBA Duplex 16 Cover PWBA Duplex 17 Cover Connect Duplex 18 Harness Assy Duplex Unit J428 J2711 19 Holder Connect Duplex 20 Spring Connect Duplex 21 22 Bracket Fan Duplex 23 Cover Harness Fan 24 Cover Har...

Страница 787: ...rinter Service Manual 9 39 Parts List Parts List 13 1 Optional 550 Sheet Feeder Tray 3 1 of 4 s6180mfp 225 Ref PL13 4 1 2 2 3 4 4 5 7 7 8 9 9 10 10 8 6 6 2 Ref PL13 2 2 1 with 2 10 PL13 2 13 4 11 with 2 12 PL13 2 8 12 with 5 8 Front ...

Страница 788: ... Feeder Tray 3 1 of 4 ID No Name Description Part Number 1 550 Sheet Feeder with 2 10 PL13 2 PL13 4 059K63430 2 Screw Joint 3 Block Safety 4 Screw BTR 5 Cabinet Assy 6 Caster 7 Caster S 8 Frame Base 9 Foot Assy FL RR 10 Foot Assy FR RL 11 Cabinet Assy with 2 12 PL13 2 8 12 Cabinet Assy AIO FDR with 5 8 ...

Страница 789: ...Phaser 6180MFP Multifunction Printer Service Manual 9 41 Parts List Parts List 13 2 Optional 550 Sheet Feeder Tray 3 2 of 4 9 Ref PL13 3 3 1 2 4 5 6 7 s6180mfp 2 J4201 J4213 Front 8 with 1 7 PL 13 3 10 ...

Страница 790: ... of 4 ID No Name Description Part Number 1 Cover Front Left 2 Cover OPF Left 3 Cover CST 550 4 Clutch Assy Turn Opt 5 Clutch Assy Feed Opt 6 Cover OPF Right 7 Cover Front Right 8 Feeder Assy Opt Cabinet with 1 7 PL13 3 9 Feeder Assy Option 059K48273 10 Roll Assy Feed Periodic Replacement Part per 100K prints 675K47670 ...

Страница 791: ... Parts List 13 3 Optional 550 Sheet Feeder Tray 3 3 of 4 1 3 5 6 7 8 11 10 a a 9 18 17 13 15 15 15 15 16 12 with 13 17 s6180mfp 227 J421 P421 P423 P419 P1 P420 P422 J420 J422 J273 J419 J4222 P4222 P4221 J4221 J4211 P4211 P4213 P4212 P4202 P4201 Front 19 with 1 11 12 16 ...

Страница 792: ... Feeder Unit J273 J419 4 5 Switch Assy Size Opt 6 PWBA Opt Feeder 7 Harness Assy C2 Chute J421 J4211 P4212 P4213 8 Harness Assy C2 Turn J420 J4201 P4202 9 Harness Assy C2 Motor J422 J4221 J4222 10 Drive Assy Opt Feeder 11 Guide Tray Right 550 12 Guide Assy 550 Left with 13 17 13 Guide Tray Left 550 14 15 Foot 16 Clamp Mini 17 Spring CST Lock 18 Clamp Locking 19 Frame Assy Opt with 1 11 12 16 ...

Страница 793: ...Phaser 6180MFP Multifunction Printer Service Manual 9 45 Parts List Parts List 13 4 Optional 550 Sheet Feeder Tray 3 4 of 4 2 with 3 4 3 4 s6180mfp 229 Front 1 with 2 5 with 6 11 6 8 11 7 9 10 ...

Страница 794: ...with 2 050K57923 2 Cassette Assy Front 550 Opt with 3 4 Tray 3 Front Assy 3 Housing Base FR 550 Tray 3 Housing Base 4 Handle CST 550 Opt Tray 3 Handle 5 Holder Assy Separator with 6 11 6 CVR RTD CST Tray 3 Retard Cover 7 Holder Separator 8 Shaft Separator 9 Clutch Friction RET Clutch Friction Retard 10 Roller Assy Retard Periodic Replacement Part per 100K prints 657K47670 11 Spring Separator ...

Страница 795: ...artridge K Metered Print 113R00734 PL5 1 18 Print Cartridge C High Capacity 6K 113R00723 Print Cartridge C Standard Capacity 2K 113R00719 Print Cartridge C Metered Print 113R00731 PL5 1 19 Print Cartridge M High Capacity 6K 113R00724 Print Cartridge M Standard Capacity 2K 113R00720 Print Cartridge M Metered Print 113R00732 PL5 1 20 Print Cartridge Y High Capacity 6K 113R00725 Print Cartridge Y Sta...

Страница 796: ...cription Part Number Power Cord North America NEMA 5 15 125 V 13A 117E35170 Power Cord Cable Assy UK 240 V 117E29510 Power Cord Cable Assy EUR 240 V 117E29500 Pin Kit Parts List Reference Description Part Number 99 99 95 Kit Pin BKY 675K47432 Hardware Kit Parts List Reference Description Part Number 99 99 99 Hardware Kit 604K34030 Screw Bind Head Del 1 Screw 8 mm Plastic 1 Screw Tap Bind Head 1 Sc...

Страница 797: ...45330 PL10 1 5 Harness Assy Fuser AIO 100V P171 J17 J47 962K45320 PL10 1 5 Harness Assy Fuser AIO 200V P171 J17 J47 962K45270 PL10 1 16 Harness Assy Exit CLT J276 J2761 962K39600 99 99 98 Kit Harness Power Switch 604K44710 PL9 2 4 Power Switch 110K11570 PL9 2 16 Harness Assy Inlet AIO 100 V J48 J481 962K45350 PL9 2 16 Harness Assy Inlet AIO 220 V J48 J481 962K46460 PL10 1 6 Harness Toner Motor AIO...

Страница 798: ...9 50 Phaser 6180MFP Multifunction Printer Service Manual Parts List ...

Страница 799: ... Diagrams and Designators Plug Jack Locators Notations Used in the Wiring Diagrams Print Engine Wiring Diagrams Optional 550 Sheet Feeder Wiring Diagram Duplex Wiring Diagram Fax Controller Wiring Diagram Scanner Wiring Diagram Automatic Document Feeder Wiring Diagram ...

Страница 800: ...ector designator in the first column of the table 2 With this information go to the map listed in the second column 3 Use the coordinates to locate the connection indicated on the map with its P J designation number Print Engine Plug Jack Designators Print Engine Plug Jack Designators P J Map Coordinates Remarks 3 3 E 138 Connects the Image Processor Board and Multi Protocol Network Card 10 4 I157...

Страница 801: ...I 144 Connects the Scanner Controller Board and A OP Controller Harness 56 3 I 143 Connects the Scanner Controller Board and Fax Board 60 3 J 143 Connects the Scanner Controller Board and ADF Scanner Assembly Empty Sensor PCB Sensor 61 3 J 143 Connects the Scanner Controller Board and ADF Scanner Assembly ADF Open Sensor 62 3 J 143 Connects the Scanner Controller Board and ADF Scanner Assembly ADF...

Страница 802: ...2 G 124 Connects the Print Cartridge Sensor C and Toner Sensor Harness 202 1 F 108 Connects the Control Panel and A OP OPP Harness 211 1 G 109 Connects the Main Drive Main Motor and Right Side AIO Harness 221 1 G 110 Connects the Main Drive Sub Motor and Right Side AIO Harness 222 1 G111 Connects the Main Drive Developer Motor and Right Side AIO Harness 231 2 H 127 Connects the Size Switch Assembl...

Страница 803: ... Connects the Image Processor Board and AIO I F Harness 480 3 D 139 Connects the Image Processor Board and AIO Controller Harness 481 4 E 151 Connects the Power Switch and AIO Inlet Harness 501 4 G 153 Connects the LVPS and AIO LVPS Harness 502 4 F 153 Connects the LVPS and AIO 24V Harness 503 4 G 153 Connects the LVPS and Fan 504 4 G 153 Connects the LVPS and AIO I F Harness 2321 2 D 126 Connects...

Страница 804: ...onnected used in Production process only 5301 1 H 111 Connects the A OP OPP Harness and A OP ESS Harness 27212 1 D 108 Connects the ADC Sensor and Transfer Unit Harness 27213 1 D 108 Connects the ADC Solenoid and Transfer Unit Harness Print Engine Plug Jack Designators continued P J Map Coordinates Remarks ...

Страница 805: ...H 183 Connects the Optional 550 Sheet Feeder Feeder Unit Harness and printer 419 6 G 180 Connects the Optional Feeder Board and Feeder Unit Harness 420 6 G 180 Connects the Optional Feeder Board and Tray 3 Turn Harness 421 6 G 179 Connects the Optional Feeder Board and Tray 3 Chute Harness 422 6 G 179 Connects the Optional Feeder Board and Tray 3 Motor Harness 4201 6 H 185 Connects the Turn Clutch...

Страница 806: ...10 8 Phaser 6180MFP Multifunction Printer Service Manual Plug Jack and Wiring Diagrams 423 4202 6 G 180 H 185 Not connected Optional Feeder Plug Jack Designators continued P J Map Coordinates Remarks ...

Страница 807: ... through 6 indicate the location of key connections within the printer Connections are referenced by their P J designation 1 Map 1 Electrical and Drive 2 Map 2 Laser Unit and Feeder 3 Map 3 Image Processor Board and Dispenser Motors 4 Map 4 LVPS and MCU Board 5 Map 5 Duplex Unit 6 Map 6 Optional 550 Sheet Feeder ...

Страница 808: ...Service Manual Plug Jack and Wiring Diagrams Map 1 Electrical and Drive A 102 103 104 105 106 107 108 109 110 111 112 113 114 115 101 B C D E F G H I J K L s6180mfp 402 211 2761 171 2721 27213 27212 144 2751 202 5301 236 251 272 222 275 221 276 ...

Страница 809: ...nual 10 11 Plug Jack and Wiring Diagrams Map 2 Laser Unit and Feeder A 117 118 119 120 121 122 123 124 125 126 127 128 129 130 116 B C D E F G H I J K L s6180mfp 403 193 121 194 235 233 234 192 191 232 231 314 313 312 311 273 2322 2412 2411 2321 241 ...

Страница 810: ...l Plug Jack and Wiring Diagrams Map 3 Image Processor Board and Dispenser Motors A 132 133 134 135 136 137 138 139 140 141 142 143 144 145 131 B C D E F G H I J K L s6180mfp 404 161 184 183 141 182 181 50 56 63 62 61 60 53 48 52 401 101 3 111 5041 480 64 65 ...

Страница 811: ...Wiring Diagrams Map 4 LVPS and MCU Board A 147 148 149 150 151 152 153 154 155 156 157 158 159 160 146 B C D E F G H I J K L s6180mfp 405 503 501 504 44 47 48 502 144 40a 40b 481 261 CN1 12 16 17 27 26 24 31 14 11 10 19 15 18 22 21 25 23 101 The CN1 is printed on the board ...

Страница 812: ...0MFP Multifunction Printer Service Manual Plug Jack and Wiring Diagrams Map 5 Duplex Unit A 162 163 164 165 166 167 168 169 170 171 172 173 174 175 161 B C D E F G H I J K L s6180mfp 406 1 427 430 431 428 4301 2720 429 ...

Страница 813: ...ck and Wiring Diagrams Map 6 Optional 550 Sheet Feeder 273 4212 4213 4202 4201 42121 422 421 419 423 420 1 4211 4222 CN2 4221 CN1 The CN1 and CN2 are printed on the board A 177 178 179 180 181 182 183 184 185 186 187 188 189 190 176 B C D E F G H I J K L s6180mfp 407 ...

Страница 814: ... Denotes a Plug Denotes a Jack Denotes Pin yy and Jack yy of the connector Pxx and Jxx Denotes a Jumper Point JPxxx xxx Each end of the Jumper connection has a numeric designation Denotes the parts PL X Y Z implies the item Z of plate PL X Y in Parts List Denotes functional parts attached with functional parts name Plug Jack P Jxx YY Plug and Jack JPxxx Jumper Fuser PL X Y Z Subassembly 1 Heater S...

Страница 815: ...n voltage is for signal in high status The arrow indicates the direction of signal Denotes the function and logic value of the signal when the function is operated Low L High H The given voltage is for signal in high status The arrow indicates the direction of signal Denotes a connection between wires Denotes a Clutch or Solenoid Denotes a Motor Symbol Description Control Subassembly 3 DEVE_A Conn...

Страница 816: ...le throw switch Denotes an On Off Switch Temperature normally close Denotes an NPN Photo transistor Represents an interconnection between parts using wiring harness or wire Represents an interconnection which differs according to the specifications Symbol Description Optic Sensor LED Safety Interlock Switch On Off Switch Temperature Switch NPN Phototransistor Interconnection Interconnection Differ...

Страница 817: ...rconnection between parts using a conductive part such as a Plate Spring I L 24 VDC Denotes DC voltage when the Interlock Switch in the MCU Board turns On 5 VDC 3 3 VDC Denotes DC voltage SG Denotes signal ground AG Denotes analog ground RTN Denotes return Symbol Description Interconnection Conductive Part ...

Страница 818: ...rd Connections of the OHP Temperature Sensor with MCU Board Connections of the OHP LED with MCU Board Connections of the Tray 1 MPT No Paper Sensor with MCU Board Drive Connections of the Main Drive Assembly with MCU Board Feeder Connections of the No Paper Sensor with MCU Board Connections of the Size Switch Assembly with MCU Board Connections of the Feed Clutch with MCU Board Connections of the ...

Страница 819: ... Board Connections of the Fuser with LVPS Connections of the MCU Board with LVPS Controller Connections of the Image Processor Board with MCU Board Connections of the Control Panel with Image Processor Board Connections of the Speaker Assembly with Scanner Controller Board Optional 550 Sheet Feeder Connections of the Optional Feeder Board with MCU Board Connections of the Optional Turn Clutch with...

Страница 820: ...roller Board Imaging Connections of the Scanner Motor with Scanner Controller Board Connections of the CCD Board with Scanner Controller Board ADF Connections of the ADF Open Sensor with Scanner Controller Board Connections of the Empty Sensor with Scanner Controller Board Connections of the Sensor Board with Scanner Controller Board Connections of the ADF Motor with Scanner Controller Board Wirin...

Страница 821: ...NECTOR 0 0 25 ONNECTOR 0 0 25 ONNECTOR 0 0 25 ONNECTOR 9 0 0 0 25 3ENSOR 9 0 0 0 25 3ENSOR 0 0 25 3ENSOR 0 0 25 3ENSOR 0 0 ISPENSER 9 0 0 0 ISPENSER 0 0 ISPENSER 0 0 ISPENSER 0 0 EEDER LUTCH 0 0 4URN LUTCH 0 0 4RAY O 0APER 3ENSOR 0 0 3IZE 3WITCH 0 0 PTIONAL EEDER OARD 0 0 0 0 4URN LUTCH PTIONAL 0 0 0 0 0 EEDER RIVE PTIONAL 0 0 EEDER LUTCH PTIONAL 0 0 0 0 3IZE 3WITCH PTIONAL 0 0 4RAY O 0APER 3ENSOR...

Страница 822: ...wer Supply 5 OARD 0 3CANNER ONTROLLER OARD 0 0OWER ONTROL AN ONTROL 0 6 0 0 54 AIN AN 0 6 2 3 6 0 0 6 6 0 3 NTERLOCK ARNESS 0 3 6 6 3 6 490 0 3 0 3 0 6 34 0 7 2 NLET ARNESS 0 0 0 S MFP 0OWER 3WITCH 0 6 ARNESS 0 NTERLOCK 6 0 603 0 603 ARNESS 0 0 0 6 6 6 6 6 3 6 3 6 6 3 33 0OWER ARNESS 0 6 6 6 6 ...

Страница 823: ... power supply voltage 3 3 VDC 5 VDC or 24 VDC exceeds the specified voltage respectively At this time the operating point is 36 VDC or less for 24 VDC 7 VDC or less for 5 VDC or 7 VDC or less for 3 3 VDC The circuit is reset when the power is turned Off and then On again after certain time Sleep Mode and Deep Sleep Mode The output of the following power supply are stopped according to the signals ...

Страница 824: ... ARNESS 0 2EGISTRATION 3ENSOR ARNESS 0 0 0 2 049 3 3 6 3 0 0 RIVE SSEMBLY 0 0 05 50 6 4RAY 04 O 0APER 3ENSOR 0 3 3 42 9 4 8 886 42 9 4 42 9 4 2 0 0 2 3 3 6 3 0 05 50 6 2EGISTRATION 0HOTO 3ENSOR 0 0 6 2 6 0 2EGISTRATION LUTCH 0 6 6 6 6 3 6 0 4RAY 04 EED 3OLENOID 0 S MFP NTERLOCK 6 NTERLOCK 6 6 6 6 0 ARNESS 0 0 3ENSOR ARNESS 0 OT 5SED N MFP 0 05 50 6 0 0 OARD 0 0 0 0 3 3 6 0 0 3ENSOR OARD 0 3 6 4 0 ...

Страница 825: ...y the Photo Sensor Registration Sensor REGI CL ON L 24 VDC On Off signal of the Registration Clutch FEED SOL ON L 24VDC On Off signal of the Tray 1 MPT Feed Solenoid OHP LED On Off signal of the OHP LED Board not used on 6180MFP OHP SENSED L 3 3 VDC Detects signal of the transparency sheet by the Photo Sensor OHP Sensor not used on 6180MFP TEMP Detects temperature data inside the printer TRAY2 MOT...

Страница 826: ...RD 0 AIN RIVE 0 0 0 0 3UB OTOR 6 3 6 3 35 4 35 4 2 35 4 35 4 35 4 2 3 0 0 AIN OTOR 6 3 6 3 4 4 2 4 4 4 7 7 3 0 EVELOPER OTOR 6 3 6 3 6 4 6 4 2 6 4 6 4 6 4 2 S MFP 2IGHT 3IDE ARNESS 0 XIT LUTCH ARNESS 0 2IGHT 3IDE ARNESS 0 2IGHT 3IDE ARNESS 0 6 8 4 6 0 0 XIT LUTCH NTERLOCK 6 NTERLOCK 6 NTERLOCK 6 NTERLOCK 6 ...

Страница 827: ...signal of the Main Motor MAIN MOT ALARM MAIN MOT CLK MAIN MOT LO MAIN MOT CW CCW SUB MOT ON Drives control signal of the Sub Motor SUB MOT ALARM SUB MOT CLK SUB MOT LO SUB MOT BRAKE DEVE MOT ON Drives control signal of the Developer Motor DEVE MOT ALARM DEVE MOT CLK DEVE MOT LO DEVE MOT BRAKE EXIT CL ON L 24 VDC On Off signal of the Exit Clutch ...

Страница 828: ...L 3 3 VDC PAPER EMPTY SENSED L 3 3 VDC Detects signal of the Feeder by the Photo Sensor No Paper Sensor TURN CL ON L 24 VDC On Off signal of the Turn Clutch FEED CL ON L 24 VDC On Off signal of the Feed Clutch 5 OARD 0 6 452 6 2IGHT 3IDE ARNESS 0 2EGISTRATION 3ENSOR ARNESS 0 0 4URN LUTCH 0 EED LUTCH 0 0 05 50 6 3 0 0 2 049 3 3 6 4RAY O 0APER 0HOTO 3ENSOR 0 0 6 6 0 0 0 0 0 2 3 37 6 0 0 2 3 37 6 0 0...

Страница 829: ...e On Off statuses of the SW 1 SW 2 and SW 3 switches of the Size Switch Note The Actuator is pushing the Size Switch Paper Size Switches SW 1 SW 2 SW 3 Letter SEF Off Off On A4 SEF Off On On A5 Off On Off B5 SEF On Off Off Legal 13 SEF On On Off Legal 14 SEF On On On Executive SEF On Off On No Tray Off Off Off Switch 1 Switch 2 Switch 3 Size Switch s6180mfp 062 ...

Страница 830: ...ifunction Printer Service Manual Plug Jack and Wiring Diagrams Laser Unit 5 OARD 0 0 0 3 2 4 3 6 3 3 3 2 4 6 3 6 2 6 2 6 2 6 2 9 3 3 2 4 3 6 6 3 3 3 ASER 5NIT 0 ASER 5NIT OTOR ASER 5NIT OARD S MFP 4 4 4 4 9 NTERLOCK 6 4 4 4 4 9 ...

Страница 831: ... Drives control signal of the Laser Unit Motor ROS MOT CLK SOS Detects reference signal for scan start of the Laser Unit V REF K Emits control signal of the Laser Diode V REF C V REF M V REF Y MONIT K Monitors voltage of the Laser Diode MONIT C MONIT M MONIT Y DATA K Provides video signal of the Laser Diode DATA C DATA M DATA Y ...

Страница 832: ...0 0 RONT OVER ARNESS 0 UMIDITY 4EMPERATURE ARNESS 0 ELT ARNESS 4RANSFER 5NIT 0 0 0 3 6 3 6 3 6 6 6 3 3 2 2 6 3 6 3 0 3OLENOID 02 ELT 0 3 6 5 4 0 0 IS PRINTED ON THE BOARD 02 OARD 802 0 UMIDITY 4EMPERATURE 3ENSOR 0 4OP 6 ARNESS 0 2 3 9 6 2 3 6 6 0 0 0 0 3ENSOR S MFP NTERLOCK 6 6 6 6 6 2IGHT 3IDE ARNESS 0 4 4 4 ...

Страница 833: ...sured by the ADC Sensor Analog value LED REM Provides remote signal of the LED of the ADC Sensor ADC V MONI Controls signal of the ADC Sensor DATA Controls signal of the EEPROM Board CLOCK TEMP Provides temperature data in the printer by the Humidity Temperature Sensor Analog value HUMI Provides Humidity Temperature data in the printer by the Humidity Temperature Sensor Analog value ERASE K ON L 3...

Страница 834: ...ice Manual Plug Jack and Wiring Diagrams High Voltage 5 OARD 0 0 603 0 0 0 0 0 0 42 42 42 42 3 2 42 42 IAS 4RANSFER 2OLL 2 IAS HARGE 2OLL 3 LECTRIC 3TATIC TTACHMENT 3 EVELOPER 42 2 6 3 6 3 6 S MFP 9 NTERLOCK 6 6 6 2 7 4 7 4 7HITE 3OLDERED ONNECTOR 4 ...

Страница 835: ...Phaser 6180MFP Multifunction Printer Service Manual 10 37 Plug Jack and Wiring Diagrams Signal Line Name Description TR MON Controls signal of the HVPS CF MON COLOR DATA CLK ...

Страница 836: ...30 3 4 8 30 3 4 8 6 6 30 3 4 30 3 4 30 3 4 8 30 3 4 8 0 0 0 4OP 6 ARNESS 0 4ONER 3ENSOR ARNESS 0 25 ARNESS 0 0 0RINT ARTRIDGE 9 3ENSOR 0 0RINT ARTRIDGE 3ENSOR 0 0RINT ARTRIDGE 3ENSOR 0 0RINT ARTRIDGE 3ENSOR 0 0 05 50 6 3 242 9 3 3 6 05 50 6 3 242 3 3 6 05 50 6 3 242 3 3 6 05 50 6 3 242 3 3 6 0 0 0 0 25 9 ONNECTOR 0 25 ONNECTOR 0 25 ONNECTOR 0 25 ONNECTOR 0 0 S MFP 0 0 0 NTERLOCK 6 NTERLOCK 6 NTERL...

Страница 837: ...E MOT XB K DISPENSE MOT A Drives control signal of the Dispenser Motor K K DISPENSE MOT B K DISPENSE MOT XA K DISPENSE MOT XB CARTRIDGE Y SENSED L 3 3 VDC Detects signal of the Print Cartridge Y Sensor CARTRIDGE M SENSED L 3 3 VDC Detects signal of the Print Cartridge M Sensor CARTRIDGE K SENSED L 3 3 VDC Detects signal of the Print Cartridge K Sensor CARTRIDGE C SENSED L 3 3 VDC Detects signal of...

Страница 838: ...er 5 OARD 0 0 0 3 3 6 4 343 6 6 3 53 2 8 4 3 3 6 USER ARNESS 0 ARNESS 0 3 05 50 6 USER 0 AMP ONTROL S MFP 4HERMOSTAT EATER ON ONTACT 3ENSOR 3 0 0 0 0 0 0 0 0 0 0 3OFT 4OUCH 3ENSOR 343 02 USER 0 XIT 3ENSOR 6 3PEC 4 0 0 53 2 6 6 5SED IN PRODUCTION PROCESS ONLY 0 X 4 603 0 4 2 9 4 34 7 2 9 4 34 ...

Страница 839: ... Humidity Temperature Sensor for detecting high temperature Analog value VC Provides temperature data measured by the Humidity Temperature Sensor for controlling the temperature Analog value VD FUSER EXIT SENSED L 3 3 VDC Detects signal of the Fuser Exit by the Photo Sensor Exit Sensor FUSER ON Displays lighting signal of the Fuser Lamp RELAY TEST LOW Tests signal of the LVPS used in production pr...

Страница 840: ...rinter Service Manual Plug Jack and Wiring Diagrams Controller 0 OARD 0 0 0 0 4 34 02 4 ARNESS 0 6IDEO ARNESS 0 ARNESS 0 3 6 0 3 0 3 343 2 9 32 9 3 639 639 639 639 9 3 39 3 0 5 OARD 0 603 0 S MFP 0 0 3 3 3 3 6 3 6 3 6 6 6 6 6 6 4 4 4 4 9 ...

Страница 841: ...rocessor Board to the MCU Board CREADY Detects signal for indicating wether or not the printer is ready for receiving command signal SREADY VSYNC K Detects signal for indicating registration position of each of images Y M C and K VSYNC C VSYNC M VSYNC Y HSYNC Detects signal for data DATA K Provides video data of four colors DATA C DATA M DATA Y 3CANNER ONTROLLER OARD 0 0 0 ONTROL 0ANEL ARNESS 0 0 ...

Страница 842: ...anual Plug Jack and Wiring Diagrams DATA Controls signal of the Control Panel CLK BACK LIGHT BL 5 VDC SPK Controls signal of the Speaker TXD Controls signal of the Control Panel RXD UI Reset Resets signal of the Control Panel Signal Line Name Description ...

Страница 843: ...TIONAL EEDER OARD 0 4RAY 4URN ARNESS 0 4RAY OTOR ARNESS 0 4RAY HUTE ARNESS 0 0 0 0 PTIONAL EEDER RIVE 0 0 05 50 6 3 0 0 2 049 3 3 6 0 0 0 2 3 37 6 0 0 2 3 37 6 0 0 2 3 37 6 3 4 4 2 4 4 7 3 6 PTIONAL 3IZE 3WITCH 0 0 6 452 6 0 0 4URN LUTCH 0 EED LUTCH 0 6 6 0 S MFP NTERLOCK 6 NTERLOCK 6 NTERLOCK 6 NTERLOCK 6 6 NTERLOCK 6 6 6 4HE AND ARE PRINTED ON THE BOARD 4RAY O 0APER 0HOTO 3ENSOR 42 9 3 ...

Страница 844: ...l of the Optional Turn Clutch FEED CL ON L 24 VDC On Off signal of the Feed Clutch PAPER EMTY SENSED L 3 3 VDC Detects signal of the Feeder by the Photo Sensor Tray 3 No Paper Sensor PAPER SIZE SW 1 ON L 3 3 VDC On Off signal of the Optional Size Switch Assembly PAPER SIZE SW 2 ON L 3 3 VDC PAPER SIZE SW 3 ON L 3 3 VDC FEED MOT ON Drives control signal of the Feed Motor FEED MOT ALARM FEED MOT CLK...

Страница 845: ...the On Off statuses of the SW 1 SW 2 and SW 3 switches of Optional Size Switch Note The Actuator is pushing the Size Switch Paper Size Switches SW 1 SW 2 SW 3 Letter SEF Off Off On A4 SEF Off On On A5 Off On Off B5 SEF On Off Off Legal 13 SEF On On Off Legal 14 SEF On On On Executive SEF On Off On No Tray Off Off Off Switch 1 Switch 2 Switch 3 Size Switch s6180mfp 062 ...

Страница 846: ...rols signal of the Duplex Board Rxd 5 OARD 0 0 0 0 RONT OVER ARNESS 0 2IGHT 3IDE ARNESS 0 UPLEX 5NIT ARNESS 0 4XD 2XD 6 3 6 6 3 3 0 0 UPLEX OARD 0 UPLEX 3ENSOR ARNESS 0 0 UPLEX OTOR 0 05 50 6 3 50 3 3 6 UPLEX AM 0HOTO 3ENSOR 0 6 50 4 50 4 8 50 4 50 4 8 0 6 50 6 UPLEX LUTCH S MFP NTERLOCK 6 6 NTERLOCK 6 NTERLOCK 6 NTERLOCK 6 6 6 6 2 3 0 UPLEX AN 0 ...

Страница 847: ...es control signal of the Duplex Motor DUP MOT B DUP MOT XA DUP MOT XB DUP IN SENSED L 3 3 VDC Detects signal of the Duplex by the Photo Sensor Duplex Jam Sensor DUP CL ON L 24 VDC On Off signal of the Duplex Clutch FAN 24 VDC Drives control signal of the Duplex Fan FAN ALARM Signal Line Name Description ...

Страница 848: ...nd Wiring Diagrams Fax Controller Wiring Diagram Signal Line Name Description DATA Controls signal of the Image Processor Board DATA VBUS 0 OARD 0 AX OARD 0 0 ONTROLLER ARNESS 0 FROM 4ELEPHONE INE TO 4ELEPHONE 3 4 4 3 3 6 53 0 0 3CANNER ONTROLLER OARD 0 S MFP 6 6 6 6 6 6 ...

Страница 849: ...ual 10 51 Plug Jack and Wiring Diagrams Scanner Wiring Diagram 3CANNER 0 3 3 3 3 0 0 0 OME 0OSITION 3ENSOR AMP AMP NVERTER 3CANNER OTOR AMP 3CANNER ONTROLLER OARD 0 S MFP 3 3 3 3 3 3 3 3 3 4 3 3 3 6 6 6 3 6 3 6 3 6 3 6 3 234 3 4 3 0 3 3 6 6 6 6 6 6 6 ...

Страница 850: ...Scanner Motor SCN A SCN B SCN B ADCLK Controls signal of the CCD Board ADCLK TG ID8 Controls image date of the document by the CCD ID8 ID7 ID7 ID6 ID6 ID5 ID5 ID4 ID4 INV Controls signal of the Lamp Inverter AFE RST Controls signal of the CCD Board AFEDATA AFECLK AFE CS HP SENSED H 5 VDC Detects Home Position signal of the Carriage by the Photo Sensor ...

Страница 851: ...lug Jack and Wiring Diagrams Automatic Document Feeder Wiring Diagram 3CANNER 0 0 6 6 3 3 2 3 3 6 6 3 0 3 3 6 2 3 3 6 6 2 0 3 3 6 049 3 3 6 0 0 6 0 2EGI 3ENSOR 2EAD 3ENSOR OVER PEN 3ENSOR MPTY 3ENSOR 3ENSOR OARD OTOR S MFP PEN 3ENSOR 6 3CANNER ONTROLLER OARD 0 ...

Страница 852: ...ADF B REGI SENSED H 5 VDC Detects signal of the Regi part by the Photo Sensor READ SENSED H 5 VDC Detects signal of the Read part by the Photo Sensor COVER OPEN SENSED H 5 VDC Detects signal of the ADF Cover by the Photo Sensor EMPTY SENSED H 5 VDC Provides Document empty signal of the ADF Tray by the Photo Sensor ADF OPEN SENSED H 5 VDC ADF opens signal by the Photo Sensor ...

Страница 853: ...A Appendix Reference Contents Phaser 6180MFP Menu Map Firmware Update Chain Link for Fax Parameter Setting Acronyms and Abbreviations ...

Страница 854: ...Auto Answer TEL FAX Auto Answer Ans FAX Line Monitor Ring Tone Volume Line Type Dialing Type Junk Fax Filter Remote Receive Remote Receive Tone Duplex Print Send Header Company Name Your Fax Number Device Name DRPD Pattern Forward Setting Forward Settings Number Forward Set Print Prefix Dial Prefix Dial Number Discard Size Color Fax Extel Hook Threshhold Country Forward Error Print Ethernet TCP IP...

Страница 855: ... window with connection options is displayed Three connections are available for updating the Control Panel Bit Map Display a For Network connection Select Network and click the Next button If your printer s IP address is available select the appropriate box Click the Next button If your printer s IP address is not listed click the Add button Enter your printer s IP address and click the OK button...

Страница 856: ... xeroxfwup window verify that The firmware update has been sent message is displayed and Sent is displayed under the Status column Click the Next button Click the OK button For Parallel connection In the xeroxfwup window verify that The firmware update has been sent message is displayed Click the Next button Click the OK button 8 Verify the Control Panel Firmware Version information a Turn the pri...

Страница 857: ...thod USB or Parallel and click the Next button 12 The xeroxfwup window with the module number is displayed For USB connection Select the box with the printer to be updated and click the Next button For Parallel connection The xeroxfwup window with Module Name is displayed Click the Next button 13 On the printer s Control Panel the Loading Data Please wait Erasing Flash Please wait messages are dis...

Страница 858: ...d from Receiving data Port 9100 AIOC Receiving data Port 9100 F W Please wait Port 9100 F W Writing Port 9100 AIOC Writing Port 9100 F W as the printer starts updating the firmware b For USB connection Select USB and click the Next button The xeroxfwup window with the printer serial number is displayed Select the box with your listed printer Click the Next button On the printer s Control Panel mes...

Страница 859: ...k the Next button Click the OK button For USB connection In the xeroxfwup window verify that The firmware update has been sent message is displayed and Sent is displayed under the Status column Click the Next button Click the OK button For Parallel connection In the xeroxfwup window verify that The firmware update has been sent message is displayed Click the Next button Click the OK button 8 Print...

Страница 860: ... On the printer s Control Panel messages are displayed from Receiving data Port 9100 NIC Checking Port 9100 NIC Writing Port 9100 NIC as the printer starts updating the firmware b For USB or Parallel connection The xeroxfwup window with the module number is displayed Click the Next button On the printer s Control Panel messages are displayed from Receiving data Parallel USB Checking Parallel USB W...

Страница 861: ...threshold for stopping disabling transmission storage 0 to 100 0 821 206 THRESH COLOR FAX RX Remaining memory threshold for disabling fax reception color enabled 0 0 5MB 1 1 0MB 2 1 5MB 0 821 207 THRESH GC START Remaining memory threshold for starting garbage collection 0 to 99 50 821 401 PAGE MARGIN Page margin with reduction OFF 0 to 127mm 20 821 406 COLOR RX PAGE LIMIT Maximum color data size p...

Страница 862: ...LTONE ONOFFPT MIN Minimum dial tone ON OFF duration 8 to 255 10ms 1 step 10 825 112 DIALTONE ONOFFPTN MAX Maximum dial tone ON OFF duration 8 to 255 10ms 1 step 100 825 605 CNG STOP SELECT Select CNG stop criterion 0 CED and V 21 1 CED 2 V 21 0 825 622 G3M TX MODEM SPEED Outbound transfer mode rate 0 Fallback partner 1 Fallback V27ter 2 V27ter 2400 4800bps 3 V29 7200 9600bps 4 V33 12000 14400bps 5...

Страница 863: ...00bps 2 4800bps 3 7200bps 4 9600bps 5 12000bps 6 14400bps 7 16800bps 8 13200bps 9 21600bps 10 24000bps 11 26400bps 12 28800bps 13 31200bps 14 33600bps 14 825 658 CAPAB V34 V34 capability 0 Disable 1 Enable 1 825 661 G3M TX CODING Outbound signal encoding method 0 MH 1 MR 2 MMR 3 JBIG 3 825 662 G3M RX CODING Inbound signal encoding method 0 MH 1 MR 2 MMR 3 JBIG 3 825 674 G3M BAUDRATE FIXATION Fix b...

Страница 864: ...Attachments AD Analog to Digital signal conversion ADC Automatic Density Control ADF Automatic Document Feeder ADSL Asymmetric Digital Subscriber Line AGC Automatic Gain Control AIO All In One AMPV Average Monthly Print Volume AOC Auto Offset Control Automatic Offset Control APC Auto Power Control ASSY Assembly ATM Adobe Type Manager BCR Bias Charge Roller BOOTP Boot Parameter Protocol BSD Block S...

Страница 865: ...ect Current is type of power for printer components Machine converts AC power from power source to DC power DCN Disconnect DCS Digital Command Signal DDNS Dynamic Domain Name System DDR2 DIMM Double Data Rate Dual In Line Memory Module DEV Developer DHCP Dynamic Host Configuration Protocol DIS Digital Identification Signal DMP Damper DP Dial Pulse DPI Dot Per Inch DRPD Distinctive Ring Pattern Det...

Страница 866: ...ity Interface Code FPOT First Print Output Time FR FRNT Front FRU Field Replaceable Unit FTT Failure to Train GB Giga Byte GND Ground HARN Harness HCF High Capacity Feeder HDD Hard Disk Drive HGEA High Grade Emulsion Aggregation Toner HSG Housing HUM Humidity HVPS High Voltage Power Supply Hz Hertz cycles per second IBT Intermediate Belt Transfer IC Integrated Circuit IDT Intermediate Drum Transfe...

Страница 867: ...nter Daemon LPR Line Printer Remote LTR Letter Size Paper 8 5 x 11 inches LVPS Low Voltage Power Supply MAC Media Access Control MB Mega Byte MCF Message Confirmation MCU Machine Control Unit Engine Control Board MHz Mega Hertz MIB Management Information Base MICR Magnetic Ink Character Recognition MM Millimeters MOB Marks On Belt MOT Motor MPC Multi Protocol Network Card MPS Multi Page Signal MPT...

Страница 868: ...Y Physical Layer PIN Procedural Interrupt Negative PIP Procedural Interrupt Positive P J Plug Jack electrical connections PJL Printer Job Language PL Parts List POP3 Post Office Protocol version 3 PPD PostScript Printer Description PPM Pages Per Minute PPR Partial Page Request PPS Pages PPS Pulses Per Second PSTN Public Switched Telephone Network PV Print Volume Management PWB Printed Wiring Board...

Страница 869: ... Short Edge Feed SLP Service Location Protocol SMB Server Message Block SNMP Simple Network Management Protocol SNR Sensor SOC Service Order Code SOL Solenoid SOS Start of Scan STS Soft Touch Sensor TCF Training Check Frame TD Tone Dialing TDC Toner Density Control TNR Toner TRNS Transport TSI Transmitting Subscriber Identification UI User Interface USB Universal Serial Bus VDSL Very High Bit Rate...

Страница 870: ...A 18 Phaser 6180MFP Multifunction Printer Service Manual Reference ...

Страница 871: ...stments color registration 6 2 resetting Fuser 6 5 setting Fax Scanner parameter 6 10 setting printer parameter 6 11 B bellt Fuser 2 32 Bias Charge Roll BCR 2 6 Bias Transfer Roll BTR 2 12 billing meters 1 38 Bottom Cover removal 8 19 C calibrations initializing NVRAM 6 6 initializing Print Meter 6 6 loading NVRAM 6 7 saving NVRAM 6 7 scanner 6 8 chain link code configuration memory and firmware e...

Страница 872: ... 10 Overlay part number 9 8 P J location 10 10 part number 9 7 removal 8 30 shortcuts 1 10 troubleshooting 4 78 wiring diagram 10 43 copy specifications 1 20 Cover Bottom removal 8 19 Front part number 9 7 removal 8 28 Left Assy part number 9 5 removal 8 26 Left Pole part number 9 5 removal 8 25 Left Pole Inner removal 8 24 Rear part number 9 5 removal 8 18 Right Assy part number 9 5 removal 8 23 ...

Страница 873: ...2 49 envelopes supported sizes 1 35 Erase Lamp operation 2 37 troubleshooting black 4 74 troubleshooting CMY 4 75 error history report accessing 3 2 chain link code 1 46 3 2 paper jam history 1 46 3 2 3 3 system fail history 1 46 3 3 error message abbreviation 3 5 list of errors 3 7 Exit Clutch location 2 39 operation 2 39 P J location 10 10 troubleshooting 4 76 wiring diagram 10 28 Exit Out Chute...

Страница 874: ...ate 1 39 boot controller A 5 control panel bit map A 3 controller A 6 multi protocol network card A 8 free belt nip fusing FBNF 2 15 Front Cover P J location 10 10 part number 9 7 removal 8 28 troubleshooting 3 138 Fuser Belt 2 32 cooling down 2 61 Exit Roller 2 32 Exit Sensor 2 32 Heat Lamp 2 32 Heat Roller 2 31 location 1 6 operation 2 31 P J location 10 10 part number 9 24 9 47 removal 8 12 tem...

Страница 875: ...acintosh operating system 1 17 troubleshooting 4 111 MACPHY chip test error 3 154 external loop test error 3 156 internal loop test error 3 155 Main Drive components 2 38 location 2 38 operation 2 38 2 65 P J location 10 10 part number 9 28 removal 8 75 wiring diagram 10 28 maintenance preventive 7 2 RIP 7 7 tools 7 2 maintenance items Feed Roller 1 14 Fuser 1 14 part number 9 24 9 47 removal 8 12...

Страница 876: ...2 27 P J location 10 10 part number 9 14 troubleshooting 4 50 wiring diagram 10 26 Tray 2 operation 2 24 P J location 10 11 part number 9 16 troubleshooting 4 51 wiring diagram 10 30 Tray 3 operation 2 51 P J location 10 15 wiring diagram 10 45 non Xerox Print Cartridge Control Panel display 1 38 troubleshooting 3 59 3 63 NVRAM initializing 6 6 loading 6 7 location 2 44 2 45 saving 6 7 troubleshoo...

Страница 877: ...peating defect 5 24 specifications 5 17 guaranteed and maximum print areas 5 21 linearity 5 19 magnification error 5 20 parallelism 5 19 perpendicularity 5 20 registration 5 21 skew 5 18 troubleshooting 5 22 print volume 1 17 printer configurations 1 3 dimensions 1 31 operating mode 1 25 operation 2 5 options 1 11 print speed 1 24 printing life 1 17 resolution 1 17 serial number 9 2 technology 1 1...

Страница 878: ...oval 8 99 wiring diagram 10 50 10 51 10 53 scanning ADF 2 80 Document Glass 2 79 specifications 1 18 to e mail chain link code 3 11 secure print 1 37 Sensor 2 63 ADC 2 33 CRU 2 37 Duplex Jam 2 48 Exit 2 32 Fuser Temperature 2 32 Humidity 2 42 Non Contact Sensor NCS 2 32 Soft Touch Sensor STS 2 32 Start of Scan SOS 2 35 Temperature 2 42 Tray 1 No Paper 2 27 Tray 1 Registration 2 25 Tray 2 No Paper ...

Страница 879: ... error 3 68 removal 8 9 Tray 1 MPT components 2 25 Feed Roller part number 9 14 removal 8 44 Feed Solenoid operation 2 26 part number 9 14 removal 8 40 troubleshooting 4 67 wiring diagram 10 26 jam error 3 30 No Paper Sensor operation 2 27 P J location 10 10 part number 9 14 removal 8 44 troubleshooting 4 50 wiring diagram 10 26 Registration Clutch operation 2 26 P J location 10 11 troubleshooting...

Страница 880: ... Guide location 2 49 operation 2 49 Size Switch location 2 52 operation 2 52 P J location 10 15 wiring diagram 10 45 Turn Clutch location 2 51 operation 2 51 P J location 10 15 troubleshooting 4 70 wiring diagram 10 45 troubleshooting abnormal noise 4 101 4 105 AC Power Supply 4 83 checklist 5 6 color fax 4 97 Control Panel 4 78 DC Power Supply 4 84 electrical noise 4 108 Fax 4 87 high pitched noi...

Страница 881: ... 110 wiring diagram ADF 10 53 configurations 10 20 Controller 10 42 DC Power Supply 10 24 Developer 10 38 Duplex 10 48 Fax Controller 10 50 Feeder 10 30 Fuser 10 40 general diagram 10 23 HVPS 10 36 Laser Unit 10 32 Main Drive 10 28 Optional 550 Sheet Feeder 10 45 Scanner 10 51 Tray 1 and Registration 10 26 Xerographic 10 34 ...

Страница 882: ...I 12 Phaser 6180MFP Multifunction Printer Service Manual Index ...

Страница 883: ......

Страница 884: ...701P47020 ...

Отзывы: