background image


Portable  LED  Headlight  System  (L2S14C)                                                                                                  www.xenosys.co.kr 


14 

D. Turn on light & Intensity change 


1.


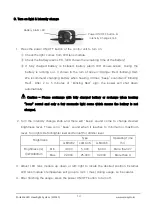
Press the power ON/OFF button of the control unit to turn on. 


Check the light comes from LED lens module. 


Check the battery alarm LED. (LED shows the remaining time of the battery) 


If  fully  charged  battery  is  installed,  battery  alarm  LED  shows  Green.  During  the 

battery  is  running  out,  it  shows  in  the  turn  of  Green→Orange→Red→blinking  Red. 

We recommend changing battery when hearing 3 times  “beep” sound and “blinking 

Red”.  After  2  to  5  minutes  of  “blinking  Red”  sign,  the  power  will  shut  down 

automatically.   

  Caution  –  Please  exchange  with  fully  charged  battery  or  recharge  when  hearing 

“beep”  sound  and  only  a  few  moments  light  come  which  means  the  battery  is  not 

charged. 


2.


Turn  the  intensity  change  knob  and  there  will  “beep”  sound  come  to  change  desired 

brightness  level.  There  is  no  “beep”  sound  when  it  reaches  to  minimum  or  maximum 

level. Turn right side for brighter level and turn left for dimmer level. 

Brightness 

Type 

Operating Time 

(hr) 

LLM1482 

LLM1474 

LLM1466 

Brightness (lx) 

@WD400mm 

Min. 

4,000 

5,000 

6,000 

More than 27 

Max. 

22,000 

25,000 

32,000 

More than 4 


3.


Adjust  LED  lens  module  up-down  or  left-right  to  locate  the  desired  position.  External 

LED lens module’s temperature will go up to 42℃  (max.) during usage, so be careful. 

4.


After finishing the usage, press the power ON/OFF button to turn off.   


Power ON/OFF button & 

Intensity Change knob 

Battery Alarm LED


Содержание L2S14C

Страница 1: ...eadlight System User Manual Optical Medical Device System Engineering XENOSYS CO LTD 2 Venture ro 100 beon gil Yeonsu gu Incheon 406 840 Korea TEL 82 32 875 9811 2 FAX 82 32 875 9813 www xenosys co kr...

Страница 2: ...CONTENTS INTRODUCTION 3 SAFETY PRECAUTIONS 4 FEATURES 7 COMPONENTS 8 FUNCTIONS 9 OPERATING INSTRUCTION 12 BASIC TROUBLESHOOTING 18 SPECIFICATIONS 19 ELECTROMAGNETIC COMPATIBILITY 22 TRANSPORTATION 22...

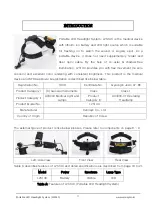
Страница 3: ...al device and KFDA approval registration is described like below table Registration No 1909 Certificate No Gyeongin Jesin 07 86 Product Category I A General Instruments Class Class 1 Product Category...

Страница 4: ...should be handled with care 4 The product is not waterproof Ordinary equipment IPX0 so avoid the humidity and water 5 Do not use in the presence of a flammable anaesthetic mixture with air oxygen or n...

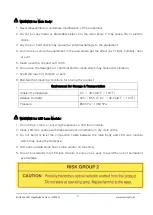
Страница 5: ...which may cause discoloration 7 Avoid the reach of children or pets 8 Maintain the following conditions for storing the product Environment for Storage Transportation Ambient Temperature 6 40 43 104...

Страница 6: ...longer to charger the battery out of this temperature range 7 Provided battery can be charged and discharged about 300 times at room temperature Lithium ion battery is expendables thus if the operatin...

Страница 7: ...ge from the battery to LED device through STEP Down circuit and generate light speed through the lens Even though battery voltage is reduced L2S14C allows LED to provide consistent brightness 2 Electr...
Страница 8: ...1 Basic Components Battery 2 EA Charger LCH14 DC Power Supply BPM010S05 Power Cord 2 Optional Anti curing Filter Only for LLM1474 LLM1482 LED Lens Module LLM1474 LED Lens Module LLM1466 Headband Clot...

Страница 9: ...fer to 11 1 Charger Cradle Refer to 12 1 Charger Refer to 12 1 Power Cord 1 Anti curing Filter Anti curing for photo polymerization Only for LLM1482 74 1 Optional LED Lens Module LLM1474 Field of View...

Страница 10: ...tensity There is no beep sound when it reaches to minimum or maximum level Turn right side for brighter level and turn left for dimmer level 2 Battery Pack 3 5 DC4 2V Input phone jack Connect the phon...

Страница 11: ...to 6 before usage 4 LED Lens Module Adjustable link LED Lens module can move up down and left right side 3 types of LED Lens Module available Choose one Class Type Feature Field of View Reference Sta...

Страница 12: ...e the defective reason In case of using non Xenosys supplied charger with higher voltage over 5V the main unit will shut down the power supply and stop the all operation after beep sound It is a secur...

Страница 13: ...off Then store it to the case Caution When no use for long time make sure to remove the battery from the battery pack 2 Store LED light in the place free from the air with pressure temperature humidi...

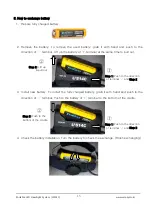
Страница 14: ...h fully charged battery or recharge when hearing beep sound and only a few moments light come which means the battery is not charged 2 Turn the intensity change knob and there will beep sound come to...

Страница 15: ...e same time to pull out 3 Install new battery To install the fully charged battery grab it with hand and push to the direction of terminal Push to the battery of terminal to the bottom of the cradle 4...

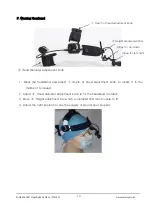
Страница 16: ...the middle of forehead 2 Adjust Head diameter adjustment knob to fix the headband in stable 3 Move Height adjustment bar which is installed LED lens module to fit 4 Adjust the right position to see th...

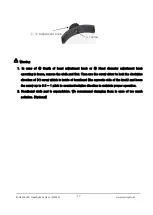
Страница 17: ...the cloth pad first Then use the screw driver to lock the clockwise direction of screw which is inside of headband the opposite side of the knob and loose the screw up to 0 5 1 pitch to counterclockw...

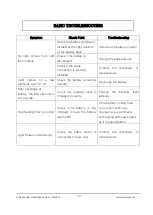
Страница 18: ...or manufacturer Light comes on a few moments and turn off Check the battery remaining quantity Recharge the battery After exchange of battery the light intensity is not enough Check the intensity lev...

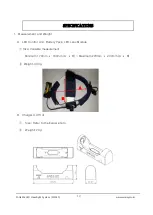
Страница 19: ...s co kr 19 SPECIFICATIONS 1 Measurement and Weight A LED Control Unit Battery Pack LED Lens Module Size Variable measurement Minimum 170mm 160mm A B Maximum 220mm 200mm A B Weight 300 g B Charger LCH1...

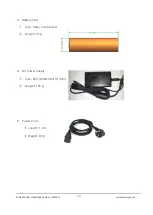
Страница 20: ...ortable LED Headlight System L2S14C www xenosys co kr 20 C Battery Pack Size Refer to the below Weight 47 g D DC Power Supply Size 95 L x53 W x33 H mm Weight 176 g E Power Cord Length 1 8 m Weight 90...

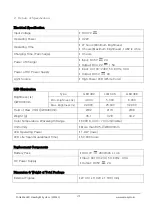
Страница 21: ...Source High Power LED White Color LED Illumination Brightness lx WD400mm Type LLM1482 LLM1474 LLM1466 Min Brightness lx 4 000 5 000 6 000 Max Brightness lx 22 000 25 000 32 000 Field of View mm WD400...

Страница 22: ...you can find out if it generates electromagnetic interruption or not Recommend to choose one and more ways to solve the trouble in the following ways 1 Relocate the equipments receiving the interrupti...

Страница 23: ...wer cord 3 Wind up the power cord loosely and store it by using the rubber bandage or cable tie 4 Do not expose the main body to excessive shock direct ray of light and high temperature which may caus...

Страница 24: ...service warranty statement applies to all countries to the extent that there is no special warranty rule 2 All services warranty should be provided by Xenosys Co Ltd or authorized personnel by Xenosys...

Страница 25: ...sending the equipment need for repair contact the manufacturer or distributor Then the manufacturer or distributor will report details with RMA No and related reference which will make easier to track...

Страница 26: ...rtable LED Headlight System L2S14C www xenosys co kr 26 XENOSYS CO LTD 2 Venture ro 100 beon gil Yeonsu gu Incheon 406 840 Korea TEL 032 875 9811 2 FAX 032 875 9813 www xenosys co kr sales xenosys co...

Отзывы: