background image

__________________________________________  Installation  2-35

8.

Double-click the Downloader icon to open that utility.

9.

Choose Download PostScript File from the File menu.

10.

Locate the Set Zone.ps file which you created in step 3.

11.

Select the Set Zone.ps file and click Download. The following
status message appears when the downloading is complete.

The download was successful.

12.

Click OK.

13.

Select Quit from the File menu.

14.

Turn the power to the printer off and on again.

If you need to connect a second host to another printer port, skip to
the section on connecting to the desired port in this chapter. If not
and you are connecting an optional hard disk, go to the next section
“Connecting a Hard Disk.” Otherwise, skip to the next chapter,
“Macintosh Setup.”

Connecting a Hard Disk

You can connect multiple hard disks to your printer via the SCSI
port. Adding a hard disk increases the available space for font
storage. You can download a font to RAM or to a hard disk.
However, a font stored in RAM has to be downloaded each time the
printer’s power is turned off and on. If you store the font on a hard
disk, it remains there until you remove it.

Usually a 20 MB external hard disk is sufficient since this size can
hold approximately 500 to 600 extra fonts. However, if you use a
large number of fonts, you may want a larger disk or multiple disks.

To connect a hard disk to your printer, you need a SCSI peripheral
cable (25-pin to 50-pin). If the disk is not internally terminated, you
also need an external SCSI terminator. See the hard disk
documentation for termination characteristics.

Содержание Accel-a-Writer 812

Страница 1: ...etup Unpacking the Printer Installing Options Installing the Toner Cartridge Loading the Paper Cassette Loading the Fold Down Tray Connecting the Power Cord Starting the Printer Printing the Start up...

Страница 2: ...2 2 Installationbb_________________________________________ Notes...

Страница 3: ...lower cassette Have an area of approximately 24 x 50 624 mm x 1292 mm so there is sufficient clearance for operation and maintenance Maintain a temperature of 50 to 90 5 Fahrenheit 10 to 32 5 Celsius...

Страница 4: ...rinter 250 sheet letter or A4 paper cassette Power cord Accel a Writer 812 User s Guide this manual XANT Utilities PSPrinter driver and other software The smaller box contains Toner cartridge for the...

Страница 5: ...ing the power cord Starting the printer Before you begin this setup take a few minutes to familiarize yourself with the printer The following illustrations figures 2 1 and 2 2 provide an overview of t...

Страница 6: ...king the Printer Various packing materials protect your printer during shipping These materials include plastic tape polystyrene cardboard and shipping spacers all of which must be removed You may wan...

Страница 7: ...r cassettes and media installed Have someone help you lift it 2 Lift the printer out of the box 3 Remove the plastic wrap from around the printer 4 Remove the tape securing the rear cover the fold dow...

Страница 8: ..._____________ 6 Remove the packing tape and cardboard 7 Push down on the plate in the bottom of the cassette and remove the plastic packing spacers fig 2 4 Then place the cassette back into the printe...

Страница 9: ...of the top cover fig 2 5 and lift up and back approximately 180 to open it ONLINE FORM FEED TRAYSELECT ENTER MENU RESET TEST DATA MANUAL READY Fig 2 5 Open the Top Cover 9 Remove the packing tape and...

Страница 10: ...2 10 Installationbb_________________________________________ 10 Open the rear cover by pressing the release lever and tilting the cover out and down fig 2 7 Fig 2 7 Open the Rear Cover...

Страница 11: ...own the two levers one on each side fig 2 8 12 Remove the shipping cardboard fig 2 8 from the fuser area Fig 2 8 Open the Fuser Area 13 Close the rear cover Unpacking the printer is completed If you d...

Страница 12: ...talling the Toner Cartridge Caution The toner cartridge is sensitive to bright lights and direct sunlight Leave it in its protective bag until you are ready to load it into the printer The cartridge c...

Страница 13: ...bute the toner evenly throughout the cartridge fig 2 9 Fig 2 9 Distribute the Toner 3 Place the cartridge on a flat surface and gently flex the black tab on the end of the sealing tape back and forth...

Страница 14: ...the printer s top cover gently until it snaps into place Note Never move or ship the printer with a toner cartridge installed Loading the Paper Cassette Your Accel a Writer 812 ships with a standard l...

Страница 15: ...mately 1 25 mm or less of laser quality or 20 lb photocopier paper To do this a Make sure the paper meets all the requirements in Selecting Media in chapter 6 b Determine the printing side of the pape...

Страница 16: ...assette Caution Make sure the paper stack does not exceed the upper paper limit marked on the cassette fig 2 12 Overloading a cassette will cause paper to jam Fig 2 12 Load the Paper Cassette 4 Slide...

Страница 17: ...gth The tray also handles COM 10 monarch DL C5 and B5 envelopes This section includes instructions for loading letter or A4 size laser quality or 20 lb photocopier paper Refilling the tray printing on...

Страница 18: ...sheets approximately 3 8 10 mm or less of laser quality or 20 lb photocopier paper To do this a Make sure the paper meets all the requirements listed in Media Handling in chapter 6 b Determine the pri...

Страница 19: ...aper to jam ONLINE FORM FEED TRAYSELECT ENTER MENU RESET TEST DATA MANUAL READY Paper Limit Mark Fig 2 15 Load the Fold Down Tray 5 Adjust the paper guides on each side so they rest lightly against th...

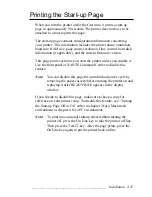
Страница 20: ...lower right side 1 Locate the power switch 2 Press the on the power switch to turn on the printer The green Ready light will begin flashing and ACCEL A WRITER appears in the display window After the...

Страница 21: ...rinter unless you disable it Use the front panel or XANT Command Center to disable this feature Note You can disable this page for an individual power cycle by removing the paper cassette before turni...

Страница 22: ...l There is a SCSI port where you can attach multiple external hard disks and an optional Ethernet port LOCALTALK PARALLEL ETHERNET SCSI SERIAL Fig 2 16 Accel a Writer 812 Ports The serial parallel Loc...

Страница 23: ...e a PC setup skip to Connecting in a PC Environment later in this chapter If you have a Macintosh setup without Ethernet go to the next section Connecting in a Macintosh Environment Connecting in a Ma...

Страница 24: ...es Fig 2 18 Place a Terminating Resistor in the Open Socket Note Be sure to terminate the open sockets on the ends of your LocalTalk network with the terminators supplied with your LocalTalk connecto...

Страница 25: ...r Serial communication allows two way communication between the host and printer Use the parallel port if your host has a Centronics parallel port available and it is within 10 ft 3 m of the printer U...

Страница 26: ...ort skip to the section on connecting to the desired port later in this chapter If not and you are connecting an optional hard disk skip to Connecting a Hard Disk later in this chapter Otherwise skip...

Страница 27: ...3 5 6 7 20 8 Printer 1 2 3 4 5 6 8 7 Data Carrier Detect In Transmit Data Out Receive Data In Data Set Ready In Ground Data Terminal Ready Out Clear to Send In Request for Send Out Open Data Carrier D...

Страница 28: ...u print make sure the host printer and application are using the same communication settings The three settings which must match are Baud Rate Flow Control Parity The factory default printer settings...

Страница 29: ...e high that it will affect the size of a group providing a warning of transmission errors Your Accel a Writer 812 supports five parity settings None Even Odd Mark and Space The printer s factory defau...

Страница 30: ...omputer stores or mail order warehouses The transceiver should have an Apple AUI Attachment Unit Interface connector on one end and either an Unshielded Twisted Pair UTP or 10BaseT cable or a thin coa...

Страница 31: ...ke ordinary telephone wire Each end has an RJ 45 plug which looks like a slightly larger version of the standard telephone plug fig 2 21 The UTP cable should be a maximum of 328 ft 100 m in length No...

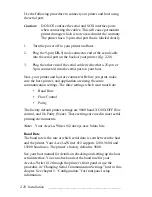
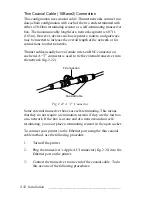
Страница 32: ...twist on BNC connector on each end A T connector is used to tie the external transceiver into the network fig 2 22 T Connection Coaxial Cable Fig 2 22 A T Connector Some external transceiver boxes are...

Страница 33: ...ting to a single BNC Connector b If the transceiver box has dual male BNC connectors first check the documentation to see if the unit is self terminating Then follow the instructions included with the...

Страница 34: ...For example to name your zone Marketing First Floor using the procedure later in this section you would type the following in step 3 EtherTalk_NV EtherTalkZone Marketing First Floor setdevparams Note...

Страница 35: ...ting a Hard Disk Otherwise skip to the next chapter Macintosh Setup Connecting a Hard Disk You can connect multiple hard disks to your printer via the SCSI port Adding a hard disk increases the availa...

Страница 36: ...The printer has a 9 pin serial port that is labeled clearly 1 Make sure the printer and the hard disk are turned off 2 Connect the SCSI cable following the instructions included with the hard disk 3 T...

Страница 37: ...en downloading this file to the printer s external hard disk using the Adobe Downloader in the XANT Utilities Caution Make sure the printer is selected in the Chooser before initializing a hard disk U...

Страница 38: ...es disk included with your printer 7 Open the Utilities folder 8 Double click the Downloader icon to open that utility 9 Choose Download PostScript File from the File menu 10 Locate the Initialize Dis...

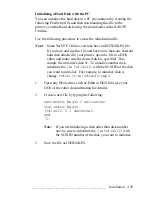
Страница 39: ...d to your printer open the file in a DOS editor and make sure the desired disk is specified This sample file initializes disk 1 To initialize another disk substitute the 1 in disk1 with the SCSI ID of...

Страница 40: ...the parallel interface or by typing COPY INITDSK PS COM1 to download to the printer over the serial interface Note Turn on the hard disk before turning the printer on whenever you start your system Th...

Отзывы: