background image

M A G M A  

Preface               

iii


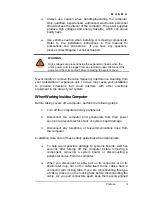
  Always use caution when handling/operating the computer. 

Only qualified, experienced, authorized electronics personnel 
should access the interior of the computer. The power supplies 
produce high voltages and energy hazards, which can cause 
bodily harm.  

  Use extreme caution when installing or removing components.  

Refer to the installation instructions in this manual for 
precautions and procedures.  If you have any questions, 
please contact Magma Technical Support.  


WARNING 

High voltages are present inside the expansion chassis when the 
unit’s power cord is plugged into an electrical outlet. Disconnect the 
power cord from its source before removing the system cover.   


Never modify or remove the radio frequency interference shielding from 
your workstation or expansion unit. To do so may cause your installation 
to produce emissions that could interfere with other electronic 
equipment in the area of your system. 

When Working Inside a Computer 

Before taking covers off a computer, perform the following steps: 

1.  Turn off the computer and any peripherals 

2.  Disconnect the computer and peripherals from their power 

sources to prevent electric shock or system board damage.  

3.  Disconnect any telephone or telecommunications lines from 

the computer.  

In addition, take note of these safety guidelines when appropriate: 

  To help avoid possible damage to systems boards, wait five 

seconds after turning off the computer before removing a 
component, removing a system board, or disconnecting a 
peripheral device from the computer.  

  When you disconnect a cable, pull on its connector or on its 

strain-relief loop, not on the cable itself. Some cables have a 
connector with locking tabs. If you are disconnecting this type 
of cable, press in on the locking tabs before disconnecting the 
cable.  As you pull connectors apart, keep them evenly aligned 

Содержание CB4DRQ

Страница 1: ...PCI Expansion Chassis User s Guide 4 Slot PCI Expansion Model PCI4DRQ Model CB4DRQ ...

Страница 2: ...electro magnetic mechanical optical or otherwise in whole or in part without prior written consent from Magma Limitation of Liability Information presented by Magma in this guide is believed to be accurate and reliable However Magma assumes no responsibility for its use No license is granted by implication or otherwise to any rights of Magma Product specifications and prices are subject to change ...

Страница 3: ...tarting Up 5 Shutting Down 5 CHAPTER 3 VERIFY INSTALLATION 7 Windows 7 Mac OS X 8 CHAPTER 4 INSTALL 3 RD PARTY PCI CARDS 10 Remove PCI Expansion Chassis Cover 10 Install PCI Cards in PCI Expansion Chassis 11 Install Hard Drive s 12 Externally Accessible 5 25 Drive Bay 15 System Should Be Up and Running 16 Finishing Touches 16 CHAPTER 5 TROUBLESHOOTING 17 Locate the Problem 17 My Computer Can t Fin...

Страница 4: ... MORE SLOTS 31 Multiple PCI Expansion System Configurations 31 Fan Out 32 Verify your configuration 33 Daisy Chaining 34 Verify your configuration 35 Combination Configurations 35 PCI Card Conflicts 36 Power On Sequence for Advanced Configurations 36 Troubleshooting Advanced Configurations 36 Finding the Problem Card 37 APPENDIX C COMPLIANCE 38 FCC 38 Industry Canada 38 CE 38 ...

Страница 5: ...ation Guide provides similar information for your Magma host card This manual is divided into the following parts Chapter 1 Provides General Specifications and Parts List Chapter 2 Briefly explains Expansion Chassis installation Chapter 3 Explains how to verify a successful installation Chapter 4 Provides information on installing 3 rd Party PCI cards Chapter 5 Provides troubleshooting assistance ...

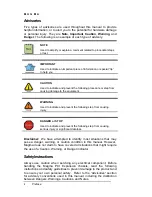
Страница 6: ... the following step from causing injury DANGER or STOP Used to indicate and prevent the following step from causing serious injury or significant data loss Disclaimer We have attempted to identify most situations that may pose a danger warning or caution condition in this manual However Magma does not claim to have covered all situations that might require the use of a Caution Warning or Danger in...

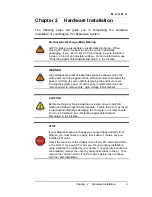
Страница 7: ...stallation to produce emissions that could interfere with other electronic equipment in the area of your system WhenWorkingInsideaComputer Before taking covers off a computer perform the following steps 1 Turn off the computer and any peripherals 2 Disconnect the computer and peripherals from their power sources to prevent electric shock or system board damage 3 Disconnect any telephone or telecom...

Страница 8: ...oper ESD procedure to reduce the risk of damage to components Magma strongly encourages you to follow proper ESD procedure which can include wrist straps and smocks when servicing equipment You can also take the following steps to prevent damage from electrostatic discharge ESD When unpacking a static sensitive component from its shipping carton do not remove the component s anti static packaging ...

Страница 9: ... Two 13 2 CFM fans Power Supply 310W Silencer auto switching Standard Cable 1 meter MTBF 25 000 hours PCI Bus 32 bit 33Mhz PCI Local Bus Specification Revision 2 2 PCI Bridge Architecture Spec Revision 1 1 Interconnect Bandwidth 132 MB sec Theoretical Max of PCI 33 32 Operating Environment 0º to 50º C Operating Temperature 20º to 60º C Storage Temperature 5 to 85 Relative Humidity Non condensing O...

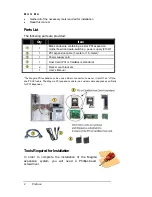
Страница 10: ...ansion cable 1 meter or 1 5 meter 1 1 Power supply cord 1 Host Card PCI or CardBus is standard 2 Rack mount brackets 1 User s Manual 1 The Magma PCI expansion cable uses a 68 pin connector however it is NOT an off the shelf SCSI cable The Magma PCI expansion cable is a custom cable designed specifically for PCI Expansion ToolsRequiredforInstallation In order to complete the installation of the Mag...

Страница 11: ...cover Turning the system power off at the power on off switch does not remove power to components High voltage is still present CAUTION Before touching anything inside the enclosure move to an ESD station and follow proper ESD procedure Failure to do so may result in electrostatic discharge damaging the computer or its components For more information see Protecting Against Electrostatic Discharge ...

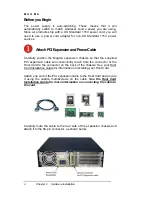
Страница 12: ...Magma expansion chassis so that the supplied PCI expansion cable will conveniently reach from the connector of the Host Card to the connector on the back of the chassis See your Host Card Installation Guide for information on installing your Host Card Attach one end of the PCI expansion cable to the Host Card and secure it using the captive thumbscrews on the cable See the Host Card Installation G...

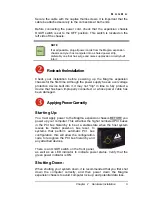
Страница 13: ...built into it it may not trip in time to fully protect a device that has been improperly connected or whose power cable has been damaged ApplyingPowerCorrectly Starting Up You must apply power to the Magma expansion chassis BEFORE you power up your computer This will allow the higher numbered PCI buses in the PCI bus hierarchy to be at a stable state when the host system issues its master power on...

Страница 14: ...M A G M A 6 Chapter 2 Hardware Installation STOP DO NOT TURN OFF THE MAGMA EXPANSION CHASSIS UNTIL YOU HAVE SHUT DOWN YOUR LAPTOP COMPLETELY It can cause a system lockup and loss of any unsaved data ...

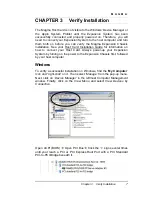
Страница 15: ...Installation Guide for information on how to connect your Host Card Always power up your Expansion System by turning on the power to the Expansion Chassis first followed by your host computer Windows To verify a successful installation on Windows find the My Computer icon and right click on it Then select Manage from the pop up menu Next click on Device Manager in the leftmost Computer Management ...

Страница 16: ...wn your system host computer first then the expansion chassis and reconnect the cables and reseat the PCI Host Card to ensure that you have a solid connection Then restart the Magma expansion chassis followed by the host computer Next try to verify the installation again as shown above If you are still having problems review Chapter 5 Troubleshooting before contacting Magma Technical Support at 85...

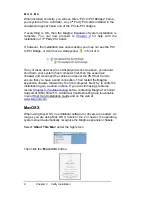
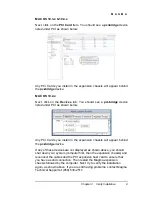
Страница 17: ... PCI as shown below Any PCI Cards you install in the expansion chassis will appear behind the pci bridge device If any of these devices are not displayed as shown above you should shut down your system computer first then the expansion chassis and reconnect the cables and the PCI expansion host card to ensure that you have a solid connection Then restart the Magma expansion chassis followed by the...

Страница 18: ...esktop computer chassis Always follow the manufacturer s instructions for installing their card on a desktop computer IMPORTANT We will provide reasonable technical support with 3 rd Party PCI cards However if you have verified a successful installation of the Magma expansion system as defined in Chapter 4 but experience difficulty installing your 3 rd Party PCI cards the PCI card manufacturer sho...

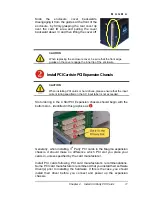
Страница 19: ...drives please ensure that the input current rating specified on the AC input label is not exceeded Slot ordering in the 4 Slot PCI Expansion chassis should begin with the bottom slot identified in this graphics as Generally when installing 3rd Party PCI cards in the Magma expansion chassis it should make no difference which PCI slot you place your cards in unless specified by the card manufacturer...

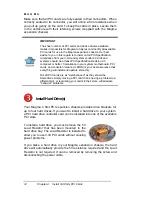
Страница 20: ... and console firmware or BIOS is your best assurance that everything will install and operate smoothly Not all PCI cards are as well behaved as they should be Sometimes simply moving a PCI card that is having a problem to a different slot or reordering your cards in their slots will alleviate behavior problems InstallHardDrive s Your Magma 4 Slot PCI expansion chassis provides drive brackets for u...

Страница 21: ...envelope and save it If you ever decide to remove the hard drive s you will need to reinstall the 5V Load Resistor to ensure your Expansion chassis continues to work properly After you have removed the 5V Load Resistor you need to remove the hard drive bay brackets to allow for an easy hard drive installation Simply remove the screws on the side of the enclosure that retain the drive bracket s tha...

Страница 22: ...ount your hard drive s to the hard drive bracket as shown You have two 2 rows of mounting holes in each mounting bracket This allows you to mount two hard drives with each hard drive bracket Next thread the hard drive ribbon cable over the metal bracket that the backplane is mounted on as shown below ...

Страница 23: ... drive The chassis has a removable panel in the lower right front that opens up access to the two lower drive bays With the addition of a 3rd Party adapter kit you can easily add a DVD burner a tape backup system or removable hard drive to your Expansion System IMPORTANT The 4 Slot PCI expansion chassis is designed to hold 4 hard drives or 2 hard drives AND 1 externally accessible drive such as a ...

Страница 24: ...rst then power up the computer Use the procedures detailed in Chapter 4 to confirm the card installation s in the Windows Device Manager or Apple System Profiler FinishingTouches After your system is working properly replace any empty slots with slot covers and replace the host computer cover and the expansion chassis cover ...

Страница 25: ...aving problems try these simple troubleshooting steps My Computer Can t Find the PCI Expansion System When Nothing Works My PCI Card Doesn t Work The PCI to PCI Expansion System is correctly displayed as a PCI standard PCI to PCI bridge Windows Device Manager and as a pci bridge MAC Apple System Profiler When connected and functioning correctly this Expansion System will be displayed as follows Wi...

Страница 26: ...itional troubleshooting steps Double check the PCI host card to ensure it is inserted correctly in a PCI slot Try moving the PCI host card to a different PCI slot Check for a bad cable or connection Try another expansion cable if you have one If the expansion system is still not visible after trying all of the above steps go to Chapter 6 to see about getting additional help Windows If the PCI to P...

Страница 27: ... Magma expansion system and that you have correctly installed your 3 rd Party PCI card s and their associated drivers as required If it powers up OK but nothing works check the computer s Device Manager or System Profiler to see if the expansion system has been found If not found try the troubleshooting steps for My Computer Can t Find the PCI Expansion System If the expansion system is visible bu...

Страница 28: ...thout the Magma expansion system attached call Magma Technical Support ii If it still hangs the problem is in the computer and not with the Magma expansion system or the 3 rd Party PCI cards b If it boots up OK without any 3rd Party PCI cards installed try adding only one card and see if it boots up i If it boots up OK with one card in it shut it down in the proper order of course and swap cards R...

Страница 29: ...for fail to resolve your problem 1 Shut down the computer followed by the Magma expansion chassis 2 Remove the PCI card displaying a problem 3 Replace the problem card with a simple PCI card such as an Ethernet card that has drivers built into the operating system Using this type of card will avoid any future questions about drivers possibly being installed incorrectly 4 Turn on the Magma expansio...

Страница 30: ...and if the PCIe to PCI Bridge Connections and the 3rd Party PCI card s are now correctly visible Support for 3rd Party PCI Cards Magma will provide reasonable technical support to with 3 rd Party PCI cards However if you have verified a successful installation of the Magma PCI Expansion System as defined in Chapter 4 but experience difficulty installing your 3rd Party PCI cards the PCI card manufa...

Страница 31: ...code indicates that there is a problem with the 3 rd Party PCI Card driver If necessary contact the PCI Card s manufacturer for updated PNP compatible drivers If all else fails contact Magma Technical Support for further assistance On the Bridge If you receive error code 12 on the first PCI to PCI Bridge call Magma Technical Support 12 On the PCI Card This usually means the memory I O or prefetch ...

Страница 32: ...ssis are not working correctly Reinstall the PCI host card into the computer s PCI slot and recheck all cable connections If the error code remains try another PCI slot If you still have the error call Magma Technical Support Other Codes For all other error codes call On the PCI to PCI Bridge Magma Technical Support On the PCI Card Card Manufacturer s Technical Support after first verifying that t...

Страница 33: ...puter Make 9 Computer Model 10 Operating System and Version 11 Make Model of PCI cards in expansion chassis 12 Detailed description of the problem You can also visit our web site at www magma com support For a quick response use the Technical Support and RMA Request Form available in the Support Section of the website Simply complete the form with all required information Please make sure that you...

Страница 34: ...itting a request at www magma com support 1 Locate a file called dbgview exe on the Magma CDROM 2 Double click on the file dbgview exe 3 While the dbgview screen is open locate and double click on a file called dump exe on the Magma CDROM 4 Switch back to the dbgview screen which is now filled with data 5 Save this file and submit it as an attachment when submitting a Technical Support request Use...

Страница 35: ... can purchase an inexpensive license from APSoft for use beyond the evaluation period PCIScope has proven to be extremely useful when verifying and debugging configurations involving the Magma PCI Expansion Systems under any Windows platform PCIScope can provide information to you and our Technical Support Group such as PCI Bus Numbering Resource Allocation and other information that may prove use...

Страница 36: ...More Help You should save this data as a file on your computer Please include your name and date as part of the file name with an extension of bpd Then email this file to support magma com if you are experiencing configuration problems ...

Страница 37: ...eep the packaging from the original shipment of your Magma product However if you return a product to Magma for warranty repair replacement or take advantage of the 30 day money back guarantee you will need to package the product in a manner similar to the manner in which it was received from our plant Magma cannot be responsible for any physical damage to the product or component pieces of the pr...

Страница 38: ...ers are We only know how they increment starting from the host card The key point in the figure of the 4 Slot topology is that the connecting cable between the host card and the 4 Slot backplane is actually a PCI bus itself This is represented in the Windows Device Manager as shown below NOTE All PCI cards installed in the PCI Expansion chassis will appear on the Third PCI Bus behind the PCI Bus t...

Страница 39: ...ation the bios finds the Magma host card in a PCI slot The bios configures it and then looks beyond it to find any PCI cards installed in the expansion chassis The bios then configures the cards and allocates resources Empty PCI slots are ignored during configuration In theory your computer should be able to travel across up to 255 PCI buses to identify and configure all installed PCI cards Unfort...

Страница 40: ...Bus should be viewed as a Resource Toll road that runs from the computer CPU resource home through the Toll Booths the PCI bridges to the Resource Users PCI Cards As in the case of a real Toll Road the more Toll Booths you have to slow down a nanosecond for the longer it will take you your data to get from the PCI Card to the CPU and back again Under most circumstances the effect cannot even be de...

Страница 41: ...the total number of PCI buses that the data must pass through COULD make a difference See Chapter 5 Troubleshooting for more information if you suspect this could be an issue with one of your specialty PCI cards Verify your configuration Before you start installing your PCI cards refer to Chapter 4 Install Cards and Drives for more information you should confirm that everything is in proper workin...

Страница 42: ...ificance of the performance variance between the Fan Out and Daisy Chaining configurations the primary reason for using this one would be limitations on physical space This could be the number of available slots on the computer motherboard or a lack of desk or rack space In the daisy chain configuration successive PCI expansion systems are added to the end of the PCI bus hierarchy which adds depth...

Страница 43: ...Expansion System Notice that each Daisy Chained unit appears in the Device Manager in the reverse order of its place in the configuration Combination Configurations Depending on your business requirements and your physical space limitations you can add additional Expansion System in multiple configurations such as these These combinations are only limited by the available slots and or slot types P...

Страница 44: ...gurations When trying to troubleshoot problems with PCI cards in a multiple expansion system configuration it is vital to correctly determine the nature of the problem Therefore the first task is to identify the card or chassis having a problem by using the Windows Device Manager or Apple System Profiler Refer to the first part of this Appendix for more information on identifying hierarchical leve...

Страница 45: ...he information contained in the Location field Look for the Error Code in the box in the center of the Properties Window and then go to the Windows Error Code section for information on how to resolve this issue MAC If you have already reinstalled and reseated everything according to instructions in Chapter 2 and the PCI to PCI Bridge is still not visible in the Apple System Profiler call Magma Te...

Страница 46: ...ules Operation is subject to the following two conditions 1 this device may not cause harmful interference and 2 this device must accept any interference received including interference that may cause undesired operation Changes or modifications not expressly approved by the party responsible for compliance could void the user s authority to operate the equipment NOTE The assembler of a personal c...

Страница 47: ...M A G M A Appendix C Compliance 39 ...

Страница 48: ...Manual P N 09 09930 01 B ...

Отзывы: