background image

2.1Connect AC Power

Every intercom is equipped with an adapter (DC 5V1A) and a cable. Please connect every intercom station 
to your local AC power. We kindly suggest that you use the original adapter and cable that was included in 
your packaging to turn on your device(s). Please feel free to contact us if you have encountered any 
problems with the adapter or cable. We will send you a free replacement as covered by the warranty and 
will give you a discount on future purchases if your warranty expires.

2.2 Set Channel & Code

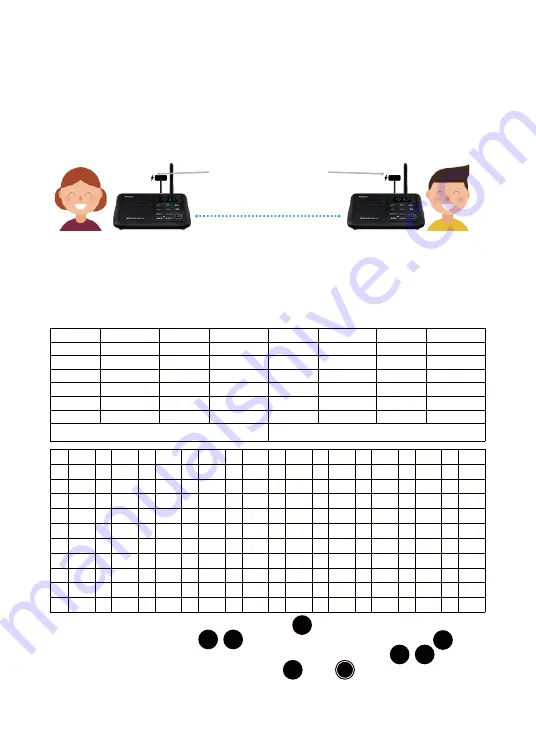
This intercom is a real-time communication system. Please confirm that both stations are set to the same 
channel and code to be able to communicate.
This intercom has 22 channels (01-22) and 100 codes (00-99) available. The following table shows the 
frequency and code of the intercoms:

After you connect to the AC power, press the MENU button        . The channel number on the left side of 
the screen will flash. Press CH+/ CH-        /        to set the channel; and click the MENU button         again, 
this will enable the code number on the right of the screen to flash. Press CH+/ CH-        /        to set the 
code. To complete the channel code setting, press MENU        or TALK        to exit editing. The screen will 
stop flashing.

Member A

keep 5 meters apart when testing

Member B

CHANNEL

1

2
3
4
5
6

FREQUENCY

462.7250
462.5875

462.6125

462.6375
462.6625
462.6875

CHANNEL

7
8
9

10

11

12

FREQUENCY

462.7125

467.5625
467.5875

467.6125

467.6375
467.6625

FREQUENCY

462.6500
462.6750
462.7000
462.5625

CHANNEL

19

20

21

22

FREQUENCY

467.6875

467.7125

462.5500
462.5750
467.6000
467.6250

CHANNEL

13
14
15
16
17
18

GROUP Frequency:467.7125MHz

GROUP CODE:743N

NO

1

2
3
4
5
6
7
8
9

10

CODE

754N
743N
734N

77

79.7
82.5
85.5
88.5

91.5

94.8

NO

11

12
13
14
15
16
17
18
19

20

CODE

97.4

100

103.5
107.2

110.9
114.8
118.8

123

127.3

131.8

NO

21

22
23
24
25
26
27
28
29
30

CODE

136.5

141.3

146.2

151.4

156.7
162.2
167.9
173.8

19.9

186.2

NO

31

32
33
34
35
36
37
38
39
40

CODE

7192.8

203.5

210.7

218.1

225.7
233.6

241.8

250.3
023N
025N

NO

41

42
43
44
45
46
47
48
49
50

CODE

026N

031N

032N
043N
047N

051N

054N
065N

071N

072N

NO

51

52
53
54
55
56
57
58
59
60

CODE

073N
074N

114N
115N
116N

125N

131N

132N
134N
143N

NO

61

62
63
64
65
66
67
68
69
70

CODE

152N
155N
156N
162N
165N
172N
174N

205N
223N
226N

NO

71

72
73
74
75
76
77
78
79
80

CODE

243N
244N
245N

251N
261N

263N
265N

271N

306N

311N

NO

81

82
83
84
85
86
87
88
89
90

CODE

315N
331N

343N
346N

351N

364N
365N

371N

411N

412N

NO

91

92
93
94
95
96
97
98
99

CODE

413N

423N

431N

432N
445N
464N
465N
466N
503N

Connect to local AC power

TALK

MENU

MENU

MENU

CH+ CH-

CH+ CH-

Содержание WL-888

Страница 1: ...Wuloo Wireless Intercom System Model WL 888 FCC ID 2AQQS 888 E mail support wulooofficial com Facebook page WulooOfficial ...

Страница 2: ...rference problems User friendly design This product is shipped with a quick start guide and detailed instructions You can also contact the Wuloo service team for product related questions and help at any time We are dedicated to providing customers with a 100 satisfactory service Please feel free to contact us if you have encountered any problems with your purchase Our fast and friendly team will ...

Страница 3: ...istribute Different Stations to Different Users 2 6 Notes 3 Advanced Settings 3 1 Volume Setting 3 2 Power ON OFF 3 3 Channel Code Setting 3 4 Functions Description 3 4 1 TALK 3 4 2 GROUP 3 4 3 MONITOR 3 4 4 VOX 3 4 5 CALL 3 5 Usage Scenario 4 Additional Notes 5 Troubleshooting 6 Adding Additional Units 6 1 Expand to more intercom stations 7 Questions Answers 8 Warranty ...

Страница 4: ...or setting up your intercom are as follows 2 1 Connect AC Power 2 2 Set Channel Code 2 3 Make an Address List 2 4 Test Connection 2 5 Distribute Different Stations to Different Users Note The examples that follow are for 2 intercom stations For multiple intercom stations follow the same directions as listed below AC Adapter Cable Speaker VOL VOL Channel Number Code Number Channel Code Setting Powe...

Страница 5: ...lashing Member A keep 5 meters apart when testing Member B CHANNEL 1 2 3 4 5 6 FREQUENCY 462 7250 462 5875 462 6125 462 6375 462 6625 462 6875 CHANNEL 7 8 9 10 11 12 FREQUENCY 462 7125 467 5625 467 5875 467 6125 467 6375 467 6625 FREQUENCY 462 6500 462 6750 462 7000 462 5625 CHANNEL 19 20 21 22 FREQUENCY 467 6875 467 7125 462 5500 462 5750 467 6000 467 6250 CHANNEL 13 14 15 16 17 18 GROUP Frequenc...

Страница 6: ...ther user Setting the stations to the same code allows you to call other users without having to set the code every time 2 This intercom is an updated version It will restore the original Channel Code number within 1 minute of intercom inactivity after you use use Lock Channel Code number function How to use Lock Channel Code number function Please check part 2 2 in this manual 2 3 Make an Address...

Страница 7: ...ercom B Channel 05 Code 01 if ringing was successful press and hold the TALK button and say the word hello to test the voice connection of Intercom B Release the TALK button after speaking If you can hear audio on both ends of the intercom system using the steps above you have successfully set up all the units of your intercom system Step 2 Set up each intercom to have the same code but different ...

Страница 8: ...same time One side may press and hold the TALK button to speak then release the TALK button after they have finished their message The other side can then answer your message by pressing and holding the TALK button and repeating the same steps You will not be able to hear the other user s voice if both sides are pressing and holding the TALK button at the same time TALK TALK TALK TALK TALK TALK TA...

Страница 9: ...ate After you connect to the AC power you need to set the channel code for the intercom This intercom has 22 channels 01 22 and 100 codes 00 99 available detail frequency data please check the table at 2 2 in this manual 1 Press MENU button the channel number on the left side of the screen will flash Press CH CH to set the channel 2 Click the MENU button again this will enable the code number on t...

Страница 10: ...s For example if 4 intercoms are set to code 01 on channel 4 any message sent by one intercom will be received by the remaining 3 intercoms 4 This intercom is an updated version It will restore the original Channel Code number within 1 minute of intercom inactivity after you use Lock Channel Code number function How to use Lock Channel Code number function Please check part 2 2 in this manual This...

Страница 11: ...hbors use GROUP function you can not solve this issue by change channel or code So Wuloo technology department made a update version for Wuloo intercon system we made a switch for GROUP function if you get a interference and can not solve it by changing channel or code it means you get interference by GROUP function from your neighbors so you can turn off the GROUP function of your intercom units ...

Страница 12: ...ge Press the VOX button on the intercom station enter VOX mode In this mode the screen will present a VOX letter In VOX mode you do not need to press and hold the TALK button to speak Every time you want to speak you will need to speak closely into the intercom station to activate it When you are speaking closely into the intercom the indicator light will turn red meaning it has successfully detec...

Страница 13: ...er Usage scenario description there is a company include 4 department include general manager room financial department HR department and sales department This company bought 4 intercom stations and distribute them to 4 department to help them communicate better Firstly set the channel and code for every intercom and distribute them to every department shows as below table Channel Code Device Loca...

Страница 14: ...s VOX mode needs to detect someone within a close speaking range to activate the intercom In VOX mode you can speak without pressing and holding the TALK button The other user can press and hold the TALK button to talk to you Monitor mode VOX mode VOX Present VOX Press the VOX button to enter VOX mode and you do not need to press and hold the TALK button to speak Usage Scenario 1 The general manag...

Страница 15: ...2 The general manager s office has something important to tell the financial department and needs to ask the financial manager to come to his office right away In this case the general manager can use the CALL function to call the head of the financial department by pressing and holding the TALK button to send the message Usage Scenario 3 General manager room need to talk with sales department may...

Страница 16: ...s while you are holding the TALK button 3 Check to make sure the intercom is not in monitor mode Monitor mode can only send audio but cannot receive it If so you can press the MONITOR button again to quit monitor mode 4 Your volume may be too low Press the VOL button to increase the volume of your intercom device 1 Check to make sure the intercoms have been set to the same channel and code The two...

Страница 17: ... solve this problem you just need to change the intercom settings to a different channel or code Question 2 This intercom uses FM wireless communication Do I need to have a license Answer 2 T his intercom system uses public frequency so there is no need for a license 7 Questions Answers The intercom units do not work The intercom does not receive any information while it is in Monitor mode 1 Try s...

Страница 18: ...l at support wulooofficial com We will do our best to answer you within 12 business hours You can also visit our official Facebook page and WulooOfficial We will reply to you immediately if our admin is online or usually within 6 hours if the admin is not immediately available Thank you very much for choosing Wuloo We believe in honesty and reliability for all our products That s why all of our pr...

Отзывы: