DigiReader Series
P/N 6600025, R
EV
. D 21
GENERAL INSTALLATION
See the procedures for the reader model and installation type below for additional instructions.
CABLE PREPARATION:
1.
Route the data and power cable to the DigiReader location and prepare the cable for attachment
to the DigiReader.
2.
Remove two inches of the plastic jacket and the shielding foil from the cable.
3.
Strip each wire back 1/4" for connecting to the DigiReader.
DR4200K, DR4203, DR4205 SERIES, DR4208S, AND DR4220 INSTALLATION:
1.
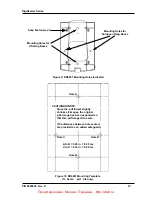
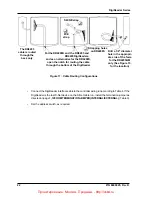
The S-Net cable on the DigiReader may be routed from the back, bottom or the side of the
DigiReader. The reader is pre-configured for cable installation through the back mounting plate.
Note:
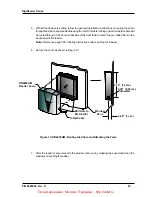
S-Net cable is routed directly through the back on the DR4203, DR4208S, and DR4220,
and, from the back, on the side on the DR4205GM DigiReader only. (See Figures 11 and 16,
below), and on the back, through the gap made by removing the plastic notch on the DR4200K,
DR4205, DR4205E, and DR4205K DigiReaders.
2.
For the DR4200K, DR4205, DR4205E, and DR4205K DigiReaders, remove the plastic notch
from the bottom of the cover. A rattail file may be used to enlarge the opening (Figure 11).
3.
The DR4208S DigiReader cable is designed to be routed in two ways. The unit comes from
the factory with the cable, secured by a 'SW-NE' strap, routed through the hole in the middle
of the upper left quadrant (looking at the back of the unit). Alternately you can re-route the cable
through the bottom notch, (removed as in paragraph 2, above) by opening the case, carefully
removing the PCB (four screws), snipping the 'SW-NE' strap, securing the cable with a 'W-E'
strap, (via the holes provided for this purpose in the PCB), and re-assembling the unit.
controller now physically connected to the S-Net, and the address switch(es) set, set up
the controller to read credentials.
•
Present a valid credential to the unit.
•
Verify that the credential can be read from the expected distance.
4
The read-range on the DigiReader should now be optimal, but,
•
If trouble persists, verify the S-Net wiring and grounding, and / or
•
Repeat steps 1, 2, 3, as necessary, to assure the best (most optimal) installed location.
Проектирование
.
Монтаж
.
Продажа
. - http://vskd.ru


