background image

World Precision Instruments

3.   Rinse the internal electrode with distilled water (particularly the tip) and let it soak 

for at least 15 minutes. Be careful not to let water get up into the handle. 

4.   Gently dry the electrode with a soft tissue (Kimwipes). Be sure to dry thoroughly 

the flat surface at the tip of the electrode. After drying the current should stabilize 

fairly quickly to a low value (for example, 0–20pA). If this occurs, it is a good indica-

tion that the electrode is functioning properly.

5.   If the electrode is not clean, repeat steps 3 and 4.
 6.   Remove the locking cap from the old used sleeve, and gently slide it onto the new 

replacement sleeve. Additional membrane sleeves (WPI#

600012

) may be pur-

chased separately.

7.   Dip the internal electrode 1–2cm into the 

ISO-HPO

 electrolyte (WPI #

100042

provided in the start-up kit. The current will rise rapidly offscale. Using the Mi-

croFil™ nonmetallic syringe needle (WPI #

MF28G67-5

) and 1mL plastic syringe 

(included in the Startup kit) inject approximately 100µL of electrolyte directly into 

the new sleeve, starting about half way down the sleeve and drawing the MicroFil 

out of the sleeve as it fills. The filling process should be performed slowly enough 

so as not to create turbulence, which could introduce air bubbles into the elec-

trolyte. The MicroFil (#

MF28G67

)supplied in the startup kit is less than the length 

of the sleeve, so that it will not puncture the delicate membrane at the tip of the 

sleeve during injection. 


TIP

: If air bubbles form in the electrolyte, gently flick or tap the side 

of the sleeve to remove the bubbles.

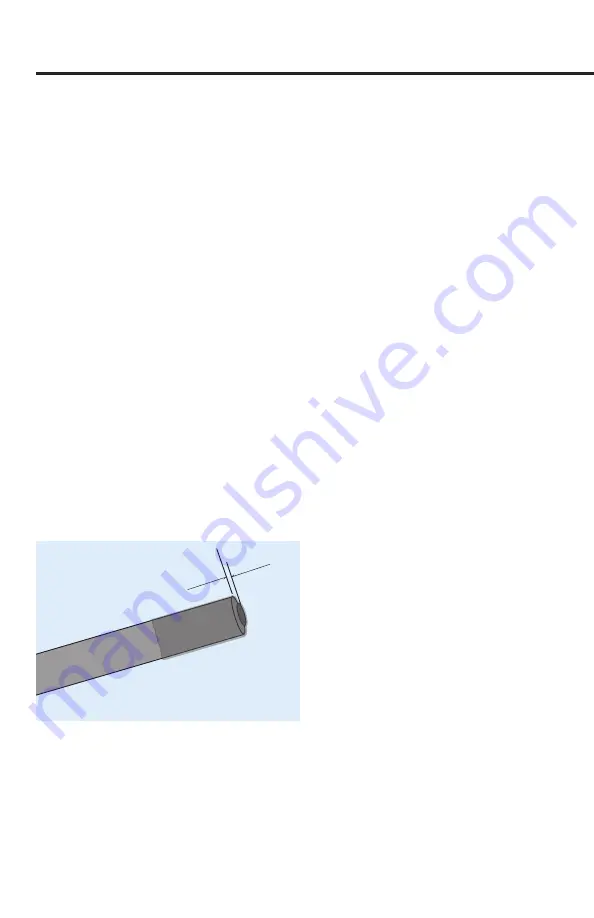
8.   Slowly and smoothly insert the electrode into the sleeve, and screw the locking 

cap into the handle. The electrode should be observed to press gently against the 

membrane (Fig. 5).

The internal electrode tip

should protrude slightly 

out into the membrane.

Fig. 5—Membrane placement. The internal 

electrode tip should protrude slightly out into the membrane.

9.   When connecting to the analyzer, the current displayed on the meter at this time 

will be high or offscale.

10.  Suspend the tip of the newly assembled probe in 0.1M PBS to polarize it or in 

distilled water for storage.

Содержание ISO-HPO-2

Страница 1: ...WORLD PRECISION INSTRUMENTS ISO HPO 2 Hydrogen Peroxide Sensor for use with WPI Analyzers Serial No _____________________ www wpiinc com INSTRUCTION MANUAL 031919...

Страница 2: ......

Страница 3: ...king of 0 1M PBS Buffer Solution 5 SENSOR CARE AND MAINTENANCE 6 Durability and Handling 6 Storing the Sensor 7 Cleaning the Membrane 7 Replacing the Membrane Sleeve 7 ACCESSORIES 9 TROUBLESHOOTING 10...

Страница 4: ...ii World Precision Instruments...

Страница 5: ...working reference electrode combination This electrode fits inside a disposable protective stainless steel sleeve WPI 600012 which must contain fresh electrolyte WPI 100042 and is separated from the...

Страница 6: ...if any parts are missing at 941 371 1003 or customerservice wpiinc com Returns Do not return any goods to WPI without obtaining prior approval RMA required and instructions from WPI s Returns Departme...

Страница 7: ...includes replacement membrane sleeves along with all the accessories to fill them properly with filling solution electrolyte OPERATING INSTRUCTIONS Polarizing the Sensor 1 Measure an appropriate volum...

Страница 8: ...f 450mV The oxidation of H2 O2 at the sensor surface produces a small current pA which is detected by the TBR4100 1025 The amount of current produced is linearly proportional to amount of H2 O2 in the...

Страница 9: ...er a half hour in solution it is likely that the membrane has been damaged and the sleeve needs to be changed See Replacing the Mem brane Sleeve on page 7 NOTE The calibration should be carried out at...

Страница 10: ...nsitivity However if the pH is below 3 0 the noise of the sensor will increase At pH 10 0 and higher the response of the sensor will diminish significantly SENSOR CARE AND MAINTENANCE Durability and H...

Страница 11: ...olution the membrane tip should first be soaked in a protease solution for several minutes to remove protein build up and then in distilled water Enzymatic detergent Enzol WPI 7363 can also be used Th...

Страница 12: ...p kit inject approximately 100 L of electrolyte directly into the new sleeve starting about half way down the sleeve and drawing the MicroFil out of the sleeve as it fills The filling process should b...

Страница 13: ...le WPI 600012 ACCESSORIES Part Number Description 5399 T Adapter Kit pkg of 3 600011 ISO HPO 2 Startup Kit 600012 Replacement Sleeves pkg of 4 100042 ISO HPO 2 Electrolyte Filling Solution 10mL 7363 4...

Страница 14: ...l interferences Calibration data set is not linear The dilution factors may be incorrect Verify the procedure used Uneven aliquots may have been used Check the pipetter calibration Sensitivity below r...

Страница 15: ...t special or consequential arising from a failure of this product to operate in the manner desired by the user WPI shall not be liable for any damage to data or property that may be caused directly or...

Страница 16: ...berg Hesson Germany Tel 49 0 6031 1602171 Fax 49 0 6031 1602180 E mail wpide wpi europe com China Hong Kong WPI Shanghai Trading Co Ltd Rm 18A No8 Dongfang Rd Pudong District Shanghai 200120 PR China...

Отзывы: