background image

36V 19

 Cordless lawn mower                     EN

17

16

17

16

4. If a grass bag is used during the fast 
growing season, the grass may tend to clog 
up at the discharge opening. Release switch 
lever to turn mower “OFF” and remove the 
safety key. Remove the grass bag and shake 
the grass down to the back end of the bag. 
Also clean out any grass or debris which may 
be packed around the discharge opening. 
Replace the grass bag.
5. If mower should start to vibrate abnormally, 
release switch lever to turn mower “OFF” and 
remove safety key. Check immediately for 
cause. Vibration is a warning of trouble. Do 
not operate mower until a service check has 
been made. 
6. ALWAYS RELEASE SWITCH LEVER TO 
TURN MOWER “OFF” AND REMOVE SAFETY 
KEY WHEN LEAVING IT UNATTENDED EVEN 
FOR A SHORT PERIOD OF TIME.

8. mUlChiNg mowiNg TiPS

While mulching, your new mower is designed 
to cut the grass clippings into small pieces 
and distribute them back into the lawn. Under 
normal conditions, the mulched grass will 
biodegrade quickly to provide nutrients to the 
lawn.
Please review the following recommendations 
for optimum mulching performance.
1. Avoid mowing when the grass is wet from 
rain or dew. Wet grass may form clumps 
which interfere with the mulching action and 
reduce runtime.
The best time to mow grass is in the late 
afternoon when the grass is dry and the 
newly cut area will not be exposed to direct 
sunlight.
2. For best mulching performance, set the 
cutting height to remove about one third of 
the grass blade length, ideally no more than 
1.5 inch at one time. If the lawn is overgrown, 
it may be necessary to increase the cut height 
to reduce the pushing effort and prevent 
overloading the motor. For extremely heavy 
mulching, it is advisable to first cut at a high 
cut height setting, and then re-cut to the final 
cut height. Otherwise, make narrower cuts 
and mow slowly.

NoTE:

 The motor is protected by a safety 

cut out which is activated when the 

blade becomes jammed or if the motor is 
overloaded.

The safety cut out will only reset when 

the safety bail 2 is released. Clear any 

obstruction and wait for a few minutes 

for the safety cut out to reset before 

continuing to use the mower. at this 

time do not operate the safety bail 2 

as this will prolong the reset time of 

the safety cut out. if the mower cuts 

out again increase the height of cut to 

reduce the load on the motor.

3. For best performance, keep the mower 
housing free of built-up grass. From time to 
time turn off mower and wait for the blade 
to come to a complete stop. Then unplug 
the safety key and turn mower on its side. 
Using an object such as a stick, wipe out any 
accumulation of grass in the blade area. Be 
careful of the sharp edges of the blade. Clean 
often in wet, new grass, and always after 
every use.
4. Certain types of grass or grass conditions 
may require that an area be mulched a second 
time to fully disperse the grass throughout 
the lawn.
If cutting a second time, it is advisable to cut 
perpendicular (across) the first cut pattern. DO 
NOT CHANGE CUT PATTERN IN ANY WAY
THAT WOULD CAUSE MOWING DOWN A 
HILL.
5. Change your cutting pattern from week 
to week. This will help prevent matting and 
graining of the lawn.

MAINTENANCE

warNiNg: Stop the mower and 

remove the safety key before 

removing the grass bag.

NoTE: 

To ensure long and reliable service, 

perform the following maintenance 
procedures regularly. Check for obvious 
defects such as a loose, dislodged or a 
damaged blade, loose fittings, and worn 
or damaged components. Check that the 
covers and guards are all undamaged and 
are correctly attached to mower. Carry out 
any necessary maintenance or repairs before 

Содержание WG788

Страница 1: ...36V 19 Cordless lawn mower EN Tondeuse gazon de 19 po sans fil de 36V F 36V 19 Cortac sped sin cables ES Pag 07 Pag 18 Pag 31 WG788 hElPliNE NUmBEr 1 866 354 worx 9679 hElPliNE NUmBEr...

Страница 2: ......

Страница 3: ......

Страница 4: ...1 2 3 4 6 7 8 17 9 5 6 11 10...

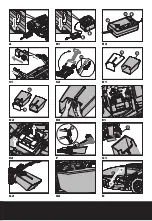
Страница 5: ...14 15 16 e b 1 2 a 5 c d 2 1 a b 19 f 18 A B1 B2 C1 C2 D1 D2 D3 E1 E2 F G1 G2 G3 H...

Страница 6: ...6 1 2 3 4 5 O 1 O 2 O 3 0 1 2 1 2 2 1 N 1 N 2 N 3 12 12 17 13 9 c I1 I2 J K1 K2 L M1 M2 N O P Q R...

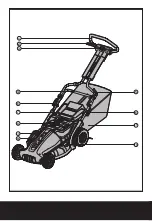
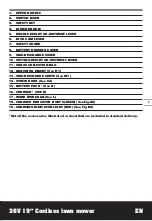
Страница 7: ...discharge cover 10 Cutting height adjustment lever 11 Grass collection bag 12 Mulching insert See K1 13 Side discharge chute See M1 14 Screw knob See C2 15 Battery pack See B 16 Charger See B 17 Work...

Страница 8: ...r model WA3722 Charger rating Input AC 120V 60Hz 45W Output 42 5V 1 0A Machine weight 87lbs 39 5kg ACCESSORIES Grass collection bag 1 Charger WA3722 1 Side discharge chute 1 Mulching insert 1 Battery...

Страница 9: ...Care Keep cutting edges sharp and clean for best and safest performance Follow instructions for lubricating and changing accessories Inspect lawn mower cord periodically and if damaged have it repair...

Страница 10: ...ders before operating Stop machine if anyone enters the area 6 Do not operate machine barefooted or while wearing sandals Always wear substantial footwear 7 Do not pull machine backward unless absolut...

Страница 11: ...blade or wear gloves and use extra caution when servicing them 8 Maintain or replace safety and instruction labels as necessary SAVE THESE INSTRUCTIONS Safe Operation Practices for Walk Behind Mowers...

Страница 12: ...or specifications d Replace the blade if it is bent or cracked An unbalanced blade causes vibration that could damage the motor drive unit or cause personal injury e Sharpen a dull blade equally at e...

Страница 13: ...a fully discharged battery See B2 6 After the battery is fully charged the green light will turn on and stay it for 15 seconds to indicate a full charge After 15 seconds the green light and charges w...

Страница 14: ...g insert has been removed 3 Pick up the grass bag by the handle and position grass bag on the lower hooks e on the mower deck 4 Release the safety guard to lock the grass bag into position Ensure the...

Страница 15: ...ng insert completely 4 The safety guard is spring loaded When you release it the guard will return to the closed position 4 INSTALLING MULCHING INSERT See K2 1 Turn the mower off wait until the blade...

Страница 16: ...o first cut at a high cut height setting and then re cut to the final cut height Otherwise make narrower cuts and mow slowly NOTE The motor is protected by a safety cut out which is activated when the...

Страница 17: ...NG See O Check balance of blade by placing center hole in blade O 1 over a nail or screwdriver shank O 2 clamped horizontally in a vise O 3 If either end of the blade rotates downward file that end Bl...

Страница 18: ...g performance is unsatisfactory or does not cut entire lawn A Has battery been fully charged Plug in charger and wait for green light to come on B Release switch lever to turn mower off Remove safety...

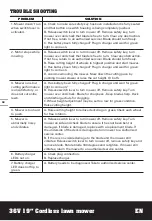
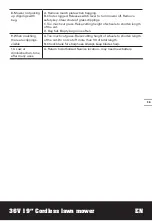
Страница 19: ...t grass Raise cutting height of wheels to shorten length of the cut D Bag full Empty bag more often 9 When mulching there are clippings visible A Too much cut grass Raise cutting height of wheels to s...

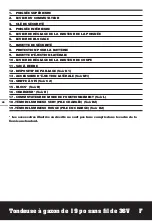
Страница 20: ...our la batterie 9 Bavette d jection lat rale 10 Levier de r glage de la hauteur de coupe 11 Sac herbe 12 Dispositif de paillage voir K1 13 Accessoire d jection lat rale voir M1 14 Griffe vis voir C2 1...

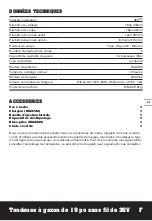
Страница 21: ...od le de chargeur WA3722 Valeurs nominales du chargeur entr e AC 120V 60Hz 45W sortie 42 5V 1 0A Poids de la machine 87lbs 39 5kg ACCESSORIES Sac herbe 1 Chargeur WA3722 1 Bavette d jection lat rale 1...

Страница 22: ...auquel il est destin 7 Ne forcez pas l appareil Il va faire un meilleur travail et avec moins de risques de blessure en travaillant au taux de charge pour lequel il a t con ut 8 N essayez pas d utilis...

Страница 23: ...tre dangereux pour la peau et pour les yeux C est un conducteur lectrique et il est corrosif Observez les proc dures de s curit suivantes a Portez des lunettes et des v tements de protection b Si l l...

Страница 24: ...bstacles 3 Ne tondez pas de l herbe humide ou dans des pentes excessivement raides De mauvaises chaussures peuvent entra ner un accident par glissade et par chute 4 Ne tondez pas proximit de foss s de...

Страница 25: ...spectez soigneusement la tondeuse et assurez vous qu elle n est pas endommag e puis r parez les dommages le cas ch ant avant de red marrer et d utiliser la tondeuse d Si l appareil commence vibrer de...

Страница 26: ...manuel La lame continue de tourner une fois la machine arr t e Attendez que toutes les pi ces de la tondeuse se soient arr t es avant de les toucher N exposez pas la pluie et l eau Ne pas jeter au fe...

Страница 27: ...ment et que la charge de la batterie est en cours Voir B2 5 Le t moin rouge s teint et le t moin vert s allume lorsque la charge est termin e il faut compter environ 16 heures pour charger une batteri...

Страница 28: ...hauteur et assurez vous d ins rer la broche dans le trou Ensuite remettez le levier de blocage dans sa position intiale Remarque V rifiez toujours que la poign e sup rieure est bien fix e 5 INSTALLATI...

Страница 29: ...de couper l herbe De continuer faire fonctionner votre tondeuse avec la batterie dans cette condition d charg e peut r duire la vie et la performance de votre batterie 3 RETRAIT DE LA PLAQUE DE D CHIQ...

Страница 30: ...NS SURVEILLANCE M ME POUR UNE COURTE DUR E 8 CONSEILS RELATIFS LA D SINT GRATION DES BRINS D HERBE En mode de d chiquetage la tondeuse coupe les brins d herbe en petites pi ces et les distribue sur la...

Страница 31: ...enait d faillir en d pit d un entretien r gulier s il vous pla t appelez notre ligne d aide pour des conseils 1 866 354 9679 AFF TAGE DE LA LAME S ASSURER QUE LA LAME ESTTOUJOURS AFF T E AFIN D OPTIMI...

Страница 32: ...fentes de ventilation Tournez la machine sur le c t et nettoyez l aire de la lame Les coupures de gazon sont compact es dans l aire de la lame enlevez les avec un bout de bois ou de plastic Entrepose...

Страница 33: ...rations autoris B Si aucun dommage visible la lame n est d termin et que la tondeuse vibre toujours relacher l anse pour teindre la tondeuse retirer la cl de s ret et retirer la lame Tourner la lame s...

Страница 34: ...r a 9 Tapa de descarga lateral 10 Palanca de ajuste de altura de corte 11 Bolsa para pasto 12 Inserto para Mantillo Ver K1 13 Accesorio de descarga lateral Ver M1 14 Mando enroscable Ver C2 15 Bater a...

Страница 35: ...ora Modelo del cargador WA3722 Clasificaci n de voltaje del cargador AC 120V 60Hz 45W Salida 42 5V1 0A Peso de la m quina 87 libras 39 5kg ACCESORIOS Bolsa para pasto 1 Cargador WA3722 1 accesorio de...

Страница 36: ...e en lo que est haciendo Use el sentido com n No use el artefacto cuando est cansado 10 Guarde los Artefactos que no Utilice en el Interior Cuando no los use los artefactos deben guardarse en el inter...

Страница 37: ...las instrucciones que aparecen en la m quina y en el los manual es antes de comenzar 2 No coloque las manos o pies cerca o debajo de la m quina Mantenga libre siempre el orificio de descarga 3 S lo pu...

Страница 38: ...los ni os se encuentran atra dos por la m quina y la actividad de corte de pasto Nunca presuponga que los ni os permanecer n en el mismo lugar donde los vio por ltima vez 1 Mantenga a los ni os alejad...

Страница 39: ...cada vez que deje la herramienta sin supervisi n y antes de efectuar una reparaci n o inspecci n f Apague el motor y espere a que la hoja se detenga por completo antes de extraer el receptor de c sped...

Страница 40: ...jelo de bordes cortantes PROCEDIMIENTO DE CARGA Ver A B1 B2 1 La carga debe realizarse con la bater a INSTALADA Ver A o EXTRA DA de la m quina Ver B1 2 Inserte el conector del cargador en el recept cu...

Страница 41: ...SE BATER AS ADICIONALES por medio de la l nea de asistencia al cliente 1 866 354 9679 MONTAJE AJUSTE Advertencia No conecte la bater a y o la llave de seguridad antes de montar completamente el produc...

Страница 42: ...encia La cuchilla continuar girando durante algunos segundos despu s de apagar la m quina Deje que se detengan el motor y las cuchillas antes de volver encenderla No apague la m quina y vuelva encende...

Страница 43: ...accesorio de abono y el accesorio de descarga lateral la hierba puede descargarse a trav s del lateral de descarga de la m quina Para montar el accesorio de descarga lateral levante la tapa de descarg...

Страница 44: ...otor El disyuntor de seguridad s lo se restablecer cuando se suelte la palanca del interruptor 2 Elimine cualquier obstrucci n y espere algunos minutos para que el disyuntor de seguridad se restablezc...

Страница 45: ...N 3 o con una piedra de afilar 6 Verifique el balance de la cuchilla Vea las instrucciones para balancear la cuchilla 7 Vuelva a colocar la cuchilla en la podadora y apriete con firmeza Consulte las...

Страница 46: ...eto Enchufe el argador y espere hasta que se prenda la luz verde D Evite sobrecargar la podadora Reduzca el ritmo de corte empujando la podadora con mayor lentitud o eleve la altura de corte Tambi n p...

Страница 47: ...ace el cargador 7 El LED del cargador de la bater a no cambia a verde A Se debe someter la bater a a diagn stico Ll vela a un centro de mantenimiento autorizado 8 La podadora no recoge los recortes de...

Страница 48: ...Designed in Italy Made in China Con u en Italie Fabriqu en Chine Dise ado en Italia Fabricado en China Copyright 2010 Positec All Rights Reserved...

Отзывы: