background image

Installation

Greenstar Heatslave II External 

ErP - 

6 720 813 345 (2014/09)

24

5.11

Weather compensation

The appliance will modulate the CH flow temperature based on the 
outside temperature when an outdoor sensor is connected to the 
outdoor sensor connection on the control board and the weather 
compensation is active.

This is designed for use with a system that has thermostatic radiator 
valves and a room thermostat.

The appliance will operate at lower temperatures when there is a lower 
heat load because the building is losing less heat due to higher external 
temperatures. This means that the appliance is running more efficiently 
as it is operating for longer at condensing temperatures.

The weather compensation curve can be adjusted to tune the flow 
temperature to suit the particular installation.

The appliance is supplied with the weather compensation deactivated.

Weather compensation activation

The weather compensation is activated via menu 1 of the text display.

▶ Select Menu 1 via ▲ ▼ scroll buttons.
▶ Press OK button.
▶ Select W1 via ▲ ▼ scroll buttons.
▶ Press OK button.
▶ Set W1 to 1 via ▲ scroll button.
▶ Press OK button.

The weather compensation is now active and the appliance will check for 
the presence of an outdoor sensor and deactivate the CH flow 
temperature modulation if a sensor is not detected. When weather 
compensation is activated but an outdoor sensor is not fitted/detected, 
the warning triangle and H03 will be displayed on the LCD display.

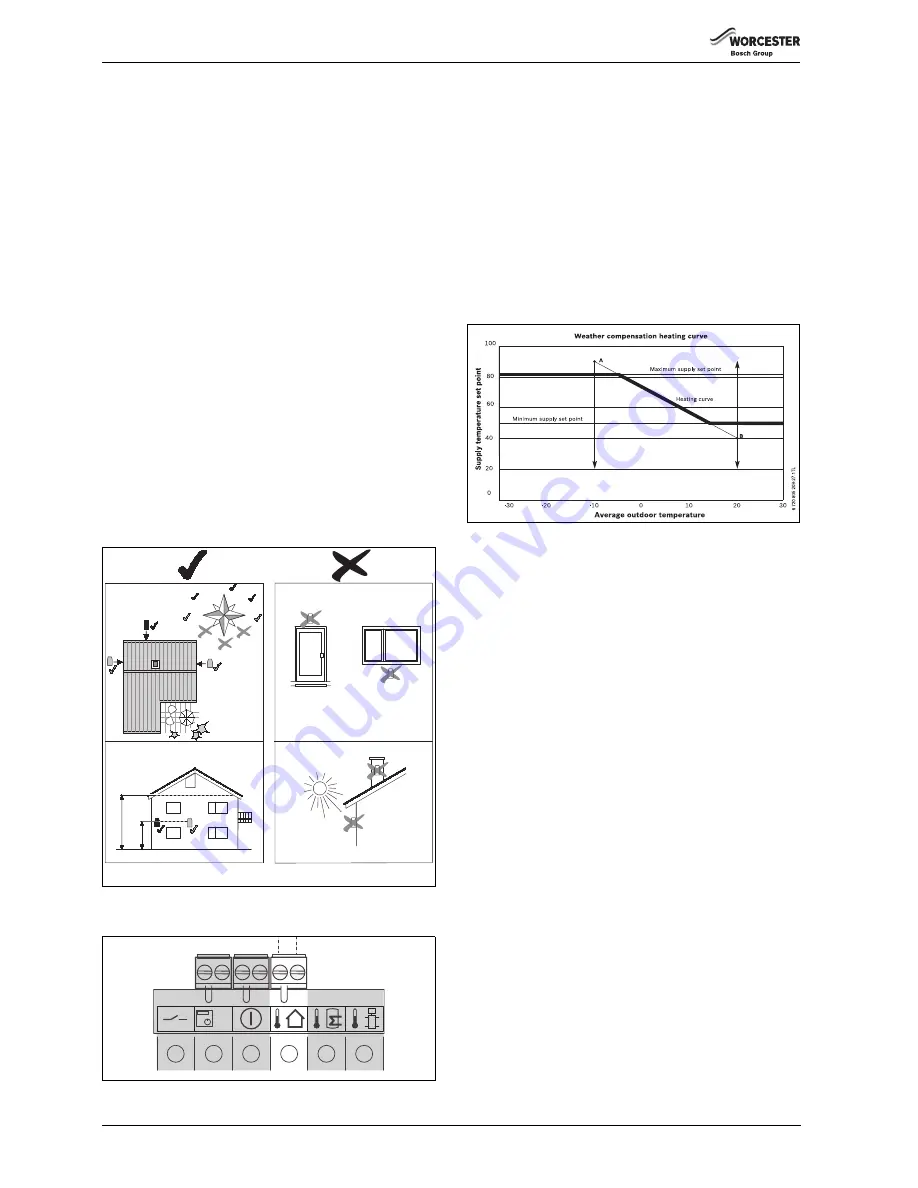
Fig. 37

Weather compensation sensor optimum siting indicated by black tick.

Fig. 38

The sensor is wired directly into the control box via terminal 4 in the low 
voltage terminal strip (

 page 22).

The heating curve

The CH flow temperature has an upper limit of 82°C (this can be capped 
via the CH control knob setting) and a lower limit of 50°C, (it is 
recommended that the CH knob is set to 82°C for the weather 
compensation to operate most effectively).

The default settings for the curve are point A = 90°C and point B = 40°C, 
this gives a 80°C flow at -4°C outdoor temperature and a 50°C flow at 
14°C outdoor temperature which should be suitable for typical systems.

Point A is the projected value for the flow temperature at -10°C outdoor 
temperature and point B is the projected value for the flow temperature 
at +20°C outdoor temperature, (these values dictate the angle of the 
slope only they are not CH flow temperature limits).

Adjusting the heating curve

▶ The weather compensation curve can be adjusted via the text display 

by adjusting the projected flow temperature at -10°C (point A), Menu 
1 W2 (pA), and 20°C (point B), W3 (pB), enabling the slope as well 
as the position of the curve to be adjusted to suit the installation.

▶ Point A and B can be set between 90 and 20°C but point A must 

always be greater than point B.

Outdoor sensor error

▶ If during weather compensation the outdoor sensor is open circuit or 

closed circuit the CH flow temperature modulation is deactivated and 
the CH flow temperature set to the CH control knob setting, a warning 
triangle and H03 are displayed on the LCD.

▶ The appliance will monitor the outdoor sensor input and if the sensor 

returns to normal then the flow temperature modulation will be 
reactivated and the LCD warning triangle and H03 are turned Off, 
(there may be a 10 second delay).

Average outdoor temperature

▶ To stop rapid fluctuations the outdoor temperature used for CH flow 

temperature modulation is an average value taken over a ten minute 
period.

▶ When an outdoor sensor is first detected the sensor value is taken to 

be the outdoor temperature, subsequent to this the outdoor 
temperature will be adjusted every 10 minutes using an average 
outdoor temperature value from the previous 10 minute period.

Frost protection

The normal condition for the appliance is that the weather compensation 
frost protection is turned Off.

If required the frost protection is activated via Menu 1 W5 of the text 
display, 0 = OFF, 1 = ON.

On Activation of the weather compensation frost protection if the 
outdoor temperature is less than 5°C the system frost protection is 
activated the same as if an external frost thermostat was activated.

1

/

2

H

(min 2m)

H

N

S

W

E

NW

NE

SW

SE

6 720 805 209-25.1TL

EMS

1

2

3

4

5

6

 6 720 805 209-26.1TL

Содержание Greenstar Heatslave II 12/18

Страница 1: ...ing combination boiler balanced flue Greenstar Heatslave II External ErP 12 18 18 25 25 32 6 720 805 210 00 1TL For fully pumped open vent or sealed central heating systems and domestic hot water cyli...

Страница 2: ...stallation 17 5 1 Unpacking the boiler 17 5 2 Pipework and flue positions 17 5 3 Boiler installation 18 5 4 Flue installation 18 5 5 Combustion chamber 18 5 6 Pipework connections 19 5 7 Oil burner an...

Страница 3: ...substances which can corrode the appliance and invalidate any warranty Handling instructions and guidelines It is advised that more than one person is involved in the transfer of the packaged applianc...

Страница 4: ...for installers who are members of these organisations to self certify their work Alternatively you must submit a building control notice to the LABC before installing any boiler The LABC will then arr...

Страница 5: ...estrictor colour Lime Beige Grey Domestic Hot Water Maximum flow rate 15 litres min 15 18 22 Minimum inlet pressure dynamic for maximum flow rate bar 1 5 1 2 1 6 Maximum hot water temperature rise for...

Страница 6: ...mperature regime 2 2 Low temperature means for condensing boilers 30 C for low temperature boilers 37 C and for other heaters 50 C return temperature at heater inlet P1 kW 5 7 7 9 10 2 Useful efficien...

Страница 7: ...5 2014 09 7 3 4 Layout components The diagram below excludes the top front and RH side casing panels Fig 2 10 11 12 13 14 18 15 16 19 20 21 22 23 24 25 26 27 29 28 a 36 37 38 40 39 42 44 43 45 45 46 4...

Страница 8: ...CE OF BS7593 Treatment of water in domestic hot water central heating and also the flushing guidelines below FLUSHING THE SYSTEM Fill the system with cold water and check for leaks Open all drain cock...

Страница 9: ...pressure Maximum mains fed water pressure 10 bar If necessary fit a pressure reducing valve Where the water main supply has a non return back flow prevention valve fitted a mini expansion vessel A mus...

Страница 10: ...ction line removed to assist purging air from the oil line Fig 6 De aerator feed Maximum pipe run for single pipe suction lift with de aerator 4 2 4 Pipework Use flexible hoses to connect to the oil p...

Страница 11: ...3 bar Radiator valves should conform to BS 2767 10 All other valves should conform to BS 1010 An automatic bypass valve must be connected between the heating flow and return where TRVs are used on all...

Страница 12: ...priate outlets 4 4 Condensate pipework Externally run condensate drainage pipe should terminate at a suitable foul water discharge point or purpose designed soak away If this method is chosen then the...

Страница 13: ...here there are likely to be extremes of temperature or exposure theuseofaproprietarytrace heatingsystemforexternalpipe work incorporating an external frostthermostat should beconsidered If such a syst...

Страница 14: ...ar clearance flue outlet on rear 2500mm It is strongly recommended that the flue terminal faces away from walls to reduce the possibility of wetting occurring Fig 16 Above clearance Fig 17 Rear exit f...

Страница 15: ...t be fitted and terminated in accordance with the recommendations of BS5410 The flue must not cause an obstruction Discharge from the flue outlet must not be a nuisance Flue gases have a tendency to p...

Страница 16: ...into the 90 bend then withdraw the tube by approximately 10mm to allow for expansion 2 Once the plume management system is in place and secured to the wall secure the terminal bend with the screws rem...

Страница 17: ...25 models 28mm copper on 25 32 model Return 22mm copper 12 18 18 25 models 28mm copper on 25 32 model DCW In 15mm copper DHW Out 22mm copper PRV 15mm copper Services duct 100mm Condensate outlet 21 5m...

Страница 18: ...10mminside the casing and to finish flush with the interior wall surface cut to size and fit the duct Fit the 100mm sealing ring where the duct enters the casing and seal the joint to the exterior wal...

Страница 19: ...dels F 10mm oil supply connection G Oil isolating valve 10mm H Flexible oil hose J Flue manifold condensate outlet K Condensate outlet and flexible push fit connect 21 5mm supplied L Condensate pipe n...

Страница 20: ...30 Ensure that the nozzle A is aligned centrally within the combustion head C Inspect for any visible defects Fig 30 Nozzle and electrode alignment Oil pump Connecting the oil pump for a single pipe s...

Страница 21: ...ovided Always apply pressure at the edges of the boiler panels when securing to avoid accidental damage Fig 32 5 9 Electrical The boiler is pre fitted with a mains supply cable and plug A The 230V sup...

Страница 22: ...tilted over DHW LR switched live This input provides the live feed in from a connection for a proprietary twin channel control to time the tank reheat function on the DHW All Worcester twin channel di...

Страница 23: ...Installation Greenstar Heatslave II External ErP 6 720 813 345 2014 09 23 5 10 Electrical schematic Fig 36 6 720 805 209 24 1TL...

Страница 24: ...s gives a 80 C flow at 4 C outdoor temperature and a 50 C flow at 14 C outdoor temperature which should be suitable for typical systems Point A is the projected value for the flow temperature at 10 C...

Страница 25: ...quired adjusttheexpansionvesselpressureusingthe Schraeder type valve A Fig 42 The charge pressure of the built in 12 litre expansion vessel is 0 7 bar as dispatched which is equivalent to a static hea...

Страница 26: ...used Single pipe gravity feed systems Disconnect the flexible oil hose and open the isolating valve to discharge the oil into a suitable container Ifa top entrytank hasbeen used the pipework will need...

Страница 27: ...LCD display J by code 9F 855 Wait two minutes then press the lockout reset button K to initiate another start sequence Repeat procedure until a flame is established Fig 48 3 Start and run for 3 minut...

Страница 28: ...econds 2 The control will run an internal test 3 When the internal test has been successfully performed this screen is displayed The boiler is in stand by Theflowtemperaturesensorindicatestheprimaryte...

Страница 29: ...Menu 2 via the and arrow buttons Press and hold OK button for 1 second to enter Menu 2 The menu lists the boiler parameters that can be adjusted in this menu Fig 56 To modify setting 4 Select the desi...

Страница 30: ...inal boiler rating at normal operating temperature using Kerosene Class C2 2 7A Demand fault indicator blue light activation 0 The blue light will only operate as a flashing fault alert 1 The blue lig...

Страница 31: ...g system in accordance with the manufacturers instructions The inhibitor or combined inhibitor anti freeze must not cause damage to the materials within the boiler mild steel stainless steel copper an...

Страница 32: ...aseofthefrontpanelusingthetoolprovided and pull the panel out and down to remove Store safely away from the working area Operatetheapplianceandsystemandnoteanyfaultswhichmayneedto be corrected during...

Страница 33: ...screws H and the oil pump cover J Replace the standard flexible oil line s at every annual service to prevent the possibility of leakage due to ageing Reassemble the burner components Check the O ring...

Страница 34: ...and replace if necessary Remove the one piece baffle set C clean and check the condition of the baffles Replace baffle set if considered to be badly corroded degraded Thoroughly clean all of the heat...

Страница 35: ...CO2 if necessary using the air shutter When the combustion is correct turn off the boiler remove the pressure gauge and refit the blanking plug and plastic cover Refit control box 5 Rotate the box tow...

Страница 36: ...D2X Short 0 45 x 60 ES 7 5 110 1 28 1 63 77 11 5 5 0 15 4 15 12 15 LD2X Short 0 55 x 80 ES 7 8 115 1 54 1 96 80 12 0 5 0 18 5 18 0 18 LD2X Short Greenstar Heatslave II 18 25 model 0 50 x 80 ES 8 5 125...

Страница 37: ...Heat Exchanger gasket 8 718 690 792 0 13 Nozzle holder 8 716 116 638 0 14 Flue sample point screw 8 718 682 081 0 15 Oil nozzle 0 35 80 SR 12kW output 8 716 156 679 0 0 45 60 ES 15kW output 8 716 114...

Страница 38: ...dary Heat Exchanger gasket 8 747 009 725 0 13 Flue sample point screw 8 718 682 081 0 14 Oil nozzle 0 50 80 ES 18kW output 8 716 156 671 0 0 60 60 ES 21 5kW output 8 716 156 680 0 0 75 80 ES 25kW outp...

Страница 39: ...dary Heat Exchanger gasket 8 718 688 799 0 12 Flue sample point screw 8 718 682 081 0 13 Oil nozzle 0 75 80 ES 25 28 5kW output 8 716 109 387 0 0 85 80 EH 32kW output 8 716 156 644 0 14 Flow turbine 8...

Страница 40: ...ng heated tank is being heated 202 CH Anti rapid cycle mode Time delay to prevent rapid cycling of the boiler on the room thermostat 203 System stand by The boiler has no CH or DHW demands 270 Power u...

Страница 41: ...toconfirmtheupdateofthenew value i13 Thermal store current temperature This is the thermal store current temperature displayed in real time rounded to 0 5 C units i14 DCW inlet temperature Current DCW...

Страница 42: ...ntion is required following clearance of the fault Press the reset button on the boiler fascia Blocking condition The boiler will stop operating and no fault code will be displayed Analphanumericfault...

Страница 43: ...d the safety sensor on the main heat exchanger should be within 15 C of each other 276 E9 Flow temperature exceeds 95 C X Primary overheat boiler waits for temperature to reduce approximately 30 minut...

Страница 44: ...Fault finding and diagnosis Greenstar Heatslave II External ErP 6 720 813 345 2014 09 44 8 5 DHW function chart Fig 84...

Страница 45: ...m the last CH demand end Applianceautomaticfrost protection monitors PHE flow and internal tank sensors PHE OR Flow sensor below 8 C T ank will scavenge heat after any burn to heat tank to 10 C 3WV to...

Страница 46: ...ring lockout 6720805209 73 1Wo Normal operation Any CUS lockout Blue light flashing Mains power loss Mains power restored Press reset button Press reset button IF the original lockout was due to a bur...

Страница 47: ...until the power has been interrupted to the burner Burner LOCKOUT Blue light flashing 9F 855 cause code on display there is no power to the burner when the controls are in lockout Hold down the servi...

Страница 48: ...diagnosis Greenstar Heatslave II External ErP 6 720 813 345 2014 09 48 8 10 Riello digital control boxes Fig 90 RIELLO MO535 MRF DIGITAL CONTROL BOX FAULT FINDING LOGIC PRE HEATER LINK FITTED FIT PRE...

Страница 49: ...Fault finding and diagnosis Greenstar Heatslave II External ErP 6 720 813 345 2014 09 49 Fig 91 6 720 805 209 76 1TL...

Страница 50: ...o top of oil or 3 5 metres lower iffittedwithade aeratorortwo pipeoildeliverysystem thanthe oil pump If vacuum is greater than minus 0 35 bar then you must also check that the oil supply is not obstru...

Страница 51: ...Greenstar Heatslave II External ErP 6 720 813 345 2014 09 51 Notes...

Страница 52: ...Greenstar Heatslave II External ErP 6 720 813 345 2014 09 52 Notes...

Страница 53: ...Greenstar Heatslave II External ErP 6 720 813 345 2014 09 53 Notes...

Страница 54: ...the manufacturer s instructions No Yes The operation of the boiler and system controls have been demonstrated to and understood by the customer No Yes The condensate drain has been installed in accor...

Страница 55: ...ster No Pump Pressure Comments Signature Service 7 Nozzle Changed Flue Pressure F G T psi Yes No ppm CO CO CO2 ratio CO2 C Date Engineer Name Company Name Telephone No OFTEC Register No Pump Pressure...

Страница 56: ...ld be removed from the oil dip pipe Boiler locks out at the start of a demand Heating off over night for example 1 If an air eliminator is being used check that there are no leaks that allow air to be...

Отзывы: