Worcester greenstar heatslave 18 Скачать руководство пользователя страница 14

PR

E-

IN

S

TA

LL

AT

IO

N

INSTALLATION & SERVICING INSTRUCTIONS FOR WORCESTER BOSCH

12

BOILER LOCATION & CLEARANCES

8-716-106-252a (03.05)

BOILER LOCATION &
CLEARANCES

• This boiler is only suitable for installing internally

within a property at a suitable location onto a

fixed rigid non-combustible surface of the same

size as the boiler and capable of supporting the

boiler weight.

• The boiler must be installed on a flat level surface

to ensure condensate does not enter the primary

heat exchanger.

• The boiler is not suitable for external installation

unless a suitable enclosure is provided.

• Roof space installations must fully conform to

BS5410 part 1 section 4.6.9

Open flue model (CF):

• In order to ensure clean and efficient combustion

an adequate supply of air must be delivered to

the combustion chamber.

• To provide sufficient air a suitable inlet must be

provided into the room or space in which the

boiler is situated, minimum size 110cm² for

18/25kW appliances.

An air brick or other form of continuous air supply

may have to be built into the installation in order

to ensure an adequate supply of air.

• If the appliance is to be installed in a confined

space or compartment two air vents are required,

one at high level and one at low level.

The minimum free area of each vent is shown

opposite and depends whether the air is taken

from another room or from outside the building.

• Where the air is taken from another room that

room must contain an air inlet as described

above.

Room sealed balanced flue model (RS):

The appliance does not require a separate vent for

combustion air.

• Installation in cupboards or compartments require

permanent vents for cooling purposes, one at

high level and one at low level, either direct to

outside air or to a room.

• Both vents must pass to the same room or be

on the same wall to the outside air.

The minimum air vent free area is given in the table

opposite.

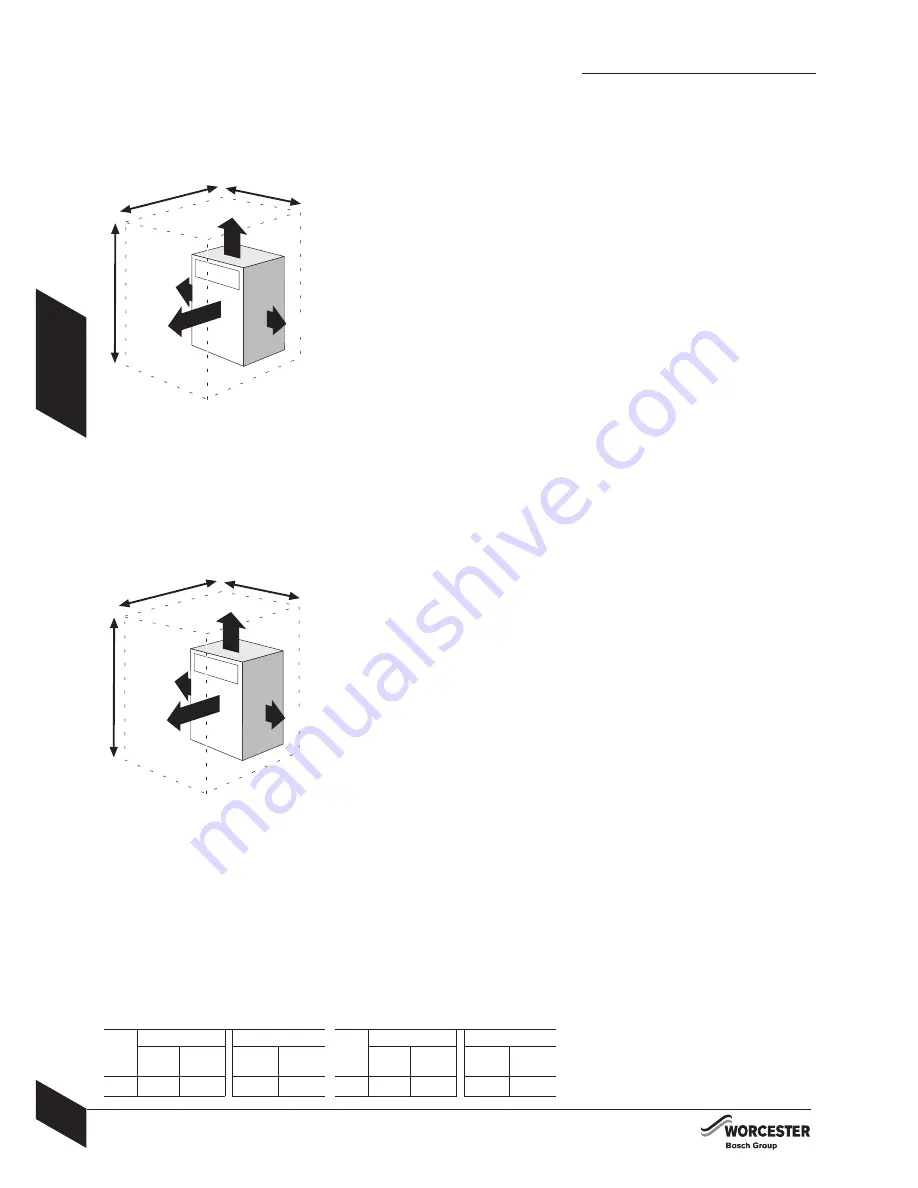
a: INSTALLATION CLEARANCES:

Diagram (a) shows the minimum space

recommended to 

install

 the boiler only.

b: SERVICE CLEARANCES:

Diagram (

b

) shows the minimum space required to

service

 the boiler only.

The appliance is suitable for an under worktop

installation providing that the worktop above the

boiler (min.10mm clearance) is removable for

maintenance and the front of the boiler is not

enclosed.
* Remove the flue 'knock-out' panel sections if this

clearance is less than 75mm.

600mm

300mm

100mm

100mm

720mm

1200mm

11

55mm

a: RECOMMENDED

INSTALLATION CLEARANCES

b: SERVICE CLEARANCES

600mm

300mm

5mm*

5mm*

720mm

1200mm

11

55mm

Conventional flue:

Room Sealed flue:

MINIMUM AIR VENT AREA (cm²) FOR APPLIANCES INSTALLED IN A COMPARTMENT:

Internal

1

 ventilation

High

Level

Low

Level

kW

External

2

 ventilation

High

Level

Low

Level

18/25220

330

110

220

18/25220

220

110

110

Internal

1

 ventilation

High

Level

Low

Level

kW

External

2

 ventilation

High

Level

Low

Level

1

Internal air to and from a space/room inside the building.  

2

External air to and from directly outside the building

Содержание greenstar heatslave 18

Страница 1: ...IONAL FLUE ROOM SEALED FLUE FOR OPEN VENT AND SEALED CENTRAL HEATING SYSTEMS WITH DOMESTIC MAINS FED HOT WATER THE APPLIANCE IS FOR USE WITH 28 SECOND KEROSENE ONLY 8 716 106 252a 03 05 INSTRUCTION MA...

Страница 2: ...INTERACTIVE Flue Systems Ltd 01908 569887 Selkirk Manufacturing Ltd SF Ltd 01271 326633 CONDENSATE PUMP MANUFACTURERS ASPEN 01323 848842 OIL FIRING TECHNICAL ASSOCIATION OFTEC 0845 6585080 www oftec...

Страница 3: ...PRESSURE RELIEF PIPEWORK 11 BOILER LOCATION CLEARANCES 12 13 FLUE OUTLET POSITIONS 14 CONVENTIONAL FLUE 15 ROOM SEALED FLUE OPTIONS 16 INSTALLATION UNPACKING THE BOILER 17 PIPEWORK POSITIONS FLUE OPE...

Страница 4: ...conomy safety and reliability of the appliance Failure to install appliances correctly could lead to prosecution The appliance should be installed by a competent person The person installing the appli...

Страница 5: ...R BOSCH 3 GENERAL INFORMATION GENERAL INFORMATION 8 716 106 252a 03 05 STANDARD PACKAGE A Floor standing oil fired condensing boiler for open vent and sealed domestic central heating and mains fed hot...

Страница 6: ...aw off 18 litres per min C Flue Exit flue gas mass flow kg hr Pipework connections Fuel line compression mm CH flow mm CH return mm Water main inlet mm DHW outlet mm CH vent optional inch BSP CH drain...

Страница 7: ...PIPE CASING 19 SECONDARY HEAT EXCHANGER MANUAL AIR VENT 20 SECONDARY HEAT EXCHANGER DRAIN 21 CONDENSATE OUTLET PIPE 22 SECONDARY HEAT EXCHANGER 23 PRIMARY HEAT EXCHANGER 24 TRAY 25 COMBUSTION CHAMBER...

Страница 8: ...n accodance with BS7593 Fill the system with cold mains water to the recommended pressure and check for leaks Open all drain cocks and drain the system Close drain cocks and add a suitable flushing ag...

Страница 9: ...ble Water Mains Pressure Minimum dynamic mains water pressure 1 2 bar for maximum performance Maximum mains fed water pressure 10 bar If necessary fit a pressure reducing valve IMPORTANT Non return ba...

Страница 10: ...he boiler access door or other hot surfaces Install a manual isolating valve B to the oil supply pipe H as close to the oil storage tank A as possible Fit an oil filter C to the oil supply pipe near t...

Страница 11: ...d at all the lowest points on the system Air vents are required at all high points on the system OPEN VENT PRIMARY SYSTEM In order to comply with BS 5549 the feed and expansion pipe and the open vent...

Страница 12: ...ng type with shrouded outlets to prevent the fitting of hand held sprays DOMESTIC HOT WATER Taps and mixing valves must be capable of sustaining a pressure up to 10 bar in accordance with the Water Re...

Страница 13: ...Gully E Internal soil and vent stack F Condensate trap 75mm min G 300mm x 100mm sealed plastic tube H Ground level J Drainage holes 50mm from base of tube 12mm at 25mm centres facing away from buildi...

Страница 14: ...ing Where the air is taken from another room that room must contain an air inlet as described above Room sealed balanced flue model RS The appliance does not require a separate vent for combustion air...

Страница 15: ...rnal space containing a bath or shower and must not communicate with a protected area such as a hall stairway landing corridor lobby shaft etc Air vents must allow access for clean free air and must b...

Страница 16: ...car parking area Minimum distance of the flue terminal to a facing wall fence building or property boundary is 2500mm FLUE OUTLET POSITIONS 1 An opening means an openable element such as an openable w...

Страница 17: ...densate which may form All flue joints must be sealed to prevent the leakage of condensate and combustion products Ensure that joints are made so that the condensate runs away and is not collected wit...

Страница 18: ...ight flue length including the terminal is Horizontal 80 125mm 4000mm excluding 120mm of terminal extending outside the building Vertical 80 125mm 6000mm including the vertical flue kit 90 elbow Then...

Страница 19: ...nel E away from the boiler to disengage ball stud connectors Lift front panel E upwards off the top supporting ledge and store safely away from the working area 4 Remove the bolts securing the boiler...

Страница 20: ...discharge pipes away from components and pipework connections FLUE OPENING Follow the diagram opposite to mark the centre of the flue 1 2 for rear opening 2 3 for side opening or 1 4 for top opening...

Страница 21: ...and secure in the position as shown 4 Depress locking ears to unplug burner lead L from control box G 5 Release the expansion vessel D from the support bracket E and remove taking care not to snag the...

Страница 22: ...pplied Terminal Guard Part No 7 716 190 050 INSTALLATION NOTES Ensure all flue seals are in good condition and seated properly To ease assembly of flue components grease seals lightly with the solvent...

Страница 23: ...baffle retainer D are correctly fitted for the boiler output as shown in the plan view opposite 3 Refit combustion chamber door A Secure with nuts and washers B and tighten until the door is firmly s...

Страница 24: ...boiler as required and connect to the isolating valve F and ensure the valve is closed Connect the flexible oil pipe G to the isolating valve F CONDENSATE CONNECTION Measure condensate pipe J mark an...

Страница 25: ...ible oil pipe inlet hose to the pump inlet and tighten to secure Connecting the oil pump for a double pipe system 1 Remove oil pump inlet plug 1 Connect the flexible oil pipe inlet hose to the pump in...

Страница 26: ...ufficiently to ensure a good seal IMPORTANT Ensure the gasket is a good seal between the burner combustion head and the boiler housing to prevent flue gases escaping from the combustion chamber into t...

Страница 27: ...iding any potentially hot surfaces allowing sufficient cable to open the control box Any external device connected to the boiler must take its power supply from the boiler only and must NOT have a sep...

Страница 28: ...unted programmer 11 Plug in connector to burner control 12 Plug in connector from burner control 13 Burner control box 14 Flow switch 15 Circulating pump 16 Diverter valve Wire colour code br Brown bl...

Страница 29: ...ections and rectify any leaks 3 Check the flue is correctly fitted and the connections are secure 4 Check the condensate pipework is correctly fitted and connected Check the condensate trap is filled...

Страница 30: ...p bleed screw 4 Sealed systems only check and if required adjust the expansion vessel pressure using the Schraeder type valve The charge pressure of the built in expansion vessel is 0 5 bar as dispatc...

Страница 31: ...ator disconnect the flexible oil inlet hose nearest to the de aerator and place in a container of the same fuel oil Place an empty container to collect oil from the oil inlet pipe connection of the de...

Страница 32: ...he smoke level is above 1 check the combustion settings are correct and the oil nozzle is in good condition Note smoke readings may be inaccurate until the smoke from burning organic binder in the acc...

Страница 33: ...r should be ON with the circulating pump to heat the water in the Heatslave tank The minimum set temperature is reached when the burner and circulating pump switch off 3 Fully open a hot water tap The...

Страница 34: ...to the temperature difference required across the heating flow and return relevant to the heating load 2 Set the room thermostat to minimum The burner and circulating pump should be off The diverter v...

Страница 35: ...entral Heating 4 Check drain cocks and manual air vents are closed and all radiator valves are open 5 Add a suitable inhibitor I or combined inhibitor anti freeze if the system is exposed to freezing...

Страница 36: ...top panel F onto the ball stud connections G and press down to secure Handover Complete the Guarantee Registration Card Set up the controls and show the user how to operate all the controls shown in t...

Страница 37: ...ppliance and system and note any faults which may need to be corrected during the service Switch off and electrically isolate the boiler 4 Depress locking ears and unplug burner lead L from control bo...

Страница 38: ...the check valve M are clear of any debris Check the condition of the O ring O Discard the check valve if the holes cannot be cleared if the unit is defective or if the O ring is damaged and replace w...

Страница 39: ...on chamber Release the M10 retaining nuts and washers B and remove combustion chamber access door A Check the fibreglass rope seal on the combustion chamber access door A and replace if necessary Remo...

Страница 40: ...se or snag the thermostat capillaries 3 Plug burner lead L into control box G Re commission the burner as described in STARTING THE APPLIANCE under the Commissioning section Refit panels 4 Unlock supp...

Страница 41: ...142 736 0 9 Transformer Excludes cable Part Number 8 716 156 696 0 10 Mechanical shut off valve Part Number 8 716 156 658 0 11 Flexible oil line kit Part Number 8 716 106 346 0 12 Burner O ring gaske...

Страница 42: ...in installation instructions No oil from nozzle No oil at pump Check and refill oil tank bleed oil line Check and clean filters valves from oil tank to boiler Air in pump Bleed pump Nozzle blocked Re...

Страница 43: ...at bulb not fully home in pocket Ensure bulb is pushed fully home No primary water circulation Check system circulating pump Short Cycling Burner rating incorrect Correct burner rating Boiler thermost...

Страница 44: ...3 N RELAY 2 4 3 1 N RELAY 3 X10 PIN 3 X10 PIN 1 white white 1 2 4 N RELAY 4 X6 PIN 2 X6 PIN 4 blue brown DHW CONTROL THERMOSTAT WATER FLOW SWITCH LOCKOUT INDICATOR X11 PIN 2 PUMP X7 PIN 1 brown MOTOR...

Страница 45: ...INSTALLATION SERVICING INSTRUCTIONS FOR WORCESTER BOSCH 43 8 716 106 252a 03 05...

Страница 46: ...INSTALLATION SERVICING INSTRUCTIONS FOR WORCESTER BOSCH 44 8 716 106 252a 03 05...

Страница 47: ...INSTALLATION SERVICING INSTRUCTIONS FOR WORCESTER BOSCH 45 8 716 106 252a 03 05...

Страница 48: ...rcester Bosch Group Cotswold Way Warndon Worcester WR4 9SW INSTRUCTION MANUAL INSTALLATION COMMISSIONING SERVICING Part Number Worcester Bosch Group is a trading name of BBT Thermotechnology UK Ltd ww...

Отзывы: