background image

6

For Warranty information, please visit ElectroBraid.com

7

Tools Required

To install your ElectroBraid

®

 Fence you need the following tools:


• ElectroBraid

®

 Tensioning Kit(s) 

• Hammer

• Handheld Post Pounder* 

• Spade or Shovel

• Black Electrical Tape 

• Measuring Tape

• Utility Knife 

• Cigarette Lighter

• Two Ratchet Handles with Sockets 

• Adjustable wrench

• Safety Glasses

NOTE: For Ground Rods and T-Posts you will have to purchase a post 
pounder from your local agriculture supply store.

Getting Started – Line Spacing 

The corner and end posts must be strong enough to withstand the forces that would 
be transmitted if a horse were to strike the fence at speed. We suggest setting your top 
strand at withers height (or at least shoulder height) of your tallest horse and the bottom 
strand somewhere between hock and fetlock based on your specific needs or preference. 
You should then install the balance of the strands by spacing them equally. 

Содержание ElectroBraid

Страница 1: ...Permanent Electric Fencing Safe Secure Simple Highly Visible Pure Copper Polyester Braid Installation Manual ElectroBraid com 855 EBFENCE 855 323 3623...

Страница 2: ...B A Very Safe Fence at a Very Low Cost For warranty information please visit ElectroBraid com...

Страница 3: ...allation minimal maintenance safety and performance Hundreds of hours have gone into testing our system to ensure high quality This installation manual can help you properly install your ElectroBraid...

Страница 4: ...ne Posts 14 Running your Lines 14 Tension Kit Assembly 15 Tensioning ElectroBraid 16 Splicing ElectroBraid 18 Electrifying the Fence 18 Choosing your energizer 18 Grounding System 19 Wiring your energ...

Страница 5: ...edance energizers Certified Safe by UL or CSA They put out a very short low amperage pulse of electricity which will not harm an animal or child NEVER use Weed Burners Weed Choppers or continuous curr...

Страница 6: ...ea and Are warning signs required Check with your County Extension Office or your City Clerk s office Sketch Your Map Begin by drawing a map of your property including all major features buildings roa...

Страница 7: ...two ______ 3 Add these two numbers together _______ This is the number of Line Post Insulators you will require for Brace Posts Line Post Insulators for Line Posts 1 Count the number of line posts and...

Страница 8: ...y by the number of strands ______ 3 Add one poly Braid TM splicer for each electrical connection 4 Add these two numbers together _________ This is the number of Poly rope splicers you need Energizer...

Страница 9: ...Ground Rods and T Posts you will have to purchase a post pounder from your local agriculture supply store Getting Started Line Spacing The corner and end posts must be strong enough to withstand the f...

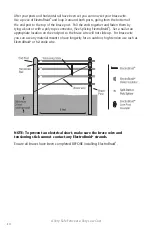
Страница 10: ...NE BRACING Whenever you fence a long straight run you need to terminate and install a brace system every 2000 feet to maintain tension on the Braid Proper Bracing will increase the effectiveness of yo...

Страница 11: ...we recommend a style known as the Horizontal or H Brace After setting your corner post end post or gate posts in the ground at the proper depth for your soil conditions measure 8 down the fence line...

Страница 12: ...y tying a knot or with a poly rope connector See Splicing ElectroBraid Set a nail at an appropriate location on the end post so the brace wire will not slide up For brace wire you can use any material...

Страница 13: ...d strands of Braid on one of your end posts then make a jig to help you mark your other posts A jig is simply a stick on which you indicate the position of each insulator so you don t have to measure...

Страница 14: ...ide an excellent brace however be certain to attach a 2x4 to the tree and then apply the insulators to the 2x4 to prevent the tree from growing over the insulators Note Remove any brush that may come...

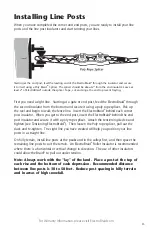
Страница 15: ...valleys first and then space the remaining line posts to suit the terrain An ElectroBraid Roller Insulator is recommended where there is a horizontal or vertical change in direction The use of other i...

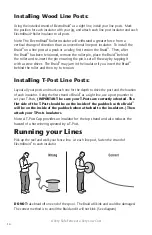
Страница 16: ...f you insert the Braid behind the roller and then try to tension Installing T Post Line Posts Layout all your posts and mark each one for the depth to drive the post and the location of each insulator...

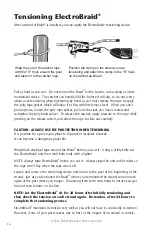
Страница 17: ...ator just as you did when you started the strand Pull hard on the Braid to remove as much slack as you can before you apply the tensioning device Clamp the ElectroBraid to itself using a copper poly r...

Страница 18: ...ical tape around the Braid before you cut it Using a utility knife cut the ElectroBraid and then melt both ends with a lighter NOTE Always tape ElectroBraid before you cut it Always singe the end unti...

Страница 19: ...will require a second tensioning kit Starting at an end post walk the perimeter until you come to the first corner Tension this corner Go to the next corner and repeat the process After tensioning re...

Страница 20: ...length of fence each energizer can adequately electrify 10 of the manufacturers mileage rating should be used as a guide in choosing your energizer ElectroBraid energizers are rated based on the dista...

Страница 21: ...e free permanent installation Secure connecting wires to the ground rods with brass ground rod clamps and cable ties After all ground rods are connected connect one ground rod to the negative terminal...

Страница 22: ...to connect your electrical components If you want to disconnect the electrical from a strand you will not have to use the tensioning device to hold the tension NOTE Use of cable ties will prevent lead...

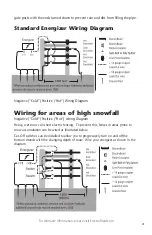
Страница 23: ...Wiring Diagram Wiring for areas of high snowfall Negative Cold Positive Hot wiring Diagram Heavy wet snow can short electric fencing To prevent this fences in areas prone to snow accumulation can be...

Страница 24: ...5 000 volts If the guard voltage is less than 15 000 volts the wire may leak electricity which will affect the integrity of your fence Your animals may not want to cross over the buried wire if they s...

Страница 25: ...xtra wire underground to allow for ground heave due to frost and ground settling NOTE When not using winter wiring configuration be sure to apply a jumper wire to connect all hot strands together at a...

Страница 26: ...short length of 14 gauge copper lead out wire to jump from each strand of Braid to each gate anchor Hinged Side of Gate 1 Install an ElectroBraid roller insulator on the hinged side of the gate post...

Страница 27: ...First read the voltage between the grounded line and each of the other electrified fence lines to confirm that the fence is wired properly with no electrical shorts Most importantly check the voltage...

Страница 28: ...greater than 300 volts the ground system is inadequate You may need more ground rods Trouble Shooting No Respect If you find your horses are showing less respect for their fence than normal it is ver...

Страница 29: ...00 watt light bulb about a dollar a month Regularly inspect your fence to ensure the Braid is taut and properly electrified Thoroughly check the fence after rainy or stormy weather and during a drough...

Страница 30: ...al and decide the fence design you want post spacing bracing number of lines of Braid etc Consult your local Yellow Pages or ask your friends for the names of two or three good local fence installers...

Страница 31: ...mpany Mission is to Build Safe Fences for Horses On other occasions has the voltage along the fence been higher Energizer inadequate Have extensions been added to the fence Shorting due to leadout con...

Страница 32: ...Woodstream Corp 69 N Locust Street Lititz PA 17543 Contact us ElectroBraid com Call us toll free 855 EBFENCE 855 323 3623 Revised June 2014 Part 151106...

Отзывы: