background image

Correct white balance adjustment is important for an exact color reproduction!


For an exact white balance, at least 10% of the recorded image should be white.
For a precise fixed white balance adjustment use the "One Push" white balance. This can be done by 
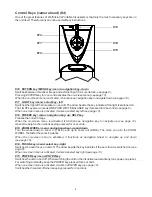
pressing the LIGHT key 

(#11)

 for 2 seconds. When the white balance is stored an on-screen message 

appears. Setting a "One Push" white balance switches off the "Auto Tracking" mode (when the unit is 
switched off and on again the "Auto Tracking" mode will be reactivated).


For specialists: The Visualizer can be switched between "

Auto Tracking

", "

One Push

" and "

Manual

white balance mode in the on-screen menu (see page 10). If you work with negative transparencies and a 
light box, use a blank (black in the image) part of the negative film for white balance adjustment! The "one 
Push" white balance will be separately adjusted and stored for top light and external light box.

Each time the lighting condition changes, the Visualizer's camera must readjust its white balance, in order 
to  optimize  the  color  reproduction. The  lighting  condition  (color  temperature)  changes,  for  example,  if 
changing between the Visualizer's light and an external lightbox (bottom light) or if the room light is turning 
on or off.


The standard setting of the Visualizer is "

Auto Tracking

" white balance.


Normally there is no need for a manual white balance adjustment. However, if the colors on the screen still 
appear to be wrong, the white balance can be adjusted manually (one-push).


Please  note:  False  colors  can  also  be  due  to  wrong  color  settings  of  your  projector  or  monitor.  It  is 
recommended to adjust the white balance of the Visualizer at first and if the results are still not satisfactory, 
the monitor or projector should be checked.

 This means that the white balance 

is continuously adjusted automatically.

White Balance Adjustment

6

IMPORTANT

Please note that the Visualizer has an 

optical 12x zoom. 

The digital 

2x

 zoom increases the overall zoom 

range to a 

24x zoom

. The smallest pickup size on the working surface without digital zoom is 

. When you zoom in further the digital zoom is automatically activated and the smallest 

pickup size is 

. However please be aware that when the digital zoom is used, 

the resolution of the picture is not as good as before. The default setting displays a message on-screen 
when you are in the digital zoom mode.

You can change the behavior of the Visualizer in the digital zoom mode in the on-screen menu (see page 
10).

33mm x 

25mm (1.3" x 1")

17mm x 13mm (0.7" x 0.5")

Digital Zoom

WolfVision Visualizers are equipped with an auto iris. This means that the brightness of the camera image 
adjusts automatically.

The standard auto iris level can be set brighter or darker in the unit's on-screen menu. When picking up 
areas with bright spot, Back Light Compensation can be switched on in the unit‘s on-screen menu - see 
page 10 and on-screen help.

Auto Iris

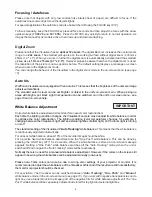
Focusing / Autofocus

Please  note  that  objects  with  very  low  contrast  (like  blank  sheet  of  paper)  are  difficult  to  focus.  If  the 
autofocus does not work just move the object slightly. 


For special applications the autofocus can also be switched off using the FOCUS key 

(#14).


To focus manually, keep the FOCUS key pressed for 2 seconds and then adjust the focus with the arrow 
up/down keys (FREEZE and EXTERN). Press the FOCUS key quicklyto return to normal operation. As 
long as the manual focus mode is active, the arrows up and down are flashing.

Содержание VZ-3

Страница 1: ...Check out our Internet Homepage for additional information www wolfvision com support VZ 3 INSTRUCTIONS INSTRUCTIONS ENGLISH R VZ 3 ...

Страница 2: ...or damage to the CCD camera Do not pull the plug from the power socket with wet hands If the Visualizer is not used for a long time disconnect it from mains The external power supply has to be approved by CSA or UL in accordance to CSA 22 2 60950 or UL1950 One PushWhiteBalance Pressthe LIGHTkey for 2 secondsto performone push whitebalance Activatingthe on screenmenu Keep the MENU key EXTERN presse...

Страница 3: ...nt Inspections tests and evaluation are according to UL60950 CSA22 22 60950 Inspections tests and evaluation are according to the CB Scheme Inspections tests and evaluation are according to the PCT Scheme Marks on the unit Approval Copyright Information Copyright by WolfVision All rights reserved WolfVision Wofu Vision and are registered trademarks of WolfVision HoldingAG Austria No part of this d...

Страница 4: ...ectors on the back behind the cable cover see below Zoom wheel see next page 3 Connectors 2 5 DVI I output see page 8 6 USB port see page 7 External Input for Computer RGB signals 15pin 10 100 TBase 7 see page 9 8 LAN port see page 7 Power connection PoE see page 7 9 Cable Tie to fix all cables to unfasten press the lug 5 LAN PoE EXTERN IN USB DVI 6 8 7 9 ...

Страница 5: ...essed for 2 seconds 13 ZOOM WHEEL menu navigation wheel up and down Turn the wheel down to zoom in TELE and up to zoom out WIDE The more you turn the ZOOM WHEEL the faster the zooming works When the on screen menu is activated it functions as navigation wheel to navigate up and down see page 10 14 FOCUS key menu select key right Switches the auto focus on and off The arrow beside the key indicates...

Страница 6: ... cover 2 Connect the power pack to the power input 8 3 Connect your display device projector monitor video conferencing unit etc to the appropriate output of the Visualizer 5 RGB with adapter and fasten the cable tie IMPORTANT For choosing the right output setting please read the detailed description on page 8 4 Slide in cable cover until it rasted 5 Lift the arm upwards The VZ 3 is switched on au...

Страница 7: ...white balance of the Visualizer at first and if the results are still not satisfactory the monitor or projector should be checked This means that the white balance is continuously adjusted automatically White Balance Adjustment 6 IMPORTANT Please note that the Visualizer has an optical 12x zoom The digital 2x zoom increases the overall zoom range to a 24x zoom The smallest pickup size on the worki...

Страница 8: ...hem to Interactive Whiteboards Smart Boards The fast USB 2 0 port can also output live motion WolfVision s Connectivity Software can store AVI files and includes a video capture driver You can view and save the live image from the Visualizer on your computer in almost every modern video editing software Please download the latest version of the WolfVision Connectivity Software from www wolfvision ...

Страница 9: ...fresh rate than your monitor or projector can display otherwise the monitor or projectorcan be damaged Follow the instructionsin the user manual of the connectedunits Please note if 4 3 and 16 9 or 16 10 resolutions are used simultaneously the 4 3 display shows black bars on top and bottom This is necessaryto ensure that all displaysshow the same image content The Auto resolution function is activ...

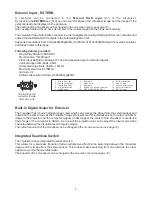
Страница 10: ...0kHz 121kHz Maximum pixel clock 170MHz Gamma 2 2 Preferred resolution SXGA 1280x960 60Hz pressing the EXTERN key 10 The settings of the Visualizer can be changed in the on screen menu see page 10 Use supplied cable without choke ferrit core other cables may block the hinge mechanically Built in Digital Scaler for Extern In The Visualizer has a built in digital image scaler which can process the si...

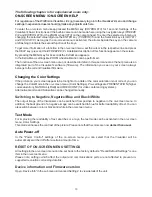
Страница 11: ...can select that the Visualizer will be automatically switched off after a certain amount of time All settings in the on screen menu can be set back to the factory defaults Recall Default Settings is one item in the on screen menu Please note settings which affect the output and communications ports are not affected to prevent un supported resolutions or loosing data link The following chapter is f...

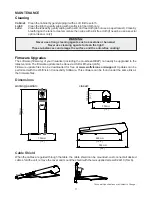
Страница 12: ...TENANCE The software firmware of your Visualizer including the o can easily be upgraded to the latest version The firmware update can be done via USB or Ethernet LAN Firmware update files can be downloaded for free at www wolfvision com support Updates can be performed with the WolfVision Connectivity Software This software can be found under the same link as the firmware files n screen HELP Firmw...

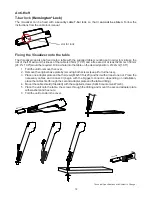
Страница 13: ...be required Drill a whole into the table on the desired position Ø 42mm 1 65 1 Fold the unit to remove the cover 2 Remove the original base plate by removing both screws keep it for further use 3 Place one adapter plate and both screws M4x50 Torx20 and fix it with at least one nut Place the necessary cables and connect it begin with the biggest connector depending on installation place the cables ...

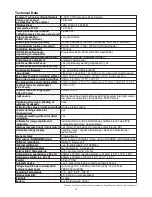
Страница 14: ... consumption external power pack Operating Temperature Relative Humidity Warranty Made in 1 CCD 1 3 Progressive Scan Camera 30 frames 1280 x 960 1 228 800 1 315 648 36 864 000 very good colors SXGA 1280x960 WXGA 1280x800 HD 720p 1280x720 SXGA WXGA 720p WXGA XGA switchable 710 lines Progressive Scan 50 Hz and 60Hz switchable automatic manual flickerless Shutter automatic and manual yes continuously...

Страница 15: ...Co Ltd Tokyo Tel 81 0 3 3360 3231 Fax 81 0 3 3360 3236 E mail wolfvision japan wolfvision com United Kingdom WolfVision UK Limited Manchester Tel 44 161 435 6081 Fax 44 161 435 6100 E Mail wolfvision uk wolfvision com Toll free Tel 1 650 648 0002 Toll free 800 356 WOLF Fax 1 650 648 0009 Japan Asia WolfVision Asia Singapore Tel 65 6366 9288 65 6366 9280 E mail info wolfvisionasia com R Manufacture...

Отзывы: