background image

26


Original operation manual 

2K GEL UNIT


2KGel_14025_25015_BAoDB_en_1701 • rs 

Operation

1. 

Set the one-hand lever of the mixing unit to "Stop" and close the flushing 

ball valves on the mixing unit.

2. 

Make sure that all compressed air regulators are turned down completely.

3. 

Place the suction for the flush pump into the cleaning agent container.

4. 

Point the outlet opening on the static mixer into an empty container to be 

able to collect the escaping material mixture.

5. 

Open the compressed air shut-off valve.

6. 

Open the flushing ball valves on the mixing unit.

7. 

Set a low pressure on the compressed air regulator of the flush pump so 

that the pump starts slowly. 

8. 

Adjust the running speed for the flush pump to approx. 15 double strokes 

per minute.

5.1.2  Flushing out the remains of the test substance

Following assembly, the machine was tested with a test substance in the 

factory for proper function. During initial commissioning, it is therefore 

necessary to first fully clean the machine to flush out the remaining test 

substance (see chapter 5.7 on page 29).

5.1.3  Filling the machine with processing material and ventilating

1. 

Establish the material supply:


For proportioning pumps that are supplied with material via a suction 

hose, place the suction hoses into the corresponding material drums for 

components A and B.


For proportioning pumps that are supplied with material via hoppers, fill 

the material for components A and B into the corresponding hoppers 

and open the stop cocks at the material inlet of the proportioning pumps 

as required.

2. 

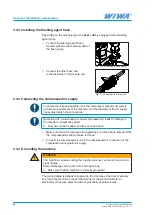
Hold the mixing unit, directing the material ejection against the inner wall of 

the collecting vessel. 

3. 

Set the one-hand lever of the mixing unit to "Injection".

4. 

Let the injection pumps start up slowly. Slowly adjust the air inlet pressure 

to approx. 1-2 bar for this.

5. 

As soon as mixed material (component A and B) consistently escapes out 

of the mixing unit, the filling and venting process is completed. 

Set the one-hand lever of the mixing unit to "Stop"  

The proportioning pumps stop!

6. 

In order to be able to check the material reactions, fill a suitable test 

container (approx. 0.2 l) with the material to be processed. 

Repeat work steps 3-5 of this chapter for this.

7. 

Flush the mixer block immediately until clean cleaning agent runs out  

(see chap. 5.4 on page 28).

Содержание 14025 R/F

Страница 1: ...riginal operation manual 2KGel_14025_25015_DBE_en_1701 jw Type 14025 R F 0641976 0643500 25015 R F 0647884 0652174 0652381 0662060 Version with hopper suction system Serial No _______________ DUAL COM...

Страница 2: ...rohibited until it is shown that the equipment into which the above mentioned unit s are to be installed or incorporated is in compliance with the provisions of Machinery Directive 2006 42 EC The equi...

Страница 3: ...d operator 13 2 5 4 Personal protective equipment 13 2 6 Guarantee instructions 14 2 6 1 Spare parts 14 2 6 2 Accessories 14 2 7 How to respond in an emergency 15 2 7 1 Shutting down and de pressurisi...

Страница 4: ...ssure 27 5 4 Flushing 28 5 5 Work interruption 28 5 6 Pressure relief 28 5 7 Cleaning the machine completely 29 5 8 Material change 30 5 9 Decommissioning 30 5 10 Replacing the attachment kits 30 5 11...

Страница 5: ...ll relevant directives and accident prevention regulations with the operation manual Furthermore always observe the manufacturer s instructions and processing guidelines for coating or conveyance mate...

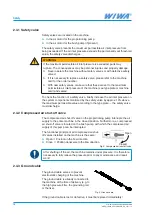
Страница 6: ...orehand in particular the Safety chapter Your safety depends on it We recommend that the machine owner have this confirmed in writing 2 1 Explanation of symbols Safety notes warn of potential accident...

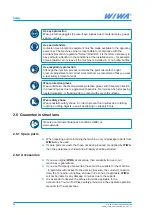
Страница 7: ...r protective goggles in order to prevent eye injuries due to material spray gases vapors or dust Use ear defenders Signals an instruction to wear ear defenders in order to prevent damage to hearing ca...

Страница 8: ...es as the maximum working pressure for the complete machine Material hoses and hose assemblies must comply with the maximum working pressure including the required safety factor Material hoses may not...

Страница 9: ...ediately Perform the cleaning work outside of potentially explosive areas 2 2 4 Explosion protection WARNING Machines that are not explosion protected must not be used in operating facilities that fal...

Страница 10: ...nicht auf Personen oder Tiere richten Do not point spray gun at persons or animals Ne jamais diriger le pistolet de pulv risation en direction de personnes ou d animaux No dirigir la pistola pulveriza...

Страница 11: ...ompressed air shut off valve Ground cable Check the safety features on the machine Prior to commissioning Always prior to starting work After all set up work After all cleaning maintenance and repair...

Страница 12: ...the system components monitored by the safety valve by approx 10 above the maximum permissible value according to the type plate the safety valve must discharge 2 4 2 Compressed air shut off valve The...

Страница 13: ...nnel qualifications Differentiation is made between 2 groups of personnel depending on their qualifications Instructed operators have received verified instruction from the machine owner regarding the...

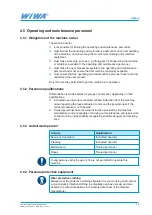
Страница 14: ...ies when processing heated materials or freezing due to contact with very cold surfaces Wear safety shoes Wear antistatic safety shoes in order to prevent foot injuries due to falling toppling or roll...

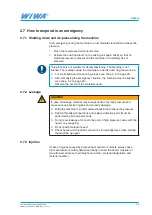
Страница 15: ...ncy situation the machine must be flushed see chap 5 4 on page 28 Observe the pot life of the materials used 2 7 2 Leakage WARNING In case of leakage material may escape under very high pressure and c...

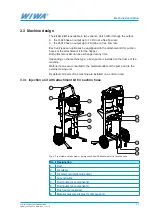
Страница 16: ...ed with it Two designs are available depending on customer requirements 2K gel unit with attachment kit for suction hose This machine is only suitable for processing runny materials wherein the two co...

Страница 17: ...n be exchanged at any time Depending on the machine type a flush pump is installed on the frame of the machine Material hoses are connected to the material outlets of the pump and to the external mixi...

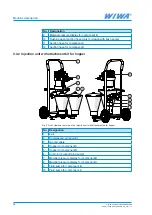
Страница 18: ...for component B 3 3 2 Injection unit with attachment kit for hopper 1 2 3 4 5 6 7 8 9 10 Fig 5 Front view and rear view of an injection unit with attachment kit for hopper No Designation 1 Cart 2 Com...

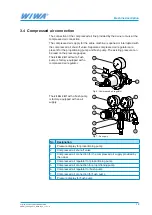
Страница 19: ...be read on the pressure gauges The 2K GEL UNIT without a flush pump is factory equipped with a compressed air regulator Fig 6 Compressed air regulator 1 2 3 5 4 The 2K GEL UNIT with a flush pump is f...

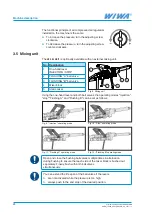
Страница 20: ...all valve 4 Mixer block 5 Static mixer Fig 8 Mixing unit 2 3 5 1 4 Using the one hand lever and both ball valves the operating modes Injection stop Flushing A and Flushing B can be set as follows Fig...

Страница 21: ...achments When lifting or loading the machine do not transport other objects simultaneously e g material drums with the machine Never stand under suspended loads or in the loading area There is a risk...

Страница 22: ...to paint mist 4 3 Assembly WARNING If untrained personnel carry out assembly work they endanger themselves and others as well as risking the operational safety of the machine Electrical and electronic...

Страница 23: ...the connections for the hoses are subjected to strain these may be torn out The material escaping under high pressure may cause injuries and damage to property If tensile forces are anticipated on th...

Страница 24: ...ust match the connections Operation with contaminated or moist compressed air leads to damage in the machine s pneumatic system Only use air that is dried and free of oil and dust 1 Make sure that all...

Страница 25: ...unattended However if this were to happen bring the respective pump to an immediate standstill and add material 5 1 Putting the machine into operation Checklist Check if all safety features are presen...

Страница 26: ...ge 29 5 1 3 Filling the machine with processing material and ventilating 1 Establish the material supply For proportioning pumps that are supplied with material via a suction hose place the suction ho...

Страница 27: ...erve the fill level of the material drum during injection Refilling the ma terial in a timely manner prevents the pumps from suctioning air and thereby having to vent the unit 9 Switch to the next pac...

Страница 28: ...er of the mixing unit to Stop The injection pumps stop 2 Turn the compressed air supply for the proportioning pumps down completely 3 Remove the mixing unit from the packer nipple 4 Hold the mixing un...

Страница 29: ...strip the material located therein into the associated container For proportioning pumps that are supplied with material via hoppers pump any existing material completely out of the hoppers and remov...

Страница 30: ...o chap 5 5 on page 28 2 Clean the machine completely according to chap 5 7 on page 29 5 10 Replacing the attachment kits WARNING Disassembling machine parts that are under pressure can cause serious b...

Страница 31: ...l via a hopper pump out the material that is still located in the hoppers completely 2 Shut off the compressed air supply 3 Completely de pressurize the machine WARNING Despite relieving the pressure...

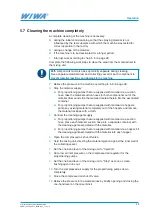
Страница 32: ...by a specialist and replace if necessary 6 3 Maintaining the flush pump 6 3 1 Checking the release agent level Prior to every commissioning check the release agent level To do so unscrew the sealing...

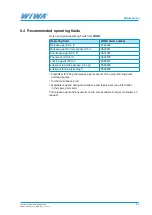
Страница 33: ...51 Anti freeze agent 0 5 l 0631387 Pneumatic oil 0 5 l 0632579 Locking agent 50 ml 0000015 Lubricant acid free grease 0 4 kg 0000025 Lubricant for stainless steel 0000233 Plasticizer for filling the r...

Страница 34: ...ys material but does not stop when the mixing unit is closed Packing or valve worn out Replace parts Pump runs smoothly but the required injection pressure is not achieved Air pressure is too low or t...

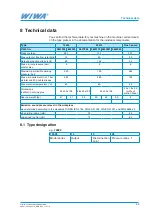
Страница 35: ...4 33 Max air inlet pressure bar safety valve 8 8 8 Maximum permissible working pressure bar 200 120 264 Max air requirement l at 7 bar air inlet and 30 double strokes 480 480 100 Max material temperat...

Страница 36: ...essories supplied with article and spare parts numbers 8 3 Type plate The type plate is located on the air motor of the proportioning pump It contains the most important technical data for the machine...

Страница 37: ...Original operation manual 2K GEL UNIT 37 2KGel_14025_25015_BAoDB_en_1701 rs...

Страница 38: ...1 3 35633 Lahnau Germany Tel 49 0 6441 609 0 Fax 49 0 6441 609 2450 info wiwa de www wiwa de WIWA Subsidiary USA WIWA LLC USA Canada Latin America 107 N Main St P O Box 398 Alger OH 45812 Tel 1 419 75...

Отзывы: