background image


19 


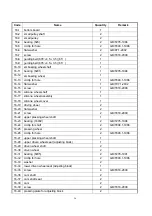
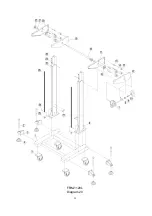
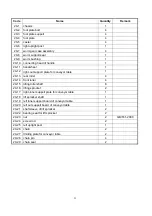
Code Name Quantity 

Remark 

17-1 bottom 

board 


17-2 

ink roller shaft 


17-3 

swing pole of ink roller   


17-4 

heating block of ink roller   


17-5 

heating pipe 110v/40w 


17-6 

printing wheel shaft 


17-7 

spring of holding latch on printing wheel 


17-8 

cover for printing wheel shaft     


17-9 printing 

wheel 


17-10  printing wheel cover 


17-11  holding latch for printing wheel 


17-12  printing-silicone wheel shaft   

1  

17-13 silicone 

ring 


17-14 circlip 

for 

hole 

GB/T893.1-1986 

17-15  core of silicone wheel 


17-16 bearing 


GB/T276-1994 

17-17 eccentric 

sleeve 


17-18  upper cooling block shaft 


17-19  upper cooling block 


17-20 flat 

washer 

GB/97.1-2002 

17-21 cap 

nut 

GB/923-1988 

17-22  lower cooling block shaft 


17-23  lower cooling block 


17-24  upper heating block shaft   


17-25  upper heating block 


17-26  lower heating block shaft 


17-27  lower heating block 


17-28 feed 

opening 


17-29 wind 

catcher 


17-30 fan 


17-31  support for brush 


17-32  carbon brush holder 


17-33  pressing plate of brush 


17-34 groove 

sensor 


17-35 electromagnetic 

clutch 

assembly 


17-36 middle 

pulley 


17-37  middle pulley shaft 


17-38  ink roller shaft pulley 


17-39  seat for ink roller swing pole shaft 


Содержание FRM-1120L

Страница 1: ... IV Performance Features 3 V Structure Working Principle 3 VI Operation Instruction 8 VII Circuit Diagram 14 VIII Breakdown Drawing of Machine Body 15 IX Breakdown Drawing of Conveyor 20 X Breakdown Drawing of Rack 22 XI Troubleshooting 26 XII Spare Parts List 28 ...

Страница 2: ...e the machine in corrosive environment 6 Do not change any parts of the machine at discretion 7 Keep the machine clean both inside and outside and clear dirt from sealing belt in time 8 Fill and exchange oil in worm gear case regularly Meanwhile remember to oil the gear and sprocket YP7408 semiliquid gear oil 9 Cut off the power supply when the machine is not in use 10 Keep this operation manual w...

Страница 3: ...s FR 1370LD Continuous band sealer with two sets of heating blocks FR 1370L T Continuous band sealer with two sets of heating blocks FR 1370AL L Heavy duty continuous band sealer with two sets of heating blocks Voltage AC 220 50 110 60 Motor power 230W 750W Sealing power 300 4W Sealing speed 0 10m min 8m min Sealing width 8 10mm Temperature control Range 0 300 Stepless adjustable Distance for seal...

Страница 4: ... can use solid ink roller to print desired colored label while sealing with the characteristics of high definition instant print and instant dry and strong adhesion For letters in R type arrange the machine can print two lines in font size two 18PT and three lines in font size five 10 5PT and 20 types can be arranged in each line Special order for T arrange or multi line types is available V Struc...

Страница 5: ...eyor table 7 silicone wheel 8 guiding wheel 9 printing wheel 10 solid ink roller 11 heating block of ink roller 12 housing case 13 embossing wheel 14 control panel 15 driving wheel 16 cooling block 17 adjusting knob 18 pressing wheel 19 heating block 20 sealing belt 21 driven wheel 22 cam shaft 23 feed opening 24 worktable 25 adjusting knob for conveyor table 26 lifting handwheel of conveyor table...

Страница 6: ...yor table 6 conveyor belt 7 stay bar for stop pole 8 stay bar support 9 stop pole 10 upright post 11 safety cover 12 adjusting knob 13 housing case 14 control panel 15 bracket for lead in guide pulley 16 lead in guide pulley 17 upright shaft 18 adjusting seat for conveyor belt 19 adjusting knob 20 lifting handwheel for conveyor table 21 chassis 22 castor FRM 1120LD Solid ink coding continuous band...

Страница 7: ...6 Diagram 4 FR 1370LD Continuous band sealer with two sets of heating blocks Diagram 5 ...

Страница 8: ...7 FR 1370L T Continuous band sealer with two sets of heating blocks Diagram 6 FR 1370AL L Continuous band sealer with two sets of heating blocks Diagram 7 ...

Страница 9: ...8 FRM 1370AL M Continuous band sealer with two sets of heating blocks Diagram 8 VI Operation Instruction 1 Control Panel See diagram 9 FRM 1120W FRM 1120L FRM 1120LD FR 1370AL M ...

Страница 10: ...d sealing position 4 According to the external size from sealing line to bag opening regulate the position of feed opening 5 According to the thickness of material that to be sealed adjust the clearance between both heating and cooling blocks to be the thickness of thickness of packing bag in one layer which must guarantee the firmness of sealing and high definition of embossing and ensure suitabl...

Страница 11: ...lt c Replace with a new sealing and install the guiding belt back d Put the driven wheel heating and cooling blocks and pressing wheel to the original position meanwhile rotate cam clockwise to make it return to original position as well e Connect the power supply and test the machine if irregular sealing appears on the belt you can make adjustment through adjusting screws on the driven wheel seat...

Страница 12: ... rotate by an angle for fastening 1 holding latch 2 end cover of printing wheel shaft 3 tranverse pin 4 type 5 fixed pin 6 fastening screw for printing wheel 7 printing wheel Diagram 12 10 The adjustment of the clearance between ink roller and types Adjust the adjusting screw 5 for the ink roller s swing pole rotate the printing wheel and make the types surface touch the ink roller s 1 surface sli...

Страница 13: ...and ink roller All the knobs of this machine are set to 0 position before leaving factory Users need to make adjustment by themselves For a new ink roller during previous time of use the temperature should be relatively lower after a period time of use the temperature can be raised to higher degree which can make the deep seated ink ooze and prolong the ink roller s life span When the ink roller r...

Страница 14: ... turn the heating switch on the green light of the electronic temperature controller will light According to the material and thickness of the packing bag adjust the temperature controller to the temperature required then set the position of heating knob of ink roller Once the heating blocks and ink roller heating block begin to preheat the machine needs to be started meanwhile and kept running at...

Страница 15: ...uit Diagram Diagram 15 K1 switch on off K2 switch start K3 switch fan K4 switch heat seal K5 switch printer W1 sealing speed regulator W2 temperature of ink roller W3 coding position R1 R2 heating pipe for sealing R3 R4 heating pipe of ink roller MD speed adjusting motor DF Fan AP1 speed adjusting PCB AP2 temperature adjusting PC board of ink roller AP3 main control PC board AP4 sealing temperatur...

Страница 16: ...15 VIII Breakdown Drawing of Machine Body FRM 1120L Diagram16 ...

Страница 17: ...7 silicone wheel assembly 1 16 18 silicone wheel cover 1 16 19 driving wheel 2 16 20 flat washer 2 16 21 screw 2 GB T818 2000 16 22 upper pressing wheel shaft 1 16 23 bearing 16002 2 GB T276 1994 16 24 circlip for shaft 2 GB T894 1 1986 16 25 pressing wheel 2 16 26 circlip for hole 2 GB T893 1 1986 16 27 upper pressing wheel shaft 1 16 28 upper driven wheel seat adjusting block 1 16 29 driven whee...

Страница 18: ...pacing ring of bearing 2 16 56 bearing seat 3 16 57 screw 9 GB T818 2000 16 58 gear 5 16 59 motor 220V 100W 1 16 60 worm gear case assembly 1 16 61 driving sprocket 1 16 62 circlip for shaft 3 GB T894 1 1986 16 63 bearing seat for connecting shaft 1 16 64 connecting shaft 1 16 65 slide block 2 16 66 spring seat for slide block 2 16 67 socket cap screw 5 GB T70 1 2000 16 68 medium gear 1 16 69 bear...

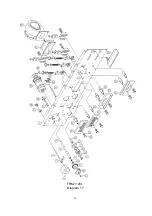
Страница 19: ...18 FRM 1120L Diagram 17 ...

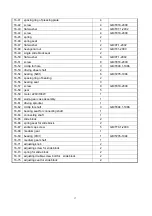
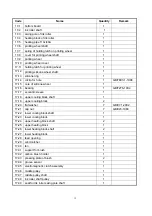
Страница 20: ... wheel 1 17 16 bearing 1 GB T276 1994 17 17 eccentric sleeve 1 17 18 upper cooling block shaft 1 17 19 upper cooling block 2 17 20 flat washer 7 GB 97 1 2002 17 21 cap nut 7 GB 923 1988 17 22 lower cooling block shaft 1 17 23 lower cooling block 1 17 24 upper heating block shaft 2 17 25 upper heating block 1 17 26 lower heating block shaft 2 17 27 lower heating block 1 17 28 feed opening 1 17 29 w...

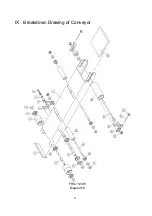
Страница 21: ...20 IX Breakdown Drawing of Conveyor FRS 1120W Diagram18 ...

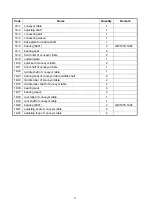
Страница 22: ...procket of conveyor table 2 18 11 front shaft of conveyor table 1 18 12 middle shaft of conveyor table 1 18 13 bearing seat of conveyor table middle shaft 2 18 14 middle roller of conveyor table 2 18 15 middle roller shaft of conveyor table 2 18 16 bearing seat 4 18 17 bearing sleeve 4 18 18 rear roller of conveyor table 1 18 19 rear shaft of conveyor table 1 18 20 bearing 6201 2 GB T276 1994 18 2...

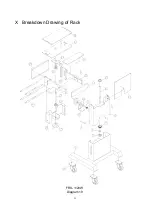
Страница 23: ...22 X Breakdown Drawing of Rack FRS 1120W Diagram 19 ...

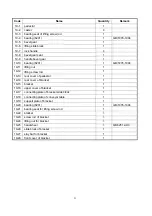
Страница 24: ...rew rod 1 19 13 rear cover of pedestal 1 19 14 rear cover of bracket 1 19 15 bracket 1 19 16 upper cover of bracket 1 19 17 connecting plate of bracket slide block 1 19 18 connecting plate of conveyor table 1 19 19 support plate of bracket 1 19 20 bearing 6201 1 GB T276 1994 19 21 bearing seat for lifting screw rod 1 19 22 bracket 1 19 23 screw rod of bracket 1 19 24 lifting nut for bracket 1 19 2...

Страница 25: ...24 FRM 1120L Diagram 20 ...

Страница 26: ... table 1 20 13 rear roller 4 20 14 front roller 4 20 15 lifting roller shaft 8 20 16 lifting sprocket 2 20 17 right inner support plate for conveyor table 1 20 18 lift sprocket shaft 1 20 19 left inner support board of conveyor table 1 20 20 left out support board of conveyor table 1 20 21 shaft sleeve of lift sprocket 2 20 22 bearing seat for lift sprocket 2 20 23 nut 2 GB T41 2000 20 24 screw ro...

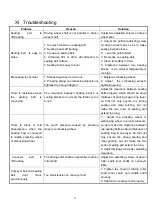
Страница 27: ...s too small the friction is too much Adjust the clearance between sealing belts properly which should be about thickness of packing bag in one layer so that not only ensure the strong sealing and clear printing but not make the two ends of sealing part extend too long There is block or fold phenomenon when the packing bag is conveyed to middle pressing wheel or embossing wheel Too much pressure ca...

Страница 28: ...otentiometer on knob is damaged 4 Carbon brush seat is not in place 5 Carbon brush is damaged 1 Replace heating pipe 2 Replace PC board 3 Replace potentiometer 4 Adjust and tighten nut then 5 Replace The temperature of heating block for ink roller printing mechanism is out of control The relay for temperature control PC board is damaged Check and replace temperature control PC board The printing p...

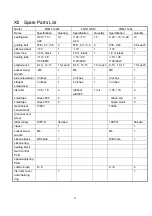
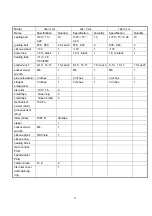
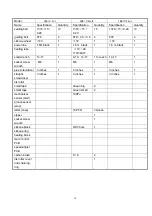
Страница 29: ... 1 for each 8 10 14 17 1 for each 8 10 14 17 1 for each socket screw wrench M6 1 M6 1 M6 1 plus screwdriver 3 inches 1 3 inches 1 3 inches 1 straight screwdriver 3 inches 1 4 inches 1 3 inches 1 ink roller 35 16 2 ribbon width35 1 roll 35 16 2 small tape Green 280 2 Green big 2 small tape Green 185 2 Green small 2 mechanical sensor start 100Pu 100Pu groove sensor stop letter case 18PT R 34 case 18...

Страница 30: ...solid wrench 8 10 14 17 1 for each 8 10 14 17 1 for each 8 10 14 17 1 for each socket screw wrench M6 1 M6 1 M6 1 plus screwdriver 3 inches 1 3 inches 1 3 inches 1 straight screwdriver 3 inches 1 3 inches 1 3 inches 1 ink roller 35 16 2 small tape Green big 2 small tape Green small 2 mechanical sensor start 100 Pu groove sensor stop letter case 18PT R 34 case nipper 1 socket screw wrench M4 1 sili...

Страница 31: ...10 28 110V 40W solid wrench 14 17 1 8 10 14 17 1 for each 14 17 1 socket screw wrench M6 1 M6 1 M6 1 plus screwdriver 3 inches 1 3 inches 1 3 inches 1 straight screwdriver 3 inches 1 3 inches 1 3 inches 1 ink roller small tape Green big 2 smalll tape Green small 2 mechanical sensor start 100Pu groove sensor stop letter case 18PT R 34 case nipper 1 socket screw wrench 1 silicone block With hole 1 s...

Отзывы: