background image

2

6) 

Clean the roof area where the base feet will attach to the roof; do not 
erase your marks.

7) 

Check with your vehicle manufacturer for approved sealant, and put 
approved sealant in the areas marked for the base feet. Place the base 
feet on top of the sealant. 

8) 

Before using the supplied mounting screws, check with your vehicle 
manufacturer for any special screw requirements. Screw down each foot 
and put sealant around the edge of feet and over each screw.

9) 

Decide the best location for the power cable to enter the vehicle as well 
as the location of the power switch inside your vehicle. Drill a ¾

 hole 

in the roof, and push the power cable inside, making sure the cable is 
accessible from the area where the power switch will be located.

10) 

Place the provided cable entry plate over the hole and cables. Screw  
the plate in place. Seal the plate and screw holes with approved sealant 
(not included).

11) 

Before moving on to installing the power switch, verify whether you need 
the additional 20 feet of power cable (supplied). If you do not, you are 
able to cut off the connector from the end of the 10 foot power wire and 
strip the ground and power wires with a wire stripper (not provided). If 
you do need more length, connect the connector of the 10 foot power 
cable with the mating connector of the 20 foot extension. 

1) 

 Choose a location to install the ConnecT 2.0 Wall Plate with power On/
Off switch. When selecting a location, remember that you will need to 
run the su12VDC power cable from the ConnecT 2.0 antenna to 
the switch along with power from your vehicle. It is recommended to use 
18 gauge wire no longer than 50 feet with a dedicated 12VDC circuit 
and a 3A in-line fuse. 

2) 

For a wall or panel mount, drill or use a hole saw to create a 1¼

 hole. 

Pull the wires through wall or panel.

3) 

Be sure the switch is in the OFF position before continuing. 

4) 

Slide the power switch into the wall plate.

5) 

Connect the +12V power wire from the vehicle to a small red terminal 
insulator. Crimp the connector.

6) 

Connect this small red terminal insulator to the isolated spade of the 
power switch. (See diagram).

7) 

Connect the red wire from the Connect 2.0 to the other small red 
terminal insulator. Crimp the connector. 

8) 

Connect this small red terminal insulator to the other spade on the 
switch.

9) 

Slide the ground wire from the vehicle into one end of the barrel crimp 
splice, and slide the black ground wire from the antenna into the 
opposite end of the splice. Crimp the splice.

10) 

Mount the wall plate with the four supplied wall plate screws. Slide the 
power switch back into the hole created in Step 2.

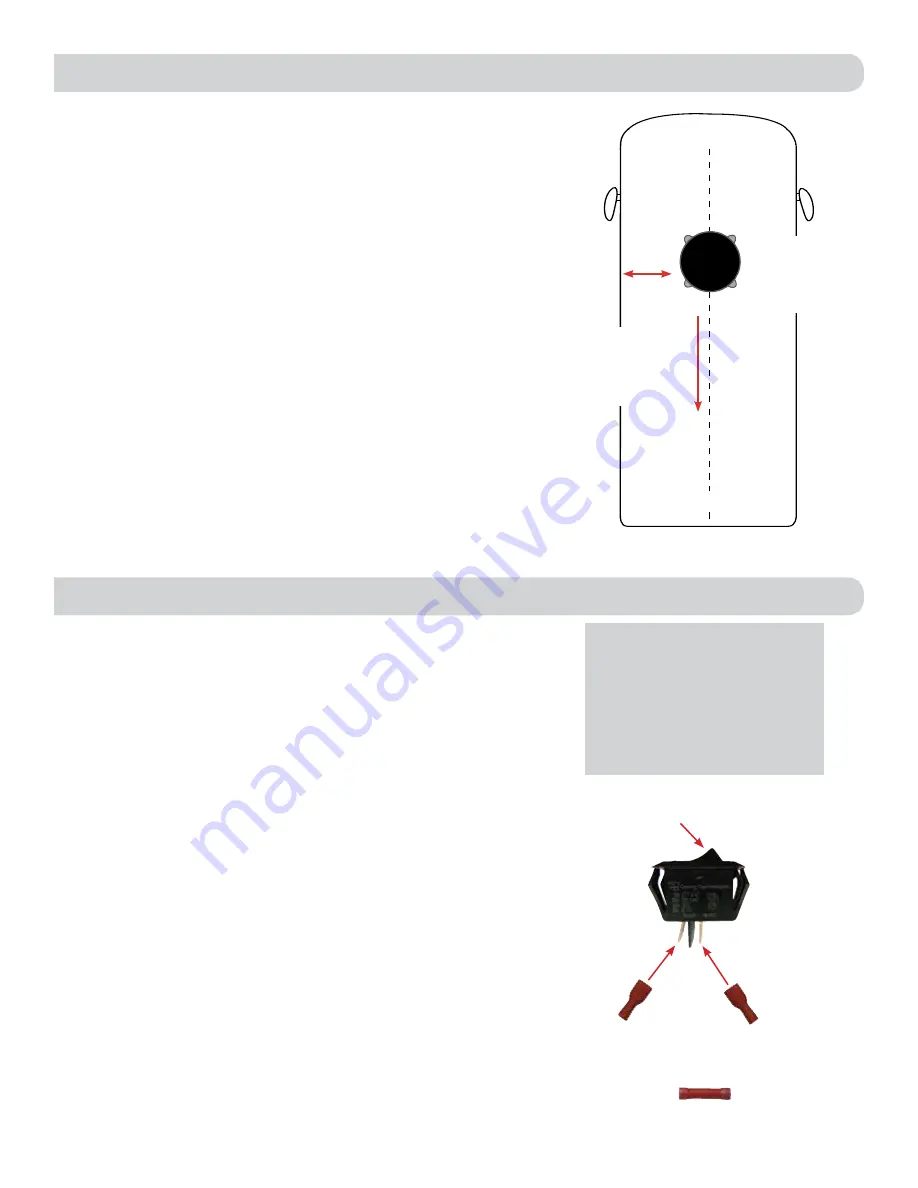
EXTERIOR INSTALLATION (cont)

INSTALLING THE POWER SWITCH

Step 3

On/Off Rocker Switch 
(shown in Off Position)

Step 5 & 6

+12 V from vehicle

Step 7 & 8

+12 V from ConnecT 2.0

Step 9


Barrel crimp splice

Front of Vehicle

Cable 

connections 

must face back 

of vehicle

At least 

12”

Mount on  
or parallel to 

centerline of 

coach

Back of Vehicle

12V Wiring Requirements


•  Supply voltage – 9-16V 

•  Max. operating current  – 1A

•  Max. operating temperature  – 60C

•  Max. power cable length  – 18 gauge 

(recommended)  – 50 ft.

•  3A Fuse

Содержание ConnecT 2.0 WF2-335

Страница 1: ... 435 LONG RANGE HIGH PERFORMANCE 4G LTE WIFI EXTENDER WF2 335 LONG RANGE HIGH PERFORMANCE WIFI EXTENDER Installation Operation Manual www winegard com connect Manuel disponible en français au www winegard com connect For help email help winegard com or call 1 800 320 9992 2452399 Rev0 10 17 ...

Страница 2: ...losive gases when not properly ventilated therefore special care and consideration is required Consult your vehicle manufacturer for additional information on safely installing accessories Save these instructions Do not mount closer than 12 inches from the edge of the roof or any adjacent devices Do not paint any portion of the Winegard ConnecT Painting the system could damage the system and will ...

Страница 3: ... will need to run the supplied 12VDC power cable from the ConnecT 2 0 antenna to the switch along with power from your vehicle It is recommended to use 18 gauge wire no longer than 50 feet with a dedicated 12VDC circuit and a 3A in line fuse 2 For a wall or panel mount drill or use a hole saw to create a 1 hole Pull the wires through wall or panel 3 Be sure the switch is in the OFF position before...

Страница 4: ...a local WiFi network or a 4G LTE network 4 To connect to a 4G LTE network select 4G LTE Only from the internet access menu Then click SELECT See figure 2 If you have available data to use the INTERNET STATUS should display Connected to 4G LTE Winegard ConnecT Data Plan If you do not have any available data the field will not display Connected You will have to add data in order to use the 4G connec...

Страница 5: ...d to something you can remember The new password must be at least eight characters long You will need to log in using the new user name and password Security Type The Winegard ConnecT Security Type has been defaulted to WPA2 PSK AES Other options are available on this screen Guest Network The Winegard ConnecT 2 0 provides a simple way to set up an extra network that doesn t have access to the Stat...

Страница 6: ...utton located inside the SIM card LED Cover plate on the left hand side for 30 seconds If you are unable to gain access to the outside antenna you may perform a power cycle from the power switch In order to do this start with the power switch in the off position You will need to turn the switch on wait 90 seconds and then turn off Repeat 3 consecutive times On the next power on the system will beg...

Страница 7: ... you have the latest version there is no need to update the software click CANCEL If the check finds that you have older software click PROCEED to update to the latest version See Figure 9 4 If you clicked PROCEED the system will unavailable for several minutes while the outdoor antenna resets After it reboots the system will function normally NOTE To retain all passwords and name changes during u...

Страница 8: ... do this please follow these instructions 1 Start with the ConnecT 2 0 powered off 2 Remove the 2 Phillips head screws that attach to the SIM card cover plate 3 Remove the SIM card cover plate 4 Next push the currently installed SIM card inward located in the middle of the housing see below You will hear a soft clicking sound Release the SIM and it will eject outward enough for you to remove it 5 ...

Страница 9: ... TO PAGE field click on the drop down menu and select Advanced Settings followed by clicking the SELECT button 8 In the Advance Settings screen click on the CHANGE PROVIDER button See figure 10 9 Verify that the correct cellular provider is listed in the CELLULAR PROVIDER field and then enter the correct APN that your cellular provider provided you when you requested your SIM card in the CELLULAR ...

Страница 10: ... the outside antenna you can also do a power cycle to get the unit back to the factory defaults See the Reset Return to Factory Defaults section of this manual on page 5 3 Contact Winegard at 1 800 320 9992 What do I do if 10 11 12 1 does not bring up the login screen One of several things has happened The first thing to check is the WiFi signal that your device is connected to If this is not the ...

Страница 11: ...etwork password screen Not Connected The Winegard ConnecT 2 0 system is not connected to a network Connecting to WiFi XXXX The Winegard ConnecT 2 0 system is communicating to the selected source signal and a connection is being made This will generally only take a minute or two WINEGARD CONNECT 2 0 SUPPORT cont Winegard 4G LTE ONLY Data Plan In the Data Plan page my rate plans and other fields are...

Страница 12: ...te of purchase when requesting an RMA number Enclose the product in a prepaid package and write the RMA number in large clear letters on the outside of the package To avoid confusion or misunderstanding a shipment s without an RMA number s or an unauthorized return s will be refused and returned to Customer freight collect WINEGARD COMPANY DOES NOT ASSUME ANY LIABILITIES FOR ANY OTHER WARRANTIES E...

Отзывы: