DXR-H4
Quad Display KVM Extender Host Card
Quick Start Guide
QS-RHA4-1110 v2.0 December 2020
For Health and safety information, refer to the sheet
The Amulet Hotkey DXR-H4 is a rack-mounted, quad-display KVM Extender Host
card. The DXR-H4 uses PCoIP® for secure, high-performance remote access for
any workstation, laptop, closed or legacy PC. The DXR-H4 sends data to a remote
zero client over a LAN/WAN. Almost any computer supporting USB and digital
video can be integrated into a mission-critical, remote-desktop solution.
You will need:
DXiP rack with PSU fitted;
DXR-H4 quad-display KVM Extender Host card;
DXR-H4 personality module (RJ45 or SFP variant);
cables for video, audio & USB (available separately in 1 m & 2.8 m sets);
SFP module (for SFP personality card only). See the SFP Modules
datasheet or contact Technical Support to discuss compatible modules.
Preparation
1
If possible, restart the host computers to ensure all updates are complete.
2
If possible, power down the DXiP chassis.
Install the DXR-H4 personality module into the chassis
1
Find the next available slot. If no other modules are installed, we recom
-
mend that the first personality module goes in slot 1.
Note:
If using a split powered rack, decide first whether to install the first card
in slot 1 or 7, depending on which Power Supply Unit will power the card.
Figure 1:
Install the personality module
2
With the Amulet Hotkey logo at the top, align the module with the slot
guides in the chosen slot at the rear of the DXiP chassis. See
3
Put the personality module a short distance into the slot until the captive
screws align with the holes of the DXiP chassis.
4
Push the personality module fully home.
5
Turn the retaining screws (1) to keep the module in place.
Connect the DXR-H4 to the host computer (FIgure 2 & Figure 4)
1
For each video cable, connect between the DisplayPort sockets on the host
PC and the mini DisplayPort sockets on the personality module (12).
2
For the USB cable, connect between the USB type A socket on the host PC
and the USB type B socket on the personality module (9).
3
Push the green and blue connectors at one end of the audio cable into the
matching green and blue sockets on the DXR-H4 rear panel (5).
4
Push the green and blue connectors at the other end of the audio cable
into the matching green and blue sockets on the host PC audio panel.
Connect the DXR-H4 to your network (FIgure 2 & Figure 4)
For best results, isolate the PCoIP connection from normal network traffic.
1
If used, push the SFP module into the network port on the rear panel (13).
See the SFP Modules datasheet for a list of compatible modules.
2
Connect the network cable from the network port (13) to your LAN/WAN.
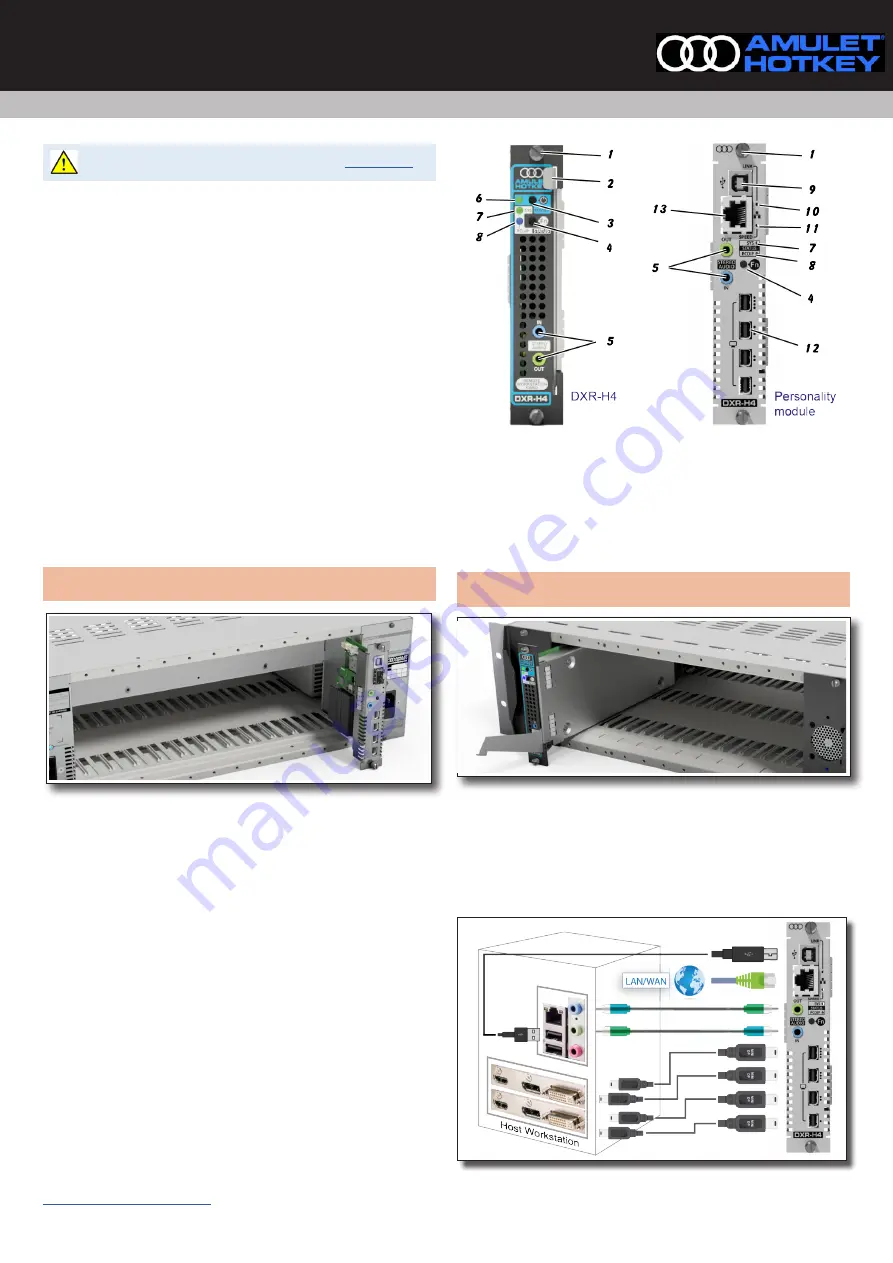
Figure 2:
Front panel of the DXR-H4 and personality module (RJ45 variant)
1
. Retaining screws.
2
. Card lever.
3
. Power button.
4
. Function button.
5
. Audio
IN and OUT
6
. Power status LED.
7
. SYS status LED.
8
. PCoIP status LED.
9
. USB
type B port.
10
. LINK status LED
11
. SPEED status LED.
12
. Video inputs.
13
. Network port (RJ45 variant shown).
Install the DXR-H4 host card into the rack.
Note:
To function, the DXR-H4 card must go in the same number slot at the
front of the DXiP chassis as its companion personality module card at the rear.
Figure 3:
Install the DXR-H4 host card
1
Align carefully the DXR-H4 card with the slot guides in the same number
slot as the installed personality module. See
.
2
Make sure the lever on the front of the card is in the ‘down’ position, out
from the card. See
3
Insert the card into the slot until its connector meets the connector of the
back plane and the connector of the personality module.
4
Push the lever into the ‘up’ position, this installs the card fully home.
Figure 4:
Cabling for the DXR-H4 (RJ45 variant)